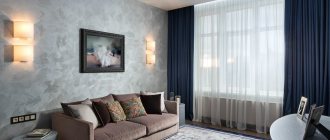
If you want to create a unique interior, look at the walls and show your imagination. Geometric designs brought coolness back to wallpaper, adding endless possibilities for tile, wood and masonry.
The optically ghostly style is full of movement and depth. This is the cure for bare walls that beg you to make them unique. A geometric wall pattern is sure to brighten up your boring walls.
To ensure that the final product does not disappoint you, you must have an idea about the future wall design. To do this, you first need to sketch out a geometric design on paper, measure the height and width of the wall. After these manipulations, you should already know where and what sizes the figures will be.
Volumetric paintings on the wall: varieties and ideas for the home
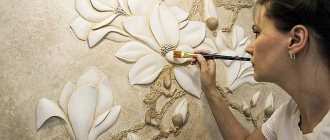
Making a three-dimensional painting with your own hands is a solution for extraordinary people who want to make their home decor individual and not stick to standard designs.
To create three-dimensional paintings for walls, a variety of materials are used, for example, a painting is made from plaster, you can create paintings from fabric with your own hands, create three-dimensional paintings on the wall from putty, make various abstractions or appliqués, create a bas-relief, use mosaics and much more.
The list of drawings is large, it is important to choose the right image, and for this we use photos and videos from the Internet, which will help you decide on the artistic design and choose the technique of applying drawings to the walls.
Features of drawings on the walls
- Patterns on the walls can create a special atmosphere, correct an unsuccessful layout and visually enlarge the space.
- The drawings are preserved for a long time as they do not fade. A creative painted wall becomes an active element of the interior.
- Each room in the apartment requires a special selection of patterns, so you should consider the proposed ideas for each of the rooms, depending on its purpose.
Putty paintings
Do-it-yourself painting on the wall is often done using putty, but this option is not for lazy people, but when you manage to create a picture, it will look beautiful, and the cost is only the putty, you can use the rest after the repair.
Three-dimensional painting made of putty
It is not recommended to make from complex paintings, it is better to make a relief drawing from a simple image, learn how, and then move on to more complex paintings, this is the right plan. There is no need to sand the surface, so you can create a picture on the wall without dust. To work you need a spatula. Before making paintings from putty, preparation is carried out.
Preparing the wall surface
First you need to prepare the tools needed to paint the wall:
- spray adhesive that attaches the stencil to the wall;
- brushes, paint roller, sponge;
- acrylic or spray paint;
- level for correct determination of horizontal and vertical.
Related article: Technique for decoupaging Easter eggs: working with egg whites
To prepare the wall, you need to clean it of dirt and dust. If possible, wash or vacuum and wipe with a dry cloth. When applying an ornament, it is better to stock up on a level, then the design will not be able to bend or move away from the intended horizontal line.
The stencil is applied to the wall, starting from the center, and the points and edges are marked with a pencil. It is better to practice in advance on old wallpaper or whatman paper; this practice will help you master the application technique and choose the desired shade of the ornament.
It is best to make several prints in different shades and apply each one to the wall for optimal color selection.
Preparing the base
Three-dimensional drawings are applied to plastered and smooth walls; if this is the case, then the surface is prepared as follows:
You can transfer the drawing to the walls using a stencil, the main thing is not to select complex wall drawings, so that there are no difficulties with plastering. The paintings are medium in size. There are two options for applying plaster to the wall:
| Applying plaster: | Description: |
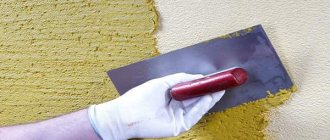
| Painting with a spatula: | Using a pencil, lines are drawn on the wall, then a spatula is placed along the line and drawn along the drawing. Excess mixture is removed with a second spatula. When the contours are dry, paint can be applied to them. Similar instructions for the remaining lines on the wall. The three-dimensional painting is ready. |
| Draw through a syringe: | The needle is removed from the syringe and reinserted after filling with putty. Next, the composition is squeezed out along the contours on the wall. After the main drawing, you need to make the details of the picture. When everything is dry, paint is used, which is applied with a piece of cloth or a sponge. The recesses do not need to be painted. When the main color has dried, a second color is applied to the small details of the design, where a brush is used. |
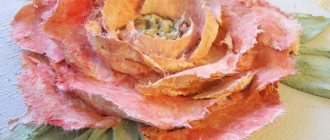
The painting is made of a flower, a tree leaf and other drawings on the wall. If desired, you can use modeling, glue additional accessories, for example, make a frame using a baguette, use twine on the canvas, decorations in the form of kanzash, quilling, macrame and other decorations. If desired, you can use strips of wood, moldings and other ideas.
Applying a pattern to the wall
Photos of the design of bas-relief paintings on the walls can be found online to make it clearer what to paint in your home, so that the interior is living and beautiful, complementing the room. An inscription is also made or a letter is left as the author’s signature.
Volumetric paintings on the wall (video)
Basics of creating a three-dimensional drawing
So we come to the main and most interesting part - creating a plaster panel with your own hands. First, let's look at such an artistic concept as “linear perspective.”
Perspective
Perspective is needed in order to show the depth of the drawing on a flat wall, i.e. reproduce the third dimension. In bas-relief this is not always used. Many simple plaster panels, such as flowers, can be made without resorting to the rules of perspective.
Simple rules of linear perspective:
- It is better to do distant objects (people, houses, trees) first, because nearby objects on the bas-relief can partially overlap them.
- The lines on distant objects should be thinner than on near objects.
- The height of an object shows the distance from it to us. In the background, all things are smaller than in front of us.
An example of a drawing with linear perspective.
What is important to observe when building a perspective.
The horizon line is always at the level of a person’s eyes, i.e. 160-170 cm from the floor. Let's say there is a picture on the wall of a street and people walking along it. The height of an adult is approximately the same; In order for the drawing to look harmonious, the level of all the characters, both those standing closer and further, needs to be done on the horizon line. Accordingly, a seated person or child will be depicted below this line.
The vanishing point is the place on the horizon line at which all lines running parallel to the ground converge: road, rails, roof level of the house, window sills, etc. (example of vanishing line in the picture below)
All straight lines on the facades of houses are directed to one point.
The vanishing point does not have to be in the center of the picture, it all depends on the perspective that we want to convey. There may be several vanishing points, for example, if we depict two adjacent walls of a house, i.e. We look at it from the corner.
Expert opinion
Marina Zanina
Interior designer
When marking a wall for a bas-relief, this technique helps: at the vanishing point, install a button or a nail to which a thread is attached. Then the thread is applied to all straight lines going into the distance.
Reinforcement of plaster (step-by-step example of bas-relief)
After the contours of the future bas-relief are drawn on the wall with a pencil, you need to think about which places will be the most protruding. They need to be strengthened to protect the plaster from chipping and cracking under its own weight.
To reinforce plaster paintings, ordinary soft wire wound onto self-tapping screws is suitable. This is done like this:
Step 1. Marking the wall. It is convenient to transfer the sketch by dividing it into squares.
Step 2. Drill holes within the contour of the pattern, insert dowels and tighten the screws, leaving about 10 mm on the surface. Then we wind the wire between the heads of the screws. This creates a kind of frame, which will then be covered with plaster mortar.
Step 3. We form the general details of the bas-relief, the reinforcement is completely covered with plaster. At this stage we work roughly, without sanding. All dimensions of the painting and the height of the relief are already visible.
Step 4. Smooth out the roughness with sandpaper and putty on the figure if necessary. We create all the small details and thin lines at this stage. After finishing the work, the panel must be primed before painting (if we paint).
Step 5. The bas-relief is fully or partially painted. For tinting, you can use varnish or wax for decorative plaster, tinted with color.
Cutting technique
This is a simple technique for working with sculpting stacks and chisels. Its essence is to sculpt the general contours of an object from plaster, and then cut through the details using the hardened plaster. It is more convenient to cut through than to sculpt from mortar, because the liquid material is drawn behind the tool, making it difficult to achieve clear boundaries of the bas-relief. But after hardening, gypsum plaster and putty perfectly retain their shape and do not chip.
Important! There’s not much you can do with cement plaster after it dries, it’s like stone. You need to cut on it 2-3 hours after application, until it has completely hardened.
You can work with gypsum materials the next day. To do this, they need to be moistened with water from a sprayer, wait 10-15 minutes until all the moisture is absorbed into the panel, and then work with a stack or chisel.
It looks like this:
A technique for cutting a design into wet plaster.
Layer-by-layer application
As was already shown above in the example of a three-dimensional Dragon made of plaster, complex drawings need to be done in several stages. If you throw a thick layer of mortar on the wall and try to sculpt small elements on it, it will turn out to be difficult - when forming the parts, the background will sag under the palette knife.
Therefore, you need to move from the general contours of the bas-relief to the details in several stages. Layer-by-layer application of putty to the picture is, as it were, the opposite of the cutting technique, because in this way we do not remove excess material from the wall, but add only the required amount.
An example of layer-by-layer creation of a gypsum panel. The material is squeezed out of the extruder (confectionery syringe).
How long should I wait before applying a new coat?
It is enough to wait for the plaster to set, i.e. did not stick to your finger and did not lose its shape when pressed lightly. On average it is 1.5-2 hours. You can leave the panel overnight and continue the next day.
Do I need to prime between coats?
It's not obligatory. If there is no dust on the surface of the bas-relief, then simply moisten it with water from a spray bottle and continue working. It is necessary to wet the base so that water from the fresh solution does not go into the already dried plaster. Otherwise, the material will dry out prematurely and may peel off.
Expert opinion
Marina Zanina
Interior designer
Advice! Avoid thin-layer application so that when sanding, transitions from one layer to another do not appear, otherwise you will have to correct it with putty. It is better to complete a single element of the drawing (leaf, flower, any object) at one time.
Often the work combines cutting out design elements and layer-by-layer application of plaster.
Coloring
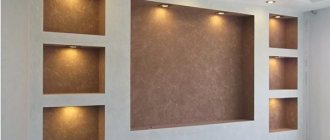
A three-dimensional pattern on the wall can look attractive without additional painting. It is enough to correctly arrange the lighting in the room (on the facade), and the falling shadows will effectively emphasize the details and volume of the bas-relief.
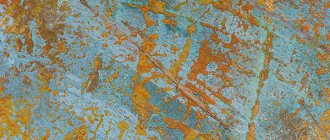
A cool way to color bulk plaster is patination. With the help of patina, the tops and valleys of the relief are distinguished; as a rule, no more than two colors are used.
The rule for patination is simple - the recesses in the texture are made darker, the tops and protrusions are made lighter. For example like this:
The base color covers the entire wall and the pattern on it. You can use any interior water-based paint.
The application method can be any: wide brush, roller, spray gun.
After the base layer dries, a patina develops. This can be decorative paint with gilding, silver, copper color or another with a metallic sheen.
Apply the second layer only to the tops of the drawing. Use a wide brush or lint-free roller and apply a little bit of paint onto the tool.
Another way to bring out texture and volume is to darken the valleys the second time you apply paint. This is done when you want the main color of the composition to be light, and the details (recesses) to be dark. It's very easy to do.
- Apply paint to the panel, covering all the plaster in the desired base color. You can skip this step if you want to leave the regular white color of the plaster mixture.
- Apply tinted decorative wax or simply darker paint with a sponge into the depressions of the texture. Without waiting for the paint to dry, wipe off the excess with a sponge or cloth.
Gypsum flowers are covered with dark decorative wax. The wax was removed from the tops and remained only in the lowlands.
I recommend looking at other articles on the topic:
Simple and effective ways to paint decorative plaster
How to mix colors and select shades
What paint to choose for painting plaster on facade walls
Cool ways to decoratively plaster walls with regular putty
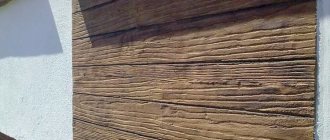
Volumetric paintings made of wood
Textured paintings on the wall made of wood look rich, but creating a three-dimensional picture will require not just skill, but also a lot of effort and time. The method of decorating the walls is unusual, and the work requires chisels, special knives, varnish, stain, and a wooden frame. The selected three-dimensional drawing must be transferred to the tree, and then begin cutting out the contours. The depth of the cut will create a three-dimensional picture. Due to the stain, an original look is obtained and the volume increases, and the finished painting is coated with varnish to protect it.
Three-dimensional painting on a wooden wall
Volumetric decoupage
Decoupage is the easiest type of wall decoration; in addition, this technique allows you to decorate not only walls, but also other surfaces; even a beginner can carry out the work. The main advantage is the ability to make a flat element three-dimensional using available material. Creating volumetric decoupage requires the following:
The step-by-step scheme of volumetric paintings for walls is as follows:
A three-dimensional drawing can be obtained by pasting the image again on top of the already finished drawing. At the very end, varnish is applied to the drawing. You can use corrugated cardboard, plasticine, paper tapes, non-woven or vinyl wallpaper, crepe or newspaper material, making a multi-colored and unusual design. You can cover any object, for example, a bottle, doors in bathrooms or bedrooms.
Advice! You can depict a winter garden, shells, salty seas. For the kitchen, a drawing of cereals, beans, or a simple cake on the wall is suitable. This is a budget design option for which you can take any household material that you have at home and use it to make the desired pattern, picture or drawing on the wall.
Design options for finished work:
Framed on the wall
Papertol "The sea in the picture"
As a decorative element
Papertol “Girl with Roses”
Christmas tree decoration
Papertol “Girl with a Basket”
We also draw your attention to the various design options for the finished work. Combined with such a powerful style variety, you will decorate your apartment (house, office) with taste, turning it into a real private gallery, in which you yourself will be the creator of all the masterpieces!
Papertol in our catalog
3d paper painting
Making pictures for interior walls from paper is the cheapest way. You can create a classic drawing step by step if you prepare:
You need to take the glass out of the frame and stick an artificial or natural material onto the backing. Jeans, braid, felt or paper are used. This will be the background that a person will look at. Next, a design is cut out of cardboard, after which it needs to be folded and slowly pasted onto the platform.
Using any master class, you can decorate all the walls in the house, even if the room is small, the covering is old. Any product is good, the work does not take long and the wall partition is quickly decorated. Also, certain techniques can be used to create a postcard. An excellent plan is to use not ready-made three-dimensional paintings for the walls, but puzzles that, after assembly, are hung on the walls or polystyrene foam from which the picture is created.
You can complement voluminous wall paintings with lighting or a strip of LED strip. Volumetric drawings on the walls are suitable for any style, even if it is minimalism, where denim material looks great. You can depict your destiny in a painting if you have artistic creativity skills.
Source
Decorating your home: do-it-yourself volumetric collages
Many people prefer not to burden themselves and print out their favorite photos on a color printer and create collages.
To make a collage, you need to choose a specific theme and select and print pictures that fit this theme.
As a theme, you can choose any significant date for you or a particularly important event in your life.
For example:
- The birth of your child;
- Prom or wedding;
- Vacation in another country;
- Years since university and other similar cases.
For such a collage, you need to choose those pictures that tell an important story from your life. It is also worth considering that the selected photographs must be of good quality, you like them and evoke pleasant memories. As for the number of such photos, it should be a multiple. From the selected photographs, you need to make an attractive composition, which must be given special attention, since the composition will determine your work, on which the attractiveness of the collage completely depends.
Such photographs are glued to a backing; you can use a sheet of plywood or a photo frame as a backing, or you can also use plastic or cardboard. It is also worth considering that photographs must be adjusted in size. In order to secure it to the base of the photo, you need to use tape or special Velcro. As for the frames of your products, they can be decorated with available materials, for example, shells and similar elements, at your discretion.
How to make a painting: ideas for lovers of hand-made creativity
We will send the material by email
Paintings done in a traditional manner (for example, oil or watercolor) are a classic design for any living space. In modern design, classics are increasingly being replaced by paintings made from unusual materials that can highlight the creativity of the owners. Below we describe popular techniques for creating hand-made works of art that allow you to fill your home with comfort and positive emotions.
Where to begin
An attractive feature of many hand-made techniques is that you can do with little to decorate your living room with an original panel, painting or 3D image. You will need quite affordable materials, attention and a little perseverance. In most cases, no special skills are needed, and you will fit within a modest budget.
First you need to determine the place where the work will be placed. It can be free space in any room, from the living room to the hallway or the wall near the stairs. You also need to choose the size of the future work; it will be determined by the location. When choosing a location and size, the following tips are recommended:
At the same time as choosing a place and size, you can think about the theme and material of the future decor (only if you have not chosen them in advance). If choosing a topic is difficult, you can evaluate homemade paintings presented on the Internet. Sooner or later, a kaleidoscope of original painting ideas will inspire your creativity, especially when you consider that many materials can be found in every home or its surroundings.
Items made with your own hands make up the uniqueness of a home. There are many techniques for creating paintings from the most unexpected materials. Every year new techniques appear that surprise with their originality; many become popular.
Button compositions
One of the most obvious is the idea of using buttons. Both adults and children are interested in such creativity. Buttons are considered an ideal material for creating interesting decorative items, varied in color, size and structure. You don't need an art degree to create simple button paintings, and the technique can be learned with a little work to get started.
String art
The name hides an interesting technique that appeared a couple of decades ago. A thread painting is made on a wooden base (light board or plywood), and you will also need small nails, threads and a hammer.
A template is applied to the base, nails are hammered along its contour; it is important that they are at the same height. The thread is attached to the first nail and wrapped around all the others, following the lines of the template. The result is a soft-to-touch, voluminous fabric.
Pictures from wallpaper
A modern trend that suits a variety of designs. Such decor will add originality to the interior, and what is especially valuable, without any special financial investments. Depending on personal preferences and location, you can use different manufacturing techniques, and the finished work can be placed in a frame that suits the style.
For work, use a single piece of roll or a combination using the patchwork technique (from several different fragments) from scraps of wallpaper. You can use your supplies, shout out to friends and relatives, or visit a store that is selling leftover wallpaper.
Silhouette paintings
A type of graphic technique that originated in China and became widespread in Europe (especially France) during the Rococo era. Silhouettes or Chinese shadows, as they were then called, were cut out of black paper with scissors, often according to a pre-planned design. Sometimes the drawing was done in ink, and the details were drawn in gold paint. Vintage silhouettes pair well with classic and retro styles, antique items and decor.
Today it is not at all necessary to master the skill of an artist; Knowledge of basic Photoshop tools is enough. A suitable good quality photograph is selected as the idea for the painting. The object in it is highlighted and painted over with black paint, the background is then removed. Another method is to use a sample, which is transferred to the canvas using a template and painted over.
Eco paintings
Paintings made from natural materials are a fashion trend that has fans all over the world. Moss, branches, dried leaves, herbs and flowers are used to create an art object. The components are glued onto a thick base, and the finished painting is placed in a frame. Such a panel is not covered with glass so as not to lose its relief.
Moss compositions made using the triptych technique (of three modules) look beautiful. Succulents can be used to create a living painting. This small vertical garden is guaranteed to attract everyone's attention.
Pictures from seeds
Excellent panels are made from seeds, cereals, legumes, and even seeds. The drawing is laid out according to the sketch applied to the base; silicone glue is suitable for fixation; plasticine is suitable for small parts. Light colored seeds (rice, pumpkin seeds) can be dyed.
Preschool children will be happy to make a simple picture of multi-colored beans. Masters of their craft use buckwheat, rice and even pasta; original art decor is made from coffee beans. To make the picture of coffee beans expressive, beans of different sizes and colors are used, which depends on the degree of roasting.
Three-dimensional paintings
Such works include elements of fabric, leather, and plaster. The original relief decor is made from polymer clay or foamiran; panels made from silk ribbons look elegant. Often the volume effect is used in flat panels as a separate part to make it accentuated.
There are different techniques for different materials; The better the material holds its shape, the easier it is to work with. To master such an art, it will take some time and a little patience, but the result will be an original interior decoration.
Light picture (lightbox)
The decor looks amazing in a dark room and at the same time serves as a lamp. You will need a sketch for the painting. You can get it with the kit or draw it yourself. There are few ready-made sketches online, since the technology has appeared recently.
The idea is that each part is cut out separately and forms a multi-layer composition; a gap is created between the layers using thin foam. The layers are glued together and with the base, and inserted into a frame box. An LED strip with a controller brought out is pre-fixed in the frame.
DIY leather 3D pictures
As you know, leather is very easy to process, but this quality of the material does not mean that making a painting from this material will be as easy.
To make it, you need to understand the work itself, know the basic properties of leather, have patience and be diligent.
It is for these reasons that experts recommend making a painting of a small size, and then if everything works out for you, move on to larger works. They mostly use brown and beige leather, but there are some individuals who add patches of green, yellow or orange leather to the look.
Main advantages:
- We obtain exclusive paintings in one copy, since it is impossible to create 2 identical products;
- A special relief, with the help of which a unique 3-D effect is obtained, and it seems that she comes to life;
- Availability of materials, since almost every owner of a house or apartment has scraps of leather, but if you do not find scraps, then they can be purchased from shoemakers at an affordable price.
But it is worth remembering that the choice of material for making a painting depends entirely on the preference of the owner.
Briefly about the main thing
Hand-made techniques are a worthy way to exclusively decorate any living space. There are dozens of popular, proven methods that do not require special skills or significant expenses.
Before you start work, you need to find a suitable place for the future panel. The placement location will determine not only the size, but also the color palette of the composition.
You can find an unusual home decor idea online. There you can also get acquainted with the options for using different materials; complex techniques are presented in detail in master classes.
Simple methods include compositions from buttons, seeds and wallpaper patterns. String art and silhouette paintings will take a little more time. A panel of succulents or a lightbox will require attention and knowledge of some features.
Source
I welcome everyone to our master class. Thank you for your interest. A little bit to bring you up to date. What is “Papertol”? It is a technique of hand-cutting and creating three-dimensional images from paper. This technique is available from small to large. Age restrictions 5+.
1. The Papertol set includes ready-made drawings and detailed step-by-step instructions.
2. Open this set and lay out the layers (sheets with a printed design) on the table in front of you.
3. For further creativity we will need: scissors, double-sided foam tape and a black felt-tip pen. Let's proceed to the first stage of our three-dimensional painting. As you can see in the photo above, you and I have 5 layers. The first step is to separate each layer with scissors and take layer No. 1.
4. Let's start cutting. The main thing in this technique is not to cut out all the details at once. It's very easy to get confused.
5. After we have cut out LAYER No. 1, we proceed to LAYER No. 2 and cut out exactly as stated in the instructions.
6. Next comes double-sided foam tape. LAYER No. 1 and LAYER No. 2 must be glued together with squares so that the tape is not visible when looking at the picture from above. We cut out squares of tape of any size.
7. After gluing the first two layers:
8. Next, we proceed to cutting out LAYER No. 3 and glue it with the two previous layers using double-sided tape in the same way.
9. After gluing 3 layers
10. Cut out LAYER No. 4 and do exactly the same as with the previous layers.
11. Glue onto the same squares of double-sided tape (the smaller the part, the less tape is needed).
12. Cut out the last LAYER No. 5.
13. Glue LAYER No. 5 to the main picture and our picture is almost ready.
14. Next is a little trick. Take a black felt-tip pen and follow the contours of each layer (you can do this as you cut). This way we paint over small burrs and the picture of butoh comes to life.
15. Finished work “Papertol”. You can make a refrigerator magnet. You can work with children. Very common in kindergartens and schools.
Thank you for visiting our Master Class. The paintings look simply magical in real life. There are a lot of such paintings on very different topics. I would be glad if you were interested in this master class. In the future we will post other paintings from the “Papertol” and “Liquid Glass” sections. Until next time.
Source
DIY paintings
A three-dimensional painting can be called a 3D sculpture in a frame, made from scrap materials. It can be anything in the full sense of the word: paper, dried flowers, polymer clay, leather, fabrics and other creative materials. For example, they make magnificent three-dimensional drawings from plaster directly on the kitchen wall. Plaster modeling is, of course, beautiful, but this article will talk about simpler techniques.
Anyone can make an original masterpiece of art with their own hands. Why don't you try your hand at it? The master class will help you learn the basic principles to get started with an idea and start creating.
Master class “3d paper painting”
For the first test of the pen, take the simplest version of a three-dimensional painting - a paper appliqué.
Set of materials for work:
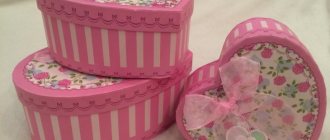
Instead of a frame, you can take a candy box.
Step-by-step description of a three-dimensional paper painting:
The presented master class is simple, but based on it you can make your own 3D plot - fluttering butterflies, tiles, people and other interesting templates.
Master class “multilayer 3d paper painting”
Making an interesting paper painting using the multi-layer technique is very simple - you just need to find a design and print many copies. The finished product, hung on the wall, looks interesting from different angles - a real 3D painting.
Set of materials for work:
Step-by-step description of a multilayer paper painting:
Now you will have a three-dimensional painting with your own hands - now you can place it on the wall in this form or add glass. Such canvases can be made from fabric, then you will get a picture with a beautiful terry surface.
Brick imitation in 3D
This is the easiest to implement of all the options listed in this material.
To make it you only need masking tape 2-3 cm wide
You need to draw straight lines in the vertical and horizontal directions. Forming squares
Then, using a knife or spatula, remove through one partition to form rectangles
It will take you about five minutes to go straight over the top of the masking tape with paint.
You will get a drawing like this. Not very pretty yet? But you just need a couple more minutes
Remove the tape by pulling on the end. It's better to do this when the paint has dried a little.
And here is the result. You won't find two identical bricks