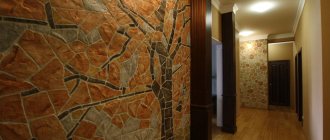
Why imitate wood using plaster?
Natural wood is one of the most popular materials for finishing, but the cost of good varieties is quite high, and therefore, if you have a limited budget, you have to look for alternatives. Wood-look plaster is used as a possible solution:
- It is suitable for almost any surface.
- Can be used in various conditions, including outdoors.
- The material covers small areas or entire walls.
- Panels or boards create a noticeable load on the walls and partitions, while the final layer of mortar 2-3 mm thick slightly increases the overall weight of the structure.
- Another argument in favor of such a solution is the possibility of surface restoration. It is enough to remove the damaged area of plaster, reapply the gypsum solution and paint it.
The disadvantages include less durability of the coating than wood. In addition, when viewed from a close distance, you will notice that plaster was used for finishing, not wood.
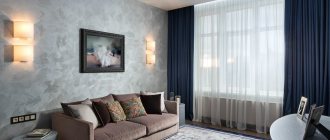
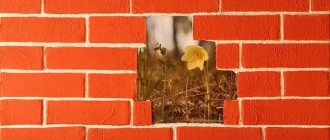
Wood-like inserts on the facade of the house
Main stages of work
To make the mold you will need 2 sheets of foam. We leave one intact, and in the second we cut out the outline for filling of the required size. To ensure smooth edges, it is better to use a square. You can cut through penoplex with a regular stationery knife.
At the next stage, the author covers the bottom and edges of the form with tape so that the gypsum solution does not stick (by the way, you can also use a piece of plywood or board as a base).
1
What materials are used
Any type of plaster is used as the main material: cement, ordinary gypsum, acrylic, silicone.
Expert opinion
Alexander Guryanov
Plasterer and decorator
The type of solution must be selected taking into account the operating conditions: for facades you will need cement plaster or moisture-resistant putty, for the interior - gypsum or silicone.
Also useful:
- deep penetration primer for wall preparation;
- trowel for applying plaster;
- masking tape to delimit the working and non-working surfaces;
- clothes brush to create a rough texture;
- coarse sandpaper for grouting;
- To paint plaster you will need a mixing container, water-based paint, primer, water-based colors, and wallpaper glue.
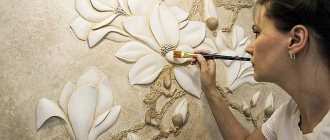
Patterning tools
The composition is applied to the walls using a trowel and spatula, and a variety of tools or improvised means are used to create the relief:
Plastic notched spatulas of different sizes
Figured rubber spatula “wood texture”
Mastakhin
Roller, “bark” texture
To create a design on plaster using these tools, you need to have some experience. If it is not there, it is advisable to practice in advance by applying the solution to a piece of plasterboard or plywood. If you don’t have the skills, you can use special devices that significantly simplify the task, for example, a rubber roller with a wood cut pattern.
On its working surface there are arched ribs that give the plaster the desired relief.
How to make a wood-look spatula with your own hands
It is not advisable to buy special spatulas, especially if you only need to treat small areas. You can make the necessary devices from ordinary plastic or improvised materials.
Using a knife to cut out notches
To cut a tool from a plastic lid from a paint or putty container, you need to draw the contours of a spatula and cut with sharp scissors. In total you will need 3 parts of different sizes:
- wide, on which large notches are formed with a stationery knife;
- medium, small teeth are cut on it;
- narrow, its working edge is left smooth.
Using a knife, you can also form notches on ready-made plastic spatulas.
Rollers are also used instead of a spatula. So that they leave a mark on the surface similar to the pattern of a tree or bark, they are wrapped with threads of different thicknesses in any direction,
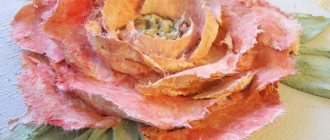
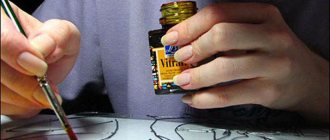
Mahogany, walnut, oak - how to make an imitation
The structure of pine, birch, maple, aspen and linden wood is very similar to the structure of mahogany, walnut, oak, and beech. For many years this observation has allowed cabinetmakers to create true masterpieces from inexpensive wood, which is always at hand, by modifying the available material into a noble and respectable one with the help of a brush. The main thing for imitation is to choose the right dye.
Hard nut to crack
Walnut wood attracts with its rich shades and wavy patterns. To imitate the pattern of walnut fibers, you need to have several basic shades of stain: rich taupe, light brown (“café au lait”) and yellow-brown.
Walnut wood has a dark brown core with gray undertones. This color fades through light brown and dark to yellow-brown sapwood.
It often happens that the fibers intertwine and dark stains form in the light layers. All three shades are applied without drying, with one brush, alternating and intertwining with each other. You should not go through the same places several times.
Red tree
Mahogany comes in a wide range of shades, from pale pink to purplish or walnut red. It is not difficult to imitate this breed. The texture of mahogany is simple and, as a rule, fairly evenly colored, with smooth transitions of tones. But there are exceptions: some types of mahogany have a special texture, with strictly alternating bright paths, which is difficult to confuse with others.
To imitate, you need to divide the stain color into two solutions so that one is brighter than the other. First, a light tone is applied to the wood, then a second, more saturated shade is applied with a brush over the raw surface. It should be applied in parallel stripes at short intervals. If the workpiece has been well sanded, the layers of texture will shimmer and look real under the varnish.
On that oak tree
Oak wood can be imitated using a tangential cut of pine (the plane of such a cut runs tangentially to the annual layer), where the texture is more twisted and there are no straight layers that give away the species.
First, you need to process the workpiece along the fibers with a hand-held metal brush with a sparse pile. On soft layers a tubular microstructure is formed, like oak wood. The desired shade is given by a solution of iron sulfate or industrial stains of the desired shades.
Read more about compositions for giving wood noble shades
Artificially aged wood - do it yourself
Wood surface imitation technique
They work by mentally dividing the surface into small sections: the solution hardens quickly, and so that it does not have time to set, the wall is treated in parts.
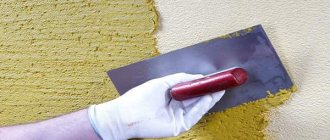
- The finished plaster is applied using a metal spatula or trowel, and the thickness of the layer is evened out with it.
- Brush over a smooth surface with a clothes brush; the bristles will leave tiny grooves imitating wood fibers. Movements should be light, do not put pressure on the brush. The direction of the grooves can be strictly vertical or with slight bends. During the process, the solution will stick to the bristles; you need to wash it off with water, otherwise the stuck mass will leave large damage the next time it comes into contact with the wall.
- Next, using a wide plastic spatula, give the surface the structure of wood: move the tools from top to bottom, leaving smooth wavy lines. Using a small spatula without notches, placing it at a slight angle to the wall, draw knots in a circular motion. When the relief is created, lightly smooth the surface with a wide metal spatula without pressure and move on to the next section.
- After the entire wall is covered with plaster, leave it until completely dry. Then it is rubbed with sandpaper to remove excess solution and smooth out roughness.
The video below shows the entire process.
oblacco
Suddenly a red leaf crept into the greenery, As if the heart of the forest was exposed, Ready for torment and risk.
We will need very few materials (the quantities are indicated for a page measuring 20 by 20 cm):
— PVA glue (yes, yes, yes, don’t be surprised) — 125 ml
— Medical bandage made of non-woven material — 1 package
— Acrylic paints in the desired shades (I have black, burnt umber, burnt sienna and gold)
— A glue brush must be flat and made of dense bristles
- Scissors
As a base, I use 1.5 mm beer cardboard, for this technique this is the minimum, because PVA glue is liquid and you will need a lot of it - even thick cardboard will suffer from such an amount of glue; I don’t think it’s worth talking about paper. Using this imitation, I designed the pages of a photo album, so the bark was made directly on the finished binding (it was a big risk, I did it for the first time, I admit honestly), but you can take anything similar in density to beer cardboard. Well, well... Let's get started, I guess.
1. We glue our bandage onto the base with the first layer and generously coat it with glue. We glue it so that our future imitation can be folded on the back side, that is, we leave an allowance of at least two centimeters. We leave our base to dry a little (about half an hour).
2. We cut the remaining bandage with scissors into strips of arbitrary shape and size (but not very wide and not very narrow), uneven edges are welcome, but within reason.
3. Apply the first strip to one of the upper corners. Using glue and a brush, we smooth our strip to the base. We're not stingy with glue, but we don't need to empty the whole bottle. Determine by eye that the entire strip is moistened with glue but does not “float” in it.
4. Using a brush, we move our strip so that it forms a small “wrinkle”. This “wrinkle” can be made anywhere, it all depends on how you move the bandage strip.
5. Below, slightly overlapping, glue the second strip and form a “wrinkle” in the same way. By analogy, we move from top to bottom and from left to right, filling the entire surface of our base with “wrinkles”.
6. As soon as the entire surface of our base is covered with “wrinkles,” we leave this matter to dry for a day.
7. After our workpiece has completely dried, we need to bring it “to its divine form,” namely, tuck in the torn edges. We turn our bark over to the reverse side and, with a slight tension, glue the edges to the cardboard.
8. Once the edges of our bark have set, we can start painting. Apply the first layer of the main color, I used burnt sienna.
9. Without waiting for the first layer to dry, immediately apply the second, darker one - I have burnt umber. If we paint the first layer very carefully - every fold, then we apply the second layer “in Russian” - on top, purely for the sake of appearance that it is painted here. The bottom layer should be transparent in places.
10. Again, without waiting for the second layer to dry, we apply the third - shadows on our bark. We do this with black paint. Due to the fact that the underlying layer is wet, we will achieve a smooth transition of shades. We paint in places - I painted the largest folds and recesses, a little in the corners and perimeter.
11. In principle, we can finish here, but since my tree is magical, I decided to gild the bark a little - with a dry brush, slightly dipped in paint, we go over the right places - I walked along the protrusions on the bark and along the edges. As soon as the painting is finished, we leave our bark to dry for a day, after which it can be further decorated or used as a background for photographing your work (this depends on the scale of the work done). After drying, acrylic paint darkens a little; take this property into account when choosing shades for painting, so that in the end the bark does not turn out completely dark. The texture is very pleasant to the touch, a little silky, I really liked the end result:
I hope you liked my master class, that's all for me, I will be very glad to hear your feedback!
In Source -In CreativeTimeIn https://www.livemaster.ru/topic/907191-imitiruem-drevesnuyu-koru
Series of messages "Scrap":
Part 1 - I brag Part 2 - Scrapbook for our Serezhenka... Part 22 - DIY memorial book for September 1st. Step-by-step master class Part 23 - DIY candy stroller. Congratulations on the newborn. MK Part 24 - Imitation of oak bark on paper. Master class Part 25 - Autumn waltz of maple leaves made of paper. Master class Part 26 - Autumn collage from paper napkins. MK Part 27 - DIY Happy New Year 2015 cards. Christmas tree made from tea bags. MK
Rate this article: ( 6 ratings, average: 4.83 out of 5)
166