Why is wall priming necessary?
Before painting, the surface is leveled using various materials. Drywall, plaster and others are often used, then putty is applied. If you do this correctly before painting, you can prevent changes, cracking and other defects. Then primer is applied to the walls. It is necessary to carry out preparatory work for the following reasons:
- To improve adhesive properties, due to which the finishing material adheres to the base coat. The primer allows the paint to better adhere to the surface, preventing it from peeling and cracking. Subsequently, it is not difficult to prepare for repainting;
- Helps reduce the degree of moisture absorption by the surface. This is especially important for walls after applying plaster, putty and other special materials;
- To strengthen the foundation. Weakened, porous and loose wall structures become strong and solid due to the penetration of a special substance inside. This is especially typical for compositions that penetrate 8-10 cm into the material;
- After applying the plaster, the development of fungus and mold is prevented. A wall primer containing fungicidal substances, used for painting, allows you to cope with existing problems on wall structures;
- The substance prevents the appearance of red spots on wallpaper and other finishing materials during use;
- Reduces paint consumption. Primed walls do not absorb large amounts of substance. During the work, a uniform decorative layer is created.
In the process, it becomes possible to get by with one coat of paint where you have to paint 2-3 times without a primer. This contributes to significant savings in money and consumables.
The primer allows the paint to better adhere to the surface, preventing it from peeling and cracking.
Is it possible to paint without a primer when it is necessary to apply a primer?
A primer before painting may not be used in cases of gluing wallpaper and then painting it, as well as after finishing with latex putty, which does not crumble during use.
The need for primer is established in cases where it is necessary to paste wallpaper. This allows you to securely adhere them to the walls. Plasterboard sheets must be primed with the substance. Plaster is used if you need to repaint old paint in a new tone, which helps neutralize the show-through of the previous finish.
Plasterboard sheets must be primed with the substance.
By priming any surface before painting, you make further finishing work easier. This contributes to better distribution of the paint layer and a reduction in consumables, which can save significant financial resources.
Pre-treatment before painting
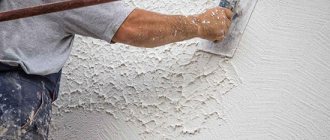
Before starting the main work, it is recommended to plaster the walls, having previously cleaned them of dirt and dust. To prepare the surface after traces of previous repairs, remove paint and tear off wallpaper. After this, the cracks, cracks, and irregularities are sealed using various soils.
There are special universal compositions that not only improve the properties of the material indoors, but also contribute to better adhesion of substances outside the building. After preparing the surfaces, paint is used.
Before starting the main work, it is recommended to plaster the walls, having previously cleaned them of dirt and dust.
All about priming walls
Why apply primer?
Types of primer mixtures
Special means
Drying times for preparations
Calculating consumption
We prime correctly
Once the renovation is complete, you want the results to last for a long time. But, unfortunately, this does not always happen. Neglecting the technology of work leads to the fact that after a short time the painted walls begin to crack, the coating peels off and falls off. To prevent this from happening, proper priming of the walls before painting is necessary. Let's figure out how to do everything right.
Do I need to prime the walls before painting?
Novice finishers do not always understand why preparatory work is carried out. It seems to them that the most important thing is to level the base, then they can safely paint. In fact, this is not entirely true. Indeed, before painting it is very important to level the coating. There should be no differences, cracks or other defects. Therefore, the first step of proper preparation is alignment. It can be made in different ways: drywall, plaster, etc.
At the last stage, finishing putty is most often applied, which will become the base for painting. The next required step is priming. It is necessary because the soil:
- Strengthens the base. It binds weak, porous and loose surfaces into a single whole, making them more durable. Deep penetration formulations cope especially well with this. They are capable of going deeper by 80-100 mm, while conventional preparations do not go deeper than 20-30 mm.
- Improves adhesion or bonding of finishing material and base coat. Thanks to the primer, the paint stays better on the surface, preventing it from peeling and cracking. Moreover, during subsequent repainting it will be easier to prepare the base for work.
- Reduces coating consumption. After treatment, the absorbent properties of the base are significantly reduced. Thanks to this, about a third less composition will be required for finishing.
There are materials with special properties. They can increase the moisture resistance of the surface, prevent mold, etc.
Soil types
The range of primers for walls for painting is varied. Based on the type of base, they can all be divided into several groups.
- Acrylic. Universal, good for wood, concrete, chipboard, plaster, drywall, etc. Can be used for porous coatings, dries in about 5 hours, odorless. Not applicable to metals.
- Glyphthalic. Area of application: metal and wood. It dries in about a day and loses its properties in conditions of high humidity.
- Alkyd. A good option for any wood. After treatment, the fibers swell slightly, which significantly improves adhesion. Dries in about 15 hours.
- Perchlorovinyl. A universal preparation that is used for plasters, metal, plywood, wood, etc. Dries quickly and takes about an hour. It is better to choose it for outdoor use due to its high toxicity.
- Epoxy. A two-component product that significantly increases the adhesion of the base. Used for metal and concrete.
- Mineral with gypsum, cement or lime. Use for concrete or brick. Dries from three hours to a day.
- Aluminum. Used for wood. Additionally protects it from fungal infection.
The optimal and most popular option can be considered universal primers, which are suitable for almost any material. They improve the adhesion of the base and strengthen it, but do not have special characteristics. However, in most cases the latter is not required.
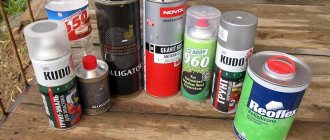
Interior primer Ceresit IN-10, 10 l
667
Buy
Types of primers
There are many options on the market for primers that can be used before painting. Having decided on the question of whether or not it is necessary to prime the putty before painting, you need to choose the right option for the job. Let's talk about each type in detail:
- Wooden, concrete, plastered material is treated with a polyvinyl acetate type of priming;
- Before painting, the brick wall is treated with silicate;
- Acrylic is a universal material. It can be used to process internal and external coatings;
- Treat metal and wood with alkyd;
- Aluminum is used for painting wood;
- For deep treatment of structures outside and inside, epoxy is used.
Select a primer depending on the type of wall being treated. Otherwise you will damage the structure. If it is difficult to decide on an option on your own, contact the seller for advice. He will give advice on what is suitable in a given situation.
Select a primer depending on the type of wall being treated.
Water-based
Water-based emulsion is not the cheapest finishing material, so pre-priming the walls will significantly save on paint consumption.
The primer applied under water-based paint reduces the hygroscopicity of the base, which leads to a more uniform distribution of paint on the surface, increased strength of the coating, and increased wear life.
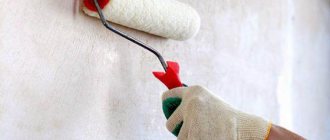
The water-based primer is applied with a brush, preferably in one layer, which should ideally cover all the unevenness of the wall, but not form uneven accumulations of soil. After the primer composition has completely dried, which takes 5-7 hours, water-based paint is applied in two layers.
We recommend: How to install a ceiling cornice
Silicate
Silicate paints are sold dry; to paint, the mixture must be diluted with water and used as soon as possible, before the paint loses its properties. Therefore, a silicate-based preliminary primer is of great importance for the speed and quality of painting.
Special primer compositions can reduce the toxicity of alkali contained in silicate paints and strengthen mineral surfaces to extend the life of the paint to 10-15 years.
Acrylic
Priming before acrylic painting has an important feature: the composition must be applied to highly abrasive surfaces; from smooth surfaces it will gradually slide off even along with the paint.
Therefore, before applying primer, the surface of the wall must be treated with a stiff brush or coarse sandpaper to artificially create grooves and roughness.
In turn, the primer solution perfectly fixes the coating particles, leveling the adhesion and absorbency of the wall, which allows the acrylic paint to lay down in an even and durable layer.
Oily
Oil paint is one of the most highly adhesive, even without applying a preliminary primer layer. Priming increases the strength of the oil coating, making it smoother and less porous. However, often oil paint, applied without a primer, itself acts as an unsurpassed material for finishing work, as it adheres well to the surface.
When applying oil paint for the first time, the use of a primer solution is not necessary. For secondary paint, you should opt for a special “on top of the paint” composition, which will save the time required to remove the old layer.
Water is primer's enemy or friend
Yes, the primer can be diluted with water, but only if you bought a primer that allows for such dilution.
There are different primers sold on store shelves. Some are specially sold in small containers so that the buyer can dilute the primer with water at home, according to the instructions, to obtain the volume of primer mixture he needs.
Also, the primer is sold in ready-made form, when dilution with water will only weaken the properties of the primer. You won't save much on this. If you heavily dilute such a primer with water, the effect will be comparable only to coating the walls with ordinary water. Some dust will go away, but you won't get good adhesion on your walls. If you plan to apply decorative plaster to these walls, glue heavy wallpaper or lay tiles, then it’s better not to take risks.
Tools you will need for the job
If you are going to apply primer to the walls before painting, you need to acquire the following tools:
- Apply the substance with a roller;
- To apply in difficult places you need to use a brush;
- Spray bottle;
- Container for primer.
The tool is selected based on the situation. If you need to paint drywall, use a roller. The brick is processed with a brush.
If you are going to apply primer to the walls before painting, you need to acquire tools.
Preparing the walls
Some owners believe that there is no need to prime the walls after puttying. If this is not done, the leveling layer will crumble during operation and absorb a lot of paint, which will significantly increase its consumption.
There are also special wallpapers that are designed for painting (painting non-woven fabric). They do not need to be subjected to special preparation, but the walls are primed before pasting the wallpaper itself. The plasterboard surface is treated in two layers. The first layer is applied immediately after installation, and the second layer after puttying.
If new paint is applied to an old layer, then such a surface needs to be primed only if there is a difference in color between the old and new layers.
Before priming, the room and walls need to be prepared.
- We remove everything that may interfere with the work process. If it is not possible to remove the furniture, then we move it to the middle of the room.
- We keep the room temperature from 5 to 25 degrees.
- The walls must first be thoroughly cleaned of all dirt and grease stains. To do this, you can wash them with hot water and a small amount of ordinary detergent.
- If there is damage on the walls, we cover them with putty, trying to achieve the most even surface possible. If necessary, we carry out mold removal work.
- Rub the putty with a block or medium-grit sandpaper. Be sure to wait for it to dry completely.
- A couple of hours before applying the primer, clean the working surface.
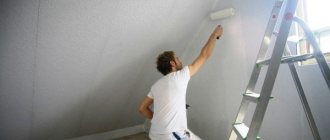
- Apply primer.
- The walls must be completely dry. If the humidity is high, then ventilate the room or dry the walls with a heat gun.
Let's figure it out: what kind of wall
Walls made of wood are light and resistant to deformation. Such walls can last more than 100 years. But wooden surfaces have a drawback - their susceptibility to external influences (insects, high humidity, sunlight).
The primer makes the wood more protected from unwanted influences, since after priming the surface of the wood becomes more durable and less permeable to insects.
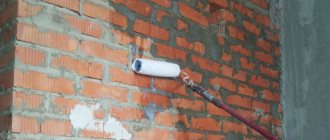
Brick walls, unlike wooden ones, are not susceptible to insects, are durable and fireproof. It may take several days to warm a brick house to comfortable conditions due to its high heat capacity. Brick walls, due to their strength and resistance to external factors, can theoretically do without priming, but this is undesirable. A primer is a primer, that is, a preparatory and leveling agent, but brick walls are not smooth and uniform. Therefore, it will be easier to achieve perfect coverage. This will also increase the durability of the finish.
Walls made of lightweight concrete (foam concrete, expanded clay concrete), like the previous ones, are fireproof (can be adjacent to stoves, fireplaces, etc.) and are not susceptible to insects. Concrete is a fairly porous material, and dust, moisture, and dirt can become clogged in the pores. The primer mixture fills these pores with a durable film, leveling the surface. And adhesion, i.e. adhesion will be significantly higher than to concrete.
Frame walls are the lightest of all those considered, so they warm up quickly and are resistant to deformation. They are susceptible to rotting and insect attack, and therefore require special treatment and protection. The primer will just create a protective layer and make the walls more resistant to the negative effects of the environment.
In general, the primer will not harm any type of coating; moreover, it will simplify the finishing and increase its durability.
Dust removal of very high walls after renovation
If there is a need to clean up a room with high walls, then one of the best options in this case would be a brush with a long handle. In addition, you can use a mop, using a dry or damp cloth if necessary.
In order to facilitate the task of removing dust from high walls, it is recommended to carry out thorough preliminary preparation. This means that the walls should be tightly covered and dampened underneath a layer of film to facilitate dust collection.
Application technology
To work you will need the following tools:
- protective respirator, glasses and seals;
- brushes, roller (or spray), a narrow brush is needed for processing corners, switches and other complex structures, the roller should be 18-20 cm wide with medium synthetic bristles;
- a container with the mixture, for example, a paint bath, the presence of a recess and a squeezing grid will allow you to apply the primer more evenly and without excess;
- degreaser;
- clean rag and wire brush.
Preparation
- We put on personal protective equipment.
- Prepare the mixture. Mix dry soil with warm water according to the instructions. Mix the prepared solution thoroughly before use.
- Pour the composition into the container. Dip the roller in it on both sides, and squeeze out the excess on the wire rack.
- We ensure good ventilation of the room in which the work will be carried out. The air temperature should be from 5 to 25 degrees, the air humidity should be at 60-80%.
- We sand the putty.
- Remove debris and settled dust with a broom or broom. If there are pockets of fungus or mold, we remove them with a metal brush and treat them with a concentrated antiseptic composition.
- We degrease the surface with technical acetone or any other degreasing substance.
We recommend: Repairs in a store: what to pay attention to?
How to prepare a wall
Before applying the primer, the walls are cleaned of wallpaper residues, crumbling plaster, grease stains and burning. Remove dust from newly plastered surfaces.
If the walls are smooth, then simply wipe them with a damp cloth. Porous surfaces are cleaned of dust with fine sandpaper. Some craftsmen use compressors, special mops with attachments, and construction sponges. There are also a lot of life hacks. One of them: adapt a paint brush with high bristles as an attachment to a regular vacuum cleaner. The pile must be long so as not to scratch the surface.
Note! Removing dust from walls is accompanied by a high concentration of dust in the air. Protect your lungs. Use a respirator when working.
Sequencing
- Apply the first layer to the wall. You should start from the most convenient place in the direction from top to bottom with progressive movements. To prevent smudges from forming, the roller should be pressed lightly, but the solution should not be allowed to drain. For hard-to-reach areas, it is more convenient to purchase a special device for a roller (telescopic rod).
- Apply the solution to corners and other difficult areas with a narrow brush. Here you need to show special care and accuracy.
- Let the soil dry. This may take from 3 to 6 hours. You can tell whether the soil has dried out or not by looking at the wet spots that should disappear. The process must take place under natural conditions; a heat gun or battery cannot be used.
- If necessary, apply a second layer without waiting for the first layer to dry. The sequence is similar.
- Then we apply paint.
To process monolithic concrete, use soil with quartz sand, which is designed to enhance the adhesion of the concrete surface.
How to choose the right primer
To achieve the best results, it is important to choose the right primer with the right composition, taking into account factors such as the type of coating and the conditions in which the work will be done.
If you need to paint walls with a completely non-absorbent, dense surface (previously painted or concrete walls), or you have to hang heavy wallpaper, then non-contact primers and adhesives are suitable here. They increase adhesion (cohesion) due to quartz and sand particles in their composition. This will create the highest level of grip possible.
If you work with metal surfaces, anti-corrosion compounds are suitable for you. They will prevent rust from appearing and increase durability.
If the object of your attention is the bathroom or kitchen, antiseptic primers designed for wet areas are suitable. Its special composition reduces the likelihood of fungus. Also, such a primer provides such high adhesion that it does not allow microorganisms to penetrate into the joint.
If the surface that needs to be primed is loose and not very durable, a deep penetration primer will help. This mixture will strengthen the wall and reduce paint consumption.
Concrete has its own approach
Most new buildings today are built from concrete, which is difficult to finish with other materials. But this situation can be corrected if you treat the walls with a primer based on quartz sand. But other types of primer mixtures will not be able to help the master. Acrylic primer, as well as alkyd and mineral primer mixtures will be useful for subsequent work when the concrete is plastered or puttied.
Quartz primer provides smooth concrete with a slight roughness that allows putty or plaster to adhere to its surface, giving it an attractive appearance.
How to prime correctly
The priming process can be divided into preparatory and main stages:
- When preparing, it is necessary to sand the surface, remove dust, dirt, and mold from it. If necessary, dictated by the instructions for the primer composition, the wall must be degreased: for this use acetone or similar solvents. During preparatory work, it is important to maintain proper ventilation of the room and temperature conditions within the range of 5-25°C.
- The main stage of priming is to dilute the required amount of the composition and apply it to the walls.
Primer base
Most often, walls are leveled with putty. Some people think that it doesn’t need to be primed, because the putty surface is already a good preparatory layer for paint. But it has disadvantages: it can crumble, and it also absorbs too much coloring composition. The primer will strengthen the base and save paint.
Paintable wallpaper does not require priming, as it is designed for application of a coloring agent.
Before wallpapering, the walls must be primed. The soil will ensure a reliable connection of this layer with the walls.
Drywall should be primed in two steps. First, you need to coat the sheets immediately after installation. Secondly, the final finishing with putty is also covered with primer.
Many people wonder whether it is necessary to prime each layer of paint. If you are painting a wall over an old layer, then primer should be used with different paint colors. It creates a barrier between two layers of paint so that the top layer does not show through.
Pros of priming walls before painting
Do I need to prime the walls before painting and is it possible to do without it? The whole point is that, in general, it is possible to get by, but it is extremely undesirable. Getting to know the properties of primer and the effect it can achieve will help you understand why you need to prime your walls before applying paint.
- The soil strengthens the surface, penetrating deep into its structure.
- Levels the base, fills small cracks and pores that exist on the surface, thereby reducing paint consumption during the painting process.
- By priming a wall, you seem to cover it with a thin film, onto which the paint adheres well, without leaving stains or streaks. If the primer lays down in a thin, even layer, then the paint will also lay down well.
- Primer compositions are available in various colors; you can choose a primer to match the color of the paint to make it brighter.
- For a damp room, such as a bathroom, you can purchase an antiseptic primer. It protects walls from the formation of mold and mildew. After priming, the painted surface will be reliably protected from these troubles.
- Without pre-coating, the paint may crack, and if you want to repaint it, it will pull away from the putty in the process.
How many times
The primer is usually applied in two layers, the first of which is thicker, and the second is necessary to better strengthen the surface. It is important to dry each layer of primer for the time recommended on the package (usually several hours).
How many times should a layer of primer be applied?
Having learned how to prime walls before painting, you should decide how many times it is recommended to apply the substance to the surface. Usually the coatings are plastered twice. For the first time, use a thicker consistency. Plaster is applied a second time to strengthen the surface well.
Plaster is applied a second time to strengthen the surface well.
What to prime
Depending on the porosity of the wall, you can prime it with a brush or roller.
Each method has its own advantages.
A brush allows you to work on unplastered surfaces, while a roller gives a uniform, smudge-free layer, which requires less primer.
We recommend: Finishing the attic: options for cladding the inside of the attic floor with your own hands, the best ideas for decorating with wood
How long after can I paint?
The minimum time for drying the primer should be found in the instructions for the specific composition; it usually ranges from 4 hours.
If repair work allows, then it would not be superfluous to let the primer soak in during the day.
In addition, if the primer composition was applied to plaster or putty, then subsequent painting should be carried out only after all layers of finishing have completely dried.
How long can it take to paint, drying time
The primer for walls for painting dries completely the next day. There are some options that allow you to start painting after 5-7 hours. Despite this, experts recommend waiting a day, which helps improve adhesive properties and strengthen the surface.
While waiting, remove open containers with water, solution residues and other substances from the room. Their presence helps slow down the drying process.
The primer for walls for painting dries completely the next day.
What to prime: popular primer options for different surfaces
Primer compositions differ according to the type of surface for which they are intended:
- For wood and metal. Alkyd and aluminum primers are used, which have anti-corrosion properties and ensure strong adhesion of the finish to the base.
- For concrete. Epoxy primers that are resistant to cracks and chips due to their high resin content are best suited. Used for subsequent painting, laying tiles, and laying linoleum.
- For brick. It is worth choosing a silicate primer, as it is the most resistant to natural influences and is suitable for treating facades, balconies or bathrooms.
- For polyvinyl acetate paint. The primer of the same name has a narrow specialization, allowing the paint to dry faster and adhere better to the surface.
A universal acrylic-based primer can strengthen and protect surfaces made of wood, concrete, ceramics, plaster and putty.
Features and useful tips on application technology
Features of surface treatment depend for the most part on what will be used for finishing.
- Water-based paint requires an acrylic primer.
- If the surface is to be finished with alkyd paint, then, accordingly, a primer of the same type is needed.
- For paints that have a narrow purpose, for example, electrically conductive, it is more advisable to select a universal primer composition.
In the store, soil is sold in the form of a ready-made solution or a dry mixture. The differences between them are convenience and price. The concentrate is diluted with warm water and as a result, as much soil is obtained as is necessary for work. Moreover, they are much cheaper than ready-made ones, since the price of the latter is increased due to hermetically sealed packaging (plastic bucket).
Based on how liquid the mixture is, and based on the area of the wall, choose the tool with which it will be applied. These can be rollers, brushes, a spray gun, and for thick compositions it is more convenient to use a plaster spatula.
Useful tips from the experts.
- Under no circumstances should primers from different manufacturers be mixed, even if they are intended for the same material. In either case, the chemical composition will vary slightly, which may result in loss of functionality.
- Storage in the cold and especially in the cold is excluded. Freezing can also cause loss of functionality and properties.
- Before starting work, be sure to read the instructions on the packaging as stated by the manufacturer.
- You can degrease the work surface with nitro solvents or extraction gasoline.
- To check how strong the primer film is, lightly press on it with the tip of any metal object. There should be no tears or cracks in the coating.
Conclusions on the topic
Let's summarize. The primer is undoubtedly a very important element in the repair chain. Although many masters often underestimate this mixture, it creates an excellent base, a strong foundation, so that your subsequent layers of the pie rest on it. We realized that it is impossible to replace the primer with water, and it can only be diluted with water if the manufacturer himself informs about this on the packaging; moreover, it must be diluted in the proportions specified by the manufacturer.
Thus, if you still have questions on the topic, we are waiting for them in the comments to this article.
Questions and answers
1. Should I prime the walls over old paint before painting?
It is recommended to prime if the color of the walls changes. Otherwise, the color may wash out, and then you will have to paint with an additional layer, wasting extra paint. The paint will not wash away the soil and will lie more evenly.
2. Do I need a primer when painting the same color?
If the walls are smooth and not covered with dust and a grease film (as can be the case in the kitchen), then you can do without a primer. If traces of dust, etc., are clearly visible on the walls, then primer should be applied before painting.
3. Is it necessary to apply a primer to putty walls before painting?
It is necessary, since dust forms on a putty wall, which is difficult to remove, which will greatly affect how the paint lays down and how it sticks to the wall.
4. In what case can the number of primer layers be reduced?
There is no need to neglect the number of primer layers prescribed by the manufacturer.
How many times do you need to prime the walls?
An important question that always worries people who want to save their money is how many layers are needed to obtain proper processing. To do this, it is worth looking at the absorbency of the wall being treated.
Note!
First, apply the first layer to a small area and then wait for the material to dry completely.
If after 30 minutes the wall has its original appearance, it means that to obtain high-quality treatment, it needs several layers of primer mixture. Typically, walls that have been plastered with chalk and gypsum putties need a large number of layers of soil.
The primer is best diluted in a small bucket
Advice from the experts
The basis for a high-quality result of finishing work is the use of products from one manufacturer. This helps avoid unpredictable chemical reactions between different formulations. In addition, product lines from one company are designed for combined use, which allows you to obtain the planned shade and structure of the coating.
The principle of a stronger base relative to the applied paint coating is mandatory to adhere to. This means that the primer layer should take on the functions of leveling and adhesion to the wall, and the selected paint will only have a decorative function.
Often, beginners seek professional help because they cannot determine whether a primer is needed at all. To determine the need to use primers, professionals conduct a very simple test - you need to rub the wall with your finger: if a mark remains, then you cannot do without a primer before painting.
Priming any surface before painting is a stage that facilitates further finishing work. Modern primer compositions can strengthen the wall, protect it from destruction, cracks, chips, and rust. After applying the primer, the paint layer is distributed much better, which allows you to reduce the consumption of paint coating.