Reasons for painting the Eurofence
These concrete structures age over time and begin to lose their performance qualities. In addition, painting of the eurofence is required for a number of the following reasons:
- Concrete absorbs moisture well, which gradually leads to its internal destruction. Great danger arises especially in cases when it is cool outside. During freezing, the water present in the pores of concrete expands, leading to sudden deterioration of the material. In spring and autumn, due to regular weather changes, cycles of freezing and thawing are repeated many times.
- In addition, moisture creates a favorable environment for the habitat and reproduction of various microorganisms, and warm and hot weather only accelerates this process. As a result, concrete structures become covered with mold and unpleasant stains appear on their surface.
- Water in the pores of concrete also allows for the growth of moss and lichens, which constantly keep the material moist, which leads to its rapid destruction.
- In large populated areas with unfavorable environmental conditions, metal oxides, sulfuric acid, carbon compounds and a number of other chemicals deposit on concrete structures, increasing the rate of erosion.
- A fence made of gray concrete is not attractive or aesthetically pleasing. Painting it allows you to significantly transform the area, which in the future will stand out from the rest of the neighboring fences with its original and individual appearance. After painting, it will begin to please the eyes, and not cause despondency.
For a number of reasons described above, it can be understood that painting a concrete fence allows you not only to change the appearance of the structure, but also to significantly increase its service life.
Selection of the optimal mixture for coloring
Before painting the eurofence, it is necessary to select the appropriate shade and type of paint composition, which will then be used to open it. The color of the mixture can be freely selected in accordance with personal preferences, but it is desirable that it matches the house and the area located next to it. For example, a fence can be painted in the same shade as the roof of a building, although this is not necessary and its painting can be done according to any of your own ideas.
If a concrete structure imitates the structure of one of the natural materials, then this characteristic feature can also be highlighted with a coloring composition. When selecting it, you need to take into account the level of dullness. Glossy compositions very well emphasize all the roughness and imperfections present on the surface. Matte ones, in turn, hide them.
Before purchasing paint, you should also first calculate the required amount of the mixture so that you don’t have to buy it again in the future. It is advisable to purchase the composition from one batch, which will eliminate the possibility of a color mismatch.
If you want to change the smoothness of the fence, you need to resort to the use of special textured paints, which not only make it possible to give the structure an original appearance, but also provide complete protection of the concrete from the negative effects of the environment.
Painting a concrete fence must be done with one of the following compositions:
- Silicone. These mixtures dry quickly on the surface after painting, tolerate even significant temperature changes, and are not subject to fading when exposed to sunlight.
- Oily. They are distinguished by their affordable cost, high resistance to moisture, and also provide protection against bacteria and fungi, preventing the likelihood of their formation in the pores of concrete. The disadvantage of these compositions is that over time, exposure to sunlight leads to their fading.
- Acrylics. Mixtures of this variety have a high level of strength and significant resistance to mechanical damage. Acrylic compositions are environmentally friendly, they quickly harden on the surface, reliably adhere to the concrete base, and they have virtually no odor. Their disadvantage is their rather high cost.
- Latex. These paints have significant durability and a long service life. Due to their high level of elasticity, concrete structures painted with them can withstand even significant temperature changes. In addition, they do not allow moisture to penetrate into the pores of concrete, and their price is slightly lower than acrylic-based compositions.
- Water-based. Such mixtures are completely environmentally friendly and safe. They are distinguished by their availability and low consumption. The negative side of water-based paints is their low resistance to mechanical damage, as well as moisture and temperature changes.
Each of the compositions has its own advantages and disadvantages, taking into account which you should choose one of them at your own discretion.
How to paint a eurofence
Previously, concrete slabs were used to fence areas. They were gray and bulky, but they were durable and reliable. Now they have been replaced by European fences, manufactured using improved technology. They have all the advantages of previous products, and the variety of shapes, sizes, and painting of the Eurofence significantly expands the aesthetic properties of the fence.
The need for finishing the fence
Eurofence is a structure made of concrete slabs and fastenings to them, which allows you to form a fence for the site. The sections have different shapes, a relief or patterned surface, and can imitate stone or brickwork, but the product is supplied from the factory only in gray. This significantly reduces the aesthetics of the structure, so the Euro fencing can be finished painted after installation.
Painting a fence is necessary for several reasons:
- technical - additional coating improves the protective properties of the fence, extending its service life,
- aesthetic. Gray color is neutral and does not evoke emotions in a person, but a beautiful colored fence can lift your spirits and combine the fence with the rest of the buildings on the site into one architectural and landscape composition.
Features of choosing a finishing coating
How to paint such a fence? Since the enclosing structure is constantly located in the open air and is exposed to atmospheric factors, for its finishing it is necessary to use paint and varnish materials intended for facade work.
What paint should I use to coat the euro fence located outside the house? For these purposes you can use:
- oil compositions. They are inexpensive, but at the same time have moisture and bioprotective properties. Their main disadvantage is their tendency to fade in the sun,
- silicate pigments. The products dry quickly, give a long-lasting color, are not afraid of temperature changes,
- acrylic coatings. They create a durable protective film on the surface of the fence, are environmentally friendly and durable, but have a high cost,
- latex colors. These coatings are resistant to the destructive effects of moisture, UV rays, have high elasticity,
- water emulsion. This is an inexpensive, but at the same time environmentally friendly composition that is economically consumed. Its disadvantages are low resistance to moisture and temperature changes.
Preparatory work before painting
In most cases, all sections that make up a concrete eurofence have some defects. They mean roughness and voids from the air that arise during manufacturing. To ensure the highest quality coloring, these and all other similar defects must first be eliminated from the surface of the product.
The preparatory process itself must be performed in the following sequence:
- Initially, the surfaces to be treated must be cleaned of contamination.
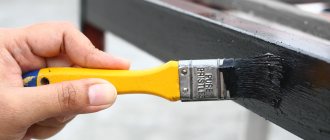
- Then they need to be coated with a deep penetration primer using a sprayer or a wide paint brush. The first tool is more preferable, since thanks to it it will be possible to better distribute the composition over the relief areas of the concrete sections.
- After the primer has completely dried, all defects present on the surface should be eliminated using putty. As a tool for applying it, you need to use a rubber spatula, which allows you to easily go around all the irregularities of the structure and place the mixture on all even the most inaccessible areas. The process itself takes a significant amount of time, but under no circumstances should it be avoided.
- At the next stage, it is necessary to cover the joints of the sections and the junctions with the pillars using a cement-sand mortar, which must be prepared in a ratio of 1:3. Instead, you can use other compositions of similar quality intended for this purpose.
- After the putty has dried, which usually hardens within 24 hours, you need to clean the material with sandpaper in the places that were previously treated with it.
- Next, it is necessary to re-open the Eurofence with a deep penetration primer and preferably several times, thanks to which it will be possible to create a reliable protective coating on its surface, which will further protect the fence from many negative environmental influences.
Note! There is no need to try to save on primer, since it will not be possible to significantly reduce costs in this way, but this can have a negative impact on the operation of the applied decorative finish and lead to its premature destruction.
In addition, the composition used must necessarily be intended for outdoor use, and also provide complete protection from moisture and low temperature.
Choice of color composition
The shade of paint is most often chosen taking into account the wishes of the owners. In addition, this composition should not be disturbed: house-garden-fence. For example, the roof of a house can be combined with a fence if they have the same color covering. Paint creates an imitation of the structure of some natural material. It is recommended to go with a matte finish. Then the defects on the surface will be masked. Gloss, on the contrary, exposes all the roughness. Using texture dye, an original texture is created on a smooth surface.
Paint for European fences is purchased for a specific purpose: painting the concrete surface. For these purposes, the following compositions are selected:
- oil This is an inexpensive paintwork material, water-repellent, with bioprotective properties. Disadvantage: the coating quickly loses its color brightness when exposed to the sun;
- KM silicate. A protective layer is formed that tolerates temperature fluctuations, maintains the brightness of the shade, with a high drying speed;
- acrylic dye. The material dries quickly, is non-toxic, interacts well with concrete;
- latex based. The moisture-repellent coating withstands the effects of UV rays from the sun and has a high level of elasticity;
- group of water-based paints. They are affordable to the average buyer, economical, and non-toxic. Their disadvantages: they do not tolerate exposure to water and temperature changes.
The hardware store has a wide range of materials for painting concrete structures. It is recommended to first select the LMB category. More often than others, this is a façade with a matte coating, water-based CM. After this, the manufacturer of the composition is selected. Among facade paints, the leading manufacturer is Caparol from Germany; its brands are in demand:
- matte durable universal paint Alpina MegaMax Universal for facades. Price 460 rub./l;
- environmentally friendly wear-resistant paint Alpina MegaMax Fassade, price 680 rub./l;
- for masking cracks and protection from chemicals compositions: Disbocret 518 Flex-Finish (price 850 rub./l), Disbocret 515 BetonFarbe (price 700 rub./l);
- matte dye Amphibolin with high adhesion, price 715, rub./l;
- matte water-repellent composition with vapor-permeable properties AmphiSilan Plus, price 1145 rub./l.
If there is only one manufacturer, and their paints are in different price categories, then this indicates that they have different fillers.
Available brands produced in Ukraine are highlighted: Kolorit, Triora, Alpina. Brands from foreign manufacturers are more expensive: Tikkurila from Finland, Vivacolor from Estonia, Caparol from Germany.
CMs are divided into three groups according to price:
- budget trains - Dufa (Ukraine), Zebra (Ukraine), Snezka (Poland) last no more than 2 years. If the container is 9-10 liters, then the price is about 1500 rubles;
- the middle price category group - Kolorit, Triora, Alpina, Aura, Feidal are often sold in 9-10 liter containers at prices ranging from 1,500 rubles to 2,000 rubles. The service life of the coating is 3-5 years;
- expensive materials - Tikkurila (Finland), Vivacolor (Estonia), Feidal (Ukraine), Caparol (Germany) with a service life of more than 5 years, containers of 9-10 liters at a price of over 2000 rubles.
Important: despite the fact that the manufacturer prescribes the dye consumption on the container, this indicator is difficult to apply to painting a Eurofence. On a porous fence surface with a complex configuration, the flow rate increases several times. Experienced craftsmen call the figure 0.25-0.3 l/m2 of painted fencing.
The KrasByt paints maintain the ratio of low price and high-quality material. Brands offered:
- Acrylic water-based paint for concrete AQUABETOL, 30 kg, price 110 rub./kg;
- ACRYLIC FACADE PAINT “BETYLATE” ON CONCRETE FOR EXTERNAL WORK, container 25 kilograms at a price of 5,375 rubles, 1 kg – 215 rubles, 1 m2 – 43 rubles. Differs in frost resistance;
- POLYMER PAINT “BETYL” FOR CONCRETE FLOORS, price 1 kg – 219 rubles;
- POLYURETHANE ENAMEL “POLIMERDECOR”, price 1 kg 345 rubles. Not afraid of chemical aggression.
As an alternative, the following compositions are purchased:
- from Finland, Tikurilla company, Kivitex matte dye;
- acrylate-based water-based dye with Novasil silicone filler;
- alkali-resistant acrylate paint Teknos SAKU;
- silicone-based mineral dye Siloxane facade. A vapor-permeable coating with high moisture resistance is formed.
Painting the euro fence
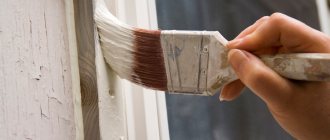
It is easier, faster and more efficient to apply paint, as well as primer, using a spray gun. If it is not there, then you can resort to using a paint brush or roller, but in this case the process takes more time, and achieving a similar high level of coloring will be noticeably more difficult.
Before opening the Eurofence with the main layer of paint, it is advisable to apply color to the section in advance. This can be done when the finished surface is treated with a primer. In such a situation, it is necessary to add a small amount of primer to the paint mixture, thanks to which the final primer ultimately acquires the shade of the required paint color. This method is optimal if the eurofence is painted in one tone.
The paint application process itself is carried out as follows:
- First of all, the composition must be thoroughly mixed until it acquires a homogeneous appearance.
- Afterwards it is necessary to dilute the mixture. When using a spray gun during painting, a viscometer is required, which allows you to measure the density of the composition. A mixture that is too viscous can cause damage to the device or cause it to malfunction. With proper experience in performing this step, you can avoid the need to use a viscometer. Then you need to select the optimal nozzle for the spray gun, with a diameter of at least 2 mm, and then you can start applying the mixture. When choosing a paint brush or roller, paying attention to the thickness is not so important, but still in this case it should not be very thick and not too liquid.
- The Eurofence must be opened in a thin layer, which will prevent the formation of drips. First, you need to paint the upper sections, gradually moving from each of them downwards.
The work itself should be performed exclusively in warm, sunny weather. Heat and sub-zero temperatures must be avoided. If the eurofence is painted in several layers, then before applying the next one you must wait until the previous one has completely hardened.
Note! To ensure uniform application of the paint and varnish material, long breaks in the process of opening adjacent structural elements should be avoided. Before you stop painting, you need to finish the started span of the eurofence to the end.
Regarding consumption: basically, what is indicated by the manufacturer will differ from the real one. This is not a trick on the part of the manufacturer; it simply increases due to the relief and porosity of the structure. On average, paint consumption when painting a concrete fence is per 1 sq. m is about 250-300 g.
Having figured out how to paint a Eurofence with your own hands, as well as following all the steps described above and recommendations in practice, you will be able to paint the structure without any particular difficulties, and the finishing coating itself will be applied with the correct suitable coloring composition, ensuring not only a long service life of the finish, but also protection protection from external negative influences.
Video:
How to paint a Eurofence: choosing material for concrete, preparation and painting
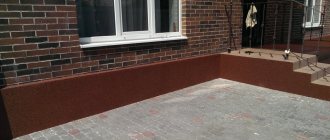
After the European fence is installed around the perimeter, the developer receives just a gray concrete structure, which visually looks quite modest.
However, this is not scary, because concrete lends itself well to finishing, and if you know how to paint a Euro fence with your own hands, you will end up with an excellent fence. Photo of a fairly original euro fence after painting
Concrete and paint
A Eurofence is a set of concrete slabs and fastenings, which, after installation, form a certain ensemble, and which can be painted. The concrete parts here can be grooved, patterned, or in the form of brick or stone masonry.
Since such structures are supplied from the manufacturer without painting, the developer always has a lot of options for giving them not just any color, but also for creating an entire artistic ornament, depending on desire and the pattern in which the slabs are presented.
Why do you need painting?
An individual approach to the appearance of a concrete fence is due to several reasons:
- Technical reason . Any finishing of the concrete mass results in the fact that the fence will be in use for a longer period. Plus, coloring always acts as a finishing touch.
- Individual . Options for painting a Euro fence always involve the opportunity to emphasize certain features of the site, landscape, roof, house, gate. Correctly selected colors can bring final harmony to landscape decoration.
- Psychology . This factor should not be underestimated, because the gray color of a concrete fence, in fact, cannot evoke positive emotions. By surrounding his home, his life with a gray fence, a person subconsciously becomes the gray part. So a bright, beautiful fence will contribute to a normal and cheerful mood.
Eurofence does not have to be gray and melancholy
What material to choose for work
When choosing paint for painting a concrete fence, you should pay attention to its technical requirements. In other words, it is necessary to choose paints and varnishes for facade work, because the fence will be standing outdoors, so the paint must withstand all climatic conditions, exposure to moisture, wind, sun, and have high frost resistance.
The question of how to properly paint a Eurofence cannot be answered with certainty by paint for interior work, so you need to choose the material carefully.
For external work, strictly façade paints and varnishes are suitable.
Important! When finishing the fence, it is not allowed to use various putties or building mixtures intended for interior use. All of them simply will not withstand outdoor use.
So, we can say that acrylic and silicone paints are suitable for painting, which should:
- Withstand climatic operating conditions.
- Create a coating on a concrete surface that can resist the accumulation of dirt.
- Be water repellent.
- Have a high degree of resistance to mold formation.
Acrylic paint for exterior use
Preparation
In the process of preparing for coloring, there are always clear instructions that are recommended to be followed.
- All cracks and splits in the body of concrete slabs must be sealed with cement mortar.
- The seams between the slabs of the structure are sealed with cement-based plaster.
- After the mixture dries, the entire fence is treated with a waterproofing mixture. Moreover, it must be applied with a spray gun.
- After 24 hours, the waterproofing is completely dry and you can begin priming the surface. It is important to add here that the primer must have deep penetration. In addition, it can be applied not in one, but in several layers.
Advice! There is no need to save money with the primer, since the price of the entire painting will not decrease much, but the performance of the fence will decrease significantly. The primer enhances the concrete's resistance to environmental influences and increases adhesion to the paint layer.
Simple primer for concrete surfaces
As for paint consumption, here it is necessary to make a small digression. The fact is that the consumption indicated by the manufacturer will not coincide with reality. The surface of a Eurofence is embossed, textured, and porous, and therefore the consumption will always be much higher than indicated.
We can say that on average per 1 sq. a meter of eurofence takes 0.25 liters - 0.3 liters of paint, and based on these indicators, it is already possible to calculate the total consumption.
Let’s say right away that painting a Euro fence with your own hands can be done strictly with a spray gun. And here again it’s all about the relief of the surface. There is no way to properly paint a fence with such a surface with a roller or brush.
The selected paint is thoroughly mixed until smooth and then diluted. And here you will need a viscometer, a device for measuring the viscosity of a material. The fact is that for normal painting with a spray gun, the paint must be of a certain viscosity. However, you can determine the average viscosity by eye, select a nozzle from 2 mm for the spray gun and get to work.
The Eurofence must be painted with a spray gun.
Painting is carried out in a thin layer from top to bottom; this rule avoids the formation of drips. Naturally, the work is carried out at above-zero temperatures and on a sunny or clear day. Each new layer of paint is sprayed only after the previous one has completely dried.