Plaster is the most common and effective material for the final leveling of surfaces of any size and complexity. The solution is pliable, easy to handle, easy to apply to the base and hardens quickly. However, after drying, many small defects remain - bumps, drops, protrusions, sagging, which are incompatible with the application of the topcoat. Properly performed sanding of the walls after puttying allows you to completely get rid of all flaws and qualitatively prepare the surface for applying the next layer of finishing.
What and how to sand the walls after puttying
When deciding how to sand the walls after puttying, you need to take into account the properties of the base on which it was applied.
Concrete slabs are characterized by high strength and a complete lack of flexibility. You can apply as much pressure as possible on them without fear that the coating may deform and crack. Plasterboard construction is not as strong. With a height of 250 cm and a width of 120 cm, the gypsum board bends easily even with slight pressure. Therefore, when considering how to sand the putty, you should take these nuances into account.
When planning this stage of repair work, it is recommended to adhere to the following rules:
- Immediately after applying and leveling the solution, it is not treated with anything. Before sanding the ceiling after puttying, you need to wait until it dries well, but not in a draft and without using heating devices. This may cause the putty to crack.
- To achieve a high-quality result, high-quality general and local lighting is necessary. Evenness is checked using side lighting, which reveals any irregularities.
- Processing is a step-by-step process. First, initial cleaning is performed with a cutting tool, then sanding, then polishing.
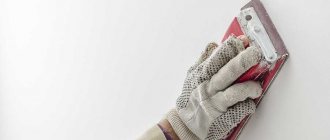
- Before sanding walls after puttying, it is necessary to take effective measures to protect interior elements from damage and contamination. When processing plaster, a lot of dust is generated, and moving stepladders and manipulating tools poses a risk to furniture and glass.
- The putty is sanded from bottom to top from one of the corners. This technique ensures a clean, uncontaminated field of activity as you move from site to site.
- Fresh plaster is a porous and brittle material. After sanding the ceiling and walls is completed, the surfaces are cleaned of dust and treated with primer several times. This makes them stronger and improves adhesion to the finish.
When choosing which sandpaper to sand the putty and which devices to use, you should focus on your own skills, abilities and physical capabilities.
It also wouldn’t hurt to check the arsenal contained in the pantry. It is possible that there is a sufficient amount of property left over from previous renovations.
Grinding process and rules
How to sand putty correctly? In order for the sanding of walls after putty to go flawlessly, you need to follow some rules:
- Proceed with sanding only when the surface is completely dry. As a rule, it takes a day for the walls to dry.
- Before starting work, protect all furniture from dust with plastic wrap. If this is not done, subsequent cleaning may take a long time.
- Find the most visible defects. How to identify them? It’s very simple - take a bright lamp, place it as close to the surface as possible, and direct the light along the wall: a shadow will appear from obvious bumps. These irregularities can be marked with a pencil.
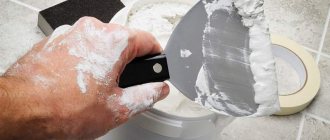
What to do if you need to add putty
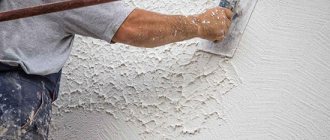
During the plastering process, the solution is applied and spread with a wide spatula. On its blade, the volume of the mixture is not uniform, which leads to its uneven smearing over the base. Because of this, bulges and depressions form on it. When a thick layer is applied, it slides down under its own weight, creating large horizontal sagging.
In such cases, sandpaper for putty or even an electric device will not save the situation. To remove such a volume of material would take too much time, effort and consumables. The best solution would be to fill the recesses, followed by leveling and polishing.
The algorithm of actions is as follows:
- Conducting an inspection of the work area using a portable lamp. Marking strongly protruding areas and depressions with a pencil.
- Making notches in recesses. They can be made with an axe, the sharp part of a hammer, or a grinder with a cutting disc. The distance between the notches is 2-3 cm, and their depth is up to 0.5 cm.
- Sanding off excess putty. This procedure can be performed with a spatula, scraper or any type of grinder. If the issue of dust formation does not play a role, then an angle grinder will do. With it the process will go much faster.
- Checking the results of preliminary work by level and rule. Bringing the surface to a level state without taking into account depressions.
- Cleaning areas that have been scratched from dust and crumbs. Treat them with a deep penetration primer. The penetration is done twice, after each time the areas must be completely dry.
- Mixing a solution similar to what is already in the defective areas. Often this is a finishing composition, characterized by softness and a long hardening time. Apply to recesses and perform careful leveling. It's better to use a long rule.
The fresh composition should harden well. Sanding off excess putty before reaching full strength is not recommended, as there is a risk of leaving new dents and grooves if moved carelessly.
In addition, you need to remember that when drying, the mixture shrinks a little, losing volume. Therefore, before rubbing the putty, you must wait at least 24 hours, and if the room is cold, up to 3 days.
Grinding technology
Visually, the process looks primitive and simple, but there are subtleties and tricks here. The first question that arises is: how to sand the putty. You must first wait for the putty layer to dry completely and make sure that the walls have gained the required strength.
- Carefully fix the abrasive on the grater.
- Put on protective equipment, prepare a stepladder, a spotlight and a small spatula.
- First you need to remove the visible bumps on the wall with a spatula.
- Then determine a small area for yourself, begin sanding the wall in a circular motion, strongly illuminating it with a light bulb or spotlight.
Important. The light bulb must be illuminated, holding it very close to the surface to be sanded, so that even the slightest roughness can be clearly visible.
Sanding the walls after puttying is done by making uniform circular movements with the tool in hand.
There is no need to press hard on the float, especially when sanding the finishing layer of putty.
Only the areas of sagging and protrusions should be sanded; holes and holes should be filled using putty. After the areas have dried, the surface is sanded again.
First, the entire area of the walls is sanded, and then difficult areas and corners.
Abrasive mesh
To eliminate unevenness and roughness of walls and ceilings when sanding, use an abrasive mesh. It is made of fiberglass and coated with abrasive chips on both sides. Typically silicon carbide is used on a rectangular blade. For large-scale work, they are produced in rolls. The mesh has a degree of pollination, which determines its grain size. It is perforated, that is, it has cells and holes through which dust particles are removed without interfering with work. The mesh is elastic, so by wrapping a small piece around your finger, you can quickly treat hard-to-reach areas.
Advice. The room where grinding is planned must be isolated from other rooms. The doors must be closed tightly without leaving any gaps. You can cover the openings, if there are no doors, with a thick, damp sheet.
Sandpaper
Sandpaper or sanding paper is a common tool for sanding; it comes in sheets or rolls. There are also standard graters cut to size.
You can sand using simple sandpaper or a special sanding mesh. On large areas, simple sandpaper has to be changed frequently, especially if it is fine-grained.
Emery grit
When choosing sandpaper for sanding, you need to take into account its grain size. For rough processing of the starting layer of putty, it is recommended to use coarse-grained sandpapers P60 P80. To get a smooth and even layer of putty, you need to use fine-grained sandpaper (P100 and above)
To process corners and difficult areas, in addition to a grater, you cannot do without sanding sponges with beveled corners. But if you don’t have one, you can use auxiliary materials at hand or simply fold fine-grained sandpaper in half.
Note. Surfaces are sanded a day after puttying, but before priming, since it creates a durable film that is impossible for the grinding process.
What set of tools is used for sanding and grouting putty?
When choosing a tool for sanding walls, you need to take into account factors such as area, room configuration, composition and density of the plaster composition. And that’s not all: you should objectively assess your physical capabilities and the availability of free time to carry out repairs.
Sanding off excess putty is not something that can be done quickly. It requires care, accuracy and a lot of time. One careless movement leads to the appearance of depressions and furrows. This means that you need to mix the solution again, plaster it, wait until the mixture hardens, and sand the putty again.
The options for choosing an alignment method can be as follows:
- Mechanical devices
. Belt, eccentric and orbital type machines are used. It is advisable to use them over large areas and on hard surfaces. For working at height, a telescopic rod with adjustable length is attached. The power of the products varies from low to high, which allows you to choose the right model for the upcoming activity. Modern tools have good ergonomics; working with them does not lead to rapid fatigue. The price of mechanics is quite high, and this must be taken into account.
- Hand tools
. The most popular are graters with clamps on the edges for fixing abrasive blades. Sandpaper, plastic or metal mesh are used as attachments. The product is sold in the form of pieces to the size of a standard grater or in rolls. The second option will be somewhat cheaper, and this must be taken into account when deciding which sandpaper to rub the putty with. The materials are disposable; to sand a room, you may need several dozen units of them if purchased individually.
To level the surface after puttying, you will need the following devices:
- spatula for scraping off excess mass;
- a commercial vacuum cleaner to work without dust during cleaning;
- stepladder for manipulations on the upper levels and along the ceiling;
- portable lamp;
- abrasive sponge for processing corners;
- rags or foam rubber to collect debris and dust.
To protect your hands, eyes and respiratory organs, you need to prepare gloves, goggles and a respirator.
Hand tool for sanding walls with putty sandpaper
To rub dry putty, you can use several types of tools. Moreover, some are universal, while others are only for one stage.
The following devices are used in the work:
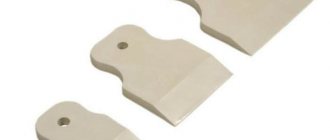
- Beam (grater)
. The product is simple, but practical and functional. Consists of a flat base, a handle and serrated clamps on the edges. These devices are made of plastic and wood with a working part length ranging from 20-50 cm. They are designed for manipulation with one or two hands. The edges of the board are slightly beveled, which ensures smooth and unhindered gliding over the putty. Strips of material are inserted into the clamps and pressed down using bolts. Replacement is carried out as the fabric wears out.
- Spatulas
. Designed for removing thick layers of composition with large volumes of defects. For small sagging, products with a blade up to 8 cm wide are used, and for large protruding fragments - 40-50 cm. Removal of excess is carried out by scraping or cutting off the mass, depending on its volume and hardness.
- Abrasive sponge
. It has the exact shape of a rectangle with clearly defined edges. Used for working in corners. To perform grinding and polishing, products with different sizes of voids and abrasive particles are used.
- Pumice
. This product of volcanic activity is lightweight and has good washing properties. Only large blocks that are comfortable to hold in the palm of your hand are suitable for work. This option is only suitable if pumice is freely available; it can be collected and cut to your size for free.
When preparing for grouting, you need to take into account that dry plaster also has abrasive qualities. So, if grater attachments are inexpensive and you don’t mind them, then spatulas can be irreparably damaged. Their blades become thinner due to friction, and teeth and chips appear on them.
After this, you will no longer be able to use them for their intended purpose; you will have to buy new ones. Therefore, it is advisable to use consumables.
Abrasive for hand grinding tools
The putty surface is leveled using flexible roll material with an abrasive coating. Both mesh and putty sandpaper are indispensable tools for such work, but they have some minor, but still differences.
The mesh has a fixed size and rectangular shape, sold individually or in packs of 10-100 pieces per package. The frame is made of synthetic thread or steel wire. Small particles of stone are glued onto it. The strips have a perforated structure. As the movement progresses, grains of the flayed mass spill out through the holes, so the canvas does not become clogged. Even if the coating is slightly damp, it is enough to remove the mesh, shake it, clean it with a brush, after which the canvas can be used again.
Despite this efficiency, the material gradually wears out. The abrasive coating flies off the threads, and they themselves wear out. The fabric will tear after prolonged use. In such cases, it must be changed immediately so that the bends do not leave deep grooves on the surface being treated. The cost of mesh is higher than that of sandpaper, which must be taken into account when the repair budget is limited. As an option, use it only at the initial stage to level planes and remove large bulges.
Sandpaper for grouting putty is most often used for sanding and for final polishing for painting. The base is fabric or paper, stone grains are glued. There are simple and waterproof materials. Sold both in pieces and in rolls, in long strips. Purchasing in rolls is more profitable, since you can cut the paper exactly to the parameters of the bar, which will completely eliminate waste.
The degree of abrasiveness of the sandpaper is indicated by the letter “P” and numbers indicating the grain size of the material. The higher the number, the lower the fraction of solid particles. That is, the marking indicates the number of grains per square centimeter.
In construction, the following classification of sandpaper is accepted:
- large - P20-60;
- average - P80-160;
- small - P180-280.
To achieve high precision and bring the base to the state of glass, blades marked P300-1000 can be used.
The disadvantage of the material is its solid structure. It clogs very quickly, and the blades need to be changed frequently.
Recommended abrasive grit. "Rule 100"
There are craftsmen who, either out of ignorance, or out of laziness, or out of “economy,” use only two types of sandpaper when polishing - first the coarsest, and then the finest. You don’t need to be a rocket scientist to understand that in this case, gross risks will inevitably remain on the prepared surface. Moreover, there is still a misconception that primer and paint will magically fill all scratches on the surface. In fact, the viscosity of the paint is such that it does not fill scratches left by too coarse sandpaper.
At the same time, complete curing and shrinkage of acrylic materials (primers, paints, varnishes) applied after filling work is not completed immediately. This is where you need to look for the solution to the sad secret: where do some mysterious scratches appear on the mirrored (at the moment the repair is completed) surface after some time?
Each paint and varnish material has a certain viscosity. For each viscosity, there is an optimal risk value that a given material can easily fill to the end, without the formation of voids at the bottom of the risk. Therefore, for each grinding operation it is important to select the correct abrasive grit.
Indeed, when processing putty, it is necessary to begin with a coarser abrasive material, then changing this paper to a finer one. But this must be done taking into account the grinding steps! With the correct alternation of abrasive materials, each subsequent gradation reduces the grinding risks from the previous one by approximately half. To do this, each subsequent grinding stage must be performed with an abrasive that differs from the previous one by no more than 100 units (increase).
This simple rule is called the “Rule of 100” - it will help you completely get rid of the problems associated with the shrinkage of materials into rough marks and, accordingly, the appearance of these marks on the finished paintwork.
Rule 100: in order to ensure that risks from the previous, coarser abrasive are removed and no subsidence occurs in the future, it is necessary to take an abrasive whose grain size differs from the previous one by no more than 100 units.
“Rule of 100”
If you violate the “rule of hundreds” and jump over the gradation (for example, from P80 to P240) in order to speed up or “cheaper” repairs, the risks from a coarser abrasive are not completely ground down, but only their tops are cut off. Moreover, during the grinding process, the risk becomes clogged with grinding dust, and even if the surface is blown off, we still will not be able to adequately assess the risk.
Subsequently, the paint and varnish material will sink into these recesses and sanding marks will appear on the finished coating.
Failure to comply with the "Rule of 100"
In each specific case, depending on the properties and characteristics of the materials, the characteristics of the repair and the experience of the master, certain adjustments can be made to the chain of gradations, but the principle itself must always be observed.
For example, it has been noticed that when using grinders, each subsequent gradation most effectively removes risks from the previous one with this alternation:
Remember also that the “rule of hundreds” only applies to coarse and medium abrasives up to and including P600. When grinding with P600 and finer abrasives, the grinding step increases to 200 units.
It is also worth noting that despite the use by manufacturers of a single designation for the grain size of grinding materials - the letter “P” (according to the FEPA system), differences in grain coarseness can still be observed, and sometimes quite significant ones. So it is advisable to give preference only to trusted manufacturers with a reputation.
Mechanized grinding of surfaces with a grinder (grinding machine)
The use of mechanical devices allows this work to be completed quickly and efficiently. In this case, much less physical effort will be spent than with manual processing. The devices are not so heavy; when using them, you don’t need to press them hard against the surface, just point them in the right direction.
The following types of instruments are available for sale:
- Angle grinders (grinders)
. Household models produce 11,000 rpm, which is too fast for stripping quality control. If you choose, then devices with adjustable speed. At low and medium speeds there is less risk of leaving deep grooves in the finish. As for the nozzles, you can use products with both metal bristles and abrasive coating.
- Belt grinding
. A ring with an abrasive coating is mounted and fixed onto a base with rotating rollers. The device is heavy, but effective. When handling it, you need to constantly monitor the alignment so that the working side is parallel to the surface and regularly change the nozzles.
- Planetary
. Designed specifically for this type of activity. The working body is a circle with Velcro on which consumables are attached. They are sold individually and in packages with different grain sizes. To purchase nozzles for a large area you will have to spend money. But it is convenient, easy and simple to manipulate such devices.
- Vibrating
. The effect on the finish is produced by horizontal movement of the blade with slight pressure on the tool. The attachments are secured with Velcro or glued with double-sided tape. With the second method, you can save on consumables, but you will have to spend more time replacing them.
When processing plaster with mechanical devices, circular movements are made in the same way as with the manual method. To reduce the risk of damage to the coating in a visible place to a minimum, it is advisable to practice in areas that, after repair, will be covered with cabinet and upholstered furniture. Even if furrows remain, they can not be sealed, but left as is.
Sandpaper for putty: marking, purpose and application features
Grouting the walls after puttying is an important stage in surface finishing, especially when the walls are being prepared for painting. However, in practice, it is sometimes difficult to figure out which sandpaper to clean the putty with, because there are quite a lot of varieties of this material. We will tell you about the rules for selecting an abrasive and the features of working with it.
It is important to know which sandpaper to use to sand the putty.
How to sand a ceiling after puttying with sandpaper with your own hands
The instructions for cleaning the ceiling are practically no different from sanding the walls, but here the work is not done as carefully, since small defects are less visible. It is better not to use a spatula to cut off frozen drips, since there are no suitable conditions for performing such manipulations. As for shallow scratches, they will be covered with water-based paint, which fills well and masks minor depressions. There is no need to decide which sandpaper to sand the finishing putty, since all types of abrasive material will be required
It is better to start processing from the center. This way, the result will be more accurate and accurate due to the fact that the hands are not yet tired and attentiveness is higher.
First you need to go over the slab with the coarsest sandpaper and level its surface. Then apply medium to fine grit abrasive cloths. The plaster should not be polished to a shine, as there should be small risks for adhesion with paints and varnishes. In corners and around pipes, the solution is removed with a hard sponge and a screwdriver wrapped in sandpaper.
Given the difficulties associated with working at the upper level, it is advisable to use power tools. The best option is a planetary type grinder. It is lightweight, comfortable and productive. Since a large amount of the cleaned substance will fall on the master, he needs to wear overalls with a hood and a helmet with a polycarbonate visor on his head.
Required Tools
Sanding walls after puttying will be much faster and easier if you choose the right tools. First, you need to assess the scope of work and your own strengths.
What tools and materials are suitable for sanding walls?
- Bar. It can be used if the wall surface is small.
- Sander. Ideal option for large areas. If the surface is not only large, but also complex, it is better to use an eccentric sander.
- Sandpaper or sanding mesh. Experienced professionals advise using the second option. The mesh is more expensive, but it will have to be changed much less often. The pores of this material are not clogged with dust and it works more efficiently.
Many people use sandpaper the old fashioned way, which also copes with the task successfully. When purchasing mesh or sandpaper, consider the size of the block and allowances for the clamps. It is better to buy sandpaper in large sheets or rolls, and then cut it - it will be more economical. Please note that you will have to stock up on material: both the mesh and sandpaper can be ground off.
Dust treatment after finishing putty on the wall before wallpapering
This stage cannot be ignored, since the wallpaper will not stick to a dirty surface, and the primer will roll off without being absorbed. If paint is applied, it will lie unevenly, and with a change in color. It will take a little time, but the quality of the foundation will be much higher.
Before you begin cleaning, you should remove debris from the floor and wash it. Dust will not rise from a clean floor. Otherwise, the work will be done in vain. It is recommended to place wet rags along the walls. They will collect and hold debris that falls during cleaning.
The first way to remove dust is to use an industrial vacuum cleaner. You need a brush with soft bristles, which can be used to cover the entire area, paying attention to the corners where the most debris accumulates. Treatment is carried out from the center from top to bottom with an overlay of 10 cm on the already cleaned area.
If you don’t have a vacuum cleaner at hand, then a broom or wide paint brush will do. Dust removal is carried out with smooth movements without strong pressure, so as not to scratch the coating.
In all cases, a small amount of dust will still remain on the slabs. You can remove it with a slightly dampened sponge or soft cloth. After each pass, the material must be rinsed and wrung out well.
Why do you need to sand walls?
All the procedures that we did before: plaster, putty - these are all procedures for leveling the wall. Plastering is rough, puttying is fine. And now the process of sanding or polishing the walls begins.
Related article: Reinforcement of monolithic walls SNIP
Even after applying a thin layer of putty, in any case, small irregularities and tubercles remain on the wall, formed mainly by the sharp ends of the spatula, which remain when we disperse the putty and connect one part of the putty wall to another.
That is why when putting putty it is better to use a large spatula so that the area of leveling the wall is maximized. But the joints, no matter how hard we try, can still be traced. Therefore, after you have puttyed the wall, you need to let it dry (at least a day) and you can start sanding the walls.
Don’t try to accidentally prime the wall after puttying! Sanding begins immediately after puttying!
What kind of sandpaper should I use to sand putty?
Today, experts at KSPortal.ru will help you understand some of the nuances of sanding the surface. In this article, we will consider a common manual sanding method that is accessible to everyone. But, despite its apparent simplicity, there are some rules that will help you sand the walls correctly.
So, what is used for grinding? Let's start with tools and materials:
- standard sanding block (manual skinner);
- special sanding sponge with cut corners for hard-to-reach places;
- sandpaper or abrasive (sanding mesh);
- good lighting - spotlight or portable lamp;
- stepladder or high table;
- sometimes you need a small spatula;
- a respirator or mask, as well as safety glasses and a hat.
- Set of tools
- Tips for choosing abrasive
- Homemade instrument
- Instructions for sanding walls
- Ceiling sanding
- Dust protection
On the question of the “grain” of sandpaper. For sanding, you can use either a sanding mesh or ordinary sandpaper. The main advantage of a sanding stack over emery is that the abrasive does not become clogged with debris and dust from putty. But emery is also a good choice for sanding, and it’s also somewhat cheaper. True, you will have to change it more often, especially fine-grained ones.
The grain size is determined by special numbers: there are macro sizes - from 0 to 20; and micro-sizes of the section – from 40 to 500 (according to FERA standards). Remember that the higher the number, the finer-grained the skin , and, conversely, the lower the number, the coarser it is.
In home work, abrasive numbers 0 are usually used; 0; 00; 20; 50; 80; 00; 20; 40; 20; 60, sometimes a little smaller.
The main rule for home repairs is the following: initial sanding is traditionally carried out with larger sandpapers, and final finishing sanding is done with fine-grained sandpaper.
Therefore, after the first putty, it is best to sand the surface with sandpaper numbers 20-180. Depending on the condition of the surface, numbers 0-100 are sometimes allowed, but this would be quite “rough”; we would not recommend it.
After the second finishing putty, finer sandpaper with 20-280 grit and below is usually used. In many ways, the choice of sandpaper depends on the condition of the base coat.
That's all. As you can see, there is nothing complicated. Have a smooth surface and successful repair!
How and with what to sand the walls after puttying
Putty is used to level the walls. However, even very carefully puttying does not allow you to obtain a perfectly flat surface. In any case, marks from the spatula, uneven transitions and other minor defects will be visible on the wall. Sanding the walls after puttying helps solve the problem of fine finishing of the surface. This article will discuss the nuances of surface grinding, as well as the tools needed to carry it out.
Before you start sanding the surface, you need to decide on the tool to use. The work can be done manually or using a grinder. You can choose putty mesh or sandpaper as an abrasive.
The abrasive mesh for puttying has a perforated surface, so that all dust peeling off from the coating will escape through the holes. As a result, it is more convenient to use an abrasive mesh than sandpaper, since it does not clog as much. However, during the work process, most likely, you will have to replace the worn mesh with a new abrasive. The degree of wear can be determined by the appearance of the mesh: if it breaks or the grinding efficiency has deteriorated, then the device needs to be replaced.
Grouting mesh is sold cut into pieces - just for the sanding block. Another thing is that the bars themselves come in a variety of sizes, so when buying a mesh you need to choose a product that fits the bar. The disadvantage of mesh is its price, which is higher than sandpaper.
The advantage of sandpaper is its cheapness. The disadvantage is that it is not durable - it wears out quickly. Sandpaper is sold ready-made (in pieces) or in rolls (of different sizes). Paper cut into bars will cost more, but this price is justified by the time savings, since the rolls still need to be cut into sheets of suitable size. When cutting, it is recommended to provide allowances on the bars for the clamps.
Note! Even though abrasive mesh is more expensive, it is easier and faster to work with than sandpaper.
So, we’ve decided how to sand the walls after puttying. You will also need the following additional tools and accessories:
- step ladder;
- carrying lamp;
- skinner;
- sanding sponge;
- putty knife.
READ How to choose putty for walls under wallpaper
Advice! When sanding surfaces, there is a lot of dust in the air. Therefore, it is recommended to use all necessary protective equipment, including a respirator, gloves, goggles and a hat.
When thinking about the question of how to sand putty, you should proceed from the scale of the task:
Many models of grinding machines are distinguished by modern ergonomics, so that your hands don’t get so tired when working with them. The most advanced models are equipped with telescopic arms, which allows you to reach even hard-to-reach areas of walls or ceilings.
If the surface is already covered with finishing materials, initial sanding is carried out with coarse-grained sandpapers, and final sanding is carried out with fine-grained abrasives. Sandpaper is classified according to grain size.
Each type of sandpaper according to FEPA standards corresponds to a specific number:
- macro sizes - from 0 to 40;
- micro-sizes - from 40 to T2500.
For initial sanding, sandpapers with numbers ranging from 120 to 180 (that is, coarse-grained) are used. The lower the number, the larger the unevenness can be eliminated using an abrasive. To remove obvious defects, 0 is often used, to treat a wall for wallpaper - from 00 to 20, for painting - from 20 to 50.
Based on the above standards, the question of how to sand the finishing putty disappears by itself - it should be an abrasive with fine grains - from 40 to For delicate leveling, the use of finer grains is allowed.
You can sand the putty in hard-to-reach areas (corners, joints, niches) using a homemade device. We take a piece of plastic L-shaped profile and cut it so that we get an even plastic strip about 7-8 centimeters wide. We glue sandpaper on the back side, and then divide the strip into segments of 18-20 centimeters. In this case, we cut the corners so that the device is shaped like a pencil.
Advice! If desired, you can equip the tool with abrasives of different grain sizes.
Sanding the putty is carried out in the following order:
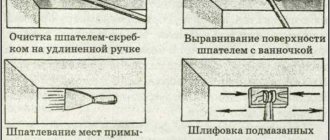
The picture shows the correct trajectories of hand movement:
Scheme of hand movement when sanding putty with a block
How to sand a wall after puttying was discussed above. Now let's briefly look at the features of ceiling polishing.
The ceiling attracts no less attention than the walls - any defect on the surface will be noticeable. From a technological point of view, the process of processing a ceiling is no different from sanding walls, however, such work is much more labor intensive. Sanding the ceiling manually is physically difficult, so it is better to use a grinder.
We put an abrasive mesh on the grinding machine. For starting grinding, numbers from 60 to 80 are suitable, and for finishing - To work with the ceiling surface, you will need a securely standing table or stepladder. However, if you have a tool with a telescopic rod, you can sand the ceiling while standing on the floor. The nature of the movements when processing the ceiling is circular.
The first step is to remove large defects. Then we remove dust and construction debris and check the surface for small flaws. If there are any, we correct them using a spatula. Next we proceed to final sanding with fine-grained sandpaper.
The sanding process is accompanied by significant dust formation. Small dust particles penetrate even through cracks in closed doors and are carried far beyond the work area. Therefore, even before starting repair work, it is recommended to purchase protective film for furniture (polyethylene) and cover all valuable household items with it. In this case, if possible, all furniture and household appliances should be removed from the work area. Windows should also be covered with film. The film is attached around the entire perimeter using tape. The cracks in the door frame can be plugged with wet towels - they will actively absorb dust.
READ Is it necessary to putty walls under wallpaper?
Sanding the surface is not a complex job. The process requires not so much any special skills as accuracy and attentive attitude to the matter.
sand the walls after puttying in two steps:
Most often, for renovation work in apartments, sandpaper from P80 to P280 is used, and for particularly delicate work - from 320 to 360P.
When the wall is sanded with starting putty, it requires subsequent polishing with coarse sandpaper, the range of which varies from 80 to 180R.
But please note that this is a very coarse-grained material, and if you plan to paint the walls in the future, such sandpaper cannot be used.
What technology is used for sanding?
Self-sanding of walls after puttying
Sanding walls. 3 options. Which one is the MOST successful?
Before you start sanding the walls, you need to check the finish for readiness (make sure it has dried properly). To make the work comfortable and the result positive, get sufficient lighting. The rays should not be distorted and cast a shadow; the area of the wall being treated should be illuminated from all sides.
Don’t forget about personal protection that will protect your eyes and respiratory organs from dust; believe me, there will be a lot of it.
If there are large protrusions on the walls, remove them with a small putty knife, but make sure it is clean. Then place some coarse paper on the block and start sanding the walls from the top, working towards the right side. Such actions will help you not to get lost and treat the surface in small areas, without missing a single centimeter of the wall.
If you have never sanded walls and are afraid of making a mistake with the grain size of the sandpaper, test the selected abrasive on a small section of the wall in a secluded place. If scratches appear on the wall during testing, your choice is wrong, so immediately replace the sandpaper with a finer grain.
Once again I would like to mention that coarse sandpaper is suitable for preparing walls before wallpapering, but subsequent painting of the walls does not allow the presence of even the smallest flaws, which will become more pronounced after applying the paint.
When sanding, try not to apply too much force when pressing on the block and do not sand the surface in one place for too long. After performing a few circular actions, check the result and move on to the next fragment of the wall.
If during sanding after initial polishing you find significant holes on the surface, skip these areas and later treat them with putty.
When the main surface of the walls has been sanded, you can move on to the more inaccessible parts - the corners. To sand corners, do not use a sanding block, as this will only damage the putty layer. For such painstaking and delicate work, sanding sponges with a beveled angle are best suited. If you don’t have such a device, use the same fine-grained sandpaper, folding it in half.
When renovating a room, the ceiling requires no less attention than the surfaces of the walls, because all the defects on it will attract the attention of not only the owner, but also the guests of the house.
Sanding the ceiling is no different from sanding the walls. The only caveat is that working on the ceiling is much more difficult. That is why, before you start sanding this area, get a sanding machine.
If such a miracle machine is used, a mesh numbered from 0 to 0 is put on it for rough cleaning, or a mesh numbered 100 is put on it for finishing work.
To easily reach the required area of the surface, use a ladder or scaffolding, but if you have a machine with a special bar, you can sand the ceiling directly from the floor.
The surface is sanded in a circular motion until the surface has a perfectly smooth texture. Initially, sanding rids the surface of major damage, after which the remaining debris and dust are removed and the surface is examined for the presence of minor defects.
When the work has come to an end, you can cover the walls with finishing putty. After the mass has completely dried, finishing sanding is carried out with fine-grained sandpaper. The technique for performing the work is identical to that described above, the only caveat is that the movements should not be so sweeping, but neat.
When all surfaces have been sanded, it is necessary to remove any remaining dust and then prime the walls. It is the application of primer that will increase the level of adhesion of the base with subsequent finishing materials.
When deciding what materials to sand the surface and what technology to use, it is necessary not only to take into account the advice of more experienced finishers, but also to try your hand at a small section of the wall. Although today you can watch many video tutorials on the Internet, they cannot replace experience working with a grinder or other abrasive materials that you need to feel with your own hands.
Plastering on wood: finishing features and its technology Plastering for concrete and processing concrete walls Sanding walls after puttying
How to properly dilute wall putty at home Leveling the walls and preparing them for…
Priming walls for wallpaper : why and how it’s done. In the photo - priming a plasterboard wall.…
How to remove paint from a wall After chemical treatment, oil paint loses its physical properties, softening...
How to remove old putty from walls without much difficulty Every renovation begins with removing old...
Sources:
https://krovati-i-divany.ru/sovetyi/%D0%BA%D0%B0%D0%BA%D0%BE%D0%B9-%D1%88%D0%BA%D1%83%D1% 80%D0%BA%D0%BE%D0%B9-%D1%88%D0%BA%D1%83%D1%80%D0%B8%D1%82%D1%8C-%D1%88%D0% BF%D0%B0%D0%BA%D0%BB%D0%B5%D0%B2%D0%BA%D1%83.html
What to consider when choosing a whetstone and grinding material (sandpaper, mesh)
There is no ironclad recommendation. Some people use a sanding mesh, others use sandpaper.
Sanding mesh
The advantage of the sanding mesh is that it does not become clogged with putty dust during operation. The mesh itself is perforated and all sanded off putty will pass through the mesh. It must be replaced during normal wear and tear, which is determined by the appearance of the mesh used. If the mesh is torn in places or you already feel that sanding is not as effective, replace the mesh with a new one.
Usually the mesh is sold in ready-made pieces directly to the size of the block and all you have to do is install it on the block and work. But, you need to remember that the size of the bars is also different, as shown in the picture. Therefore, when taking a mesh, immediately select a block to match its size. Mesh is more expensive than sandpaper.
Sandpaper
During operation, the sandpaper will become clogged with sanded off dust and the sandpaper will have to be changed more often than the mesh. You need to be aware that sandpaper, although cheaper than mesh, is also not a cheap material. It is sold in completely different versions: large rolls, small rollers, rectangular pieces.
By reading my blog, you are probably making repairs.
this page to your bookmarks .
This is where all the useful home improvement stores are located. If you decide to sand with sandpaper, then you need to figure out how you will cut it, taking into account the size of the block, so that there is as little waste as possible. You, of course, can refuse to cut the sandpaper and buy pre-cut pieces ready for bars, but this will be more expensive! There is a concept of sandpaper grit (paper with different grains).
In order not to blow your mind on this topic, buy paper with grain 60, 80 and 100 in small quantities at the store and try to work with it. There is no exact recommendation on what grain to take. But it’s better not to take less than 60 for sure, because it will be very rough sandpaper. More than 100 is also not very good, because it will become very clogged with dust during processing and will have to be changed very often.
There is one more recommendation. If you have sandpaper with a suitable grain from old stock, then of course use it. No need to run to the store for a sanding mesh.
IMPORTANT! The walls that you will sand usually go on to either wallpapering or painting. In case of painting, the wall should be absolutely smooth, I would even say polished. In this case, the craftsmen sand the wall 2 times. The first time, for example, with 60-grit sandpaper, to remove obvious large frozen pieces of putty, and the second time, take even finer sandpaper, for example, with 120-grit sandpaper and polish the wall with it. But in the case of wallpaper, this is clearly a redundant operation. For wallpaper, just go over the wall once.