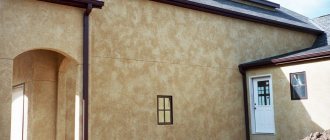
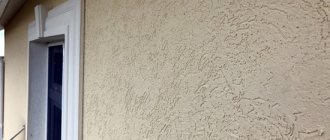
Sanitizing plaster - description and application
Sanitizing plaster is understood as a material for creating a two-layer, vapor-permeable coating that allows moisture to evaporate and salts to crystallize and remain inside. Plaster helps dry out surfaces, so it is considered an excellent way to waterproof and protect the base material of walls.
Sanitation mixtures are widely used for finishing cellars, repairing walls, plinths, foundations, and bathrooms. The solutions are especially recommended for use in basements and semi-basements with a high degree of masonry salinity. They seriously extend the life of walls and coatings, since they prevent the destructive effects of capillary moisture and salts.
The mixtures are no less suitable for the restoration of monuments and historical buildings. They are also widely used in cases where waterproofing has not been completed in full or does not cope with its tasks.
Advantages and disadvantages of sanitizing plaster
Sanitation plaster has two layers - it includes the sanitization layer itself, as well as a base layer with a porous structure. This “pie” reliably protects the room from moisture, which cannot seep inside. The advantages of using sanitizing plaster are:
- reducing the risk of efflorescence due to the uniform distribution of salts throughout the material;
- extending the service life of structures;
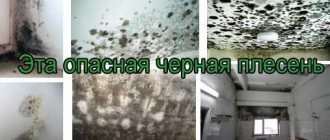
- preventing the appearance of bacteria and mold by reducing humidity and antiseptic effects;
- preventing unpleasant odors in the house;
- creating waterproofing, protecting structures from precipitation;
- improving vapor permeability, due to which air masses freely leave the room, which gives the effect of natural ventilation;
- no cracking, including when applied in a thick layer;
- the ability to be used for interior and exterior work, used as cladding without further finishing;
- significant sulfate resistance;
- environmentally friendly composition, harmless to the environment and the health of residents.
There are few disadvantages to sanitizing mixtures, but they are worth pointing out. The price of such compositions is usually higher than the cost of conventional plasters. They must be applied taking into account all the subtleties of the technology, so without experience you will have to invite specialists for this. It is not recommended to use this type of waterproofing to protect retaining walls or other structures from groundwater, as well as from water supplied under pressure. In addition, standard sanitizing plasters are not suitable for gypsum bases: for them you will need to select special lime mixtures, which have a lower degree of strength and moisture resistance.
How can external walls be treated to protect them from moisture?
Almost all building materials are porous and absorb moisture. And it surrounds buildings and structures from all sides: it props up from the soil, is brought in in the form of precipitation, and is deposited by dew on the outer surfaces of walls. The same capillary and osmotic forces that lift sap to the very tops of trees transport moisture throughout building structures. This triggers all types of destruction of structural materials at full capacity: biological (rotting), chemical (rusting, decay), physical (crack growth, peeling). In structures created using standard technology, moisture in the pores and cracks, when frozen, crumbles and destroys the building material. With moisture, almost all thermal materials lose their properties, gypsum softens, electrical conductivity increases and, accordingly, electrocorrosion occurs. Soluble salts move and fall out in the most unpleasant way. “Efflorescence” on the façade is a phenomenon of the same kind. Destruction processes of different natures overlap and reinforce each other. Thus, the rusting of reinforcement expands and breaks the surrounding concrete, and the deposition and growth of salt crystals in the pores of the plaster also quickly destroys it. Modern construction is based on the use of concrete and brick. These are very good strong, durable and inexpensive materials. If it were not for the destruction processes caused by moisture, then they could be called eternal. What can be done? Pores are a natural part of concrete and brick; cracks often occur during shrinkage and movement of structures; frost cannot be canceled either. One thing remains - to increase the water-repellent properties of building materials. Therefore, in recent years, one of the means of combating moisture saturation of building envelopes has been the treatment of their external surfaces with special compounds - water repellents. Water repellents are special compositions based on organosilicon compounds designed to impart hydrophobic (water-repellent) properties to building materials of mineral origin. When applied superficially, they penetrate into the thickness of the material to a depth of 1.5–10 mm and prevent its wetting as a result of exposure to precipitation. Unlike most paints and varnishes, water repellents do not form a surface film, and therefore do not close the pores and do not reduce the vapor permeability of enclosing structures, but, nevertheless, reliably protect them from getting wet for 8–10 years. Hydrophobization creates completely new possibilities. The mentioned destruction processes, as well as pollution, “efflorescence”, etc., stop without significant costs. Heating costs are reduced by up to 30%. Treated mortars, putties and plasters, and decorative coatings move from the category “for dry rooms” to the category “for wet rooms.” The consumption of paints and varnishes and impregnating materials is reduced. The destructive effects of acids are greatly reduced. The mobility and plasticity of concrete, mortar, and plaster mixture increases. Fire retardant and antiseptic compounds acquire weather resistance, and water-based paints, varnishes, and adhesives acquire water-repellent properties. With the introduction of modern water repellents into mortars and concretes applied on top of the roof sealant, the requirements for soft roofing are reduced, up to its complete absence. Thus, hydrophobization makes it possible to reduce labor intensity, simplify and speed up work, and eliminate a number of complex and expensive waterproofing technologies. Treated materials retain these qualities during surface treatment for at least 10 years, and according to indirect data, up to 30 years. With volumetric application (deep impregnation) - for the entire service life of the structure, building, structure. The traditional area of application of water repellents is the external surface treatment of brickwork - building facades. Therefore, you can treat the outer surface of the building walls with water repellents intended for sand-lime brick. But, first of all, to drain groundwater from the building, it is necessary to arrange drainage, since the main saturation of the walls with moisture occurs due to the soaking of the foundation. Therefore, in your case, external surface treatment of brickwork with water repellents is like a poultice for the dead.
Added: 01/20/2012 15:25
Discussion of the question on the forum:
How can external walls be treated to protect them from moisture?
Reasons for the appearance of salt stains on facades and basement walls
Efflorescence, or salt stains on walls, facades, and foundations, negatively affect the aesthetic component and also have a bad effect on the service life of structures. Especially many such defects are found on old houses. They appear due to the fact that, due to strong capillary tension, water begins to penetrate inside the walls or foundation. If the building is poorly constructed and has structural defects, this process is accelerated.
As a result of exposure to moisture and its filling of pores and capillaries, the existing plaster layer begins to be damaged. As it moves, moisture dissolves and captures salts from building materials and soil. After the water evaporates and dries, only salt deposits in the form of whitish stains remain on the surface. If there are too many of them, there is a high risk of complete rejection of the plaster layer and other finishing materials.
Subscription
Category: Repair › Walls › Basics and general recommendations Date: 2012-02-15 19:01:03 Almost everything in the house needs protection from moisture: the roof, openings, foundations and walls. Any wall - brick or wood - must be reliably protected from liquid. And when dampness appears on the walls, it is not always their waterproofing that is to blame - often a poor-quality foundation can fail at the most inopportune moment. And, as you know, there are capillaries in the walls through which water can rise higher and higher. Moisture can also enter the walls from the roof if the waterproofing is not done properly. How to protect walls from moisture
?
Waterproofing the wall should start from the bottom. Horizontal waterproofing must be done 10-20 cm above the blind area. You can immediately worry about vertical waterproofing. To do this, you can drill several holes in the wall at a slight angle and pour insoluble silicon elements into them. Now the capillaries in the wall will be filled with a solution through which soil moisture simply cannot penetrate. The part of the walls that is in direct contact with the roof must be reliably protected from atmospheric moisture. In addition, it is important to take care of the outer part of the wall. But first things first.
Creating a hydrophobization effect
From the very beginning, you need to create a boundary for moisture to enter through the outer part of the wall. By hydrophobizing walls, it is possible to prevent their wetting. When applied, water will not penetrate inside, but will simply roll onto the blind area, from where it will then be diverted away from the building. When deeply treated with the substance, the materials will receive protection from moisture for the entire period of their operation. Before applying a water repellent to the surface, it must first be cleaned.
Another way to protect walls from moisture
– use of plaster waterproofing. It is applied to the wall with a spatula, after which the surface can be finished with any material. Even ordinary cement applied in a millimeter layer can be used for these purposes. But with prolonged exposure to water, the cement becomes wet. But if you add liquid glass or ceresite to it, then the waterproofing will become more effective.
Polymer mixtures are an effective means of combating moisture
If you use ready-made mixtures, which include fillers, binders, mineral and polymer additives, then you can provide high-quality protection of walls from moisture. It is known that these substances have minimal interaction with liquid. After their application, the walls can be covered with porous plaster or facade paint.
Another means to protect walls from moisture
– These are moisture-removing plaster mixtures. They not only protect walls from moisture, they are even able to draw water out of them and evaporate it. Penetrating waterproofing has also been developed. A wall that is protected in this way is not afraid of even direct contact with liquid. After all, this type of protection reliably fills cracks, voids, pores and capillaries, so that there is simply no room left for water.
Other ways to protect walls from moisture
Another type of waterproofing is a mixture of quartz sand, Portland cement and chemical elements that simply seal the pores of the walls. Before applying the coating, the surface should be thoroughly cleaned of dust and oil stains. The brickwork should be embroidered half a centimeter deep. Now it should be sealed with the waterproofing mixture contained in the cement mortar. This is very reliable protection - water is more likely to enter the house through a window than through the walls.
As you can see, people have achieved some success in protecting walls from moisture. However, effective control methods are very expensive, and affordable ones do not provide comprehensive protection. An ordinary dry mixture is often used as a coating waterproofing material. It is created on the basis of special polymers and cement. With its help, you can obtain an effective frost-resistant and elastic coating that has waterproof properties and good adhesion. To create such protection, you first need to clean the wall from dust and erosion using a wire brush. In cases where the partition is damp, it should be covered with quick-drying cement. Each component of paint or plaster must be mixed. Try not to prepare a large amount of the mixture, because you may not use it right away, and then it will become unusable.
Without wasting time, you need to apply several layers of the substance to the wall. If it is a moisture-repellent paint, then the strokes of each subsequent layer should be applied perpendicular to the previous one. You should work in a respiratory mask. Although protecting walls from moisture requires financial and time costs, with its help you can reliably protect your home from sad consequences. It is known that mold and fungi grow in damp walls, which often harm our health. Therefore, if you are concerned about the well-being of yourself and your family, then take the time to worry about high-quality protection of your walls from moisture.
Sanitizing plaster for the bathroom
When in contact with water and when exposed to air with high humidity, sanitizing plaster fully demonstrates its strength and protective properties. These features make it possible to use it when finishing bathrooms, where waterproofing is urgently required.
Most often, bathrooms are tiled with ceramic tiles. Since sanitizing plasters have a high adhesion force to the base and are slightly susceptible to destruction, they will easily withstand the weight of the finish. Also, sanitizing compounds will prevent the growth of fungus and mold. In addition to tiles, they can be applied under paint, which is also used to cover bathroom walls without using tiles.
It is only important to choose a paint with good vapor permeability in order to maintain the drying properties of the plaster. If you decide to use a moisture-resistant decorative mixture, it should also not disturb the microclimate in the room.
Selection of material for hydrophobization
In order to decide on the mixture that needs to be used for application for the purpose of hydrophobization, you should know what basic protective solutions exist. There are silicone and silicone solutions.
Surface protection mixtures with silicone base:
- aqueous emulsions;
- water-soluble mixtures;
- organosoluble emulsions.
The mixtures may contain various flame retardants, antiseptics and other substances that prevent the growth of fungus and the spread of mold.
Material selection
Silicone water repellents may include:
- potassium alkyl siliconates;
- alkoxylanes;
- hydrocontaining siloxanes;
- hydroxyl-containing siloxanes (rubbers).
Composed of organosilicon compounds, the solutions have a penetrating ability of up to 15 cm and help protect the facade for a long period. After applying and drying the solution with silicon, a layer resembling a film is formed on the surface: it qualitatively prevents moisture from entering the wall.
Mixtures intended for hydrophobization may contain colored components to give a different shade to the brick or to form a glossy coating. There are also colorless mixtures.
IMPORTANT!
When choosing a water repellent, you should be guided by its purpose according to the instructions.
So, for example, for brick a mixture “for brick” is used , for other materials - accordingly.
Tools for work
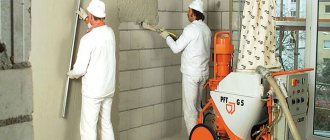
To apply plaster, you can use a manual or mechanized method. For the manual method you should prepare:
- construction mixer for diluting the mixture;
- container for kneading mass;
- spatulas - wide, medium, narrow, angled;
- graters and graters.
To clean the walls from the old coating and increase adhesion, you will need metal brushes, and for priming, brushes and rollers. If you decide to carry out mechanized/automated application, you need to purchase a spray gun, compressor or other unit for plastering.
Material application technology
Sanitation plaster is applied in two layers, and the technology is somewhat different from that when treating walls with conventional mortar. The first layer of sanitizing plaster has fairly large pores, which facilitates the evaporation of water filtered by the previous layer.
Work order
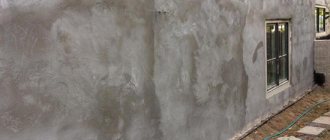
Initially, a leveling layer of plaster is applied to the prepared base; its thickness is usually 20-40 mm, although it may be less. This layer is needed to fill defects, hide masonry seams, and form an even plane. After drying, it will begin to draw moisture from the walls, accumulate salts and prevent them from leaking out. The sanitizing material, which is applied as a second layer, can serve as a finishing coating before painting or as a base for decorative plaster.
Preparing the mixture
Most mixtures are prepared on the basis of cement, so they are sold only in dry form and require dilution before use. You can’t dilute too much of the mixture at one time - you won’t be able to use it completely before it hardens.
The mixture must be applied within 20 minutes, otherwise its porosity will decrease after drying. The powder is poured into water at room temperature in the proportions specified by the manufacturer and thoroughly mixed with a construction mixer for 5 minutes. There is no need to pour liquid into the mixture - it will be almost impossible to stir the lumps.
Preparing walls for work
Before starting plastering, carefully prepare the surface. The order of preparatory measures depends on the condition of the walls or other surfaces. It is important to assess the degree of salinity of the base, as well as the reliability of the old coating. If the plaster falls off in pieces or is saturated with salts, you will have to clean the material right down to the load-bearing wall. Individual efflorescence is removed with a wire brush.
Before plastering, it is also important to clean the base of substances that will reduce the adhesion force to the material. These include oils and fats, bitumen, paints, varnishes, dirt, dust. Fungus and mold are also removed, and these areas are treated with an antifungal compound. To clean walls and other structures, you can use sandblasting or washing with a jet of water under pressure, if such methods are available.
Afterwards, you need to widen the masonry joints and deepen them by at least 2 cm. If the walls are too smooth, notches are made on them. To bind dust and strengthen the base, it is covered with deep penetration primer, which should be well suited for the specific substrate material and mineral plasters. Reinforcing fiberglass mesh is applied at the joints of the plates.
Application sequence
After drying the structure, you can begin the main stage of work. The first, base layer is applied with a semi-spray, for which a regular cement-sand mortar is used (in a 3:1 ratio with water). It is mandatory to add adhesive additives to the solution. After spreading, the thickness of the layer should be at least 0.5 cm (preferably 1-2 cm). Masonry seams, chips, and large defects are filled in manually. Afterwards, level the mass with a grater, leveling it, but not rubbing it until smooth. If necessary, allow the plaster to dry, then apply another leveling layer.
Typically, it takes a day to dry 1 mm of the base layer, provided that the air humidity does not exceed 50%. To enhance adhesion to the sanitizing plaster, scratch the base plaster with a wire brush 15 minutes after leveling. You can also roll the layer with a special roller, which is usually practiced if the surface will be tiled in the future.
After the base layer has dried, a sanitizing layer is applied, the thickness of which is less than 2 cm. It is applied in several stages, giving 24 hours to dry each 1 mm layer. The last layer is used to finally level the walls, eliminating all roughness and defects.
Finishing
If necessary, the sanitizing plaster can be used as a finishing plaster. In such a situation, it is permissible to prime it and coat it with paint, which has high vapor permeability. You can also stick different types of cladding onto the sanitizing layer or apply decorative plaster.
Preparing walls and applying protection
Hydrophobization work is carried out in accordance with the rules for performing these works. The procedure begins with an inspection of the external walls of the facade.
Next, perform the necessary steps step by step:
- frees up space near the walls for work, as well as for the possible installation of stepladders or lifting mechanisms;
- remove dirt from the wall; if necessary, scrape off old paint and sweep away dust.
Cleaning a wall manually
Walls are cleaned in several ways, depending on the degree of damage and contamination of the walls:
- chemically. Special chemicals are used, which are rubbed into the surface with hard brushes, and then after 40 minutes they are washed off with water along with salts and contaminants;
- under pressure with a water jet. The most common method, in which, depending on the condition of the walls, the water temperature, the pressure of the directed jet, the cleaning agents used, and the treatment time are selected);
- sandblasting. A mixture of abrasive substances with water or air is directed to the surface, thereby removing contaminants.
After the cleaning of the facade walls is completed and the wall is dried after the cleaning procedure, they continue to carry out a set of works to carry out hydrophobization:
- when unevenness occurs, the facade is leveled, the cracks are sealed with building material (putty);
- prime the walls and allow the primer to dry completely;
- using a sprayer, sponge or brush, apply the mixture to protect the facade in one layer, then after complete drying (up to 1.5 hours), apply a second layer.
CAREFULLY!
The hydrophobic solution should be applied at a temperature of at least 5°C.
Recommendations for applying the solution should be indicated in the instructions supplied with the material . In addition, it is advisable to carry out work to protect the facade during the warm period, when the likelihood of rain is reduced; salt stains are more effectively removed in dry and warm weather.
Spray application
Application with a brush
Carrying out hydrophobization significantly increases the service life of the facade, and also preserves the aesthetic appearance of the building for a long time. Based on practice, carrying out hydrophobization at the construction stage significantly reduces the possibility of moisture penetrating inside, and eliminates the need for work to protect the facade in the future for quite a long time.
Moreover, this procedure should be carried out both on single-story and high-rise buildings: all walls are exposed to moisture . To carry out work, you should be guided by the rules for their implementation, and also use only high-quality materials, then the effect of the work performed can last more than 15 years.
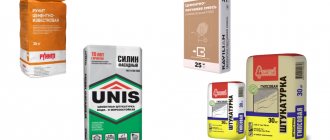
Plaster manufacturers
The stores offer a wide range of domestic and foreign sanitizing mixtures. Here are the most popular formulations:
- Epasit LPF. High-quality dehumidifying mixture for damp walls with or without efflorescence. It is used for processing brickwork, plinths, basements, and other internal and external structures.
- Deumisan. Plaster with excellent moisture-removing properties. Has high porosity. Used at moderate capillary humidity.
- "Ceresit SR-62". It can be used even in very damp, salty rooms and for outdoor work. Suitable for large-scale and local repairs and restoration of monuments.
- "Plitonite T-Saner." It is used for draining and leveling walls made of concrete, aerated concrete, brick, and for sealing uneven surfaces and slab joints. Suitable for dry and damp rooms and for outdoor use. Keeps salts inside, prevents the appearance of fungus.
- "Runit Sanitizing." Designed for rough leveling and for drying walls. Reduces capillary conductivity and improves vapor permeability. It has maximum workability due to the presence of special functional additives.
Common mistakes and usage tips
Experts advise not to allow the applied mixture to dry too quickly and not to use forced methods for this purpose. As a result of violating this rule, the plaster often comes off in layers or cracks in the near future. After plastering the street walls, it is best to cover them with film or shade them, or spray them with water several times during the first hours of drying. This will create a coating with maximum durability that will last for many years.