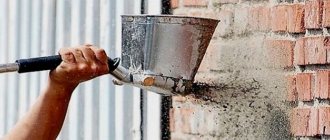
Features of plaster
The purpose of plastering work is both the aesthetic finishing of surfaces and their protection from the harmful effects of weather factors.
Plastering walls in winter
Because of this, different types of plaster are used in construction and renovation:
- Cement-sand. The simplest and cheapest option.
- Lime - similar in composition to the previous option, but with the addition of lime instead of some cement. Plastic, light, but fragile.
- Gypsum - used only for interior decoration, because it does not withstand weather exposure: it is too hygroscopic, gets wet and falls off.
- Acrylic - on a polymer base made of acrylic resins. Moisture-resistant, stable, adheres to any substrate.
- Silicate – based on potassium glass. Has increased vapor permeability.
- Silicone – based on silicon (silicone) resins. The highest quality – but also the highest price.
Due to the difference in goals when plastering, it is necessary to take into account not only the air temperature, but also:
- humidity indoors and outdoors;
- drying conditions according to coating technology;
- composition that the solution has;
- method of application (machine, manual).
At the same time, we must remember that it is pointless to finish slopes and other places that are primarily exposed to cold in winter. Sufficiently reliable plaster cannot be placed there at this time. They should either be processed first or left until warmer weather arrives.
Preparing the wall
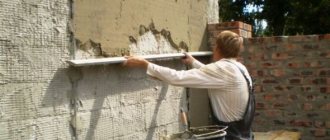
To plaster walls in the cold season, be sure to properly prepare their surface:
- The base is thoroughly cleaned of ice (when performing outdoor work), masonry residues and traces of salts, degreased and thoroughly dried.
- For masonry, in which the seams are filled with mortar, notches are made on the walls.
- The prepared surface is primed to increase adhesion.
At sub-zero temperatures, it is not allowed to use water for cleaning. In the cold, the liquid will freeze and turn into ice.
Installation of sheet gypsum plasters can be carried out on:
- metal lathing;
- wooden frame;
- glue pad.
At what temperature can you plaster walls?
Now let’s figure out at what temperature you can plaster the walls inside and outside the building.
On the street
When deciding at what temperature you can plaster the facade of a house, you need to be guided by official building codes.
They stipulate the following:
- Air heating should not decrease less than 5 degrees (preferably not lower than +8). The atmosphere cannot cool below this value around the clock as long as the coating is drying (for classic cement plaster - at least 2 weeks).
- If the air is already cooled below this value, special chemical compounds should be used to ensure freezing.
- The humidity of the surface of the object should not exceed 8%. That is why the formed ice can only be cleaned off and melted with a hair dryer or heat gun, and not defrosted with hot water: it will moisten the wall, making the coating unstable. As a result, there is a risk that with the first thaw the coating will come off in a single layer.
- When using machine application, bins and solution lines must be insulated. They should not be overcooled, and the mixture should not be cooled below 8 degrees.
Building codes must be followed when plastering the facade of a house.
The following are used as additives:
- Chlorine water. This is a solution of bleach (bleach), left for about an hour and a half. Based on this substance, a composition is prepared for cement plasters, usually used as a base. Due to the release of chlorine gas and chemical aggressiveness, all work with plaster based on chlorine water can only be carried out in protective clothing and a respirator.
- Potassium carbonate solution (aka potash, aka potassium carbonate). This composition is used to dilute cement, cement-clay and cement-lime plasters. The amount of additive in the solution is determined based on the average daily air temperature: the colder it is, the more carbonate, up to 2% of the total amount of substance. Working with potash solution is complicated by the fact that the composition based on it can only be used for an hour. As with the use of bleach, working with carbonate plaster is only allowed in special clothing: the risk of poisoning is too great.
- Ammonia water (ammonia hydrate, when diluted weakly is called ammonia). This component is prepared in a factory way and is usually obtained as a by-product during the coking of coal. It is used in chemical production as a nitrogen fertilizer for plants (with appropriate dilution) - and in construction. When the plaster is being prepared, the ammonia hydrate is carefully stirred to the desired composition in cold water (not warmer than +5 degrees, otherwise the release of hydrogen nitride may begin too early). Cement and lime-cement mixtures are diluted using ammonia hydrate. The use of this chemical with gypsum is strictly prohibited. The advantage of this additive: mixtures can harden even in frosts down to -30 degrees. The main disadvantage is ammonia vapor, which has an extremely bad effect on the skin and mucous membranes. Therefore, compositions with ammonia hydrate should be used only for façade work or in well-ventilated interior areas.
Concrete additives
In addition to the additives listed, it is possible to use calcium and sodium chloride, however, when defrosting plasters with them, salting out may occur. In addition, neither they nor potash can be used at air humidity above 60%.
Also in recent years, synthetic winter additives have appeared on the construction products market. They are durable, quickly gain strength, and allow you to work in frosts down to -50 degrees. However, their key drawback is their high heaviness, about one and a half times higher than standard plaster. In addition, they do not indulge in the richness of design.
Particular attention is needed when preparing the wall. It should be thoroughly cleared of snow and ice (but not with boiling water!), notched (to increase adhesion), primed (unless a compound that works without a primer is used) and only then begin plastering.
Useful tips
When decorating exterior and interior walls, you must take into account the following recommendations from professionals:
- Before plastering, it is necessary to find out the humidity of the walls; according to SNiPs, it should not be more than 8%.
- It is also necessary to clear the walls of snow and ice, make notches on them to improve adhesion, cover them with a primer and only then plaster them.
- Preliminary preparation must necessarily include heating the walls to a thickness of at least 50%.
- At a temperature of -25 °C, the applied solution must be heated to +5 -10 °C.
- Window and door frames become very cold in winter, so the applied solution in these places must be well heated.
- When performing outdoor work in winter at temperatures less than -5 ° C, frost-resistant additives must be added to the solution. You can also use a slaked lime mixture.
- While the plaster is drying (10-15 days), the room must be regularly ventilated so that it does not become damp.
- You cannot lay plaster on frozen walls; in the spring it will fall off, because after warming up, condensation will form underneath it.
Plaster solutions dry up to 2 weeks and require frequent ventilation of the room
Thanks to these tips, you will be able to decorate the facade and interior walls in winter with plaster, which will not crack and fall off after the arrival of heat.
Plastering walls in winter is a complex and labor-intensive procedure that involves the use of frost-resistant additives, heating devices and the arrangement of façade covers. But you can still do it by following the recommendations of experts. This will allow you to put the building into operation on time.
Have you ever plastered walls at low or very high temperatures? What methods were used to make the plaster layer durable?
Specifics of work in summer
For comparison, we note that it is necessary to keep in mind when finishing work in conditions not of hypothermia - but rather of overheating.
In the hot season, the plaster lays down, dries and holds well, but the following points must be taken into account:
- The façade should not be finished in direct sunlight if the temperature is above +30 degrees. Uneven and too rapid drying of the outer surface can lead to cracks and collapse of the layer.
- When plastering interior spaces, ventilation must be provided to reduce humidity.
Painting work in winter
Internal painting work is carried out in insulated and heated rooms; the air temperature in the premises, as well as the temperature of surfaces, should not be lower than +8°. External surfaces may be painted with lime compounds if the outside air temperature does not drop below +5° during the day. External surfaces can be painted with perchlorovinyl paints at outside temperatures down to -20°.
Permissible moisture content of plaster for painting work
| Index | Type of paint or finish | |||||
| oil | adhesive | limestone | lime-cement | emulsion | wallpaper | |
| Permissible moisture content of plaster in % | 4-6 | 6-8 | 10 | 6 | 4 | 4-6 |
Minimum temperature of paint compositions
| Index | Types of compositions | ||
| soap making ground | aquatic | oil and varnish | |
| Minimum temperature of paint compositions at the time of application | +5 | +8 | +15 |
Painted surfaces should not be exposed to sudden temperature fluctuations or washed with warm air from ventilation pipes, open vents, etc.
Specifics of working at negative temperatures
Winter facade plaster is always prepared only with chemicals that ensure the mixture sets in the cold. It is unrealistic to warm up the façade completely to ensure the hardening of conventional plaster mixtures.
Plastering in an unheated room in winter may require both the use of special chemicals and heating with hair dryers or heat guns. The best option is to warm up the wall plane to +18-20 degrees when applying the mixture, and then maintain the air heat at +5-8 degrees until the finish sets and gains full strength.
When applying by machine, you should organize an insulated and heated special unit with the solution or a uniform supply of the warm mixture as it is prepared.
Heating methods to ensure drying of plaster
You can warm up rooms with plaster walls using wood stoves (for example, potbelly stoves), cannons, oil and electric heaters. With this equipment, it is necessary to maintain a constant temperature of 20 to 30 °C.
After the plaster has completely dried, the heating equipment can be removed if the room temperature is maintained at least +8 °C. This will protect the walls from moisture and mold.
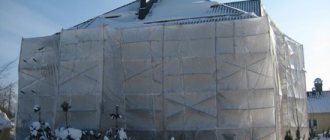
When performing exterior finishing, the walls must also be warm enough so that the solution can be applied to them. Covering allows you to maintain the desired temperature. A canopy or hut is installed along the facade, which is sheathed with tarpaulin, reinforced film or other dense materials.
To warm up the room before plastering work, it is allowed to use heat guns and air heaters.
In the process of arranging these structures, it is necessary to prevent the penetration of cold air into them and the outflow of warm air out. In addition, such a shelter must withstand large gusts of wind. Inside the canopy or hut you need to place heating equipment that is used to heat cold rooms (stoves, guns). After heating the walls to the required temperature, finishing work is carried out.
Heating devices and shelters are left until the plaster dries and gains 100% strength.
You cannot warm up the walls with hot water; the heat must be dry.
What are the dangers of non-compliance with the temperature regime?
There are no exact indicators at what temperature walls should not be plastered. You just need to keep in mind that finishing with plaster in cold weather is a much more difficult and expensive procedure than in summer. However, nothing is impossible in it. The main thing is to follow the technology and use the right types of plaster and additives for them.
If the finishing technological process for heating or freezing is disrupted, this threatens the following:
“Nature has no bad weather,” I would like to say the same about various repair work. In modern times, there are a lot of technologies and tools that will help make repairs at any time of the year, and plastering in winter is no exception.
Is it possible to plaster in winter?
Plastering walls allows you to provide adhesion to finishing materials and improve the quality of surfaces, level them and give the room a finished look. This is labor-intensive work, but it is very important for those who strive to improve their quality of life.
Construction/repair operations often take place in the winter. Thanks to the correct organization of future work, plastering can always be done. The only thing that needs to be taken into account is some conditions for preparing the compositions and drying.
In this case, the permissible standards for winter work should be taken into account. There are few of them, but each of them is required to be taken into account. Permissible humidity and air temperature must be taken into account. The humidity level should not exceed 8 percent, and the composition should not be colder than +8 degrees
. Thawing should occur to a depth of more than half the wall. You should also level all slopes in the room with plaster. It is prohibited to use hot water to remove ice from walls or to accelerate the heating of frozen walls.
Features of working at sub-zero temperatures
Work outside should be carried out at temperatures above -5 degrees
. But it is possible to work at significantly low temperatures if you use a solution with chemicals that are added to the composition during preparation.
The usual solution is not applicable in cold weather, since it does not harden, but freezes. This will cause the plaster to fall off as the weather gets warmer. Plaster compositions with modifiers harden in the cold, so they do not lose their performance characteristics even when applied in winter.
The object where it is planned to apply plaster must be prepared without fail. Slopes and frames of doors and windows are plastered in advance. A draft negatively affects the quality of the plaster in the future, so it is necessary to glaze the windows and close the entrances tightly. Attics and spaces between floors must be insulated.
The usual plaster composition is used indoors in winter if the average temperature is 8 degrees. The temperature is measured next to the outer wall, half a meter from the floor level. The ceiling should not be more than 30 degrees, as the solution will dry out too quickly. This will lead to cracks and loss of strength.
The most suitable option is to have a DSP. In this situation, the contractor does not have to worry about work in the winter season, since all possible restrictions are excluded. This is comfortable and allows you to quickly, efficiently and effectively perform plastering.
Drying plaster in winter
Depending on the type of plaster, the duration of its drying, as well as the drying method, also depends.
- Lime plaster requires a minimum of carbon dioxide. Accelerated drying is prohibited in this situation, as the composition will lose strength and crack.
- The gypsum-based solution dries in approximately 7 days. For gypsum plaster, it is necessary to ventilate the room, but the main thing is not to create drafts. That is, in winter a small crack in the window is enough.
- Compositions with cement and lime-cement dry in about 14 days, and no additional ventilation is required. This is due to the fact that the solution requires moist air.
The optimal heating for any type of plaster is central. In its absence, you need to think about a temporary one. This way you can ensure comfortable working conditions and drying of the surface.
A large volume of work requires the use of air heaters. These devices allow you not to think about the question of whether it is possible to perform plastering inside the building in winter. Such devices heat the air to a comfortable temperature even in large rooms. Their use allows you to dry the plaster in 7 days at temperatures above 30 degrees.
At the moment of drying, the wall dries to a humidity of 8%. It is necessary to set the temperature to 8 degrees Celsius so that the walls do not cool down and become stained. Plaster with added lime takes about 10-15 days to dry, and this is provided that the room is ventilated 2-3 times per hour!
Winter work in an unheated room
The following conditions are suitable for plastering walls in rooms without heating:
- The recommended temperature for plastering work is not less than +8°C. Lower values lead to slower cement hydration and cracking of the plaster.
- Humidity inside – up to 70%. The drying speed of water depends on this parameter.
- The temperature of the composition is within 5-8°C. It is obtained by preparing the solution in a room with heating devices and adding hot water to the mixture.
The room in which work is carried out must be completely insulated. Therefore, walls in an unheated room should be plastered only after glazing window openings, installing doors and insulating interfloor ceilings. It is also worth sealing all cracks and plastering the slopes on the windows, blocking the path of cold air.
Compositions for plaster in winter
Premises without heating and external work at low temperatures are carried out using special plastering compounds.
- Chlorine water is added to the mixture, which allows work to be done at -25˚C. Moreover, you do not need to be interested in the technique of plastering brick walls with this composition. The technology is the same as in the case of conventional solutions. There is only one feature - you should not apply large layers.
- Potash does not form efflorescence and does not expose metals to corrosive destruction. So it is an ideal method for plastering reinforced structures. It provides maximum protection from the environment and other factors. Based on potash, you can make mortars containing cement, cement with clay and cement with lime. You should buy low grade cement. The amount of potash administration is calculated depending on the air temperature. At -5˚ 1% is enough. At lower temperatures, it is recommended to introduce more than 1.5%. In this case, you need to inquire about the air temperature in order to make a suitable plaster solution.
- Ammonia water is a homemade inoculant. It should be added to the finished mixture. In this case, it is necessary to introduce ammonia and ordinary water at a temperature no higher than 5 degrees Celsius, since at a higher temperature ammonia evaporates. If the concentration of ammonia in water is 25%, then 3.15 liters of ordinary water are added to 1 liter of plaster mortar to achieve a working additive of 6%. If ammonia is 15%, then 1.5 liters of cool water will be required for 1 liter. The modifier is stored in sealed containers. Glass containers with stoppers are suitable for this. This will protect the product from loss of ammonia as it evaporates. When preparing to plaster walls for laying tiles or other finishing materials, you need to understand that ammonia water is suitable for various types of mortars containing cement, except cement-clay ones. With their help, you can prepare surfaces for cladding in the winter season. Lime-gypsum compositions should not be used.
- Ammonia solutions are suitable for working at -30˚, but unless absolutely necessary, you should not try to work in such conditions. These are too extreme conditions for performing the work, since the contractor will not be comfortable plastering and working with the mortar.
Materials for winter plastering
After measuring the temperature outdoors and indoors, special frost-resistant additives are added to the plaster. These are chemical hardeners that allow the solution to set and gain strength in cold weather.
To enhance frost resistance, special additives are added to the plaster.
Chlorine water
For exterior finishing, you can mix mixtures with chlorinated water, which can be laid at temperatures down to -25 ° C.
Chlorine water is prepared as follows:
| 1. Plain water is heated to +35 °C. | |
| 2. Bleach is added to it in a ratio of 15 kg per 100 liters. | |
| 3. The composition is stirred until all the lime has dissolved. | |
| 4. The milk prepared in this way is left to stand for 1-1.5 hours. | |
| 5. Pour the settled solution into a clean container and mix the mixture with it. |
Cement and complex mortars are mixed with chloride water, which can be used to cover brick, concrete and wooden walls. Other types of mixtures cannot be made using this water.
Finishing with chloride solutions is carried out mechanically or manually. Each subsequent layer of plaster is applied only after the previous one has hardened. Rub the finishing layer after the cover has set. Chlorine plasters harden completely after 8 days. This additive allows you to increase not only frost resistance, but also the strength of the coating.
When working with chlorine solutions, you need to wear a respirator and special clothing. After drying, they become harmless, since the chlorine evaporates from them.
When working with chlorinated solutions, respirators and other protective equipment should be used.
Chloride water cannot be heated above +35 °C, because the chlorine will evaporate. It is prohibited to use unsettled chlorine water, since the applied layer will crack as a result of sediment entering the solution.
Potash (potassium carbonate)
Potassium carbonate (K2CO3) is also ideal for preparing frost-resistant plaster, which can be used to decorate reinforced structures. This substance makes it possible to increase the solution’s resistance to precipitation, temperature changes and other unfavorable factors.
It can be used to mix cement, clay and lime mixtures based on low-grade cement. If the street is at least +5 °C, then 1% of dry potash from the total mass is added to the mixture. At temperatures below - 1.5-2% of the substance.
Solutions with potash are suitable for plastering mesh and reinforcement elements
The resulting solution must be worked out within an hour. You need to work with them in a respirator and overalls.
Ammonia water
When using ammonia water, it is possible to avoid the formation of efflorescence on the plaster.
It is sold ready-made, because you cannot make such a solution yourself at home. Before adding to the mixture, it is diluted to the desired concentration. Dilution proportions depend on ammonia concentration:
- A 25% concentration allows you to obtain a 6% additive by mixing the solution with water in a ratio of 1 to 3;
- at a concentration of 15% you need to use a proportion of 1 to 1.5.
Only cement-lime or simple cement compositions can be diluted with ammonia water
Depending on the temperature outside, the solution needs to be heated. In frosts down to –15 °C it needs to be heated to 2-3 °C. At a temperature of –25 °C the mixture must be heated to +5 °C. It is impossible to apply the solution to walls at temperatures below –25-30 °C.
Ammonia water is intended for mixing cement-lime and simple cement mortars, so making other mortars with its help is prohibited.
Modern materials
Today on sale you can find more modern frost-resistant additives based on synthetic components, thanks to the use of which you can plaster at temperatures down to –50 ° C. They allow you to increase the strength and service life of the plaster, speed up the drying of the solution and make it more elastic. They do not form efflorescence on the plaster, but it weighs more (about 1.5 times heavier than usual).
They sell dry additives and plaster mixtures with frost-resistant additives. Popular brands are:
- BERGAUF;
- VETONIT;
- HENKEL;
- "Remix".
Popular frost-resistant plaster mixtures
All these substances must be added to the solution strictly according to the instructions, otherwise it will not be possible to achieve the desired result.
First, let's look at some general information.
Before starting work, you need to determine the degree of humidity of the surface on which work will be carried out. According to SNiP (building codes and regulations), surface humidity should not exceed 8%. Window and door slopes are subject to cooling, so the plaster is heated and insulated in winter, and it is better, of course, to plaster them before the cold weather.
Plastering walls in winter, if we are talking about external plaster, should be done at a temperature not lower than -5°C. If the temperature is still lower, then the plaster is mixed with additives that will help you work calmly in the cold.
Little secrets: a solution with fine slaked lime will also help; heating the walls with hot water is not allowed because, as stated above, the walls should not be wet, and it will take a very long time for them to dry completely.
Winter plaster with anti-frost additives
Frost-resistant plaster can be made independently or purchased from building materials stores. Most often, chlorine water, potash and ammonia water are used for its production, less often - potassium chloride and sodium chloride. As a result of the addition of the last two substances, efflorescence appears on the plaster.
If you doubt whether it is possible to plaster walls with such solutions in cold weather, do not hesitate. They are allowed to decorate walls at temperatures down to –25 °C.
The use of plaster modified with anti-frost additives allows work to be performed at temperatures of -25⁰С
Plastering walls in winter requires preparation
All cracks must be caulked, regardless of whether plastering will take place outside or inside the building. Doors and attics must be tightly closed and insulated. Glaze the window sashes. I hope you no longer have the question: is it possible to plaster in winter? The answer is so clear - “It is possible”, and below you will find out how this is done.
The plaster will dry faster at a temperature of +4-10 °C. If the temperature near the ceiling is more than +30°C, it will begin to dry out and become cracked. The plaster will begin to fall off in the spring if it was applied to frozen walls in winter. When thawing, moisture will accumulate, and this is an enemy for plaster. So that this problem does not take you by surprise, before applying the plaster, remove the plaster and warm the room to the desired temperature.
Heating and drying
Remember the saying “If you hurry, you make people laugh”? So, quick drying is unlikely to lead to the desired result; the plaster simply loses its strength and cracks easily. Plaster with added lime takes about 10-15 days to dry, and this is provided that the room is ventilated 2-3 times per hour!
In general, when drying, pay attention to the binder. It’s good if it is possible to warm up the room with central or stove heating, well, temporary will also do. If the room is large, and accordingly the volume of work, then you can resort to water heaters. With their help, the plaster will dry in 7 days.
Calorifier stops are also a way out of the situation. After drying, it is important to monitor the temperature in the room; it should be + 8°C. An important detail: if you have resorted to using a heater and there are workers in the room, then carbon monoxide must be removed using a special tube.