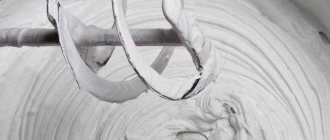
On the plastered surfaces of buildings and structures, over time, for various reasons (moisture, mechanical damage, shrinkage of buildings), cracks, swelling or detachment of plaster fragments may appear. To restore the façade and walls of the building to an attractive appearance, work is being carried out to repair or completely replace the plaster. One of the ways to repair the coating is to grind the façade plaster.
Unlike a complete replacement, this method is less labor-intensive and cheaper. When grinding the plaster, the worn-out coating layer is renewed, rather than completely replaced, which allows the building to return to a beautiful, fashionable appearance in a short time.
What is plaster grinding?
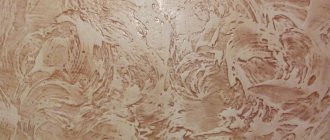
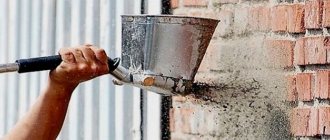
Work on grinding plaster consists of completely cleaning the walls and facade from dirt, dust and old paint. After cleaning, large cracks are filled and repaired, and fragments of plaster with swelling are removed. Next, priming and new plastering are carried out to eliminate minor defects and traces of repair.
The last stages are final priming, painting and application of a water-repellent layer. This method can be used for both grinding the plaster of smooth facades and facades with decorative finishing.
Process Features
- For grouting work, you should use a wooden trowel.
- All prepared surfaces for grinding should be generously moistened with water.
- The main task is to distribute the solution over the surface as evenly as possible.
- The final layer has low strength; drying should occur naturally.
- It is necessary to avoid mechanical impacts on finished walls; drafts and temperature changes in the room should be prevented.
- The distance between the wall and the baseboards must also be carefully sealed. All stains from baseboards can be easily removed with water.
When the applied solution has completely dried, you can begin further finishing.
What tools are needed to grind plaster on a facade?
To carry out facade repair work, the following are used: units for washing facades; equipment for sandblasting, for mixing and supplying the finished plaster mixture; compressors and paint sprayers for finishing walls. The list of equipment and devices directly depends on the total volume of work performed. So, for small volumes, repairs and grinding of plaster are carried out from hanging cradles using only hand tools, and with an increase in the area being processed, the installation of scaffolding will be required.
The list of hand tools for preparatory work includes: a hammer drill or chisel and a hammer, as well as a spatula for removing peeling and cracking, a metal brush and a paint brush for cleaning from dust and other contaminants.
To prepare the solution you will need suitable containers, shovels and buckets, a mixer for mixing or a concrete mixer.
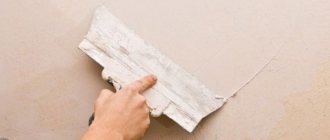
When performing work on applying plaster, you need: a ladle or trowel and a trowel for spreading the mortar, a metal rule for leveling the applied layer, a trowel for applying the mortar, leveling and preliminary troweling of the plaster surface, cutting - a small plaster spatula for sealing cracks, eliminating small defects, trimming mortar, trowel for final grouting of the surface of the plaster layer after it has dried.
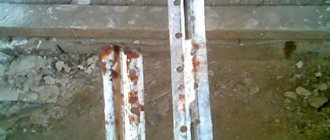
Defect detection
If large cracks on the walls and swellings of the plaster are clearly visible, then the places where the plaster has peeled off but has not fallen off must be found. To do this, the entire wall, regardless of its appearance, is tapped every 30 cm (for example, with the handle of a trowel). At the same time, a dull sound at the tapping site indicates a detachment that must be completely removed. If the sound is clear, the adhesion of the plaster to the wall in this place is strong.
Recovery
You can determine the scope of work and understand the issue of grinding plaster, what kind of repair procedure this is, in accordance with TERR 61-26-1. It includes only 2 positions: scraping off the old paint and the actual grinding.
To perform the operations, you will need a tool for cutting cracks (painting spatula, straight knife, scraper) and working with mortar (wooden float, wetting brush).
Solution
A thick solution is required for grinding.
The consistency of the solution used to grind the plaster must be thick. This is necessary not only for dense filling of crack cavities, but also for the possibility of obtaining a sufficiently thin layer over the surface of the preserved old coating.
Repair of areas that have been cleaned to the ground is carried out with the same solution that was laid when creating the coating; on the rubbed part of the wall, a different proportion of 1/1 is used (for cracks - with the addition of gypsum):
Narrow cracks can be sealed with a thinner solution. Acrylic or chalk are also used as additives in this case. To learn how to make the solution, watch this video:
If gypsum is included in the solution, then after drying, be sure to carefully prime the laid layer.
Performance
Do not forget to moisten the solution during the entire grinding process.
Grinding will be done efficiently if you follow the technology features in the following sequence:
- Uniform distribution of the solution over the entire area begins after all the areas of old plaster sealed as a result of defective repairs have dried.
- Before applying the lime-sand composition, the wall is moistened with water or primed to ensure strong adhesion of the renewed layer to the base. It is better to wet no more than 2 m² of wall area at the same time.
- When treating walls of a large area, the solution is mixed in portions, using only freshly prepared mixture.
- Before leveling, the solution is applied to the wall with a trowel in a checkerboard pattern with an interval of 15 - 20 cm.
- During the grinding process, the solution is periodically moistened.
- The quality of the resulting surface increases when using felt or felt pads on a wooden grater.
- Since the grout layer is very thin, you should try to ensure maximum uniform drying, eliminate drafts, direct sunlight, and uneven temperature of the wall materials.
- In places of contact with laid communications, the dried solution may subsequently crack, so it is better not to coat foreign materials closely, but to fill the gap left with acrylic sealants. No gaps should be left between the wall and the baseboard. For more information about grinding plaster, watch this video:
After hardening, stains and splashes on surrounding surfaces can be easily removed with water.
Preparation for grinding
Preparatory work consists of completely removing swollen and loose fragments of the old coating from the wall, filling cracks, followed by priming and putty. If there are oil stains on the walls, then the layer of plaster in this place must be completely removed. Places on the walls where the plaster has been removed are carefully cleaned with coarse sandpaper, notches are applied to the wall with a chisel or a reinforcing mesh is attached. If the areas with the removed layer of old coating have a large area and exceed the length of the rule, hanging and installing beacons will be required. To correctly form the corners, edged boards are attached to the door and window slopes with self-tapping screws, protruding outward to the final thickness of the plaster layer. The next step is to thoroughly remove dust and dirt from the walls.
This measure is very important, since the presence of any contaminants on the surface of the walls significantly reduces adhesion, which in the future can cause peeling of the plaster.
The best way to clean is with a pressurized water hose. The last operation before applying plaster is the application of a deep penetration primer, and in the case of concrete walls, a “Betonokontakt” solution.
In this case, not only the walls are primed, but also the end surfaces of the old plaster coating.
Features of outdoor work
Repair of facade covering has its own specifics, for which the following amendments are made:
- The solution must be made using a composition intended for outdoor use. In particular, silicate filler will allow for high-quality grinding of façade plaster. What does this mean in terms of operational impact? At a minimum, protection from precipitation will be provided while the structure of the problem coverage area is strengthened.
- Plaster cannot be applied to a dirty surface. To clean facades, use a special high-pressure cleaner.
- The sealing is carried out with the obligatory preliminary primer in 2-3 thin layers. At the final stage, leveling the plaster can be done with a waterproof sealant.
Grinding solution
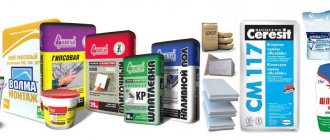
For carrying out plastering work, a variety of ready-made mixtures are available for sale, the properties of which are specified by the manufacturer, which allows you to select the required parameters for the plaster mortar. If the mortar is made independently, as a rule, two types of compositions are used - cement-sand and cement-lime.
A cement-lime mixture is preferable - cement gives the necessary strength to the plaster and resistance to the external environment, and lime provides good adhesion and, in addition, has antibacterial properties. Washed and sifted fine sand is added to the mixture as a filler. The quality of sand is very important, because impurities entering the solution can significantly change its properties, and small pebbles create defects, which is especially undesirable in the finishing layer. When mixed with water, the mixture acquires the necessary plasticity and fits well on any surface.
For a cement-sand mixture, use a mixture of sand and cement in a ratio of 2-4 to 1. Cement-lime plaster contains three components - cement, slaked lime and sand in a ratio of 1: 1-2: 6-10
To speed up hardening and acquire water-repellent properties, PVA glue is added to the plaster mixture, and a small amount of detergent is added to slow down drying. The amount of glue or detergent is selected experimentally.
How to grout concrete floors
Depending on the surface area of the concrete floor, its grouting can be done manually or using special trowels (helicopter). This operation allows for forced additional compaction of the top layer of the concrete floor, which leads to an improvement in its characteristics. To harden the surface of a concrete screed, grout mixtures called toppings are used.
Regardless of whether grouting will be done by hand or by helicopter, in order to obtain a high-quality surface, this process must consist of the following operations:
- rough grout, it is necessary to compact the top layer and squeeze out the cement laitance;
- finishing grout;
- coating with liquid polymer, this allows you to close small pores;
- cutting expansion joints.
In order to correctly complete all the stages of creating a concrete floor, you must be able to determine the moment when each operation begins. If you don’t know how to do this, then it’s better to invite specialists.
Grouting by hand
If the area of the concrete floor is small, then it can be grouted manually. To get the maximum effect from this operation, you need to correctly determine the time when you can begin the work. If you put a board on a concrete screed and step on it, and after that there is no mark left on the floor, then it is too late to grout. If the depth of the mark is 2–3 mm, then this means that it is time to start grouting the surface.
Required Tools
To grout a concrete screed manually, you will need a minimum set of tools:
- spatula or trowel;
- grater;
- grater;
- a trolley for applying the topping, but you can also do it manually;
- knee pads
When the work is being done on a small surface, then you should not buy ready-made toppings, since they are usually sold in large packaging, and you will not have time to use it up. Most home craftsmen use regular dry cement when grouting concrete screeds.
You can use cement and sand in a 1:1 ratio. The main condition is that the mixture should not have any foreign inclusions; the sand is taken of a fine fraction. After preparing such a topping, it is necessary to sift the composition through a fine sieve again, since the presence of large particles will negatively affect the result of grouting the floor and its appearance.
Some home craftsmen like to experiment and add quartz, liquid glass and other components to the topping composition. Their proportion is determined experimentally. If you want to give the floor higher characteristics, then you need to purchase ready-made toppings. They can be quartz, metallized, corundum and give the surface different characteristics.
Depending on the load expected on the concrete floor, the amount of topping that needs to be applied per 1 m2 will depend:
- if the load is small and medium, then 5 kg is enough;
- if the load is medium and high, then 5–8 kg;
- when using colored compounds, they must be at least 5 kg.
Sequence of work
You can begin this stage of creating a concrete floor after the moisture has evaporated from the mixture. Before you begin to trowel the concrete screed, if there are beacons in it, they must be pulled out and the grooves sealed with mortar.
Concrete should be grouted immediately after the water evaporates. To perform the work, polyurethane floats are used, which are pressed tightly to the surface. In order not to damage the screed, you need to use special knee pads, which you can purchase or make yourself.
Depending on the ambient temperature and air humidity, grouting can begin in 6–8 hours. This technological process consists of the following operations:
- The prepared topping is evenly distributed onto the surface to be treated. The prepared mixture can be applied to a small area by hand, and for a more even distribution, it is better to use a sieve. You need to wait a little until the applied mixture begins to absorb moisture. The fact that you can start grouting will be indicated by darkening of the applied composition.
- Grout. To grout, you need to wear knee pads so that when moving across the floor surface, you leave minimal marks. Using a grater, the mixture is evenly rubbed into the concrete screed. Rub in a circular motion until the surface turns a dark gray color.
- Elimination of irregularities. Grouting is carried out until the floor is smooth and almost dry. If there are small traces of tools left on its surface, they can be rubbed off with sandpaper. To harden the surface, it must be left for at least 4–7 days, but you can walk on it within a day. When the surface has completely hardened, it can be fully exploited or the installation of the finishing coating can begin.
It must be remembered that grouting of the screed is not carried out on a moistened surface, but on a concrete floor that has not completely dried.
In our next article you will learn about the technology of installing concrete screed:
Using a helicopter
In large areas, grouting of concrete floors is carried out using special trowels, which are popularly called a helicopter. Such equipment can have either an electric drive or an internal combustion engine. The latest machines are convenient to use in rooms where there is no access to the power grid yet.
Such equipment can be single-rotor or double-rotor; it has replaceable disks, which can be made of chipboard or metal. Single-rotor devices are more mobile, their weight is about 30–70 kg, and control is carried out using a long handle. Twin-rotor models are more powerful and heavier; the operator controls them while directly on the helicopter.
Near walls, in doorways and in sharp corners, wall devices are used; these are small units with compact dimensions and a limited disk diameter.
Required Tools
To grout with a helicopter, you will need the following tools and equipment:
- bladed rotor devices, which, due to the presence of a bladed propeller, received the popular name helicopters;
- topping trolley, it can be manual or automated and is used to uniformly apply the dry mixture to the concrete screed;
- wall devices, which are used for working near walls, in passages and sharp corners;
- hand trowels, they are necessary for correcting small defects, as well as for grouting in hard-to-reach places where work cannot be done using machinery.
What mixtures are used and how to prepare the composition
Since with the help of trowels the work is carried out over large areas, in such cases, they usually do not prepare the mixtures themselves, but buy ready-made toppings. If desired, you can make them yourself; the proportions and composition are no different from those used for manual grouting. To obtain a higher-quality surface, it is better to use ready-made toppings, in which all the necessary components are selected and in the correct proportion.
For grouting, a topping is used, which includes the following elements:
- high quality cement;
- dyes;
- plasticizers;
- fillers, the final properties and appearance of the surface will depend on their type.
Three types of toppings are used for grouting concrete floors:
- Quartz. These are the most popular mixtures and their cost is the lowest. They use perlite as a filler, and coloring pigments are used to give the mixture the required shade. This topping is suitable for rooms with average floor loads, for example, in a school, store or warehouse. Quartz mixtures are used effectively in residential premises. Thanks to the use of such mixtures, the strength of the concrete coating increases by 1.5 times.
- Corundum. Here, corundum chips, which have high strength, are used as a filler, due to which the surface of the concrete screed is strengthened by 2 times. Such compositions are used in rooms with intense and heavy loads on the floor. After applying corundum topping, the surface takes on a matte tint.
- Metallized. These mixtures use metal shavings mixed with cement. This solution allows you to obtain the most durable surfaces. The use of metallized topping allows you to increase the strength of concrete by 2 times. Such compositions are used in large enterprises, where heavy equipment moves, if there is a lot of vibration. Such compositions are usually not used in residential premises due to their high cost and complexity of application.
How to grout
Grouting a concrete screed using a helicopter is carried out in several stages:
- First application of topping. Once you have determined that the moment has come when you can carry out the specified stage of work, begin applying the topping. At this stage, about 2/3 of the prepared composition is applied. This is done using a special trolley, which helps to evenly distribute the mixture over the floor surface. To distribute the topping even more evenly, you can use a leveler.
- Rough grout. The process is performed in two passes, and their directions must be perpendicular. When carrying out work, keep in mind that near columns and walls the screed will harden faster than in the middle of the room. You have to work quickly to get everything done before the screed is completely dry.
- Second application of topping. The remaining 1/3 of the mixture is applied immediately after rough grouting, while there is still moisture on the surface so that the topping has time to soak in it.
- Final grout. Using trowels, the surface is again processed. Such units have great power, so you need to make sure that their blades do not bury themselves in the surface being processed. To get an ideal surface, you need to make several passes, and each time move in a direction perpendicular to the previous one. If you want to get a mirror surface, then gradually raise the blades of the trowel and increase their rotation speed.
It will not be possible to perform high-quality grouting by hand, so if you want to get an even, smooth and glossy surface, you need to use a trowel.
Remember, while applying the topping, you cannot pour water on the concrete surface, so it is very important to correctly determine the moment to start grouting the floor.
In order to further protect the concrete surface, polymer impregnations are used. They clog the smallest pores and further bind the particles of the top layer. This ensures high strength of the concrete screed and if it is a finishing coating, dust will not form on it. Such compositions are applied using a brush or roller.
At the last stage of work, expansion joints are cut and filled with sealant. Thus, you get a durable, reliable and beautiful coating that will serve for many years.
You will learn which mixture to choose for leveling the floor and how to carry out the work from our material:
Video: grouting a concrete floor using a helicopter
Grouting a concrete floor can be done either manually or using special equipment. Regardless of the method of its implementation, such treatment can increase the strength of the surface, its service life and improve the appearance of the concrete floor. When performing such work, the main thing is to correctly determine the time when you can start grouting. Everything must be done quickly so that the floor does not have time to dry completely. If everything is done correctly, then depending on the topping used, it is possible to increase the strength of concrete by 1.5-2 times.
In order for the building to always look neat and inviting, it is necessary to regularly take care of its appearance, and then it will be like a well-groomed young lady, pleasing the eye and soul. Unfortunately, not everyone understands that a building is the calling card of the people in it. Under the influence of climatic conditions and weather precipitation, a network of cracks and other types of defects often appears on the surface of a painted or lime-coated facade. Such negative aspects should be immediately eliminated by carrying out work on repairing facade plaster.
Plastered buildings are repaired by removing the defective façade plaster and forming a new one in its place. It is not necessary to re-plaster the entire facade - you can restore the building only in damaged areas. At the same time, the cracks and cracks are cleaned and expanded.
Giving an old house a new look is not a cheap pleasure, but you can significantly save money by inviting industrial climbers as workers. Professionals in their field will carry out high-altitude work using the industrial mountaineering method at the highest level of quality and with extreme care.
Grinding technique
The plaster mixture is applied to the prepared surface using a ladle, a falcon or a trowel, and then, moving the rule from bottom to top, the applied layer is screeded and leveled. The plaster is dried for 24 hours and the surface of the plaster is rubbed with a float or trowel.
The grouting stage is necessary for better leveling and to avoid the appearance of microcracks during the further operation of the building. To make work easier, the walls are moistened with water during grouting. If a cement-sand mixture is used, then the work is performed in two layers, in the case of using a cement-lime mixture, in three.
After completion of plastering work, the walls must be covered under plastic film. This precaution will slow down the drying of the plaster layer, which will prevent cracking in extreme heat, wind and mild frost. The walls should remain under such cover for at least a week.
After the plaster has completely dried, finishing work begins: applying a finishing layer (bark beetle, lambskin) or painting. The grinding stage is completed by treating the walls with water-repellent impregnation.
What is grouting a concrete floor, is it necessary to do it?
The process of creating a concrete floor consists of several operations, and in order to obtain a high-quality, durable and durable coating, it is necessary to follow the technology of performing the work at each stage.
After the required layer of concrete has been applied to the floor and leveled over the surface using a rule, a stage called grouting begins. To understand the role of this stage of work, you need to understand what happens to the concrete after it is applied and leveled.
After applying concrete, the large particles of sand and crushed stone included in its composition are lowered into the lower layers, while the fine fraction and concrete laitance are squeezed up. After the moisture dries, small voids, cracks and irregularities remain on the surface, all of which significantly reduces the strength of the screed and worsens its appearance.
Grouting the surface allows for additional forced compaction of the top layer of the concrete floor
We can only see external imperfections of the surface, but in addition to them, microvoids also appear in the upper layers of concrete, which leads to a decrease in the adhesion strength of sand and crushed stone particles to each other, and this causes peeling of the top layer. As a result of this, significant depressions and potholes soon appear on the surface. Such a floor not only loses its appearance, but also needs to be repaired, which costs additional money and time.
To avoid the described disadvantages, it is necessary to grout the concrete floor; this can be done manually or using special troweling machines.