It will be useful for beginners to learn how to properly apply decorative plaster on walls, primarily from a financial point of view. Having mastered the finishing technique, you can significantly reduce the cost of decorating all premises. So the cost of repairs will be much lower than when involving third-party specialists.
In our article we will tell you what decorative plasters are and also describe the basic techniques for applying them.
There are many processing techniques
Material overview
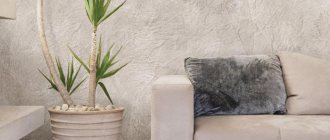
Decorative plaster is a mass that is used to decorate various surfaces. It is called decorative because of its appearance: after application, a rather attractive coating with high aesthetic potential is formed on the wall.
Textured coating
All materials that are used for plastering walls can be divided into two groups:
- textured plasters - made on a lime, gypsum or polymer base. When finished, they are a plastic mass that changes its shape quite easily. Using different tools, you can get a coating with a wide variety of relief;
Note! Typically, coloring agents are introduced into the base of the material, but after texturing and polymerization of the surface, the wall can be additionally painted or tinted. Particularly popular is the treatment of textured plaster with metallics or pearlescent pigments.
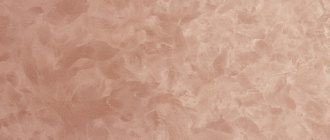
- structural compositions differ from textured ones in less plasticity. Mineral granules - grains of quartz, marble, granite, etc. - are responsible for the formation of texture in them. The mineral grain is either located on the surface of the plastered object, or is located in the thickness of the material, providing the creation of a relief surface.
Structural surfaces
In principle, there are other types of materials on the market - fiber products, translucent plaster mixtures, etc. However, they are used quite rarely, so it would be more advisable to focus on more common finishing techniques.
Materials and tools
Like any construction process, concrete plastering is carried out using certain tools and materials. The main tools include: a rule, a level, wooden slats, screws and a mixture of plaster, which can have a different composition. For example, cement-lime or polymer-cement plasticized mixtures are often used. These or other compositions can be synthetic based or based on a dry mixture. Usually they add organic plasticizers, which are designed to increase the mobility of the solution. In rooms with humidity up to 60%, two types of plasters are used: lime (when plastering walls and partitions) and lime with Portland cement or other binders (when exterior finishing of concrete walls and ceilings is done).
Preparing for work
Required Tools
Now we need to figure out how to apply decorative plaster. In fact, you can do it with just one spatula, but in this case the work will take quite a lot of time, and the skill of the finisher will be very impressive.
Basic equipment for a plasterer
As a rule, the following set of tools is used to perform decorative plastering of walls:
- containers for plaster (large volume for mixing, smaller volume for direct work);
- drill with mixer attachment;
- plaster trowel;
- trowel;
- plastic and metal graters;
- spatulas of different sizes;
- flat brushes with hard bristles (among them there should be at least one paint brush for priming);
- Quite a hard sponge.
- special rollers with a pattern to form a relief surface.
The shape and size of the rollers can be very different
Naturally, to perform pre-processing of the wall we will need other tools, but we will talk about this in the next section.
Surface treatment
Now we need to prepare the base so that the decorative composition sticks to it firmly enough. The question of what surface decorative plaster is applied to has been resolved by professionals a long time ago: if the preparation is done correctly, then it can be applied to almost any surface.
General scheme of work performed
Of course, most often we will work with concrete, brick and drywall. Here the list of preliminary work will be as follows:
- We remove the old finish, leaving a bare base. It is also advisable to remove the old plaster layer, as it may fall off over time.
Note! Deciding whether decorative plaster can be applied to plaster must be done individually in each case. The best option would be to tap the entire surface with a fairly heavy hammer: if the material does not crumble and no voids are revealed underneath (their presence is indicated by a characteristic dull sound), then it can be left.
Applied primer improves adhesion
- We check the condition of the surface, identifying all cracks, cracks and other defects. We fill the voids with a cement-based repair composition.
- After polymerization of the repair mixture, prime the surface with a penetrating agent. It is advisable to apply at least two layers of primer, each time pausing for 5-6 hours to allow the material to dry.
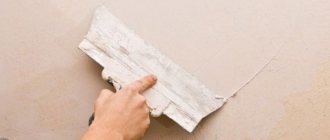
Rough plastering
- Next, it is advisable to apply a primer layer of plaster about 20 mm thick. It will create a reliable foundation and help level the surface, eliminating large differences in the plane.
Important! When processing gypsum board, basic plastering can be replaced by applying putty. Naturally, after drying the material does not need to be sanded, as this will reduce adhesion.
As for walls made of other materials, before applying decorative plaster to the walls, you need to keep the following in mind:
- Wood and materials based on it (chipboard, OSB and analogues) are hygroscopic. On the one hand, this can lead to soaking of the base and its deformation, on the other hand, to disruption of the drying regime of the plaster mass. So before processing, wooden walls must be impregnated with a primer with a moisture-proof component.
Wooden surfaces must be carefully prepared
- Smooth surfaces like plastic or laminated plywood must be sanded with a coarse abrasive, otherwise most plasters will simply slide off them under their own weight.
- Metal elements (for example, embedded parts in walls) after treatment with decorative compounds can cause rust stains. To avoid unpleasant consequences, it is worth using anti-corrosion coatings.
Formulation options
You can prepare the plaster solution yourself. Even experienced craftsmen often improve the plaster formula, saturating it, for example, with PVA glue as a plasticizer. You can consider several common recipes for making plaster mortar yourself.
Putty based
To mix the bulk you will need ordinary putty (6 kg), water (2 l) and PVA glue (0.2 l). Dry powdered putty is placed in a container, water is gradually poured in, and stirred. Then add PVA glue and mix again. In the absence of such glue, it can be replaced with drywall grout (the proportions remain the same 1: 1).
With primer
The base remains putty, to which, instead of water, a primer is added in a ratio of 6: 2. The mixture is mixed, after which grout (0.2 l) and color are added to the mass (the saturation is selected individually). This recipe allows you to obtain decorative plaster material. Therefore, the primer must be used white in order to paint it without losing the quality of the desired shade.
Cement
To make such a plaster mortar you need cement, as well as sand and water. The ratio varies: for spraying the proportions are 1: 4, for soil 1: 3, water is added until the consistency of sour cream. The solution should not spread. You cannot use cement with sand in a ratio of 1:16, the sand coating will quickly crack.
Clay
Making clay plaster yourself is not difficult. The composition is made up of clay and sand; water is added to it for performance. Depending on the type of work, the proportions can be 1: 3, 1: 4, 1: 5. This applies to spray and soil. If clay-lime plaster is required for work, the proportions are as follows: lime 1 part, clay 2 parts, sifted sand 6 parts. If you need to plaster the walls outside, use clay, sand and cement in the ratio: 0.2: 3: 1, don't forget to add clean water.
With lime
Lime composition is used for finishing adobe houses. The coating is not durable and is afraid of moisture. Consists of slaked lime (1 tsp) and sand (3 tsp). For soil the proportions are 1:2, for spraying 1:3, for covering the ratio is 1:2. The lime-cement composition is more in demand. However, for kneading they use lime itself, and lime dough. The ratio of cement - lime - sand is different for each layer. For one layer it is 1: 0.4: 3 (4), for the second 1.61: 2.5 (3), for the third 1: 1.5: 4.
Plaster
The recipe for gypsum plaster involves the use of white gypsum powder. Six parts of the mixture will need to be diluted with 2 liters of cool water, then add 0.2 liters of PVA glue to it. If it is made with an admixture of lime, use lime paste in a gypsum-lime ratio of 1:3.
Venetian
This decorative plaster is prepared from ordinary fine-grained putty. Quartz, marble, malachite chips, slaked lime and color of the desired shade are added to it. The color concentration is selected individually, however, its abundance will lead to a deterioration in the quality of the solution. The total amount of lime for the entire composition varies between 50-60%. This takes 3 hours, while plaster takes 1 hour. To add gloss, after the coating has dried, it is treated with special wax.
Versailles
This finishing mixture for interior work is created on the basis of two types of putties: starting and finishing in a 1: 1 ratio. They are mixed and the desired color is added. An essential component that provides Versailles plaster with a special effect is silver. It is used after the coating has completely dried. Add to water-soluble varnish (dilute by half) and spray only the protruding parts of the relief.
Structural compositions
Spraying a “fur coat”
So, what to apply decorative plaster on, we have studied how to prepare the surface for work - also, now let's move on to the finishing technologies themselves. Structural coatings are easier to apply, so we’ll start the description with them.
Photo: mechanized wall covering
Decorative “fur coat” is one of the most popular coatings based on cement-sand mortar.
The material is mixed in a ratio of 1:3 (1 mass part cement to 3 parts sand), and then applied to the wall by spraying:
- The easiest way to apply the “fur coat” is to use a special plastering machine. It releases a solution under pressure, which sticks to the wall, forming the relief we need.
Three methods of applying a “fur coat”
- If you don’t have a machine at hand, you can use a broom. We take the broom in our right hand and lower it into the solution, picking up a small amount of liquid material. We bring a broom with plaster to the wall and hit it against a stick, which we hold in our left hand.
- Another technique is brushing. We take a long-haired brush and place it on a small portion of the solution. We pass the board along the pile, pushing it forcefully towards us. When straightened, the bristles will throw the solution onto the wall in small portions.
- Finally, you can use metal mesh on a wooden frame. We place the structure against the wall, level it and press it with bricks, and then use a trowel to throw the mortar onto the wall. After the mesh is removed, all we have to do is eliminate minor defects and smooth the surface with a brush.
Formation of relief with mineral granules
Compositions with mineral granules are also quite easy to apply. The most popular of them is “bark beetle” - plaster, the surface of which imitates wood damaged by insects.
Apply the base layer
Instructions for applying the composition are not complicated:
- Apply decorative material to the surface prepared and leveled using a plaster composition. To apply, use a grater, holding it at an angle of about 600 to the wall surface.
Advice! The optimal thickness of the applied layer should correspond to the size of the largest grain.
- After application, dry the surface. As soon as the applied hand stops sticking, we move on to decorating.
- We apply a plastic grater to the surface with its entire plane and move it under slight pressure. In this case, the mineral grains will shift, leaving grooves on the surface that repeat the direction of movement of the grater.
Forming the relief with a grater
- After the surface has been treated and dried, we paint the “bark beetle” with acrylic-based pigments.
Surface preparation
To begin with, the surface is prepared - cleaned of dirt and dust, bitumen and grease stains. It is necessary to cut down wall protrusions and concrete smudges, as well as concrete sagging when making trusses and husks. If protruding areas or surface differences are too large, then the base must be covered with a metal mesh. Typically, wire mesh or woven wire mesh is used. One way or another, they fasten it with tension on dowels and tie it with wire. In this case, the mesh should have cells no more than 10x10 mm, and the diameter of each wire rod should be about 6 - 10 mm.
Plastic compositions
Processing with spatulas, brushes and other devices
In this section we will tell you how to apply textured decorative plaster. The main difference from the previous version will be the fact that the result here depends not so much on the processing technique, but on our skill.
In many ways, the formation of relief is akin to painting and sculpture, so even an experienced plasterer should practice before starting work to understand how the new material will behave.
We begin the work by applying the main layers:
- To begin with, we lay a base several millimeters thick on the leveling plaster. It will provide adhesion and will act as a background for our decor.
Note! Since the material will be applied on top of the base in a very thin layer, it must initially be painted in the shade we need. This is done by introducing pigment into the plaster solution and then mixing.
- We dry the base to a state in which a tool passed over the surface without excessive pressure will not leave marks on it.
- Then we take a small amount of decorative composition onto a spatula or grater and apply it to the wall in the form of strokes. We stretch each stroke along the base, trying to form a thinning layer about 2-3 mm thick at the starting point and 0.5 mm at the end point.
Apply strokes with a spatula
- The pattern of decorative plaster depends on the direction of the strokes. So, with a “Venetian” finish, the spatula should move chaotically, while the “rain” plaster is applied with diagonal movements along the previously applied markings.
- Instead of spatulas and graters, you can use brushes. In this case, we lay a layer of greasy plaster on the surface of the base (more binder and water, less filler), then level it with a trowel, and after that we treat the surface with a hard brush. The bristles of the brush will leave parallel grooves on the surface, forming the relief we need.
Applying relief with a brush
- Another interesting technique is to apply plaster yourself using plastic film. On a layer of greasy covering 2-3 mm thick we glue polyethylene with a large number of folds. We leave the material to dry and after a few hours carefully remove the film, leaving a very interesting relief underneath.
Advice from practice! You need to remove the polyethylene carefully, trying not to damage the coating. It is also important not to overexpose the film, otherwise it will dry out and come off with parts of the plaster.
Use of polyethylene
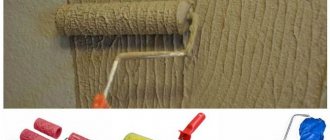
Rolling the relief with a roller
If the described technologies seem too complicated to you, and you are not sure that your skills are enough to create a beautiful relief, you can purchase a special roller. The protrusions and depressions on its surface form a pattern, which, when imprinted on the raw plaster, gives it a beautiful appearance.
Homemade and factory models
Advice! For work, you can also use a simple paint roller, partially plucking out its lint. Wrapping the working part of the tool with cords, polyethylene or tarpaulin with folds also gives good results.
These devices are extremely easy to use:
- We apply a layer of decorative plaster about 2 mm thick (this value is determined by the configuration of the roller).
- Roll the roller over the surface, forming a pattern.
- We make sure that the material does not stick to the working part, otherwise a lot of waste will appear.
- After drying, paint the plastered surface or finish it in another way.
Applying relief “under the skin”
Plastering concrete walls
A solution for plastering walls is prepared according to the recipe indicated on the package. The method of applying the solution is the same as when finishing brick walls (the “spray” method). The only difference is that the spray on a concrete surface must be leveled. The thickness of the plaster layer should be no more than 5 mm. However, immediately before the procedure itself, a number of other works are performed. As already mentioned, if the surface is uneven, then stretch a metal mesh. If the walls are smooth, then they begin to install slats, the distance between which should be no more than 1 meter. They are designed to divide the wall into sections and simplify the process of plastering the walls. Next, the wall is moistened with water (for wet plaster) or slightly moistened (for synthetic plaster). Then they proceed directly to the “spraying”. Apply the solution from the corners, and then move on to sections. As a rule, they are carried out along the slats in the direction from top to bottom, while removing excess solution. If somewhere on the contrary there is not enough solution, then it is added. This is done with all sections on the wall. Afterwards the composition should set and harden. The slats are carefully removed. The grooves remaining after the slats are also filled with plaster solution. At the final stage, grouting and smoothing are done. On a note! In addition to finishing concrete walls with plaster to level the base, there is also “decorative plaster for concrete.” And it is fundamentally different from the first one. Its main function is not to level the walls, but to create a decorative surface that imitates concrete in texture and color. Such compositions are often used to create “techno” design or when finishing verandas, basements, and utility rooms. Concrete plaster has different properties and performance characteristics. Therefore, be careful when purchasing and do not confuse it with the main plaster mixture.
Finishing
No matter how the decorative plaster is applied, after drying it should be treated to improve its appearance and protect it from various influences. There are several processing methods:
Wax is applied by rubbing with force
| Technology | Description |
| Painting | For painting, acrylic pigments are most often used for interior or exterior work. Apply the material using a brush. Using a roller or spray bottle, trying to paint all the relief elements. Sometimes the paint is applied in several layers: the bottom one is made darker, and the top one is made lighter. This processing method allows you to give relief plaster greater visual depth. |
| Decoration | Body-painted plasters can be additionally decorated with metallics or pearlescent pigments. These materials are applied to the embossed surface either with a sponge or with a dry brush, and then secured using one of the two methods described below. |
| Waxing | Waxing is a standard option for protecting Venetian plasters, but it will also be applicable for other compositions. The limiting factors here are the price of the raw materials for waxing, as well as the strength of the plaster itself - some materials simply cannot withstand polishing. |
| Varnishing | Instead of a wax coating, you can use acrylic varnish for protection and decoration. It is applied in the same way as on any other surface - in two or three layers with mandatory drying. |
Metallic “gold” with partial painting