X
There are many ways to repair ceilings, and each one has a different repair technology. It will all depend on what needs to be done and how badly damaged your ceiling is. We will talk to you about all the methods today.
Everyone, even an inexperienced craftsman, is able to repair the ceilings in an apartment with their own hands, even in the most difficult cases. Of course, many have encountered the fact that ceilings usually become unusable thanks to neighbors above, who every now and then forget to turn off the water taps or something like that. After a good flood, repairs will cost you a pretty penny, so first you need to negotiate compensation with the pests or go to court. Yes, if you are compensated for everything, that’s not bad, but repairs still need to be done and done in such a way that the ceilings not only have a decent appearance, but also serve you for a long time.
Ceiling repairs are done for many reasons, not just when your neighbors flooded your home. If the paints have faded and dulled or the whitewash has peeled off, if the entire ceiling lining is swollen and warped, repairs are simply necessary. Otherwise, if you re-paste the wallpaper on the walls and leave the ceilings as they are, they will significantly spoil the appearance of the room.
Helpful information:
- How to build an attic with your own hands
- How to make a self-leveling floor with your own hands
- Do-it-yourself septic tank from Eurocubes
- Do-it-yourself corrugated roof
- How to make a wooden floor with your own hands
- DIY septic tank for a private house
Ceiling repair methods
Ceiling repair work can always be divided into several types: wet and dry, deep and superficial. For light damage to the ceiling, the dry and superficial method is always used. The most labor-intensive will be the deep repair. Yes, there is practically no dirt and dust from it, but in return it requires the highest skill. A deep repair, if you figure it out, is not difficult, but a beginner in this matter will have to sweat. Before starting a deep ceiling repair, it is necessary to remove furniture and carpets; if possible, it is better to cover the floor with film to make it easier to get rid of construction dust after work.
The methods are different, because everything will depend on what you want to see in the final result. We will list some ways to increase the complexity of the work:
- Painting and covering dry ceilings.
- Cleaning for painting or wallpapering if the ceilings are smooth, dry and have no visible streaks.
- Leveling and plastering if the ceiling has stains, streaks and the old plaster has peeled off in many places.
- Preparation for further installation of suspended or suspended ceilings.
- Finishing ceilings after your upstairs neighbors flooded you.
- Repair after your roof leaked and the ceiling was simply damp, if it was on the top floor.
Removing cracks
One of the main stages of ceiling repair is sealing cracks. You should not treat this with disdain - simply covering up the crack will not be enough. It is necessary to approach this issue more seriously.
Make the cracks wider and deeper so that the repair compound “lies” well in it. You can deepen and expand the damage to the ceiling using a chisel and hammer.
After the work has been done, it is necessary to clean the cracks. Then use a primer to help the future repair compound adhere better to the surface. Only after all the work has been done can the gap be filled with a repair compound. It must be applied with pressure to seal the crack completely.
Precautionary measures
Gypsum dust, construction dust, cement dust are a kind of abrasive for the skin that promotes the development of bacteria and infection. This dust will also be harmful if it gets into the eyes and respiratory system. If the ceiling was flooded from above and not only with water, but also with sewage, you will have to remove the red stains, and this is done with the help of rather aggressive chemicals that are very toxic and contain volatile compounds.
It is difficult to carry out repair work, since you will be under the ceiling almost all the time, standing on shaky surfaces. At the same time, your arms, back, and legs get tired. Therefore, before you begin, take care of safety precautions and protective equipment.
- A headdress is required.
- Clothing should be made of dense materials.
- The sole should not be slippery.
- Safety glasses, or at least a cap with a visor.
- Gloves and respirator
- Reliable and stable sawhorses, on which you will feel confident when standing.
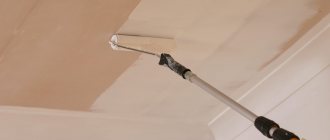
Let's start priming
Before repairing the ceiling, its surface must be primed. They proceed to this stage immediately upon completion of cleaning of the old finish. Priming should begin with seams and joints. In these places, the gypsum or plaster mortar must be held firmly and reliably. If this is not the case, then the joints are cleaned and filled again with gypsum cement mortar or a special building mixture with fiber inclusions. When the solution dries a little, the surface is cleaned, leveled and left until the mixture dries completely. Only after this can priming begin.
A deep penetration primer is used so that the materials for repairing the ceiling, which will be applied later, firmly adhere to the surface. The primer can be applied either with a brush or with a roller. It is important to protect your eyes and skin from contact with the primer mixture. When the primer layer is completely dry, you can begin further finishing.
Necessary tool
Always, before starting work, inspect what tools you have and what you are missing. Yes, I agree that everyone already has some kind of tool, but sometimes you need something and you don’t even know what you need. Therefore, I will list all the necessary tools for the job:
- Rotary hammer - look for less weight, but at least 800 watts of power. The hammer drill requires a concrete chisel.
- Mixing attachment for mixtures.
- Grinder – we are also looking for something lighter, but not less than 600 W. Flap disc or wire brush.
- Abrasive mesh and straight bar.
- Be sure to have a building level.
- Spatulas with flexible and thin blades.
- Trowel, roller and brushes.
- Polyurethane foam and a gun for it.
- Container for mixing gypsum mixture.
- Spray bottle and vacuum cleaner.
It is not necessary to buy bars for abrasive mesh. You can find a piece of regular timber and cut it to the size you need. This block is checked for evenness using a level. To prevent the mesh from moving off the block, you can secure it with several staples or screws.
With a set of such tools, you can repair ceilings of any level of complexity. Of course, this tool is selected for the most complex ceiling work, and according to the degree of their ease, the list of necessary tools will decrease accordingly.
Ceiling finishing: options
Requirements for finishing ceiling bases
Each person chooses the main finishing criteria for himself, but there are several general requirements that the ceiling base and the choice of appropriate materials must meet:
- environmental friendliness of building materials, their safety;
- durability;
- high quality fastenings.
Depending on the type of room, there may be additional requirements for frost resistance, moisture resistance, resistance to the development of pathogenic microorganisms, additional noise insulation and some other parameters. Therefore, before starting to repair the ceiling, you should choose what criteria will be used for finishing and selecting building materials.
Materials for repair and finishing of ceilings
Buy the necessary materials for repairs, such as finishing and starting plaster, paint, putty, primer only from one manufacturer. Why? Yes, because all technological tests of materials are carried out on their own manufactured products and therefore quality will be guaranteed only when all materials are from one manufacturer.
When performing any repair work on the ceiling, you will definitely need to protect the walls and furniture from dirt and dust that will fly in all directions. You can use plastic film for this.
Previously, when leveling ceilings, they used a rowan mesh, stretching it on anchors and laying durable waterproof cement plaster on top. But sooner or later the metal mesh will manifest itself in the form of red spots. Therefore, if you want the repair to last for a long time, then it is better to use a polymer plaster mesh or special ceiling plasters.
If your ceiling is leaking, then you will need a dye such as methylene blue to repair it. Remember that if you add dye to the mixed plaster mixture, your ceiling will come out mottled. You must first dilute the dye in water, and then mix the plaster mixture with this water. Only one batch of plaster mixture should be used on the entire ceiling surface to be repaired. You won't be able to find a second shade exactly the same.
If, after your neighbors flooded you, and the ceiling has become unusable: the plaster, wallpaper, etc. have come off, and you need to re-level the ceiling, then do not use metal beacons for these purposes, as they will appear through the wallpaper or paint as red spots. Strips of plasterboard are best suited for you as beacons. They are perfectly attached using PVA or any other glue, such as Titan. Just use ceiling mixtures to level the ceiling, such as isogypsum, which can be laid on a ceiling up to 20 millimeters thick.
Cleaning the ceiling surface
Before you begin, you need to take some preparatory steps. The very first and most important of them is cleaning the ceiling from the old coating. Without this, your ceiling will serve you for an extremely short period of time.
A plastered or whitewashed ceiling should be thoroughly wetted and scrubbed using a hard sponge. The ceiling covered with wallpaper (regular or liquid) is cleaned using a spatula. This surface also needs to be wetted and left for a while.
Work order
A person who has never dealt with repairs or finishing work, but wants to do everything in the house with his own hands, is unlikely to assess the condition of the ceilings and the necessary repair work at first glance. On the one hand, this is not very good, but on the other hand, when a person makes repairs in his house, he has a whole lot of time for everything. It is from this that the entire procedure for ceiling repair work will flow.
- First of all, inspect the ceilings and decide what kind of final finish you will have.
- If you have a flood, be sure to evaluate and document the condition of the ceiling before repairing.
- The room must be completely dried by opening the windows.
- Re-documenting the condition of the ceiling.
- We make repairs according to the chosen finish.
Preliminary inspection of a damaged ceiling
The main goal when inspecting a damaged ceiling is to identify all the defects that need to be corrected. It happens that the ceiling may sag in the middle, then it is necessary to inspect the structure of the beams and identify the cause of the sagging. Until the problem is fixed, there is no point in starting repairs. If you have concrete floors with cracks between them, then they need to be completely cleaned and re-plastered, and in the future you will have to level the ceilings around the entire perimeter. If your neighbors flooded you, then you need to let the ceiling dry completely. Examine the condition of the plaster and, if it has not come off, putty it with pre-treatment with special solutions so that moldy spots do not appear on the ceilings.
Documenting damaged ceilings
Documentation will be, in this case, ordinary photography. This is also necessary for identifying defects. For example, if you take a piece of fiberboard and place it in the garage for several days. With an ordinary glance, you will not be able to determine the condition after you pick it up after some time. And if you take a photo before placing it in the garage and after, and compare the result on a computer, you will see that after the piece has become darker. If you dry it even with an ordinary hairdryer, salt may appear and streaks will appear.
This must be done so that after the completion of repair work on the ceiling, a stain that did not seem to exist does not appear after the repair. There are times when after repairs stains appear that you didn’t even see, the so-called hidden stains. Maybe the old owners painted the ceilings with oil paint before plastering; the oil, which is perfectly absorbed into the concrete floor, is biding its time. Therefore, after your ceiling has been damaged, you need to dry it thoroughly.
How to properly dry ceilings
Craftsmen who work on ceilings dry them with a hair dryer after the surface has been completely cleaned, before the ceilings are covered. But for good household drying, there are other excellent methods that we will talk about now.
- On trestles around the entire perimeter of the room you need to hang the most ordinary hundred-watt light bulbs at the rate of one light bulb per square meter. This method will not damage your wiring, but will only increase your electricity costs.
- In the middle of the room, half a kilogram of silica gel per square meter is placed in vapor-permeable bags. You can use the most inexpensive and even painted one.
- A stool is placed in the middle of the room and scales are installed, on which several bags filled with silica gel are placed. Using a scale, you can easily monitor the level of moisture absorption.
- The light bulbs on the trestles on the silica gel side need to be covered with something so that the heat from them does not dry out the silica gel, you can use ordinary sheets of fiberboard or sheets of plywood.
- The room must be completely closed, without drafts or slightly open windows. If, due to poor quality installation of plastic windows, the sashes do not close tightly and there is a slight draft, then you need to adjust your PVC windows.
High decor or choice of ceiling design
Drying the ceiling using this method will take you no more than one day. As soon as you notice that the silica gel has stopped gaining weight on the scales, or the indicators have significantly slowed down in growth, you can finish drying after about two hours, be sure to photograph the final result and compare it with previous photos.
It is also necessary to keep control of the temperature in the room being dried. If it becomes too hot, the lamps are turned off until the temperature drops within 40 or 45 degrees and the lamps can be turned on again.
How to remove old paint
In some cases, oil or water-based paints were previously used for minor ceiling repairs. To remove them from the ceiling surface, you will have to work hard. There are two approaches to removing old paint: chemical and mechanical.
Mechanical cleaning involves using a spatula or sandpaper. This creates a large amount of dust, and it takes a lot of time. The chemical method is the use of special reagents; they are sold in any hardware store. After applying the chemical composition to the ceiling surface, it may take about 12 hours for the old paint to soften. The soft loose paint will then be easy to remove.
Any decorations and decorative parts, as well as polystyrene tiles, must be cleaned with a spatula with a metal blade. If a little glue remains on the surface of the ceiling, it must also be thoroughly cleaned. Upon completion of the work, you should have an absolutely clean surface.
If you plan to overhaul the ceilings with your own hands in an apartment where suspended or tension structures were installed, they must be very carefully and carefully dismantled so as not to damage them. If, of course, they are intended to be reused.
Choosing a repair method and type of finishing
After the drying stage, you need to decide how the repair will be carried out and decide what kind of ceilings you would like to see in this room. Inspect the condition of the ceiling very carefully after drying. It happens that you are not heavily flooded, but the plaster can peel off from the ceiling in whole layers.
Check the ceiling for evenness using a rule or level. If the unevenness reaches five millimeters, then you can get away with partial repairs of those places that have defects. If there are differences of more than 15 millimeters, then a professional plasterer is needed who can level them to perfect condition.
To decide on ceiling repairs, you need to clearly understand its types and methods. This is necessary so that when installing, for example, suspended ceilings, you do not plaster or level the concrete floors. It will be of absolutely no use to you.
Whitewashing with lime mortars
This is a cheap, simple and old-fashioned method, which is no longer used anywhere when finishing ceilings. Whitewashing can also be an allergen, and this method will be more suitable for utility rooms.
Finish plaster
I will say that all modern mixtures generate a little dust, so I don’t recommend doing this kind of finishing in a nursery or bedroom. This can be done if the ceilings are painted later. This method is also not expensive, the only thing is that the ceilings for painting must certainly be perfectly smooth. Every defect will be visible on the painted surface. Modern paints can make your ceilings both matte and mirror-like. The main thing is to prepare the surface well for painting.
Artistic ceiling painting
Here, of course, a professional artist is needed. Painted ceilings are not for everyone and there is no need to level the ceiling to perfect condition, since painting is done on plaster. If you decide to apply a layer of acrylic varnish on top, the glare will negate the beauty of the ceiling painting.
Gluing wallpaper to the ceiling
An alternative and cheaper option compared to painting. In almost every third apartment you can find ceilings covered with wallpaper. Cheap, simple, but the ceilings must be leveled before gluing.
Construction of suspended ceilings
There is no need to level concrete floors. The suspended ceilings themselves allow you to realize and come up with many design effects and ideas. In this case, the ceiling space can be used for communications. The only disadvantages of suspended ceilings are that the ceiling level will be lower by 12 - 20 centimeters and their high cost. In the process, it is also possible to make sound insulation.
This type of ceiling work is considered the simplest and will not entail a lot of waste and time. Basically for work you will need:
- Drill for concrete.
- Self-tapping screws with dowels.
- Drywall, maybe even moisture resistant.
- Of course, a screwdriver.
- Gypsum plaster or putty.
If you decide to radically change your ceilings and make, for example, “Armstrong” suspended ceilings, you will need the following materials and tools:
- Mounting foam, dowels, self-tapping screws, anchor pins and bolts;
- Collets for a specific type of suspended ceiling;
- Drills for each type of fastener and chandelier suspension;
- Materials for deep cleaning of your ceiling: silica gel, or copper sulfate.
Stretch ceiling
They also do not require leveling. The only thing that needs to be done is to remove dust. This is done using PVA glue, which is applied to the entire ceiling or can simply be painted. Stretch ceilings usually come in different types: matte, mirrored, colored, painted, photo. They will also take away your height by 5–10 centimeters and you cannot lay communications.
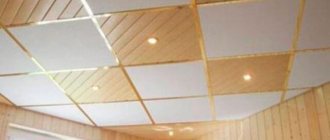
False ceilings
They are made by covering ceilings using lining, plasterboard, MDF and other materials. The cladding is done on a metal or wooden frame, pre-fixed to the ceiling. Very often they are covered with plastic panels. They can be matched to any tone and color.
Drywall is mainly used to level ceilings for further painting or finishing. For example, in the kitchen, it is best to make the lathing from bars or a metal profile. Since in the kitchen there are more fumes and greasy contaminants, which always tend to rise. In other rooms, the sheathing can be made from the same plasterboard. Which must be impregnated with a water-polymer emulsion. The strips are glued to the ceiling using glue and secured with self-tapping screws.
Wallpapering the ceiling
This is one of the best and most popular options for ceiling renovation in 2021. However, this will require more effort than painting or whitewashing. To carry out the work we will need wallpaper glue and the wallpaper itself. Prepare glue as stated in the instructions. Apply glue to the wallpaper and let it soak. Glue the wallpaper to the ceiling and level it using a roller.
Types of ceiling repairs and work process
How to sheathe for gluing or painting - this type of work is described above. I will only add that the previously numb ceiling must undergo deep cleaning and drying. It must also be treated with disinfectants. All work is carried out as during a major overhaul.
Surface cleaning of the ceiling
This type of work will be a little more complicated, but cheaper in terms of consumables. It will be more difficult because when doing it, your hands are simply “taken away”. Materials for surface cleaning of the ceiling:
- Bar and abrasive mesh.
- A product for removing wallpaper or paint.
- Gypsum putties for ceilings.
- Primers for gypsum preferably have biocidal properties.
- Polymer finishing plaster.
It usually starts with removing: old wallpaper, plaster and paint. That is, the floor slabs must remain clean. If there are suspended and suspended ceilings, then this is not necessary. Using a block and an abrasive mesh, clean the entire surface and remove dust, using a vacuum cleaner.
Ceiling finishing: options
After the ceiling is dust-free, inspect it again more carefully; re-clean any depressions in which paint or other coating remains. It is better to seal the depressions in the ceiling with gypsum mixtures using a hard and fairly wide spatula.
Having puttyed it, it is necessary to prime it. We select a primer with deep penetration, which is applied using a fleecy roller. After the primer has completely dried, you can begin painting the ceiling with acrylic or other paints.
Leveling and replastering dry ceilings
If your ceiling is painted, then all the paint can be removed using an abrasive or a special remover. It is necessary to spray generously with water and after a few hours, remove all the plaster using a spatula. It should come off easily and in layers.
As soon as the ceiling is completely dry, beacons are installed on the ceilings along the width of your large trowel and plastering begins. Please pay attention when leveling the ceiling - the plaster mixture should not come off at the time of application. You need to mix the solution in small portions, so you will need an assistant who will constantly mix more and more new portions.
The last layer of plaster is applied very thin. As a result of leveling, there will be small protrusions or lumps on the ceiling. They must be removed using an abrasive mesh and a wooden block.
It is easier to plaster or level ceilings if glass wallpaper is previously glued to them. As a result, you will get a better quality surface on which cracks will not appear.
At the end, as soon as the plaster has dried, we apply a layer of finishing putty of no more than one millimeter. This must be done carefully and immediately achieve a smooth and even surface. If you want to hang vinyl or non-woven wallpaper, they will easily hide small bumps and bumps.
Major ceiling repairs
You will need the following set of materials and tools for serious work, such as repairing ceilings after you have been poured from above, removing black mold from ceilings that occurs due to high humidity, leveling ceilings, and so on.
- “Whiteness” is a chlorinated liquid oxidizing agent.
- Copper sulfate.
- Polyurethane foam.
- Primer, preferably deep penetration on concrete.
- Reinforcing mesh - for sealing joints if you are covering with plasterboard.
- Assembly glue or PVA.
- Starter plaster for ceilings. Keep in mind that plaster made from a sand-cement mixture will not adhere well.
- Plaster beacons.
- Concrete drill and self-tapping screws with dowels.
This type of repair can be done both on individual damaged areas and along the entire perimeter of the ceiling.
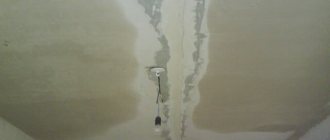
The stages of work during a major overhaul are not much different from other types of work. Mandatory drying, replastering, complete cleaning, sealing cracks, and so on. We clean the cracks, this is done using a hammer drill and from the attachments we select a narrower brush, according to the width of the ceiling crack. It happens that the slabs fit very tightly, and there is practically no gap. In this case, we simply treat the gap with a deep penetration primer. We apply a masking bandage and cover the cracks between the tiles with plaster. Then you can plaster.
Also, deep cracks between the slabs can and should be repaired using polyurethane foam. First, dry the crack, then foam it, and only then apply a primer. Remember that the foam may not adhere to the primer and again moisture may seep through the micro cracks. If partial repairs are necessary, then it is advisable to apply the finishing putty of the same brand that was used. Otherwise, the part of the ceiling being repaired will stand out a little.
Repair of painted ceilings after flooding
After you have been flooded, you need to remove the paint from the ceiling, otherwise yellow spots may appear on the new coating. You can degrease and remove microorganisms using bleach. Be careful when doing this work as the chemical is very aggressive. If bleach gets on your skin, rinse the affected area with plenty of water and, if necessary, consult a doctor.
You can disinfect it using a sponge, which is placed in a tray with a chemical. The sponge should protrude from the tray and by pressing the vessel against the ceiling, we disinfect it along the perimeter. As soon as the reaction begins - hissing, or foam starts, we move to a new area. Everything is done in a spiral - starting from the walls and reaching the center of the ceiling. After this treatment, the ceiling must be dried. You can do this using natural methods.
Afterwards, you can treat the surface with copper sulfate using a regular paint roller. Throw away all used materials immediately, as they are toxic and harmful to health.
Ceiling repair. Cleaning, priming, plastering, puttying and painting the ceiling
Common finishing technologies
After completing the basic leveling of the ceiling or installation of gypsum boards, they begin finishing, of which there are also many options. Let's start with the classic one - whitewashing, but it makes no sense to consider preparing a solution from lime and chalk yourself - there is a wide range of water-based compositions on sale in a wide price range.
Whitewashing a concrete ceiling with water-based paint
If the basic leveling of concrete slabs is carried out by plastering with cement-sand mortar or a ready-made cement-based mixture, then the final leveling of the surface is performed with gypsum putty - depending on the qualifications of the performer and the quality of the basic leveling, this will require the application of one to three layers. The surface is pre-primed in one layer with a latex-based composition, and each subsequent layer of putty is applied after the previous one has dried. Having achieved the evenness of the base, sand it with sandpaper, after which the ceiling is cleaned of dust with a vacuum cleaner and primed again.
Painting is done manually with a paint roller, then painting hard-to-reach areas with a brush. Typically, the instructions for use require diluting the paint with water in an amount of 10% to obtain the optimal consistency. Compositions for external use are also suitable for painting ceilings; their grain size is slightly higher, but they are better able to withstand washing with water if necessary.
If desired, you can add a colored tint to the white emulsion, but the amount of paint after that should be enough for two layers - you won’t be able to get the same tone of the composition a second time.
Painting is done in two layers (more if the quality of the emulsion is low), which are applied in perpendicular directions.
Important! Painting is done in the direction from the window towards the opposite wall, and the last layer should be applied along this direction.
After drying, which should occur without drafts, decorative ceiling skirting boards made of polyurethane foam are installed, the size and profile of which is selected in accordance with the dimensions and style of decoration of the room.
If you use baseboards cast from gypsum, then their installation is carried out at the stage of final leveling of the ceiling by installing gypsum putty on the solution, since higher demands are placed on the strength of fastening of these elements.
Foam skirting boards are attached to paste-like PVA glue or colorless silicone sealant, after which the joints are sealed with finishing putty. Installed skirting boards can be painted to match the ceiling or, conversely, made to effectively contrast.
Whitewashing a gypsum board ceiling with water-based paint
The technology for painting a plasterboard base is identical to finishing a leveled concrete ceiling. However, it is necessary to take into account the hygroscopicity of gypsum even in the moisture-resistant version of plasterboard, so it is better to prime drywall with a latex composition in 2 layers - in the future this will allow you to safely clean the finish using water.
Wallpapering ceilings
This type of finishing is popular and can be performed both on a concrete base and on a ceiling lined with plasterboard.
The choice of wallpaper material should be made specifically from the segment of finishing products for ceilings, since the width of ceiling wallpaper is greater than that of wall wallpaper (to reduce the number of joints), and its thickness is smaller (to reduce weight). The most common wallpaper is non-woven based.
Important! If the finishing leveling with gypsum putty is made with defects, it is advisable to choose ceiling wallpaper with an embossed texture, which will hide minor surface imperfections.
Wallpapering the ceiling is done by two people, cutting the material into strips of the required length and applying glue to one or both surfaces - depending on the wallpaper material and the type of glue.
Strips of wallpaper are glued end-to-end and placed along the rays of light from the lighting source - the transverse layout will reveal the joints of the material.
Pasting is done using special wallpaper glue, which does not leave stains from accidental dirt after drying.
The pasted wallpaper should also dry without drafts or additional heating devices. If the wallpaper material is white, then it can be painted, two or three times during use, to improve the aesthetics of the finish.
After the finishing has dried, ceiling plinths made of polyurethane foam are installed using silicone sealant.
Ceiling decoration with decorative polystyrene foam tiles
If the finishing leveling of the ceiling base is made with minor defects that painting will not hide, and there is no time to correct these defects, decorative polystyrene tiles, which will simultaneously act as a heat-insulating coating, will help solve the problem. It can be glued to both concrete and gypsum plasterboard bases.
There are a lot of varieties of this material on the market; they differ in density, surface texture, color and degree of decorativeness, which generally determines the price of the material, which is usually affordable to a wide range of consumers.
Other methods of finishing ceilings
There are many other ways to repair the ceiling in an apartment on your own or with the help of professionals, and the list is constantly growing with the development of technology. These are suspended and suspended ceilings, finishing with siding and mosaics, upholstery with finishing fabrics and decoration with gypsum stucco. The choice of method must be thoughtful and rational.
There is a nuance that is also advisable to take into account - the more money invested in the decoration, the more difficult it is to part with it, and any interior in a room becomes boring or wears out over time, not to mention rapidly changing fashion.
Coloring
When deciding how to repair a ceiling with your own hands, you turn to painting as a finishing method quite often. This popularity is primarily due to the availability of paints and varnishes on the construction market, as well as the ease of performing the work. Moreover, in some areas, such as kitchens or bathrooms, painting is a practical and convenient option. Mandatory conditions for high-quality ceiling painting are careful preparation and leveling of the surface. Otherwise, all irregularities will be visible.
Most often, water-based paint is used, less often - oil-based paint. Before use, just stir the paint thoroughly and, if necessary, dilute it until the desired thickness and color are obtained. After this, you can finish the ceiling - repair the ceiling by painting. To work, you will need a brush and a paint roller with a long rod. Painting begins from the wall, where a narrow strip is worked with a brush. For the central part of the ceiling, use a roller.
Sometimes an already painted surface needs a do-it-yourself cosmetic repair of the ceiling. In this case, the ceiling is examined for the presence of blisters and peelings of old paint. Defective areas are cleaned with a spatula and then painted again. In this case, a full repair will soon be required. However, if the old paint layer is holding up well, you can simply refresh the appearance of the ceiling by applying a new coat.
How to stick polystyrene tiles
Compared to wallpaper, the process of covering the ceiling with polystyrene tiles is much faster and easier. You can do the job alone. You will need tiles, acrylic glue, painting thread, a spatula, a construction knife and a mounting gun.
The working method is as follows:
- Calculate the center point of the room by drawing two diagonal lines from the corners of the room. Through this point, draw two lines perpendicular to each other between the walls.
- You should start gluing the tiles from the center of the ceiling. Glue is applied to the tile along the edges in a dotted line and a little in the center, after which it is applied to the ceiling. The angle of the tile must strictly coincide with the lines on the ceiling.
- All other tiles on the ceiling surface are glued in the same way. If the tile does not fit completely at the edges, it is cut to the required size.
- Finishing is done using decorative skirting boards or borders.
In this material, we looked at how to make ceilings in an apartment with your own hands, using several of the simplest methods. We hope the information will be useful to you. As for suspended and tensile structures, they are a separate topic for description.
Suspended structures (suspended ceilings)
A suspended ceiling can be both the basis for finishing and the ceiling itself, that is, there are essentially two types of suspended ceilings:
- Designs of ready-made prefabricated ceilings, like slats, Armstrong, tension - a type of suspended structures.
- And suspended ceilings can be a frame or a base that is subject to further finishing, for example, a plasterboard ceiling, which itself is a suspended structure designed to define the geometry of the ceiling and requiring further finishing. Another option is when a frame is assembled from plasterboard profiles or wooden slats and the finishing is done, in principle, to suit every taste according to the frame/slats, with any panel or sheet materials, such as PVC or wood.
There are several suspended structures, the most common are:
- A plasterboard ceiling that is painted or finished with some kind of finish.
- Slatted ceiling (usually installed in bathrooms, less often in kitchens).
- Stretch ceiling is a type of suspended structure.
- Armstrong.
Armstrong type ceiling - a classic of suspended ceilings
It is quite possible to make a slatted ceiling from suspended structures with your own hands (the link tells you how to install it). You can also install a tension one, but only a fabric one, which does not require heating.
Stretch ceiling
A stretch ceiling is, in fact, a type of suspended ceiling structure, consisting of guide rails around the perimeter of the room and a fabric: fabric or PVC. More often, PVC sheeting is used, which is heated by a gas heat gun and stretched over slats. As it cools, the canvas contracts and, in fact, stretches, forming an even and elastic ceiling.
Fabric sheets do not require heating and can be installed independently; this is discussed in the article → about installing a fabric stretch ceiling.
Stretch ceilings are considered a classic in modern times; they are inexpensive and protect against leaks from above. Compared to the “plaster + putty + paint” complex, stretch ceilings are cheaper. Installed by craftsmen in a matter of hours (2-3 hours per room).
Behind them, like any other suspended ceilings, you can hide communications: ventilation, electrical, etc. In suspended ceilings you can install lamps of almost any shape and size, from spotlights to wide rectangular and round shapes, as well as any chandeliers; they are attached not to the ceiling, but to the base (ceiling).
I recommend: Wide selection of Excavator Attachments in Diam Almaz
The only negative is that it can be easily pierced.
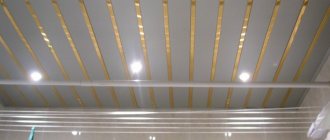
Slat ceiling
Slatted ceilings are a suspended structure consisting of a frame and slats. The frame is mounted on the existing base (ceiling and walls), the slats are inserted into guides along the perimeter of the room and snapped onto pre-installed stringers (combs, tires - other names).
The panels of this ceiling are made mainly from aluminum or plastic. Installation of a slatted ceiling can be mastered quite quickly without any experience. The kit comes with instructions, and how to install a slatted ceiling → is written on the website, read it if you are interested.
Armstrong
Having previously been a “ceiling for offices,” today the Armstrong-type ceiling has acquired new colors. Thanks to transparent panels, patterns and working with lighting, you can create truly beautiful ceilings. There will be a glowing ceiling or sky above you.
Armstrong is a frame that is attached to the base and panels/sheets are laid on top in grooves on the frame.
Plasterboard ceiling
As mentioned above, a plasterboard ceiling is not an independent finish; a frame of almost any shape and size can be constructed from it. All curved, wavy, multi-level ceilings - all this is made from plasterboard on met. profiles. In the future, the ceiling is finished at will with almost any finish described above. There is an → article on the website about installing plasterboard ceilings with your own hands.