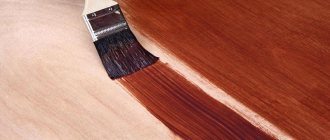
A unique and interesting technique for creating a floor covering or subfloor is liquid flooring. It is also called liquid, and all thanks to a special arrangement technology. This is an excellent option for a durable, reliable, and most importantly, perfectly smooth coating that will not leave anyone indifferent. What are self-leveling floors, what are they made of and how to make a liquid floor at home?
Liquid floor
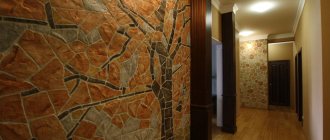
Liquid floor in the kitchen
What is self-leveling floor
A mixture of cement and sand was usually used to level the floor. But the solution turned out to be heavy; it was not possible to fill small depressions in the base with it and create the most smooth surface possible. Then, to increase plasticity, special components were added to the cement-sand mixture - this is how a self-leveling floor with the necessary characteristics was obtained.
The advantages of self-leveling floors over screed are obvious
Cement- mixtures are used mainly for preparing the base with the subsequent installation of floor coverings made of finishing materials - parquet, tiles, linoleum.
Polymer compositions have been developed specifically for the ideal finishing coating , which form a glossy surface when hardened.
A special feature of self-leveling floors is the minimum thickness of the fill, which is 3 mm.
All types of self-leveling floors are united by a common installation technology. The mixture in liquid form is poured onto the prepared base, leveled and rolled with a roller with needles.
The type of dry mixture or composition is determined depending on the humidity of the room, the required leveling thickness and the intensity of mechanical loads during further operation.
Comparison of characteristics of self-leveling floors
Advantages and disadvantages
All types of liquid floors are not ideal; they have their pros and cons, which requires, before making a choice, to determine the requirements that will be placed on the coating and the quality characteristics of a particular type of floor.
Advantages of liquid floor:
- perfectly flat surface;
- absence of connecting seams;
- strength;
- the ability to maintain appearance under mechanical, chemical, temperature, ultraviolet types of influence;
- moisture resistance;
- small thickness of the layer, it can be placed where the room does not allow the installation of others;
- Possibility of installation with waterproofing and heated floors.
Flaws:
- high price of materials;
- special requirements when preparing the foundation;
- complexity of dismantling and repair.
If all the conditions of the technological process are met, the listed disadvantages become irrelevant.
The flooring is of high quality, with a long service life, which justifies its high cost.
Main types of self-leveling floors
Based on the composition of the starting materials, self-leveling floors are divided into two main groups:
- mineral;
- polymer.
The former are a mixture of cement with fillers and belong to the category of self-leveling coatings. They have good binding qualities, so they easily form the base and final surface.
Polymer compositions are used to create a continuous finishing coating.
Self-leveling
Self-leveling floors on a cement-sand base contain additional components that give the mixture plasticity and easy horizontal alignment when installing the coating. Glue, granular filler and tint pigments are also used as additives. The dry mixture is diluted with water to the consistency of liquid sour cream.
After hardening, a smooth and even surface is obtained, in contrast to the use of a conventional cement screed, on which roughness occurs. To install such a coating, professional training is not required; the process is simple and does not take much time. The floors are not afraid of moisture, therefore they are considered universal for indoor spaces and outdoor areas.
Polymer
Depending on what binder is included in the composition, polymer floors are divided into the following categories:
- polyurethane;
- epoxy;
- methyl methacrylate.
The components are mixed using a nozzle attached to a drill for 5 minutes at low speed. The resulting compound is applied as a pour and evenly distributed onto the surface to be treated. The polymer floor is laid on concrete, metal or wooden bases.
Note! The hardening process of thermoplastic resin occurs quickly, so all work from mixing to rolling with a roller with needles is completed within 40 minutes!
Polyurethane
The floor mixture is prepared on the basis of a urethane prepolymer with the addition of a hardener. The mass easily spreads over the surface and after hardening retains elasticity, so during further use it reliably withstands vibrations and temperature changes. The floor is resistant to deformation and shock loads.
Polyurethane coatings are used in industrial and residential premises. Suitable for agricultural enterprises for raising animals and plants, as well as in industrial freezing complexes. For a variety of colors, it is possible to tint the mixture with acrylic paint.
Epoxy
The coating is created from a two-component polymer - epoxy resin and hardener. For the formation of adhesive contact, the degree of heating of the epoxy mixture is of great importance. At elevated temperatures, the viscosity of the resin decreases and a tighter adhesion of dissimilar surfaces is achieved, which ensures long service life.
It is the epoxy floor that creates a glossy surface that resembles the smoothness of glass. Reliable strength allows it to be used in industrial production with intense chemical and moderate physical loads, since high-power pinpoint impacts can destroy the epoxy layer. Due to its abrasion resistance, the coating is even used in parking lots.
Methyl methacrylate
The base is methacrylic acid methyl ester. In the middle of the last century, methyl methacrylate began to be used in the production of plexiglass. Today, improved by polymerization, the composition is used to create particularly durable flooring. The resulting defects or fragments of destruction are easily corrected by local application of the mixture.
Note! Working with methyl methacrylate requires respiratory protection from toxic fumes. It is necessary to use a respirator and provide supply and exhaust ventilation in the room.
Floors made of methyl methacrylate do not deform in the cold; the composition can be applied even at negative temperatures. High strength and abrasion resistance allow the use of MMA in production areas with intense mechanical loads. To form a durable coating, it is recommended to lay the mixture on a concrete base, the thickness of which is at least 70 mm.
How to choose a floor depending on the room, base or final finish
All brands of flooring are different. To choose the most suitable one, it is better to consider in advance exactly where the floor will be poured:
- In residential apartments and houses. It is better to choose mineral poured coatings; epoxy or polyurethane are also suitable (they can be used without finishing).
- In the kitchen, mineral mixtures are suitable under laminate, tile or linoleum.
- In the bathroom and toilet where the tiles will lie, a cement-based floor or polymer compositions are required. In baths it is also worth using cement, but without gypsum impurities.
- When sealing a balcony, porch and any external areas, it is important to choose frost-resistant mixtures. Polymer grades are suitable, but gypsum should not be used at all.
- It is better to pour a polyurethane floor in the garage. You can make a cement screed and cover it with a thin layer of polyurethane.
It is also important what basis the self-leveling floor will be on:
- Concrete (floor slab). Any composition can be poured onto it.
- Waterproofing (bitumen) or old tiles. You will first need to fill it with a floating cement-sand screed about 4 cm thick, then apply a thin layer of the final fill onto it. You can use a self-leveling floor for screeding.
- Wood or insulation. First the cement screed, then the final finishing.
Exterior decoration also matters:
- You can pour any mineral mixture under the tiles.
- Any floors are suitable for linoleum, parquet, carpet and other coverings.
Antistatic self-leveling floors
To protect industrial premises and residential areas from the formation of static electricity, a special coating installation technology is used. A conductive circuit made of self-adhesive copper tape is laid on the concrete base, forming a grid with cells of one to two meters. Be sure to ground the ends of the copper strips into a single building system.
Note! Antistatic floors are always used in areas sensitive to electromagnetic fields - computer rooms, air traffic control rooms, laboratories.
To increase the resistivity, a primer layer containing carbon black is applied to the surface prepared in this way. For the finishing coating, polymer compositions with reinforcing fibers made of metal or graphite are used. This results in surface resistance of less than 110 ohms and static leakage in the range of 105 to 108 ohms.
Which one is better to choose?
When choosing, take into account the type of room where the renovation will be carried out. Whether it will be a living space or not. The loads in these options are different, for this reason the liquid floor can be used differently. For a residential building, it is more suitable with a polyurethane or epoxy base.
These types can also withstand high humidity, for this reason they are also suitable for bathrooms and toilets. In bedrooms and other rooms where they live, the optimal choice would be to use a polyurethane type, which is more versatile in its characteristics.
Their application is done in a thin layer, this saves consumption, at least two millimeters, otherwise it will not be possible to obtain wear resistance.
For a residential building, it is more suitable with a polyurethane or epoxy base.
High-strength floors
To create a smooth surface with a strength of at least 25 MPa, a combination of cement, fractional additives and polymer fillers is used. The mixture is poured with water, mixed and applied to the prepared base within 40 minutes in a layer of 40 to 100 mm. The solution takes a long time to dry, so you can walk on it only 24 hours after pouring.
The composition is intended for basic and final leveling of concrete surfaces, mainly for further laying of finishing coatings. Used in rooms with intensive operating loads - warehouses, basements, garages. Also suitable for underfloor heating systems and the formation of screeds on the separating layer.
Device Tools
The list of tools required for pouring floors is not that long. For this reason, they often decide to carry out repairs themselves. You should ensure that you have the following tools in advance:
- Building level;
- Containers for preparing the composition;
- Construction mixer;
- Brush, needle roller to remove air from the layer;
- Special squeegee for leveling the coating;
- Damper tape, it will protect the walls from contamination, helps protect the layer from cracking under the influence of temperature changes;
- Steel marker beacons.
You should make sure you have the tools in advance.
Areas of application of self-leveling floors
| Self-leveling | Places with heavy traffic, factories, factories, warehouses, basements, garages. Used as a preparatory layer for subsequent installation of decorative coatings. |
| Polyurethane | Freezers, production workshops, sports facilities, unheated premises, parking lots. Hospitals, clinics, sports facilities, waiting rooms |
| Epoxy | Industrial enterprises, laboratories, utility rooms, hangars, nuclear power plants, medical institutions, shopping and entertainment centers. Country houses, apartments, schools, canteens, restaurants. |
| Methyl methacrylate | Pharmaceutical enterprises, factory floors, industrial freezing units, sports grounds, parking lots, ramps. |
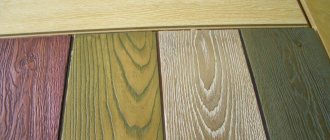
Decorative design of polymer floors
To add decorativeness, epoxy and polyurethane coatings are made with geometric or pictorial patterns. a 3D effect look especially impressive . To do this, a three-dimensional pattern is glued onto the prepared surface, and after 24 hours it is filled with transparent epoxy resin.
The graphic image is applied to paper, fabric or special film. To create a spatial effect with visual perspective, photo printing is used. Fashionable 3D floors are actively used in shopping centers, offices and institutional halls. The hypoallergenic nature of epoxy resin makes it possible to decorate children's playrooms with three-dimensional designs.
flocks - when pouring .
They are available in various colors and sizes. Apply immediately after pouring and rolling, until the coating layer has hardened, by hand or using a flock gun. After 12 hours, the dried surface is coated with colorless varnish or transparent epoxy resin.
Note! Self-leveling floors with silver, gold and multi-colored sparkles look original. The manufacturing technology is the same as creating a coating with flocks. Shiny floors create a festive atmosphere and are used in cafes, restaurants and shopping centers.
Another interesting decoration option is a stone carpet .
Quartz sand with a rich color palette or stone chips are added to polymer resins. To obtain a catchy pattern, several shades are used in one coating, which are applied using stencils.
Depending on the place of use, the stone carpet is made in two versions:
- Open. It has a rough surface that has anti-slip properties. Used in rooms with high humidity or outdoors.
- Closed. It is carried out in two stages - after applying a mixture of mineral filler and polymer component, leave it for 12 hours and apply a transparent layer of epoxy resin. The result is a glossy coating with decorative inclusions inside.
A stone carpet looks original when one of the filling elements is shell rock with a fraction of 50-60 mm. This coating is appropriate to use when decorating the space around swimming pools and artificial reservoirs.
To create luminous floors and paths in the garden, a luminescent component is added.
Cracks and their elimination
There are situations when, due to careless operation or due to a violation of technology, cracks appear on the surface of the liquid floor. They should be eliminated immediately, without waiting for an increase.
Necessary
- slightly expand the resulting damage;
- remove dust from its surface;
- cover with primer mixture;
- fill with new solution.
If you don’t want such troubles to await you at the end of a job you’ve done yourself, invite professionals.
The polymer materials manufacturer Streamline pours liquid floors using its own materials.
The result of the work is guaranteed. If you want to buy floors cheaper, read the news from our online store, where we publish not only tips and pouring rules, but also promotions for discounts on certain groups of products, as well as discounts on floor installation.
How to calculate the required amount of mixture
To ensure that there is no excess solution left or a shortage of it is discovered during the pouring process, it is necessary to first calculate the exact consumption of the material. To do this, you should know the basic parameters:
- The area of the room that is planned to be filled is S.
- How thick will the layer be – H.
- The mixture density value is P.
By measuring the perimeter of the room with a tape measure, you can easily calculate the area to be filled. The size of the layer is determined depending on the purpose of the self-leveling coating. The density of the mixture is always indicated on the commercial packaging.
To calculate how much mixture is needed, you need to multiply three parameters:
Flow = S x H x P
Then divide the result by the weight of one package and get the exact amount of material needed.
EXAMPLE:
A room of 30 square meters is filled with a layer of 10 mm. The density of the mixture is 2 kg/m2/mm. Packaging 25 kg.
Consumption = 30 x 10 x 2 = 600 kg or 24 bags.
Pouring technologies
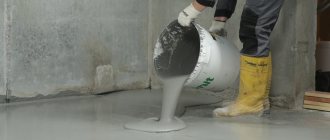
Self-leveling floor
Work begins with preparing the base - cleaning it from dust, dirt and elements that can weaken adhesion. If there are cracks, they should first be sealed using a thick cement-based mortar. Then the base is treated with a primer and allowed to dry for an hour. A damper tape is fixed around the perimeter of the surface being poured; this is done to compensate for thermal expansion. Beacons are installed on the base prepared in this way, checking the horizontal position using a level.
The mixture is diluted with water at the rate of 200 ml per 1 kg, it turns out that 5 liters of liquid are needed for a 25 kg bag. Mix to obtain a homogeneous mass using a drill with an attachment or a professional mixer. Take a break for 5 minutes and then stir again. The floor must be poured no later than 40 minutes from the start of mixing.
Note! Excess water will cause the mixture to separate and reduce the strength of the coating.
The floor begins to be poured from the area furthest from the entrance, gradually moving towards the exit of the room. The solution spilled over the surface is leveled with a T-shaped lath and then rolled with a needle roller to remove air bubbles. Until the floor has completely hardened, which will take 24 hours, it is necessary to protect the coating from temperature changes and mechanical stress.
The nuances can be seen in our video:
Polymer floor
The poured polymer compound can be laid on a concrete, wooden or metal base. All gaps, cracks and delaminations must be sealed with special compounds designed to work with a specific material, and then the surface is treated with a primer. A deformation tape is laid around the perimeter and beacons are placed.
Benchmark for self-leveling floor
If the floor is poured in a room with high humidity, then the binder must be waterproofing.
The polymer floor consists of two components, one of which is a hardener. They are mixed for 2-3 minutes in a large container using a spatula attachment attached to a drill. Since a thermal reaction occurs during the mixing process, it is recommended to cool the tank where the mixing is carried out by immersing it partially in cold water.
The floor is poured at a temperature not lower than +10 degrees; at lower values, the floor becomes less plastic. They start from the farthest corner and do not stop, because the finished mixture must be poured in 30-40 minutes. During the pouring process, remove air bubbles using a roller with needles.
During hardening, drafts should not be allowed in the room, because the layer must dry evenly, otherwise cracks will appear.
Depending on the type of polymer and added components, the self-leveling floor can dry to the stage of possible mechanical load from several hours to 3-5 days. Some types of polymer coatings take a week to dry.
Application of Dekotla epoxy self-leveling floor:
Do-it-yourself liquid floor - step-by-step instructions, technology features and preparation for work
Those who are planning to install self-leveling floors themselves are warned that apparent simplicity is deceptive.
There are nuances that must be strictly observed. This concerns the preparation of the base and the process of mixing the working composition.
Don't think that details don't matter. Any violation makes the new expensive coating unsuitable for use. Correcting errors will require dismantling (and this is a very labor-intensive process) and pouring a new coating.
When preparing the base for pouring, it is treated with a grinding machine, cleaned of debris and dust and carefully inspected. All defects must be eliminated, potholes and cracks repaired. The protrusions are removed during the grinding stage.
For the base, the permissible height difference is no more than 2 mm. Measurement is made by level. How much working composition will be consumed during pouring depends on the thoroughness of this stage.
Particular attention should be paid to areas with traces of old paint or oil stains. These substances do not allow the layers to adhere, which means that the new coating will peel off.
After all defects have been eliminated, the base is again sanded and dust-free. Poor cleaning also impairs adhesion. The prepared base is coated with a primer, which also improves the adhesion of the layers.