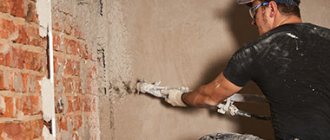
Renovation of premises involves several stages of surface finishing. Plastering walls is a construction technology, one of the main stages of processing and preparation. Professionals know that the result of the repair depends on the accuracy of following all the rules for plastering walls. Beginners who decide to plaster the walls themselves may encounter difficulties. To help novice builders, our material about the types of plaster mixtures and technology features. Find out recommendations for choosing plaster, tips for applying the mixture and ways to save money.
What is plaster used for? Surface Requirements
Why is plaster needed?
The main purpose of plaster is to prepare the surface for further finishing. Plaster coating also solves problems such as:
- Leveling the ceiling and walls for applying the finishing touches.
- Masking of small cracks, potholes, chips.
- Strengthening brick and stone masonry.
- Preventing the penetration of moisture from the environment.
- Protecting walls from rot, mildew, mold, rodents and insects.
Also, treating surfaces with a plaster mixture serves as additional insulation and sound insulation. A plastered wooden wall becomes less fire hazardous due to the protective layer.
Plaster is used on various surfaces. For each type, there are requirements specified in the construction regulatory documentation.
For non-residential premises
In premises not intended for living (utility, storage, public purposes), restrictions on surface unevenness are established - per 1 sq.m. the difference along the horizontal and vertical axis should not exceed 3 mm.
For facades
External walls on the outside should not have vertical and horizontal deviations of more than 2 mm per 1 sq.m.
For residential premises
More stringent requirements apply to wall surfaces in residential premises. Allowed 1 mm level difference per 1 sq. meter of processed area.
Simple, improved and high quality plaster
Any of the above types of plaster can be made in a simple, improved and high-quality version. Simple plaster is used mainly in non-residential premises or in cases where further finishing with other materials (for example, tiles or decorative panels) is planned.
Much more stringent requirements are already applied to improved plaster. According to the snip, the plaster should not have a deviation from the plane of more than 2 mm. The evenness of the plaster is checked using special tools - a rule, a plumb line and a special probe. Measurements are carried out in an amount of at least three for every 10 m2 of surface. Such plastering is most often performed outside the room, but only if the building is not planned to be decorated with additional stucco.
For interior spaces, high-quality plaster is most often used. It is performed in several layers. First, a spray layer is performed, then primer layers and several finishing, covering layers. The usual thickness of high-quality plaster is 20 mm.
Plastering of the surface is carried out according to beacons - guides, which allow the work to be completed flawlessly. Placing beacons takes quite a long time and requires considerable scrupulousness. The cost of such work is significant, so high-quality plaster is produced in rooms that have the most stringent requirements.
Flaws. The main mistakes of newbies
The main mistakes of beginners
When starting to independently treat walls with a plaster composition, you need to focus on the end result. The result of the work should be smooth, smooth walls with a uniform surface. However, without some experience in using the technology, it is difficult to achieve the ideal effect. This is the only negative point in using plaster. Beginners often make mistakes that ultimately do not give the desired result.
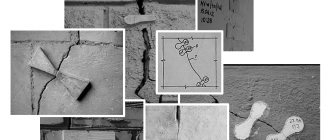
Formation of cracks
Cracking of the frozen layer is caused by:
- Failure to comply with temperature recommendations during work - for each mixture, the manufacturer determines the permissible temperature range at which plastering can be carried out. It is necessary to follow the instructions for use, since it is at the specified temperatures that the mixture retains its plasticity and does not lose its performance properties. For example, façade work must be carried out at positive t˚ values.
- Changing the period and mode of drying of the composition - the technology of applying the plaster solution includes observing the hardening period of the mixture. The manufacturer also indicates the approximate setting time of the composition, and the exact drying period depends on the wall material, environmental humidity and the thickness of the applied layer.
Important! When plastering walls, you need to make preliminary measurements of the temperature in the room, determine the humidity level, and also be patient to maintain the final hardening period of the composition.
Violation of technological regulations
Construction standards should not be neglected even in the case of serious defects in the surfaces being treated. If the walls have areas with falling fragments, before plastering it is necessary to eliminate the defects of the partitions and load-bearing structures. The thickness of the mixture layer must correspond to normal values; deviation is allowed in extreme cases when the unevenness of the plane is too large.
Surface contamination
If you use finishing plaster ready-mixes, you may encounter their ability to increase the attraction of dust, small debris, and dirt. To avoid this effect, a protective composition is applied to the walls - a primer, special varnish or wax.
Increased solution consumption
For an ideal result and a smooth surface, beginners in plastering apply a large volume of prepared mortar to the walls. At the same time, the technology for applying plaster is not followed. Leveling should be done in stages, evenly and maintaining the same level.
16 mistakes in plastering walls video
Types of plaster
Types
The quality and result of plastering walls depends on the correct choice of building mixture for plastering. There are many types of composition classifications. When purchasing this building material, you need to pay attention to the main component of the mixture, user characteristics and purpose.
Cement
Cement mixture
The most common and traditional type of construction mixture. From the name it is clear that its main component is cement. The characteristics of the plaster depend on its brand - strength (performance properties), resistance to temperature changes (frost resistance), vapor permeability (moisture resistance), etc.
Used for rough finishing and finishing decorative coating. Can be applied manually or mechanically and is easy to level. The working layer can reach up to 20 mm, excluding reinforcement.
Cement plaster is the basis for other types of mixtures with enhanced properties. To improve performance characteristics, polymer components, lime, clay and other materials are added to it.
Plaster
Gypsum mixture
is indispensable for treating walls in dry rooms. Due to the fine fraction of the gypsum base, this plaster is suitable for masking small cracks and creating a smooth surface. If the leveling technology is followed, it does not require additional surface filling.
Gypsum plaster is plastic, does not form cracks on the surface, and withstands shrinkage of walls in new buildings well. It is used for rough and finishing interior finishing; it can also be used as a decorative coating. Compatible with other dry mixtures and components, such as clay or lime. A special feature of gypsum plaster is its short hardening time.
Decorative
Decorative plaster
The main purpose is to create artistic accents and add texture to the surface of the walls. Such mixtures contain fractions of insoluble materials, which create a certain effect on the treated surface. Working with decorative plaster requires skills and the use of special tools. There are many techniques for applying the composition; the result depends on the choice of method.
Not used for rough finishing; applied as a finish in a small layer of no more than 10 mm.
Silicone
Silicone plaster
In addition to the cement-sand mixture, plastic materials are added to the composition of such plasters - silicones, resins and additives. They give elasticity to the finished mortar and strength to the treated walls. Features of silicone plaster:
- long service life - manufacturers guarantee up to 20 years of operation;
- immunity to UV radiation – retains an attractive appearance for a long time (does not fade);
- increased resistance to temperature changes - withstands both severe frosts and heat, without loss of strength;
- high adhesion - adheres well to any wall material (wood, concrete, gas silicate), and does not require preliminary priming of surfaces.
The plastic material can withstand wall shrinkage without cracking.
Sgrafito
Sgraphito
A type of plaster lime-cement mixture with various fillers, such as marble or quartz chips. Also called the method of applying the solution. Sgraffito technology is the effect of scratched patterns, ornaments or designs.
Used as a main and finishing finish. Fragments of walls or panels made using the sgraffito technique and plaster look especially impressive.
Venetian
Venetian type of plasters
This is the name of a separate type of plasters. Mixtures may differ in composition, which includes only natural ingredients. The most common mixtures contain marble flour or the more expensive onyx. Several application methods have also been developed for treating surfaces with Venetian plaster. It is possible to imitate craquelure and a cut of natural stone. With the help of Venetian plaster, they create a fresco-like stylization and create a glossy surface.
Textured
Textured mixture
A type of plaster mixtures for finishing facade and interior walls. The composition may include various materials, such as fiberglass, cellulose, quartz flour, silicate and other fillers. Used to create various textures - imitation of stonework, velvet, silk, mother-of-pearl cladding, etc.
Recommended Blends
Among the popular brands of wall plasters, we will consider the most popular ones. It is necessary to select building materials taking into account the characteristics of the base that will be plastered.
KNAUF Rotband
KNAUF Rotband Construction multifunctional mixture
Construction multifunctional mixture based on gypsum with polymer additives. Has leveling properties. It is applied to concrete, brick walls, as well as surfaces made of polystyrene foam and cement without prior use of a primer.
The consumption of plaster from a German brand is almost half that of a conventional cement-sand composition - approximately 8.5 kg per 1 sq.m, provided that the layer is no more than 10 mm. It is possible to apply a layer of up to 50 mm without previous spraying.
The plaster mixture is sold in bags weighing 30 kg. The cost of one package is about 410 rubles.
Weber Vetonit Profi Gypsum
Weber Vetonit Profi
Basic building material based on gypsum. Used for leveling walls and ceilings indoors. It has good adhesion to any substrate - wood, concrete, etc.
Consumption is economical - from 8.5 to 10 kg per 1 sq.m. with layer thickness up to 15 mm.
Standard packaging is a 30 kg bag. Approximate cost: 390-420 rubles.
Forman 61
Plaster Forman 61
Cement-based plaster, suitable for rough and basic finishing for interior and exterior work. Easy to apply, similar in properties to similar gypsum mixtures. Can be applied to any substrate with varying degrees of unevenness.
Consumption – up to 14 kg per 1 sq.m. with a lining thickness of 30 mm. It is possible to apply repeated layers up to 10 mm.
Sales - in bags of 25 kg at a price of 220 rubles.
Veber Vetonit TT40
Universal mixture Veber Vetonit TT40
Universal mixture for basic leveling of external and internal wall surfaces. The basis of the composition is cement, there are quartz additives. Suitable for concrete, foam concrete, brick surfaces, as well as for walls made of expanded clay concrete blocks. Not recommended for use on polymer substrates.
The mixture is consumed very economically - 1.7 kg per 1 sq.m. with a layer of 5 mm. You can apply a layer of up to 40 mm, while the drying time of the solution increases to 2 days.
Plaster is sold in 25 kg packs, the cost of a bag starts from 280 rubles per bag.
M100 Besto
Construction mixture M100 Besto
Construction mixture based on cement and lime. Used for interior work and exterior wall decoration. Has leveling properties. Suitable for concrete, wooden bases.
Dry material consumption – 17-18 kg per 1 sq.m. provided that the layer thickness does not exceed 10-12 mm.
Plaster is sold in bags of 25 and 50 kg, the price is from 125 kg per 25 kg bag.
Special plaster
Special plaster . This type of plaster is necessary to impart specific properties to various surfaces. Most often, plasters with waterproofing, sound-absorbing, heat-insulating, X-ray protective and acid-resistant properties are used. Waterproofing plaster is made on the basis of cement with the addition of sealing additives. It is used for rooms with high humidity (kitchen, bathroom, etc.). Apply to the prepared surface with a spray bottle or manually: use a medium-sized spatula to spread the plaster onto the surface, after which it is leveled using the h-rule. The layer thickness should not exceed 20 mm. Most often, waterproofing plaster is used when laying ceramic tiles. In this case, the resulting surface is given a ribbed relief to improve the adhesion of the plaster to the tile. Sound-absorbing plaster is made from light porous rocks. This type is used to reduce noise levels. Apply by spraying with a spray gun or manually with a metal trowel using the throwing technique. The main layer of plaster must be at least 25 mm. Sound-absorbing plaster is not rubbed down, since unevenness enhances the sound-proofing properties. The best covering in this case would be wooden gratings or thick fabric - these materials are distinguished by their natural sound-absorbing ability, and their use will enhance the desired effect. Thermal insulating plaster is made with the addition of foam glass, expanded clay or perlite. The use of perlite-based material gives the surface acoustic, thermal and waterproofing properties. Heat-insulating plaster is applied to the prepared surface - it is cleaned of dirt and dust, and areas of the old coating that are poorly attached to the base are removed.
The plaster is applied to the surface with a metal spatula in a layer of 10-20 mm. You should wait until it begins to set with the base, then moisten the surface with water and smooth out any unevenness with a trowel. All heat-insulating plasters contain caustic substances that, if they come into contact with the skin, can cause serious inflammation, so it is necessary to work with rubber gloves.
X-ray protective plaster is used in medical or industrial areas where radiation is used. It is made on the basis of cement with the addition of barite, and barite sands must have grains of no more than 1.25 mm and contain at least 85% barium sulfate. The composition of plasters must contain at least 25% barite. Acid-resistant plaster is used for finishing industrial premises with an aggressive acidic environment. It is made from cement with the addition of quartz sand, liquid glass or quartzite.
Decorative plaster
Today it is the simplest and most effective means of surface finishing. Using decorative plaster you can create a wide variety of designs. This is achieved thanks to the variety of its types and methods of application. The material is used both for facade work and for interior decoration. Plaster looks equally good on walls, floors and even ceilings. You can find more interesting articles in the STEP-BY-STEP CONSTRUCTION section!
- Previous: Applying cement plaster
- Next: Hanging a wall
Required tools and materials
Necessary tools
When working with plaster mixtures, you will need construction tools, consumables, and personal protective equipment. Before work you need to prepare:
- The required amount of plaster mixture is calculated taking into account the consumption of the selected material and the processing area.
- Mixing Tool – Mixing the mixture by hand is difficult and almost impossible to achieve a uniform texture. To facilitate the process, use a special mixing attachment on a drill or hammer drill.
- Container for preparing the solution - it is advisable to take a container no more than 15-20 liters.
- The main tools are a spatula, a trowel, brushes for applying the solution and moistening the base, a rule for simultaneously leveling the mixture over a large area, and a foam roller for priming.
- Hammer – for installing beacons.
- Consumable fasteners - dowel pairs, self-tapping screws for concrete or wood.
- Auxiliary devices - a level, a square for monitoring the quality of work and identifying errors, an iron brush for cleaning surfaces, metal profiles, rags.
- Abrasive materials - sandpaper, wooden or plastic grater - a device with clamps for the abrasive base.
- Protective equipment – gloves, goggles, respirator mask, work clothes and hat.
It is also necessary to provide a primer composition for pre-treatment of the walls. Its quantity is also calculated taking into account the absorbent characteristics of the base and the recommended consumption.
Surface preparation
A procedure that is perceived by many as optional and insignificant. Beginners do not understand why they need to prepare walls, especially for rough finishing. However, the result of covering the walls with plaster depends on how the preparatory work was carried out. The base must be able to accept and retain wet working composition well, and be free from residues of previous finishing materials, contamination, etc. Each type of base being processed has its own preparation nuances.
Removing old plaster
Dismantling
This stage must be carried out if walls with previously applied finishing materials are being plastered. You should get rid of all layers of old plaster using a spatula. If voids are found underneath (you can tap the surface with your hand or a small object), you should use a hammer. Having broken the swollen places, you can pry off the remaining plaster with the sharp angle of a spatula.
After the dismantling has been completed, unevenness in the concrete base, mortar leaks from the seams between the bricks and other flaws in the walls should be cleaned. Iron brushes are used for this purpose.
Another common step for all substrates is to remove dust and debris using a dry wide brush and a damp cloth.
Preparing a concrete wall
The main defects on such a surface are cracks, chips, and potholes. You need to get rid of them before plastering. There are several ways to do this:
- Filling large cracks with polyurethane foam.
- Joining chips and cracks with a knife and filling the resulting holes with putty or sealant.
- Covering with cement mortar for “stripping” - the composition is applied to the defective area and the residue is removed with a spatula.
Then you need to apply notches about 10 mm deep on the wall for better adhesion of the base to the mortar. Use a hammer or ax for this purpose. After the notches, remove the dust and prime the surface. You definitely need to check how well the primer has worked. Run your hand along the wall and check if there are crumbling particles. A properly primed surface will not cause flaking.
Preparing a wooden wall
How to prepare wooden walls
The main type of preparation is drying the base and protecting the wood with special compounds. The treatment is carried out 1-2 days before the main work, antiseptic agents are used to prevent rotting, mold, mildew, and insect pests.
The next stage is installation of the sheathing. This must be done so that the working mixture sticks to the tree. Natural material tends to change in volume - wood contracts and expands due to temperature changes. The sheathing on wooden walls is mounted from thin slats, shingles, nailed diagonally or reinforced with chain-link mesh. The shingles are also treated with antiseptic and fire-fighting protective compounds.
Preparing a brick wall
If you decide to plaster a brick wall, the main preparation steps will be:
- cleaning from solution build-up;
- notching;
- dust removal;
- degreasing;
- primer.
If work is carried out on old brick walls, it is necessary to carry out reinforcement with a chain-link mesh.
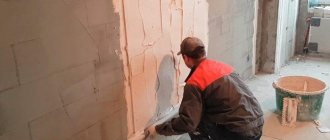
Plastering brick walls indoors
Plaster on painted walls and whitewash
Professionals do not recommend plastering walls with a weak coating - a layer of paint or whitewash. If it is not possible to completely get rid of old finishing materials, you need to assess their condition before plastering. All places where the paint peels off and the whitewash crumbles are cleaned and sanded. To remove as much of the old coating as possible, the walls are wetted with warm water and re-troweled.
Then notches are applied with a depth of 8-10 mm and at a distance of no more than 10 cm. Afterwards, the surface is dusted off and allowed to dry thoroughly. The preparation of painted or whitewashed walls is completed by treatment with a deep penetration primer.
How to putty on paint
Preparation of aerated concrete and foam block walls
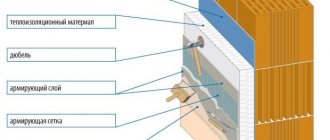
Such surfaces have a porous structure, which promotes good adhesion to the solution. However, aerated concrete blocks and foam blocks are treated with a hydrophobic compound that repels water. Therefore, it is necessary to treat the surface intended for plastering with a primer that penetrates deeply into the base structure. With the help of a primer, dust is removed and the adhesive properties of the walls are increased.
Arbolite walls
Wood concrete is a porous material that holds the plaster solution well and does not require any preparation other than a primer. But professionals recommend taking into account the cladding layer - if it exceeds 20 mm, it is better to install a reinforcing mesh for additional adhesion.
Plastering surfaces
All types of structures are plastered only after they have completely settled. In this case, the strength of the underlying layers of plaster must be higher than or equal to the strength of the covering layers.
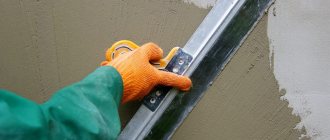
Applying the solution manually is allowed only for a small amount of work. The solution is applied in two ways: by throwing and spreading.
Plastering of interior spaces with conventional solutions is carried out in the following sequence: plastering the ceilings and upper parts of the walls; pull out cornices, arches, and other rods, cut apart ceiling husks; cover and rub the ceilings and upper parts of the walls; plastering the upper parts of window and door openings; cut up the husks and husks; cover and rub the bottom of walls and openings. Plaster layers are applied to the surface at certain intervals: lime-gypsum mortars - 7-15 minutes, cement mortars after 2-6 hours, lime mortars after the previous layer has whitened and not completely dried.
The spray is applied to the surface in a continuous, even layer and, as a rule, is not leveled. The primer is applied to the spray in one or more layers at the required time intervals. Each layer of soil is leveled. The last layer is leveled especially carefully with a trowel, after which it is checked using a control rule; this makes it easier to apply the top layer.
Cornices, belts and other rods are pulled out using templates according to the guide rules.
Window and door openings are finished using a mortar according to a guideline.
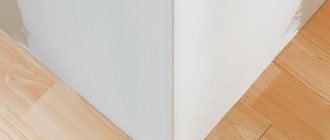
The husks (the inner corner at the junction of two walls or the ceiling and the wall), the husks (the outer corner at the junction of two walls) and chamfers are rubbed with ordinary or shaped tools - a grater, a husk rule and a truncated grater, and templates. For rubbing husks, usenki and chamfers, use solutions prepared in fine sifted sand.
For the covering layer, use a solution of the same composition as the soil, but prepared on fine sand. It is applied to soil moistened with water and carefully leveled with trowels.
A decorative surfacing layer 5-50 mm thick is applied in two or more stages onto scratched, hardened, well-cleaned and water-moistened soil from an ordinary solution in the usual way without or with subsequent processing. During subsequent processing, the plaster is trimmed, scraped, cut using relief rollers or combined methods, etc. When trimming with brushes and brushes, textures of varying degrees of roughness are obtained. To give the surface a hatched appearance, cycles are used. A repeating pattern is made with relief rollers on the surface.
When installing stone plaster, a solution is used, which includes:
1) Portland cement,
2) Lime dough,
3) Marble flour,
4) Pigments,
5) Rock crumbs (marble, granite, limestone, etc.) with a particle size of 0.3-5.0 mm,
6) Quartz sand,
7) Mica (up to 10% by weight of cement)
It is processed by forging, notching, hewn to look like torn stone, etc.
Terrasite plaster differs from stone plaster in the presence of a large amount of mica in it. Treat it with scrapers or nail brushes 3-6 hours after applying the solution. As a result of processing, crumbs and mica are exposed.
Waterproofing plaster is made from a conventional cement-sand mortar with a composition of 1:2 - 1:3, which is applied to the insulated surface with a cement gun and from a cement mortar with sealing additives (liquid glass, ceresite, sodium aluminate, emulsions, etc.)
Sound-absorbing plaster is made in the usual way over a spray layer of cement-sand mortar.
X-ray protective plaster is performed on barite filler; its thickness should not exceed 50 mm. If the thickness is greater, monolithic plaster is replaced with cladding made of barite concrete slabs.
Acid-resistant plaster is intended for finishing premises of chemical enterprises. Its resistance to aggressive agents is ensured by the use of acid-resistant cement as a binder, and crushed quartzite as fillers.
For finishing the facade surfaces of buildings or industrial products of large-panel housing construction, decorative coatings based on paste-like compositions are used. With a total thickness of 5 mm, coatings can be composed of one or more layers of paste applied by mechanical means.
When performing plastering work, various scaffolding, scaffolding, cradles, towers, tables, and mobile lifting units are used.
Plastering on beacons
Plastering on beacons
Beacons are landmarks installed on the walls to create a flat surface. This method is used for walls where differences exceed the recommended layer of mortar by 5 cm or more. Metal profiles are used as beacons. Here's how it's done:
- Markings are made - the length of the walls is divided into segments of 1-1.5 meters,
- Installation of beacons - guide profiles are installed according to the marks, the vertical is checked with a plumb line
- The evenness of the installation is checked - the horizontal level is checked with a level.
- Fastening - the profile is attached to self-tapping screws or dowels, and in order to install the headers tightly on the wall, you need to use a quick-setting mortar. This is usually a gypsum mixture.
Important! You can begin the main work only when the fastening solution has dried.
Preparation of the solution (step by step instructions)
How to properly prepare putty
Before you start preparing the solution, you need to read the recommendations of the manufacturer of the building mixture. As a rule, the bags indicate water standards for a certain amount of dry matter. You need to decide how many workers will work in approximately 40-50 minutes. This is the average time for the mixture to retain its properties. Based on the calculated amount, begin preparing the solution in several steps:
- Based on the manufacturer’s recommendations, the required volume of water is collected into the prepared container.
- Add a small amount of dry matter to the liquid and stir by hand. For 5 liters of water, it is recommended to first add 5 trowels of plaster mixture.
- The required mass of the building composition is added to the liquid solution and a mixer is connected for mixing.
It is necessary to achieve a uniform consistency, otherwise when leveling the solution with a spatula, lumps will leave grooves.
Saving Tips
The cost of plastering walls can be reduced if you listen to the advice of professionals:
- Choosing the right composition for plastering - you don’t need to focus only on cost. It is necessary to take into account many parameters - the type and purpose of the finished dry mixture, the manufacturer’s recommendations. For example, for rough processing of surfaces with large differences, you can use a simple mixture of cement and sand, and for the ground and finishing layers, purchase more expensive plaster with a fine composition.
- Draw up an estimate - cost calculations should be made taking into account measurements of the area of the surfaces being treated, the expected thickness of the applied layer, and the recommended proportions for preparing the solution. This way you can calculate the exact number of bags of plaster and not buy too much. Experts recommend adding 6-8% to the result obtained for unforeseen situations (the solution did not have time to develop and it dried out, the thickness of the layer increased, etc.)
- Prepare the walls thoroughly - get rid of old finishing materials, putty or foam large cracks and holes. This reduces the amount of plaster composition consumed.
- Do not ignore the primer - a special solution penetrates into the surface layers of the base, forming a barrier of resinous substances in them. Such a barrier prevents strong absorption of the plaster, thereby reducing the consumption of the working composition.
Solutions for special plasters
This type of plasters includes waterproof, water-repellent, X-ray protective, thermal insulation, acoustic, fire retardant, etc. Solutions for these plasters are applied in the usual ways manually or mechanically, and some of them are applied by shotcrete. Solutions for these types of plasters are prepared directly on site.
Solutions for waterproof plasters are prepared from cement, sand and additives (liquid glass, ceresite, sodium aluminate and calcium nitrate, superplasticizer). Liquid glass is used diluted with water 5-10 times. The resulting solution is used as mixing water.
Ceresite, sodium aluminate, calcium nitrate use 5-^-10% aqueous concentration as mixing water. The superplasticizer is introduced with mixing water in an amount of up to 1% of the cement mass, and the amount of mixing water is reduced (W/C no more than 0.5) due to an increase in mobility.
Solutions for water-repellent plasters are prepared by adding organosilicon water repellents to them to increase water resistance (aqueous solutions of sodium siliconates GKZh-10 and GK.Zh-11, aqueous emulsions of polyhydrosiloxane liquids GKZh-136-41 and GKZh-136-157M, phenylethoxysiloxane emulsions FES-50) .
Hardened plaster is treated with a 5-10% solution of these liquids. Check the quality of the surface by wetting it generously with water after three days: if the water rolls off and the material does not get wet, then the quality is satisfactory.
For heat-protective plasters, lime and clay-lime mortars with light fillers (sawdust, wood chips) are used. Dry heat-insulating mixtures consisting of gypsum, perlite sand and additives are also used (GOST 10832-83*).
The most common method of applying heat-insulating plasters is mechanical spraying, and when using dry mixtures, the gunite method is used.
Solutions for acoustic plastering are light solutions with a density of 600-1200 kg/m3, where the binder is cement or gypsum, and the fillers are slag, pumice and other lightweight materials. Acoustic solutions are applied directly to cleaned surfaces or over a soundproofing layer of asbestos fiber, mineral wool, or foam materials.
Solutions for barite (X-ray protective) plasters are prepared from cement and barite sand containing at least 85% barium sulfate (ratio 1:3; 1:4). Solutions are prepared directly at the work site.
The thickness of barite plaster is at least 30 mm. It is applied manually in several layers with a thickness of 25 about 6 mm. The last layer of plaster (covering) is made with a cement-sand mortar with a layer of no more than 1.5 mm.
In connection with solving the problem of fire safety, the use of fire-retardant plaster OGVP, developed at NIIMosstroy, in construction practice is very relevant. It consists of a heat-insulating filler (mineral rock wool, slag or mullite-silica wool), an inorganic binder (gypsum-cement-pozzolanic binder), a binder retarder (aqueous polymer dispersion based on SKS-65 GP latex) and a fire-resistant plasticizing additive (flotation sludge phosphorite ores - a waste product from the Voskresensky Mining and Chemical Combine).
The fire retardant composition OGVP is produced in the form of two components: component No. 1—gypsum cement-pozzolanic binder, packaged per batch in kraft paper bags; component No. 2 - hydromass prepared in a factory by mixing fiber, airborne fiber, sludge and water in an SM-400 type mixer for 25-30 minutes and packaged per batch in polyethylene containers.
Conclusion
Plastering is the simplest and most common way to level wall and ceiling surfaces. A variety of ready-made mixtures allows you to treat walls both indoors and outside buildings. Do-it-yourself plastering is a completely doable task even for those who have never held a rule and a spatula in their hands.
To achieve the desired result you must:
- carefully study the composition of the mixture, its purpose, consumption;
- pay due attention to the preparatory stage;
- follow the manufacturer’s recommendations on the proportions for preparing the working solution;
- observe temperature conditions during work;
- follow the step-by-step instructions when preparing the solution, applying and leveling the mortar on the wall.
Don't be afraid to carry out such a labor-intensive process yourself. Armed with patience, confidence and our advice, you can tackle plastering your walls with ease.
Do-it-yourself plaster from A to Z
Facade plasters and plasters for interior work
If we consider what kind of plaster there is, depending on the conditions of further operation, then all plaster coatings can be divided into two classes: for facade and for interior work. For facade plaster, the fundamental properties will be its strength and durability. Since the plastered surface of the building is constantly in contact with the external environment, facade plaster must have frost resistance, moisture resistance and inertness to ultraviolet radiation and atmospheric oxygen.
It must be said that when choosing plaster for the facade, it is necessary to take into account the type of material from which the walls of the building are made. For houses built from cellular concrete, porous and lightweight bricks of an enlarged format with a significant proportion of voids, the use of conventional lime-cement plaster mixtures is not recommended, since in this case massive formation of cracks or even rejection of the plaster layer is observed.
For the finishing of such buildings, the market has long been offering special compositions, most often based on gypsum with additives, their properties optimized for application to material with a cellular structure. So before carrying out plastering work, be sure to consult with a specialist which plaster will best suit the walls of your home.
Plaster used for interior work is not exposed to fairly harsh weather conditions. Therefore, when choosing it, preference is given to such quality as environmental friendliness. From this point of view, water-based plasters are much preferable for interior work. After all, even if they contain polymers, when they decompose, they do not form toxic decomposition products. An important factor in choosing the type of plaster for interior work is its decorative qualities. Although, it must be said that such a division is somewhat arbitrary and many plasters have a universal purpose, being used both indoors and for finishing the facade or basement of a building.