What is plaster
Plastering of the facade is carried out using special mixtures, which contain a binder component and various additives. The material can be ordinary or decorative. When cladding buildings, this nuance should be taken into account in order to correctly select and calculate the required amount of mixture, as this will help reduce costs. For significant surface unevenness, both types must be used. In cases with insulation, for example, using wet facade technology, only a decorative layer will be sufficient, since leveling occurs due to the laying of thermal insulation materials.
Most experts prefer finishing the façade of a house with plaster. This material has its pros and cons. Its popularity is due to:
- High quality characteristics. The cladding material must have increased abrasion resistance and good vapor permeability. This is exactly what plaster is. In addition, an additional layer of heat and sound insulation is created on the plastered surface. The high strength of the material prevents damage from external factors.
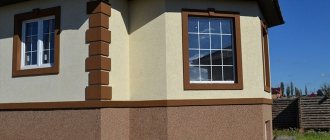
- Attractive appearance. You can make the facades of houses made of plaster perfectly smooth or with a relief surface. Working with decorative plaster compositions will bring originality, and painting the facade over plaster will make it brighter and more expressive.
- Ease of application. All work can be done with your own hands without much effort; how quickly the finishing is done depends on the surface area, as well as the tools used.
The production of facing material takes place using a variety of raw materials, and the application options also differ.
Reliable and beautiful without extra costs.
As a result, the final result of plastering is also different, therefore, in order to achieve the ideal effect, you should carefully study the features of all varieties.
Main principles of work
No one will argue that external plastering of walls is important during construction. The materials used for this do not always provide high-quality results if important requirements and technologies have not been met.
Those who are so interested in the question: how to plaster an external wall with their own hands should adhere to a number of rules:
- On a newly built house, the process of applying plaster becomes possible after a couple of months. Ideally, this period will increase to six months. Otherwise, cracks may appear as a result of shrinkage of the building;
- Plastering on the outside is carried out only after interior work has been completed with full finishing;
- Before plastering the outer wall of the house, it is important to complete all types of repairs - carry out all communications, eliminate all holes, fill openings if necessary;
- It should be taken into account that the base must always be stronger than the material being applied. The opposite situation should not be allowed to happen. Cement mixtures can be classified as strong plasters and lime-based materials can be classified as weak;
- Having chosen a specific plane for finishing, it is necessary to gradually complete the entire range of work without interrupting the finishing;
- Monitor the outside temperature during repair work. It should be moderate and not fall below 5 degrees Celsius. This is explained by the fact that the plaster will not adhere properly to a frozen wall, but if it is too hot, it will simply slide off. If the air outside is still hot, spray the plaster with water to prevent cracking.
Technology of applying plaster to the facade
To plaster external walls, minimal construction skills are sufficient. The procedure can be carried out either using specialized equipment or using basic tools. Depending on the type of method chosen, the speed of work will depend.
Manual
This method involves using a spatula to apply and level the mixture. Often a second layer of plaster is applied on top of the first, which improves the quality and reliability of the finish. This should be done after the previous one has completely dried.
Manual method
To ensure maximum adhesion of the plaster to the surface of the facade, you will need to thoroughly clean it and treat it with a primer. Usually the mixture is gray, so after finishing it should be painted in the desired color.
Mechanized
The solution can also be applied using special equipment. The machines are powered from the mains and allow you to distribute the plaster over the surface of the facade as quickly and evenly as possible. This option is more expensive from a financial point of view, and such machines are available only to professionals, so the first method is more common.
It is possible to rent equipment, but this is an unnecessary expense. But it is important to take into account that the device uses plaster composition economically and applies the thinnest possible layer.
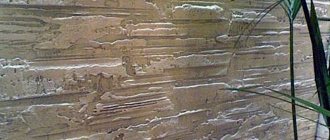
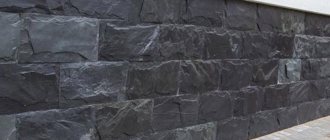
“Stone fantasies” or imitation stone on a facade made of OSB boards
The stone looks noble in any exterior. Unfortunately, its use on the facade is not always possible. Firstly, the cladding has considerable weight, which is not always the strength of the foundation. Secondly, stone is not a cheap material. Thirdly, not everyone can do such work on their own. To try to create on the facade of your own house, the walls of which are made of OSB boards, an imitation close to the original, decorative plaster of the facade walls with your own hands will help. Finishing is carried out in the following order: spray, adhesive solution, colored plaster mixture, disconnector, acrylic impregnation. Dry mixtures for applying decorative printed plaster are sold in 25 kg bags.
Rules for preparing the mixture
To perform the spraying, a solution is prepared: a certain volume of water placed in a container is mixed. The components are mixed with a construction mixer until the consistency resembles a plastic mixture that does not drip from the brush when applied. Using the same brush with a wide base, without making any gaps, apply the first layer (especially carefully you need to paint under window frames, in places where door frames are installed). It is necessary for better adhesion of the surface of walls made of OSB boards with a subsequent colored plaster layer (if the walls are concrete, then the spraying stage is not needed). An acrylic primer is applied to the dry surface with a roller, brush or spray. At the same time, it also processes the foundation. Primed surfaces must be completely dry.
A colored plaster mixture is prepared: water is poured into a trough or other container, and with constant stirring, the mixture is poured with a mixer in the proportion of 6.5 liters of water per 25 kg (bag) of the mixture. The finished solution should not contain lumps or foreign impurities and should stick to the spatula.
Important! To prevent the appearance of cracks when plastering the facade walls with your own hands, a fiberglass mesh with a 5x5mm cell is attached to the wall. The canvases are laid with an overlap of 10 cm. The mesh is adjusted or fixed with glue. This work must be done before applying colored plaster.
Technology of applying plaster “under the stone”
- The plaster mortar is applied with a narrow spatula onto a wide trowel. The mixture is applied with a thickness of 10 mm-20 mm (depending on the thickness of the matrix used for printing) in a circular smoothing longitudinal motion. Section by section, the solution, as it were, stretches along the grid without gaps or the formation of lumps.
- You can create a relief texture of natural stone by using a polyurethane matrix. It can be of different types.
- Fine powder (disconnector) is sprayed onto the prepared wall, onto the matrix using a roller. You will need about 0.5 kg of powder per 1 sq.m. wall area. At this rate, the surface will be covered evenly, without the bottom layer showing through.
- The pattern is being printed. The matrix is applied evenly, focusing on horizontal and vertical markings.
- The form is slightly pressed, you need to tap it, then move it to a free place, guided by the pattern.
- If the plaster layer is damaged during printing, it is corrected manually, removing sagging.
- The leading row should be printed with a slight offset so that the lines of the design do not overlap.
- The “painted” wall is kept for 2 days to fix the solution, after which it is washed.
- By watering with a hose, use a brush to wash off the dry disconnector.
- The bulges are washed with a 3-5% solution of hydrochloric acid to the color of the plaster. Then the solution is washed off with water.
- The walls are allowed to dry. At the finishing stage, acrylic impregnation is applied.
What can’t you do to make your own home pleasing to the eye! Fortunately, today you can decorate the facade to suit every taste. But it’s doubly nice if you bring beauty with your own hands.
Leveling plaster along beacons
The use of beacons can significantly reduce plastering time. With their help you can make the wall as smooth as possible.
But it should be remembered that too large unevenness should be eliminated, and if there are significant differences, then the plaster must be applied in several passes.
Beacons begin to be installed from the corners. The thread is pulled from them, and then, guided by the marks, several more beacons should be secured to the main surface. It is necessary to secure the screws, the heads of which should protrude from the wall as much as there is a difference in height. After fixing the hardware, it is necessary to secure the profile.
To plaster the entire surface perfectly, you need to apply the mixture in stages, not on the entire wall, but from lighthouse to lighthouse. Proceed to the next part only after completely smoothing the previous one.
How to carry out the procedure yourself?
Buildings made of logs and timber can be plastered only after shrinkage. Then plastering is performed in several stages:
- Preparing the walls.
- Fastening shingles.
- Installation of beacons.
- Applying plaster.
Before applying plaster, the walls must be prepared, all metal fasteners and parts must be removed from them, and must be cleaned of mold, bitumen and grease stains. After cleaning the stains, an antibacterial agent is applied to the walls and the cracks are caulked on both sides. In damp rooms, waterproofing coatings are attached to the wall.
The outside walls are prepared in the same way. Instead of shingles, you can use metal or fiberglass mesh on the outside.
Wood plaster must be reinforced. For this, shingles are used - thin wooden slats that are stuffed onto the wall so that they form cells of 3-5 cm.
The first row of shingles is filled at an angle of 45°. The output layer of shingles is stuffed on top of the core layer.
Then the beacons are installed vertically along a plumb line, retreating 30 cm from the corners in steps of 1 meter.
The process of applying plaster inside the house:
- dry the wood to 12% humidity so that anaerobic mold does not form in it;
- after shrinkage, spray with a solution that has a more liquid consistency;
- then mix a viscous solution and apply it with a trowel;
- application is carried out in two layers;
- then grouting is done to create the most even surface possible.
Immediately before grouting, the plaster is sprayed with water from a spray bottle.
What types of façade plasters are there?
You shouldn’t skimp on building materials, and you also need to carefully choose the type of mixture to get the desired effect. Plaster for the facade must meet the following parameters:
- Resistant to temperature changes. This will prevent cracking and extend the life of the finish.
- Moisture resistance and vapor permeability. Resistance to the negative effects of moisture is important, but a significant nuance is the ability of ready-made mixtures to breathe, that is, to remove vapors outside, thereby maintaining a favorable indoor microclimate.
- High strength. Resistance to mechanical damage guarantees reliable protection of the facade.
- Sound and heat insulation. The cladding will not only be beautiful, but also practical if the material has low thermal conductivity and noise insulation characteristics.
- Unaffected by ultraviolet radiation. This property will maintain its attractiveness for a long time.
- Aesthetic characteristics. The variety of textures of decorative facade plasters allows you to choose the material to suit any tastes and needs.
Today, many manufacturers offer a variety of formulations. External plaster is distinguished by its quality and visual characteristics. Some mixtures can be prepared on your own.
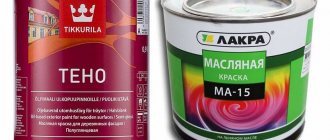
Cement-sand: do it yourself
The most affordable finishing option is to use a cement-sand mixture with your own hands. This material has good strength. Cement plaster can be used to finish the base of a house. In this case, the base will be reliably protected from external negative influences, and additional painting will help make it an integral part of the overall design.
To make the solution you will need:
- binder - the best option would be Portland cement M350 and higher;
- sand without impurities of middle fractions;
- additives – to improve aesthetic characteristics.
The solution preparation scheme is as follows:
- sand is sifted;
- 2-3 liters of water are poured into the container;
- cement is poured in with constant stirring;
- sand and additives are added (their quantity depends on the brand of cement, but on average the proportion of cement and sand is 1:3);
- the components are mixed.
If the consistency of the solution is unsatisfactory, you can add a little sand or water to bring it to the desired consistency.
If you need to improve the plasticity index, then 30-50 ml of detergent can be added to the finished solution.
Cement ready from the manufacturer
Plaster for external finishing from the manufacturer is a guarantee of the quality of the composition.
This material has excellent moisture resistance. In addition, the finish will withstand low temperatures well. It is worth noting that when choosing a mixture, it is necessary to take into account the drying process. For cement plaster this period is longer than for other options. An important point is the use of special additives in production, which make it possible to give mixtures different textures. By correctly following the application technology, you can create a stone-like surface. Cement-based plaster is ideal for such work.
Gypsum mixtures
If elastic plaster is required for facades, then you should pay attention to gypsum mixtures.
If cement-based compositions are gray in color, then gypsum ones are distinguished by their whiteness. It has high strength, but its cost is higher than cement options. Gypsum plaster can guarantee high-quality protection of walls from mechanical stress, as well as the negative influence of atmospheric factors.
Tool
To apply plaster to a brick wall, prepare:
- Master OK;
- ladle;
- steel spatulas (wide, narrow);
- grater;
- rule;
- trowel (for decorative work);
- level, plumb line or construction laser;
- roulette;
- pencil;
- mixer;
- containers;
- rags;
- masking tape;
- devices or tools for removing old coating;
- individual protection means.
What is the mixture consumption: material calculation
The amount of material required can be calculated using online calculators or on your own. First of all, you should study the manufacturer's dosage recommendations.
Usually the packaging indicates the consumption of dry mixture per 1 m². Then the total surface area for plastering is calculated and the thickness of the layer of plaster mixture is calculated.
The manufacturer's consumption is then multiplied by the thickness and by the area. The resulting figure is the required amount of dry mixture. Next you will need to calculate the number of bags. To do this, the total amount of plaster is divided by the volume of one bag. Most often, the material is purchased in packages of 50 kg.
Facade plaster consumption per square meter
The consumption of mortar depends on the curvature of the walls - the slope of their planes horizontally and vertically.
Costs are calculated only after the wall has been cleaned and marks (beacons) have been placed using a building level. The more of them are installed, the more accurate the result will be. Next, the maximum height value is determined from the beacons - it is this that determines the degree of curvature of the facade. Absolutely all deviations are summed up, and the resulting figure is divided by the number of beacons.
If we look at the calculation using an example, it looks like this:
- for example, the area of the wall to which plaster must be applied is 20 m2, and the maximum unevenness along the beacons is 10 mm;
- 6 beacons were used to calculate the curvature;
- the deviation values were 1 cm, 2 cm, 3 cm, 4 cm, 7 cm and 10 cm, which totaled 27 cm;
- to obtain the average layer thickness you need to divide 27 by 3, which equals 9 cm.
Considering the formula, we can say that to make the façade even, you need to apply a solution 9 cm thick.
How to choose plaster for facade walls
Plaster is selected taking into account a large number of factors. It is important to consider not only visual characteristics, but also operational ones. The following properties of the mixture should be taken into account:
- base, namely binder;
- drying period;
- elasticity;
- quality of adhesion to the base;
- maximum layer thickness;
- consumption;
- application method;
- texture;
- color;
- price.
The service life of the facade will depend on the quality of the material used, so only high-quality plasters should be used. Most mixtures are decorative, so it is worth first applying cement or gypsum plaster and then covering the surface with a decorative composition.
Finishing the facade with plaster: typology of material and installation specifics
Plastering exterior walls, as well as finishing with stone or siding, is a popular façade design option. The cost of the service is calculated in m2 and directly depends on the complexity of the work and the type of material used. With the development of construction technology, new types of facing compositions are increasingly appearing for the design of external walls of buildings. The facade is the face of any construction project, so it is very important to choose the right cladding technique. Stone-like plaster looks very nice on facades. Modern compositions make it possible to obtain not only smooth, but also textured surfaces. Finishing the facade of a private house with plaster is a common service in Moscow that is not losing popularity. The cost of the service per square meter can be clarified in a specialized company.
Do-it-yourself facade plastering technology
Plastering the facade of a house must be carried out strictly according to technology to ensure high-quality coating and excellent external characteristics. If you need to ensure reliable thermal insulation, then one plaster mixture will not be enough. It will be necessary to install thermal insulation material, and only then apply the mixture on top of the insulation. There are general recommendations for various types of solutions that will help you do the work yourself.
What tools will you need?
Initially, you will need to prepare the necessary equipment for surface treatment, as well as applying plaster to the facade. To work you will need:
- a trowel, a ladle for throwing the mixture, or a device if mechanized plastering is provided;
- trowel for spreading plaster on walls;
- rule and spatula for leveling the surface;
- spatula for processing difficult places;
- corner aligner for creating perfect corners;
- grater and hatchet for leveling walls before plastering;
- level for correct placement of beacons;
- container for diluting the mixture;
- mixer for kneading.
Having all the necessary tools significantly speeds up the work on plastering facades.
Preparing the surface of the facade
To ensure ideal adhesion, it is worth carefully preparing the façade for plaster.
Preparatory work
Preparatory procedures include:
- Removing the old layer. Using a hatchet, remove strong protrusions. The old plaster is removed.
- Cleaning the surface with a stiff brush.
- Treat cracks and grooves, if any;
- Clean the façade from dust and dirt. To do this, you can use a regular sponge; if the surface is very dirty, it is better to use a soap solution.
- Check the quality of the façade preparation using a level.
Also, preparation of the base includes treatment with a primer or other protective compounds. It depends on the type of surface.
Brick wall
Brick walls should be pre-cleaned and primed. To improve adhesion, you will need to make notches on the surface. Placing beacons is especially important, as it will be possible to achieve a perfectly flat surface. Both metal profiles and wooden blocks can be used as guides. It is necessary to begin applying plaster to the facade strictly after the primer composition has completely dried, since working on a wet surface can lead to cracking of the plaster mixture after drying.
Monolithic wall
Plastering a monolithic surface also begins with removing the old finishing layer. If the house is new, then it is worth removing the remaining formwork compound. It is also important to check the quality of the plaster by tapping it with a hammer. If a ringing sound is heard, then it is necessary to remove the old layer and apply a new one. High-quality processing will eliminate excess consumption of the plaster mixture and guarantee the thinnest possible plaster, hence savings.
After preparation, a primer for the facade is applied. It is worth considering that regardless of the methods of applying the plaster mortar, it is better to wet the monolithic wall, since concrete can quickly absorb moisture, which will speed up the drying process of the mixture and can cause cracking.
To improve adhesion properties, you can make notches on the walls, although the concrete itself is rough, this is not a necessary procedure. But if thorough cleaning has been carried out, then priming should not be neglected.
Foam block, gas block and similar
It is better not to cover walls made of foam block, gas block and other cellular materials with cement-sand plasters, since their characteristics contrast with those of aerated concrete, which leads to deterioration in performance characteristics and a reduction in the service life of the building.
Surface preparation begins with sealing the seams, which will reduce the consumption of the plaster composition and ensure uniform drying of the first layer. Then the surface is cleaned. The next step is priming. It is important to select a primer carefully, since it is necessary to ensure that the vapor permeability of aerated concrete and foam blocks is maintained.
If work is carried out on wooden facades, it is also important to treat the surface with antiseptics to prevent the development of mold and mildew.
Installation of mesh if necessary
Reinforcement improves the adhesion of the plaster to the surface and also prevents the formation of cracks. The most commonly used is galvanized steel mesh. If installation is carried out on insulation, then an alkali-resistant mesh can be used.
It is attached to the thermal insulation material with glue. In the absence of insulation, the adhesive base can be replaced with plaster. The mixture is applied in a thin layer to the façade and the reinforcing mesh is embedded in it.
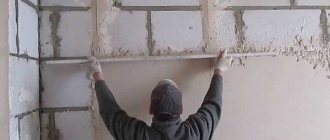
We display beacons
For uniform plastering of the facade, beacons should be installed. Installation begins with corner profiles and frames of window openings. It is these that ordinary beacons will focus on.
The distance between the mounted profiles must be equal to the width of the rule that will be used for alignment.
Installation of beacons
The beacons are fixed with a solution based on cement and alabaster.
To level, it is worth stretching the threads between the beacons so that all the unevenness remains under them.
How to plaster external walls - technology for finishing work
When preparing to plaster the facade, carefully study the technology requirements. It provides for the following stages of work:
Carefully study the technology requirements when preparing to plaster the facade
- Choice of finishing material.
- Preparation of the external surface of the walls.
- Installation of guide elements.
- Applying the plaster mixture.
- Clean finishing.
Each stage has its own characteristics. Let's look at them in more detail.
Choosing material for plastering external walls
When choosing a suitable mixture for finishing work, pay attention to the following points:
- performance properties;
- shelf life of the plaster composition;
- manufacturer rating;
- reviews from professional builders;
- adhesion of the finishing mixture.
Also analyze the adhesive properties of the material and the need for additional preparation for application.
Preparing walls for applying finishing mortar
You should take responsibility for preparing the surface of façade walls. Their condition affects the quality of plastering activities.
The preparation of the surface of facade walls should be taken responsibly
Prepare the surface of the walls according to the following algorithm:
- Remove old plaster with a chisel and hammer or use a hammer drill.
- Clean the surface from finishing residues, sweep away dust, and remove grease and oil stains.
- Cut the brick joints by widening and deepening the joint areas.
- Remove the bumps, seal existing cracks and level out elevation differences with putty.
- Apply a deep penetration primer to the wall surface and wait until it dries.
- Attach a plaster mesh with square cells with a side of 20-25 mm to the outer surface.
If there are significant deviations in the flatness of the walls, there will be a need to apply an increased layer of plaster mixture. This leads to increased consumption of materials and increases the likelihood of plaster peeling in problem areas. Once you have completed your preparation, proceed to the next step.
Fixation of special beacons
Beacons are made of metal profiles and are securely fixed to the walls at certain intervals. Guides allow you to smooth out the plaster mixture using a rule, ensuring a flat finish.
To install beacons, you must perform a number of operations:
- Check the verticality of the walls by level or plumb.
- Cut the beacons to the height of the walls.
- Step back 20-30 cm from the edge and draw a vertical line.
- Apply a thick solution to the marking at intervals of 0.5-0.6 m.
- Place the guide along the markings and press into the solution.
- Adjust the verticality of the beacons according to the level.
- Remove any solution that has floated onto the surface of the guides.
- Fill the cavities under the beacon after the solution has set.
Fixing special beacons allows you to use a rule to smooth out the plaster mixture, ensuring a flat finish.
When determining the distance between the guides, take into account the length of the rule. The optimal interval between beacons is 1.5-1.8 m.
Applying external plaster to the facade of a house - finishing rules
Plastering technology involves sequential application of the material:
- First, a liquefied solution is poured. You should add polyvinyl acetate glue to it and add water until it reaches a creamy consistency.
- After drying, the main layer of plaster is applied. It is necessary to evenly distribute the finishing composition over the surface, ensuring a layer thickness of no more than 50 mm.
- Grouting completes the finishing activities. A wooden or foam trowel is used to smooth out uneven surfaces and seal cracks. Grouting should be done in a circular motion.
Start finishing after 5 days, when the plaster is completely dry.
How to properly plaster external surfaces - protecting problem areas
Problem areas include corner areas, as well as surfaces adjacent to window and door openings. Plaster problem areas using standard technology.
Paying attention to the following points:
- thoroughness of sealing defects on the surface;
- uniform filling of cavities with plaster mortar;
- flatness of the finishing composition after grouting.
Grouting must be done correctly. First, make spiral-shaped leveling movements and, starting with a small diameter, gradually move to a larger circle.
Exterior wall finishing - finishing operations
At the final stage of work, finishing is carried out. Possible options:
- creating decorative spray;
- painting the surface in the required color;
- formation of a rough surface.
The choice of the optimal finishing option is carried out individually.
Stages of plastering work
Plastering involves carrying out work in several stages. The mixture is applied in layers to provide an even, homogeneous coating that, once cured, forms a perfectly flat surface.
Throwing the mixture onto the wall
The first layer can be applied by spraying. This technique will help fill the recesses and eliminate existing defects, after which it will be possible to completely cover the facade with plaster. The solution is poured from the bottom up. To do this, use a ladle or spatula.
If you have a compressor, then mechanized plastering can be done, and the consumption of the mixture is significantly reduced. Each subsequent layer is applied only after the previous one has set.
To improve adhesion, notches are made on the cured plaster. Typically, the next layer is applied within a day. But it is also possible to increase this period. Manufacturers usually indicate the drying period on the packaging. The time may also depend on external conditions.
Alignment
A rule is used to level the surface. If beacons are installed, then the tool is placed on the nearest profile and carried out from bottom to top to evenly distribute the mixture. If voids form, you will need to fill them with a solution and apply the rule again.
Leveling must be done approximately 15-20 minutes after applying the mixture to the facade.
This will allow the solution to set. If the surface to be plastered is large, then the work should be done in separate areas so that the mixture does not have time to harden, since after this it will be impossible to distribute it evenly over the surface.
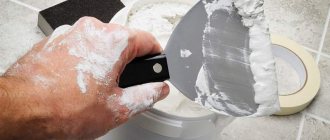
The final stage is grouting the plaster
After drying, grouting is done using a special brush. This process is also performed in several approaches:
- first - pressing tightly, move the grater in a circular motion clockwise;
- the second - the tool is used to grout horizontally.
Grouting
These steps will make the surface smooth. If you need to create a relief pattern, then after applying the finishing layer you will need to use special rollers or stencils without waiting for it to completely harden.
Decorating the facade of the house
The decor is created on smooth walls. Therefore, work should begin after the leveling layer of plaster has completely hardened. The facade can be decorated in various ways, each of which differs in the materials used and decoration technology.
Your own plasterer: step-by-step work plan
The general stages of the process are: preliminary (preparation of wall surfaces), distribution and installation of “beacons”, direct application of plaster for external walls.
Preliminary work
The appearance of the finished façade largely depends on the preparatory period when the old cladding is removed: in some places it needs to be removed, and in others it needs to be beaten off (depending on what the old cladding was made of). Unnecessary layers are scraped off and removed by tapping with a mallet over the entire area of the wall. The presence of voids is indicated by a dull sound. If necessary, use a chisel with a hammer or a hammer drill. Along with the old facing layer, the bumps and formed sagging are removed.
At the preliminary stage, contamination in the form of stains, dust, and dirt is combated. At the same time, the seams on the brickwork are “embroidered”: recesses are made in the joints between the bricks. This type of work, as well as the application of notches, promotes better adhesion of the applied layer to the surface of the walls.
Structures with a smooth surface, for example, made of foam blocks or reinforced concrete slabs, are not embroidered. Surfaces, including brick, pre-lined walls, are primed with a deep penetration solution. Then a reinforcing plaster mesh is stuffed or glued. The completion of the preparatory work is considered to be complete drying of the primer.
Approximate beacons
For your information! The purpose of using beacons in plastering is to lay the plaster in an even layer and prevent its pieces from falling off in the future. Beacons are ordinary strips or metal guides fixed to the wall and holding the finishing layer when the rule moves along them. In this case, the plaster layer is smooth and uniform.
The “lighthouse” method is especially suitable for novice builders who are plastering the facade of a house with their own hands for the first time. The correct installation is as follows:
- The places on the wall in the vertical plane are determined where the surface “departs” from the vertical measured by a plumb line.
- In places of strong deviations, marks are made to indicate that more plaster mixture will need to be laid here.
- Beacons are installed of a given size, 3 or 4 m long and about 10 mm thick, for spot application (a patch with a diameter of 10-15 cm) of the plaster mixture. The distance between such points is half a meter.
- The beacon is pressed into the applied composition.
- It is better to choose a gap of 1.7 m between the alarms.
- The formation of the thickness of the layer of the applied mixture depends on the distance of the base of the lighthouse to the surface. This means that the thinner the patch, the larger the layer.
- A rule with a water level built into its “body” is applied to the beacon pressed into the solution.
- Pressing the plank against the wall, it is pulled back with progressive intermittent movements, forming an even layer of the required thickness. The solution deposits are immediately cleaned off, using a spatula to achieve a smooth surface.
- After waiting until the mixture on the wall sticks, the empty spaces under the lighthouse are eliminated.
- If the walls are more than two meters long, you will need to install guides in the corners.
- All work is constantly monitored by level.
Step-by-step application of plaster
Do-it-yourself decorative plaster on the facade is applied as follows:
- First, the mixture is prepared according to the manufacturer's instructions on the packaging of the finished mixture. Or a cement mortar of liquid consistency (pancake dough) is mixed. To improve adhesive properties, a small amount of PVA glue is added to it.
- Using a ladle, the material is thrown over the entire area of the wall. In this case, the cast should stay on the surface and not flow off it. The “semi-finished product” should dry out.
- The work is carried out in areas measuring 50 x 50 cm2. The prepared mixture, reminiscent of sour cream in thickness, is poured between the beacons. The thickness of the layer is determined experimentally, taking into account the fact that with a multi-layer coating, the total thickness of the entire plaster should not be more than 50 mm. Otherwise, the layer will simply fall away.
- Starting from the bottom, moving upward along the beacons, make progressive light movements, usually in the horizontal plane. There should be a flat surface at the bottom of the rule. For potholes and dents on the walls, in places marked at the preparation stage, an additional portion of the mixture is placed in the recesses, and the leveling is repeated again.
- All minor flaws in the form of cracks, bulges, small voids are eliminated at the next stage, when grouting is performed. It is performed using a special wooden grater in a circular motion only after the plaster layer has dried for a short time.
Description of facade decorative plaster
Facade plasters are mixtures that not only add attractiveness and allow you to achieve certain textures, but also provide additional protection. This became possible thanks to a special production technology, which increased the quality and performance of the material.
Types of decorative plaster for the facade of a house
There are several types of decorative plasters for facades. Their main difference is the binder. The application features will depend on the type of material chosen.
Benefits of plaster
Regardless of the type of cladding chosen for the house, plaster has a number of advantages:
- affordable cost (price is, perhaps, one of the main factors explaining why so many people who want to improve their cottage or country house prefer to plaster);
- aesthetic appearance (if you plaster the facade correctly, it will look very attractive, because a wide range of textures and shades of modern decorative plasters allows you to give the facade any look);
- water permeability (coating the house with a plaster mixture protects the facade and insulation from moisture and precipitation);
- resistance to external influences (anti-corrosion and frost-resistant qualities);
- simplicity and ease of use (to plaster a house correctly and efficiently, you only need to know the correct sequence of actions and have a minimum set of tools);
- dozens of shades and textures.
Types of finishing of a plastered facade
The external characteristics of the structure will depend on the chosen cladding technique. It is possible to obtain both a perfectly smooth surface and achieve an original visual effect that imitates natural materials.
Painting
Painting can be done on both smooth and textured walls. There are many application techniques. Painting can be done using a brush, roller or spray gun. Before painting, you should prime the walls so that the paint adheres better to the base. Facades can be painted either in one color or in a combination of different shades.
Fur coat
The facade of a one-story house looks original with such finishing as “fur coat”. The surface is rough. The texture is added using a roller or trowel. The fur coat is also dyed in the required color to achieve the desired visual effect.
How to properly plaster the walls of a house
To properly plaster the outside of a house, you can use a special plastering machine, or you can apply the solution yourself.
To apply plaster compositions yourself, no special equipment is required, you only need a standard set of tools. However, to create special textures you need shaped spatulas and, of course, some experience in this field. However, with a little training you can easily learn how to plaster facades correctly.
The main thing is to strictly follow the manufacturer’s recommendations regarding the use of plaster, its application and drying time. If you have any doubts about your abilities and capabilities to do the plaster cladding correctly and efficiently, it is better to seek the help of qualified workers.
Application of decorative textured plasters
There are other textured design options. Their difference lies in the grain structure, as well as the application technology, which results in a relief surface that imitates certain materials. To get the desired effect, you need to choose the right decorative plaster.
Mineral
The mixture, which contains natural stone chips, has become widespread. The material is made based on cement, so the cost is quite reasonable. Mineral plaster for facades has a high degree of exposure to various factors. It is easy to work with, but requires certain skills. In addition, the color variety of mixtures is limited. This can be corrected by dyeing, but the color of natural material looks more attractive and natural.
Acrylic
Polymer plaster based on acrylic resins has good moisture-repellent characteristics. It has a longer service life than mineral compounds. There are also disadvantages of acrylic plasters, such as low resistance to ultraviolet radiation, as well as rapid contamination and attraction of dust. It is also worth noting that this material is not suitable for working with metal surfaces. It is not recommended to use it when finishing houses made of aerated concrete, since the mixture has poor vapor permeability. This is an elastic plaster for facades, so it is very convenient to work with.
One type of mixture that is made on the basis of acrylic is flexible plaster. It is not subject to cracking. It can be applied either manually or using special equipment. Tinting of the mixture is not expected, but after application you can paint the surface in any color.
Silicone
The features of silicone plaster for facades make it very popular, but the high cost limits its scope of use. The material tolerates precipitation well, as well as low temperatures without loss of quality characteristics. Among the important advantages of using a silicone mixture are excellent vapor permeability, as well as the ability to heal small cracks on the facade. An important advantage is the ability to self-clean during rain.
Silicate
Silicate plaster for the facade is produced using “liquid glass”. The silicates included in the mixture give it important characteristics, such as odorlessness, antistatic properties, and a high degree of fire safety. This composition can be used when plastering facades made of aerated concrete, as it has excellent vapor permeability. The disadvantage is that it hardens quickly, which is why the solution should be used immediately after opening the container, as it will then be unusable.
Finishing a house with plaster - types of compositions for protecting walls outside
Specialized stores offer an expanded assortment of various materials for plastering external walls.
Various materials for plastering external walls are presented in an expanded range
Finishing compositions are divided into the following types:
- plaster mixtures based on cement or lime.
- polymer-based acrylic compositions;
- silicate plasters containing liquid glass;
- silicone solutions including fine filler.
Each type of plaster has its own advantages and disadvantages.
Mineral compositions
They are offered in the form of a dry mixture containing binder material, filler and special additives. A distinctive feature of mineral compositions is their low cost, due to the low cost of binders.
The main advantages of cement plaster:
- environmental cleanliness;
- Fire safety;
- durability;
- good adhesion;
- water-repellent properties;
- resistance to the development of microorganisms and mold formation;
- noise protection characteristics;
- thermal insulation properties.
The main disadvantages of mineral plaster:
- limited color range;
- cracking of plaster during shrinkage of the building.
Each type of plaster has its advantages and disadvantages
Acrylic plaster
Sold ready for use, it has good contact with wood, stone, concrete and brick, preventing cracks from forming. Plaster is a dispersion solution containing a polymer component – acrylic.
The finishing composition has a number of advantages:
- good vapor permeability;
- resistance to temperature fluctuations;
- increased elasticity;
- ease of application;
- resistance to moisture penetration;
- texture.
When purchasing a mixture, you should pay attention to the weaknesses of acrylic plaster:
- the need for regular updating;
- gradual destruction under the influence of ultraviolet radiation.
Silicate composition
Contains liquid glass and is sold ready-to-use. Advantages of using silicate-based plaster mixture:
- improved vapor permeability properties;
- acceptable price;
- surface resistance to contamination;
- variety of color shades.
Acrylic plaster is a dispersion solution containing a polymer component - acrylic.
Due to reduced electrostaticity, dust does not linger on the treated surface. Disadvantages of silicate plaster:
- cracking of the protective layer during shrinkage of the building;
- problematic use for finishing aerated concrete walls.
Silicone mixture
It has a fairly high price due to the polymer ingredients it contains. The workforce is characterized by:
- increased vapor permeability;
- high elasticity;
- self-cleaning properties;
- long service life.
Walls coated with a silicone mixture do not need to be washed or cleaned throughout the entire period of operation. The main disadvantage of the material is the increased cost of purchasing finishing.
Types of textures of decorative facade plasters
There are different textures of decorative compositions. Each of them has its own characteristics, can imitate different materials and be painted in different ways. The most popular are:
- lamb, fur coat or terrazite;
- Venetian - imitation marble or onyx;
- Marseilles wax;
- bark beetle;
- craquelure;
- sgrafitto;
- wet silk;
- sea breeze;
- latex plastic.
To obtain the required texture, various tools are used. Some of the listed options are rarely used when carrying out facade work, more often when finishing interiors.