Drywall is a universal building material that can be used to design openings, arches, shelves, ceilings and walls of any configuration. Drywall corners deserve special attention, since any weak fastening or insufficient rigidity contributes to the slow destruction of the structure. The first sign of poor installation is cracks at the seams. To ensure that there are as few such signs as possible, it is important that the corners are mounted exactly according to technology.
Maintaining the shape of a right angle even in problem areas of the joint of gypsum board sheets without a perfugle is very difficult
Incorrectly installed corners of plasterboard structures begin to crack over time.
Drywall corner
Corner joints are the most vulnerable part of a plasterboard structure. Since the material is quite fragile and it is almost impossible to achieve an absolutely even connection, because the sheets are cut by hand, and the edge turns out to be uneven. Protruding corners are very noticeable, so you need to properly seal the joints, achieving an ideal surface.
When wet, drywall is very plastic and can take any shape, creating a perfectly flat surface without cracks or other defects. GCR corners also turn out perfect, and such installation does not require any special skills or experience. For repair work, you need to prepare a level, usually a tape measure, screws (preferably in frequent increments), primer and gypsum glue.
They start by checking the corners for curvature, since if stored improperly, the flexible profile is easily deformed. If bends are visually detected, it is better to put the corner aside, since it is difficult to align it. Using a tape measure, determine the length of the corner; as a rule, it is 2-5 mm shorter than the corner.
It is convenient to press the corner along its length, making sure that there are no gaps between them. The verticality of the corner is checked with a level by placing it on top. If there are deviations, they can be adjusted by pressing and releasing the structure. Having fixed the corner with screws that are screwed into the perforation holes, you can put the rule aside.
Schematic illustration of finishing a corner from gypsum plasterboard
Plan for installing drywall on an external corner
After fixing, the corner can be coated with thick glue using a spatula, applying it to the corner halves. With glue you need to fill all the voids in the perforation of the corner.
Once the glue has cured, the screws can be removed by going over the vacated areas with a putty knife and spreading out the excess glue. When the adhesive treatment has completely dried, the corners are sanded, treated with a primer and puttied.
There are external and internal corners; the finishing of each type has its own specifics.
Important nuances of technology
The main load is borne by the corners; if installed incorrectly, the structure may collapse or become deformed. Cracks and peeling of the decorative coating will appear. The rigidity of the structure is checked after complete covering with plasterboard sheets. Sufficient rigidity of the base is achieved by a competent screw-in step of 25 cm.
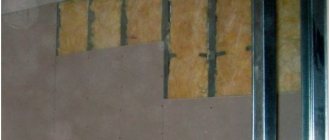
Drywall box
When finishing drywall, the cardboard edges are cut off from the ends of the sheet (with a T-shaped connection, the cut angle is 45 degrees). When cutting the cardboard edge, remove everything down to the plaster, and the cut should be made as even as possible.
Otherwise, it will take a long time to achieve an elegant evenness of the base when sealing joints. After cutting off the edges, the ends must be primed. When lining the outer corner frame with plasterboard, the slabs are placed on top of each other.
The resulting corner structure is glued with fiberglass construction mesh and an aluminum corner with perforation is mounted. Before installation, the corner is checked for bends and irregularities. Only those that are not deformed are accepted for work. They fix it using a rule and secure it with screws, then coat it with glue, after which it has completely hardened, the screws are removed if necessary.
To make subsequent finishing easier and not require additional leveling, all work is carried out under level control. This is especially true during subsequent wallpapering.
Internal corner made of plasterboard
To design any type of corner, you first need to make a metal frame. For the internal corner, a base on CD or PS rack profiles is suitable.
It is better not to skimp on the quality of profiles, as otherwise the walls will quickly become covered with cracks.
There are several ways to cover an internal corner; the instructions present the simplest one.
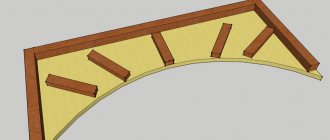
To cover curved corners, an arched corner made of plastic is used
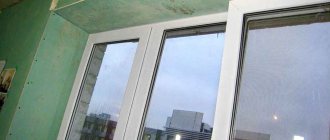
Drywall joints in corners
Drywall corners are finished using the following auxiliary corners:
- aluminum, it is quite rigid, not subject to rust, it can be used if you need to seal drywall corners at right angles;
- galvanized, it is more rigid, it is difficult to break, but it can rust over time, also used for right angles;
- made of plastic, this element is less rigid, does not rust and is not brittle, can be used for any angles, for sharp, straight and turned ones.
How to work with drywall joints
The question arises, how to seal the corners of drywall using corners? You can watch a video about this process on our website.
The principle of working with all types of corners is the same:
- we remove the chamfer from the end edges with a special plane for working with plasterboard so that there are no protrusions;
- We apply a layer of gypsum putty on both planes; the Knauf fugenfüller is best suited for this;
- glue the corners, pressing them with a rule or an even strip so that the excess mixture comes out through the perforation;
- We give the corners a chance to set with a thin layer of fugenfüller.
Important. The price of Knauf fugenfüller often exceeds the prices of leveling putty from other manufacturers. But this is a well-known brand that has proven itself well. If you choose material from another manufacturer, try to read reviews about its quality before making a decision.
Step-by-step instruction:
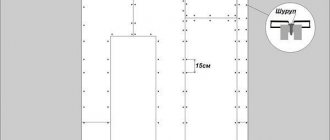
- At the first stage, a frame from the profile is installed. To do this correctly, the guide profile is installed along the perimeter of the wall, the plane of which forms the side of the corner. The profile is secured with long self-tapping screws (from 45 cm) and dowels.
- After installing the guides, mark the vertical position of the CD profile in 60 cm increments and install U-shaped fasteners for the ceiling profile at intervals of 1 m of its height.
- After installing the frame on one wall, it must be covered with plasterboard, and only then move on to the adjacent plane.
- Now you can make a frame on the adjacent wall, complementing the internal corner. First of all, install the UD guide profile. It is simply fixed to the sheathed wall using drywall.
- The next step is to install the vertical CD profiles on U-shaped mounts.
- The mounted frame is covered with plasterboard, and an additional chamfer is removed along the edge of the gypsum board adjacent to the corner. After such preparation, the finishing will be of higher quality.
When installing an internal corner, it is important to consider the distance between the screws. The rigidity of the base depends on this, and for the inner corner it should be maximum. Therefore, screws are screwed in in increments of 25 cm.
Forming the frame of the internal corner (method 2)
The method is used by experienced builders - first the entire frame is mounted, and then all that remains is to twist the drywall:
- The guide profiles are screwed to the floor and ceiling in the shape of an angle;
- Two corner rack profiles are twisted together so that the side of one profile is adjacent to the front part of the other to the middle. For twisting, use self-tapping screws with a press washer, in increments of 25 - 30 cm;
- This reinforced corner profile is inserted and screwed to the floor and ceiling guides;
- To enhance the rigidity of the corner, you can form L-shaped holders from profile scraps and attach them to the rough wall and to the paired corner profile;
- After forming the corner, the required number of rack profiles are set, which are attached to the NP with self-tapping screws, and to the rough wall with direct hangers.
How to prepare drywall for wallpapering yourself
The structure is covered with plasterboard: first, the side where the shoulder of the paired profile is smaller. Otherwise, the thickness of the gypsum sheet will cover the area of the profile, causing the edge of the gypsum board to be fixed too close to the edge, which is not very reliable. Then they begin finishing with the finishing coat.
Note: rack profiles for walls with light finishing (wallpaper, painting) are placed at a distance of 60 cm, but with increased load on the wall, for example, when facing with stone, tiles, the step between joints is reduced to 40 cm.
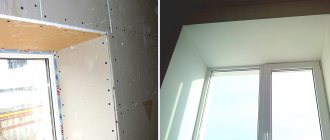
External corner made of plasterboard
The outer corner differs significantly from the previous instructions in installation technology.
Step-by-step instruction:
- The guide profile is installed along the perimeter of the walls that form an angle.
- Next, CD ceiling profiles are mounted, with 2 profiles installed side by side, on both sides of the corner and fixed with self-tapping screws to the perimeter profile.
- The remaining profiles are installed in increments of 60 cm.
Drywall is fixed to the finished frame, positioning it in such a way that the uncut edge of each sheet hits the corner. Then it can be covered with reinforcing tape under putty. This will increase the adhesion area of the finishing material to the drywall.
Installing profiles for drywall: installation secrets
- Place the hanger at the intersection of verticals and horizontals on the wall;
- Mark the locations of the dowels through the mounting holes;
- Drill holes at the marked points;
- Secure the hanger to the wall with dowel nails.
The height of the racks should be one centimeter less than the height of the room. If they are installed end to end, cracks may subsequently appear in the drywall.
- Cut the CD to the height of the wall;
- Tuck the end post into the UD and align it opposite the vertical line on the wall;
- Apply a long rule to the post and level it;
- In this position, fix the stand in the hangers with self-tapping screws;
- Also install the stand on the opposite side;
- Stretch several twines between the outer posts;
- Align the intermediate posts along the stretched twines, as shown in the photo, and fix them in the hangers.
- For covering walls with plasterboard;
- For installation of interior partitions;
- For covering plasterboard ceilings.
- Will make jumpers from UD according to the diagram;
- Install lintels above and below openings, as well as at the joints of drywall sheets.
- profile length;
- There will be two rack profiles for each corner;
- the number of corners available in the room. Here you need to take into account the degree of angles.
- perforator;
- screwdriver with a set of attachments;
- Bulgarian. With its help, you can easily adjust the length of the profile to the desired angle;
- metal scissors, as well as a hammer;
- knife for cutting drywall sheets;
- building level, plumb lines, squares and meters;
- sandpaper;
- set of spatulas.
Important! There are situations when the walls are so crooked that fixing the UW profile on the wall will not lead to anything good. In this case, in one direction, the CW rack is positioned as close as possible to the wall, taking into account maintaining a perpendicular to the base, then, using peobraks (or direct hangers), it is attached to the wall, ceiling and floor UW profiles. The second rack-mount CW is attached to it as a base. Strange as it may seem, such situations also occur. And the point here is not that the angle is categorically impossible to install; of course, you can set it, and it will be exactly 90, but the price of this angle will be golden. And the measure of this action will not be money, but a hidden space on which one could safely place, at least a cabinet, like this.
We explain what to do in this case - a turned corner.
How to sew up a corner with plasterboard
Select plasterboard sheets so that in the corners they meet the original truncated edges. This is necessary so that at the stage of laying the construction mesh on the internal corners and the corners on the external corners, the reinforcing mesh and corners do not stand out on the general plane of the plasterboard sheets.
If this edge of the sheet has already been cut, a chamfer must be removed from it, cutting it at an angle of 45° to the depth of half the sheet or slightly less than its thickness. This is necessary to increase the area where plaster and putty are attached when sealing joints.
Self-tapping screws are used to secure the sheets to a metal frame. Sheathing with plasterboard will give it the necessary rigidity.
Profile fastening scheme when creating a corner structure
When installing internal corners, an L-profile is used
Before finishing the corner, it is necessary to freeze the perforated corner
Features of such angles
It is worth taking a responsible approach to assembling the corners of plasterboard structures. When covering a corner with plasterboard, or when joining two sheets, the joints must be reinforced using perforated profiles according to the technology. There is enough information on how to build a correct and beautiful corner from plasterboard. The construction technology is simple. In order to quickly cope with the task, you need to have basic tools and materials on hand. The sequence of actions depends on the type of corner being constructed.
Drywall corners can be internal or external.
Finishing drywall corner
GKL putty does not require high skill, the main thing is to maintain consistency and accuracy. After fixing the sheets, a primer is applied to their surface. This will help strengthen the drywall surface, making it hard and moisture resistant.
To get the corners without extra layers of putty, you need to remove the protective film from the plasterboard with a knife.
Then they move on to putty. First, you need to seal the recesses for the screws, then the joints and seams are processed. To finish the corners, you need some kind of reinforcing material, for example, serpyanka. The mesh is cut according to the width of the finishing strip (40 cm on each side) and glued end-to-end, thickly spreading it with putty for the seams. Gently press the mesh into the putty layer and smooth the surface. It is convenient to do this with a spatula. The solution must be thin enough for water to saturate the surface.
Preparation: stage one
In general, we can say with confidence that working with corners is one of the most difficult and painstaking activities. It seems that making them will be very simple, but in reality everything is different. And therefore, this process is divided into several stages, each of which is important in its own way.
It all starts with preparing the necessary tools, materials and consumables (accessories, etc.). Why is this so important? It’s worth imagining what a workflow would look like, during which you constantly have to search for the right element. There should be order in everything; this is the key to a quality finish.
Tools
- Electric drill and mixer attachment. This kit will help you mix the putty mixture. This way you can achieve the best quality. In any case, this cannot be done by hand.
- Set of different spatulas. For work it is supposed to use standard types: wide, medium and narrow. Each of them is needed for a specific embedding process or to interact with each other.
- Block and sandpaper. By securing the abrasive to a purchased block (or one made from improvised means), you can quickly carry out grinding and leveling.
- Level. Its purpose is familiar to everyone.
- Brushes and container.
Materials
- Corner reinforcing mesh (in the form of a tape), it is similar to ordinary serpyanka, but has a narrow purpose. That is, it is very easy to stick to internal joints.
- Various types of corners. They are perforated, all-metal, plastic. Each of them is used for different jobs. Thus, plastic products bend well, which allows them to take complex shapes.
- Primer. It is practically impossible to do without this composition. It is this that makes it possible to reduce porosity and increase the adhesion of materials.
Choice of putty
There are a significant number of putties for walls (surfaces) on the market. They vary in composition, price and much more. The right of choice remains with the end consumer. But for working with internal and external corners, the ideal solution would be a dry gypsum-based mixture.
Gypsum putty is an excellent choice for leveling the corners of plasterboard walls
It is affordable and has all the necessary qualities. Namely, it allows you to putty any part of the wall in a short time, and also creates a strong and reliable layer.
How to putty external corners and mask drywall joints
Knowledge of puttying technology at joints will prevent cracking of the coating. In this regard, the alignment of the outer corners is more difficult - you need to overlap the corners (for the inner ones, it is enough to use a serpyanka).
Drywall sheets are fragile and susceptible to damage; be careful when handling them. First, apply a perforated metal or plastic perforated corner - it will protect the drywall from damage.
Note! The cost of corners made of galvanized steel, aluminum, and plastic is almost the same. Each of them has pros and cons that you should familiarize yourself with before purchasing. For example, the former, when used in rooms with high air humidity, can form rust stains. Aluminum eliminates this possibility, but close proximity to copper and some other materials destroys them. PVC is gaining popularity every year due to the fact that it is impervious to corrosion, does not rot, and resists deformation.
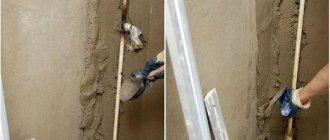
- To begin with, measurements are taken of the joints, corners are cut at an angle of 45º, metal ones - with metal scissors, plastic ones - with a painting knife (but most often with ordinary scissors).
- Next, a level is applied on each side of the slope to determine the evenness of the slope of the surface. Marks are made on the wall indicating the approximate thickness of the future layer of putty.
- A solution is prepared and applied to the slopes at intervals, according to the marks.
- The pre-selected corner is pressed in before the putty is squeezed out through the holes.
- The excess is removed and the angle of the angle is checked with a level. By applying pressure, the correct vertical or horizontal position is created.
- The excess is removed, another layer of putty is applied, leveled with a spatula and wait until it dries completely.
- If at the end of the work there are still unevennesses, a correction layer of “nulling” is applied.