If you keep an aquarium at home, then you probably know how difficult it can be to keep your fish house in good condition. This is especially true for already old or damaged aquariums, which can easily become broken.
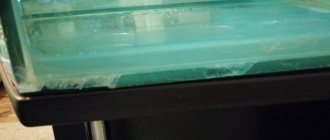
The cause of the leak can be anything, but in any case the problem lies in the sealant that glues the glass walls together. Over time, it can lose its properties and begin to crumble, which leads to a leak in the aquarium. Sometimes the owners themselves break this tightness when they scrape off algae in the same place in the aquarium.
However, container damage is easy to fix, and if desired, this can be done even at home.
Types of sealants
All sealants come in two types: one-component (ready-to-use) and two-component (you need to mix the glue with the activator.) One-component ones are widespread. The composition of sealants is:
- polyurethane;
- polysulfide;
- bitumen;
- acrylic;
- thiokol;
- silicone.
Silicone sealant is suitable for gluing an aquarium. Polysulfide, polyurethane and bitumen compounds are toxic, acrylic is not moisture-resistant and not durable, just like thiokol does not withstand exposure to moisture.
Features of choice
Silicone sealants are divided into acidic and neutral. The former have a strong vinegar smell and are marked “A” on the tube. Neutral sealants have no odor; these are the ones you need to buy to repair your aquarium yourself. They cost more than acidic ones; a product cannot be too cheap. Sealants have the following properties:
- durable, elastic, moisture resistant;
- withstands changes from -70 to +70 degrees;
- do not tolerate staining - the paint literally rolls off;
- They cannot stand applying a new layer to an old one; they will have to completely clean the product and degrease the base.
When purchasing, you need to pay attention to the colorlessness of the sealant (colored options with added artificial pigments are not suitable), and to a good residual shelf life. The instructions must indicate that the product can be used to glue aquariums, which will confirm its safety.
Properties of silicone
Silicone is safe and non-toxic, so no protective equipment is required when working with it.
- Almost odorless.
- Bonds surfaces well and is elastic.
- Moisture resistant.
- Heat resistant.
- Dries quickly.
Silicone glue is used not only in the aquarium hobby, but also in the repair of glass, metal and wooden products.
Black
Black and white dyes are added to aquarium silicone. Black sealant is used for decorative purposes. Color does not affect the properties of the sealant. Tinted glue is no less strong and durable than its transparent counterpart. Black silicone is suitable for multi-liter tanks, as it visually makes the structure heavier.
Transparent
Use clear glue on small containers. Remember that the transparent composition turns greenish due to algae and food residues caught on the seam.
Silicone sealant
Soft and plastic silicone sealant is made from a solid substance - silicon, that is, polymers obtained on its basis. The base part of the sealant is silicone rubber. Also includes:
- vulcanizer that affects the viscosity of the material;
- an adhesive component that ensures adhesion of surfaces;
- plasticizer – additive for elasticity;
- colored filler;
- reinforcement necessary for strength.
Silicone for an aquarium should be quick-drying, plastic, and moisture-resistant. Let's consider the advantages and types of silicones used in the manufacture and repair of aquariums.
Advantages
It is recommended to use aquarium silicone sealants when gluing glass tanks for keeping fish, snakes, snails and other inhabitants of the aquatic world. Synthetic products do not contain toxic compounds, so they are safe for living organisms.
Advantages of silicone sealants:
- extensibility;
- increased strength;
- excellent adhesion;
- moisture resistance;
- heat resistance;
- impenetrable to UV radiation.
Acid
One-component aquarium silicone comes in three versions: alkaline, acidic or neutral. Alkaline is included in the special-purpose group and is rarely used in everyday life. Acid polymerization silicone sealant is used for constructing aquariums and terrariums. It has a strong vinegary smell that appears as the layer hardens. Perhaps this quality somewhat reduces demand. When working, you must wear a respirator, and you cannot use the prepared container until the vinegar fumes have evaporated. Before adding fish, the aquarium must be rinsed with water several times.
Neutral
A good alternative to acid sealant is neutral glue for aquariums: it is odorless and has enhanced adhesive properties. It dries quickly, but its price is higher than that of acid. The neutrality of the composition is also emphasized by its color – transparent. Repels dyes and does not adhere to the old layer of sealant. Before application, it is necessary to remove any remaining adhesive from the surfaces and degrease them.
Colors
A dye is added to the silicone sealant, which affects the color of the finished product. Aquarium glue can be black, white, or colorless. The white sealant is painted to match the color of plants, medicines, and food additives in the aquarium. Transparent silicone loses its invisibility over time, as a film of plaque and food particles accumulate on it. Black material is considered more aesthetically pleasing, especially in large aquariums.
How long does it take for silicone sealant to dry?
To prevent bubbles from forming in the filled seams, it is necessary to tighten the walls of the aquarium with twine. Drying the aquarium after applying silicone glue takes approximately 20-24 hours. The full curing time is indicated on the sealant packaging. In the depths of the seam, polymerization occurs much more slowly than outside. To speed up the process, it is recommended to increase the humidity in the room.
We recommend: Polymer glue: pros and cons
What sealant to use for an aquarium
Not all silicone is suitable for an aquarium. The sealant can be acidic or neutral; the latter is suitable for an aquarium. Acidic, unlike neutral, has a characteristic sour odor and affects the composition of water. The label of acid glue contains the letter A (acid), such compositions are cheaper than neutral ones. The packaging must contain a label indicating that the composition is safe for fish. This could be an emblem with a fish or an inscription in Russian or English. If it contains dyes, make sure they are non-toxic. Use unopened and unexpired product.
Bonding and repairing an aquarium
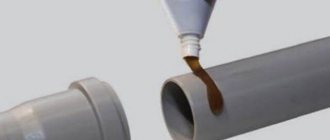
How to glue an aquarium at home using sealant? Instructions for the beginning master:
- cover the desktop with cellophane;
- cover the cut glass parts with masking tape, moving away from the edges, to protect them from contamination;
- degrease the areas to be glued with alcohol or acetone;
- apply sealant, level it (there is no need to make a layer that is too thick);
- lean the walls against the bottom (first the front, then the right and left, then the back);
- hold the parts, fixing them for the time specified in the instructions using rubber bands, threads, cords;
- until the glue has dried, run a scraper along the outer and inner parts of the seam to remove excess composition;
- After the drying time has ended (usually no more than 24 hours), fill the aquarium with water, make sure that it does not leak along the seam, then drain this water.
If old glass is used to make an aquarium, you need to completely clean it of existing glue and sealant. This is done using acetone and a sharp metal spatula. It is important to lubricate only dry surfaces with sealant; on wet surfaces, adhesion will immediately decrease.
When the aquarium is cracked, the procedure for repairing it with sealant will be as follows:
- inspect the leak site, remove the released condensate;
- drain the water, place the fish and plants in another container;
- dry the defect area, degrease with alcohol;
- squeeze the sealant into the crack and smooth it with a rubber spatula;
- wait the necessary time for drying.
We recommend: How to reliably glue polypropylene - do-it-yourself pipeline repair
Tips for working with glue
- Remove old glue with a razor blade. Be prepared for the process to take a long time.
- Use a tie to better secure opposing panes of glass and provide additional support.
- Drain the water, remove the soil and decorations. Replant the fish even if you are repairing a crack in the top of the aquarium.
- If the glass is damaged from above, use a glass cover coated with glue.
- Check the bond strength after the aquarium is completely dry by filling it with water. Any leaks in the aquarium indicate that you need to seal the leaking areas well with sealant or redo the work.
Glue sealant for aquarium
In the production of frameless aquariums, special silicone glue is used. When a breakdown or seal failure is repaired at home, you need to buy exactly the same glue.
It looks like a jelly-like mass that hardens when exposed to moisture in the air. 30 minutes after gluing the damaged area, the polymerization process occurs. And after only a day, the glued area is almost impossible to damage, since the seam completely interlocks the two edges of the glass and forms one common surface, similar to the original glass. This effect is achieved thanks to silicon, which is part of the silicone adhesive and the glass itself.
This glue can be purchased at some pet stores and at any construction hypermarket.
IMPORTANT: When choosing silicone glue, look on the packaging for the words: “For aquariums” or “For gluing aquariums.” This option is the best.
Brands such as Soudal, VIK Aquarium Silicone and Penosil are most optimal for your situation. These brands are safe, and the components included in the glue will not harm the fish. Also, the glassy mass can harden to the state of glass.
Silicone for aquarium: advantages
If we talk about adhesive bases for reliable connection of container elements, here we should also give preference to silicone bases. Such products freeze within a few minutes. In most cases, a day is enough for final polymerization. Seams treated with silicone glue are extremely durable. To destroy them, it is necessary to apply a force exceeding several hundred kilograms. At the same time, the frozen product retains increased elasticity. Thus, the connections are less susceptible to cracks and destruction.
Main varieties
Silicone sealant is available in 2 color options: transparent and dark.
Black
This product is considered the best option for assembling containers. Some aquarists attribute increased strength and rapid hardening to the composition. This is not true, because black differs from transparent glue only in the presence of dye. The dark color gives the seams an aesthetic appeal. The aquarium takes on clear, strict forms. Black sealant is used when assembling volumetric tanks.
Transparent
This sealant makes the container floating and weightless. However, when certain medications are added to water, the transparent seams may change color. The plaque formed by algae and fish stands out more strongly on the joints.
Colorless glue is used in the assembly and repair of small aquariums. The composition is suitable for beginners doing this kind of work for the first time.
Adviсe
Having learned about the types of sealants and properties, before repairing the tank, you should familiarize yourself with the advice of professionals and experienced aquarists:
- If there is excess glue in the aquarium being glued together, the smudges can be easily removed with a rag soaked in a vinegar solution.
- Before repairs, fish and other living creatures are removed from the reservoir. Even if repairs are required at the top of the container, unnecessary movements will frighten and cause stress to your pets.
- When gluing the film, it is useful to know one trick, how to glue the background to the aquarium without bubbles and firmly: it will attach securely if you lubricate the surface with vegetable oil.
- Before applying sealant to the seams, remove the old layer. To do this, use a razor blade.
Aquarium sealant is a tried and true product that has helped fix many tanks, saving owners money. When choosing a silicone adhesive mixture, it is important to pay attention to products that do not contain aggressive and toxic components, and be sure to check the expiration date.
Properties of good glue
When working with simple glass, not intended for making a new or improving an existing aquarium, use almost any glue. If there is a need to make changes to the design of a home pond, then you need to use only a sealant that meets certain requirements:
- Elasticity . The water in a glass reservoir constantly presses on its walls. If the glue used in the work hardens after hardening, then in no case will it be possible to avoid the appearance of cracks on the glass. This will never happen with flexible sealant.
- Reliability . Aquarium glue is simultaneously exposed to sunlight, air and water. Moreover, the temperature inside and outside the artificial reservoir is very different. Therefore, the sealing material connecting the walls of the tank must easily withstand the effects of negative environmental factors, preventing leaks from occurring.
- Safety . When choosing a product, you need to pay special attention to its composition. Aquarium glue should not contain toxic substances that are dangerous to fish and plants.
If the sealing material does not meet at least one of the above requirements, then it is better to discard it. After all, there is no point, for example, in a reliable and elastic adhesive material if it is unsafe for the life of your beloved pets. And also non-toxic and completely inelastic glue is not suitable for making a strong aquarium.
General information about aquarium sealant
Manufacturers offer different compositions: acrylic, acid, polyurethane, butyl, silicone. The glue is chosen taking into account the purpose of use.
Purpose
The compositions are used for:
- Assembling new aquariums. Fish lovers do not always purchase ready-made designs. Experienced breeders assemble containers of the desired configuration with their own hands. This helps to create a design with the required parameters and save money.
- Repair of existing tanks. When using aquariums, the joints lose their tightness and the glass cracks. In such cases, it is not necessary to dispose of the container. You can close the defects with glue-sealant.
- Installation of decorative elements in the aquarium. The product is used to secure objects to the bottom or walls of the tank.
Compound
Sealing agents can be made based on:
- acrylic, which does not have very good adhesion and is not resistant to moisture;
- polyurethane, polysulfide or bitumen, characterized by insufficient strength and safety;
- epoxy resins, characterized by a long curing period, complicating application;
- silicone, characterized by increased elasticity, resistance to moisture, safety, and good adhesion to smooth surfaces.
Kinds
Manufacturers offer 2 types of products:
1. ready-made one-component compositions;
2. two-component (to prepare the product you need to mix a waterproof adhesive base with an activator).
The first type of funds is more popular.
Popular formulations
To glue the aquarium, you should use special compounds that say “Aquarium Sealant”. It is not recommended to use other materials, since it is unknown how the glue will behave. Let's consider several popular brands of materials.
Moment
Silicone one-component sealant for aquariums Moment Germent is one of the popular materials on the market. It is 100% silicone and has high adhesion to glass, metal, many types of wood, ceramics, synthetic rubber, silicone, natural and synthetic fabrics, plastic and painted surfaces.
The material is harmless to living organisms, withstands contact with sea water and is resistant to increased vibration. It is used for sealing various terrariums, aquariums and other glass structures.
KRASS
One-component sealant KRASS is used for aquariums and terrariums. It can also be used on glass cabinets, display cases and seams that are subject to high stress. The composition is suitable for gluing metals and ceramics.
The sealant has good adhesion to glass, painted surfaces and enamel, and is resistant to high loads, detergents, ultraviolet radiation and weathering. It practically does not shrink, and is also waterproof and non-toxic.
DOWSIL
Everyone knows Dow Corning silicone sealants. They are currently produced under the DOWSIL brand. DOWSIL 7093 Sealant is a universal, neutral-curing silicone compound. It has excellent adhesion to glass, metals and other substrates.
The composition is suitable for sealing materials with different coefficients of thermal expansion. At the same time, it forms elastic and very strong connections.
TYTAN
TYTAN sealant is designed for sealing and assembling terrariums and aquariums. It is completely safe for reptiles, fish and plants. In addition to aquariums, the material can be used in industrial glazing, for installing curved and concave industrial glass, installing plastic and metal advertising boxes, sealing cable duct wires, etc.
The sealant withstands prolonged exposure to water, has high adhesion to glass and non-porous surfaces, does not contain solvents, does not flow on vertical surfaces, and is resistant to low and high temperatures. The material forms a strong, durable and flexible seam.
Soudal
Silicone sealant Soudal Silirub AQ – vinegar. During the curing process, it releases acid into the environment. However, after polymerization it is absolutely harmless to animals and can be used to assemble aquariums and terrariums, as well as other glass structures and products.
The material is UV resistant and does not fade. It has high adhesion to many substrates, retains its elasticity for a long time and is absolutely neutral after curing.
Fixing leaks in an aquarium
Self-repair of an aquarium at home is carried out in the following sequence:
- First, determine the place where the water is leaking from.
- Then drain the water and clean off the destroyed sealant.
- Next comes the most important stage - gluing the surfaces.
- Finally, the container is dried and the reliability of the connection is checked.
Whether the water will need to be drained completely depends on the location of the damage. If the side seam is damaged above the midline, the problem can be repaired fairly quickly and without unnecessary manipulation.
Determining the location of the leak
While the water is not drained from the aquarium, inspect the side joints and bottom. Having found a leak in the corner between two vertical walls, reduce the water level 3-5 cm below the damaged area. If drips continue to appear, look for a leak at the bottom of the seam. Wipe the glass from the outside dry with paper napkins, this will make new streaks more noticeable. Try placing a sheet of corrugated paper, or even better, cardboard, one at a time across the joints. When wet, these materials change color. A wet spot will indicate where the leak is.
If the defect is in the bottom part, repairing the aquariums is impossible without complete drainage. In this case, remove all plants, soil, and decorations from the tank. Drain the water using a hose or ladle. Wash the inside of the glass with a soft sponge and let it dry.
Removing old sealant
When the aquarium is completely dry, begin cleaning the depressurized joint. Use a thin knife to carefully clear the gap of glue; in narrow places, use a sharp razor blade. This stage of repair requires the greatest patience and perseverance. You need to scrape off all the old sealant to glue the surfaces together as firmly as possible.
Attention! After cleaning, the corner must be degreased with alcohol, acetone or another solvent. Wet a cotton swab with cleaning liquid and thoroughly wipe the area where the future gluing will be made.
How to seal an aquarium
So, the preparatory work has been completed, the defining stage of the repair lies ahead. There are two options here: the first - without disassembling the walls, the second - with the separation of the vessel into parts. Let's look at a simple way to seal an aquarium without disassembling it into segments:
- Glue two strips of masking tape along the seam.
- Apply silicone to the joint using a gun.
- We distribute the sealant by pressing it inside the seam.
- We wrap the aquarium with twine or rope to increase the pressure and fit of the glass being glued.
You can use a wooden frame that will firmly fix the walls of the leaking vessel.
Drying
The fixed aquarium must stand without intervention for at least a day; this time is necessary for the sealant to set and crystallize. Then the quality of the repair is checked: water is poured into the tank above the gluing level, and its edges are covered with napkins. If no leakage is observed within several hours, the vessel is sealed properly.
If you discover that the aquarium is leaking again, you will have to repeat the repair procedure. For greater confidence, you need to carefully process the edges of the glass from the slightest chips and sand them. It may be necessary to replace the wall so that the gap is minimal and the sealant layer is thin.
Attention! It is recommended to let the sealed container stand without water for 4-6 days, only then check it. Some sealants require a long curing time, and the exposure time depends on the area of the surface to be bonded.
Brief overview of sealants
On store shelves and Internet sites there is a wide selection of sealants from different companies and companies. The following brands are considered the most popular and in demand:
- Tytan - products are manufactured by a Polish company, supplying goods to more than forty countries. The adhesive mixtures from this manufacturer are durable and harmless to fish and other aquatic inhabitants. The cost of one copy is about 350 rubles.
- Krass – Krass brand sealants are produced in Poland. They are considered an affordable option: the cost of the product does not exceed 200 rubles, and the quality corresponds to the declared one.
- Soudal is a sealing mixture originally from Belgium. Ideal for tank repairs: safe for pets, free of dyes and toxic substances, fits perfectly and holds tightly. The price of this brand does not exceed 350 rubles.
- Domestic manufacturers produce popular sealants: Germent, Henkel. The funds are considered proven and reliable.
Requirements for sealant
- High elasticity. On average, an aquarium holds up to 400 liters of water, so its glass walls and bottom are constantly under high pressure. Adhesives with low elasticity will quickly lose their seal under such conditions.
- Long-term resistance to aggressive factors. The adhesive joint is influenced not only by water pressure from the inside, it is exposed to temperature changes, sunlight and air masses from the outside.
- Environmental Safety. The sealant for aquariums should not contain any toxic components, antibiotics, antiseptics, acids or dyes, since fish, snails, plants and other aquatic inhabitants are very sensitive to them and can die from poisoning.
- Reliability. The sealant must have high adhesion to glass or plexiglass.
Repairing an aquarium with glue
The height of the socket above the countertop: measurement rules, choosing a location at the initial stage of repair, tips and instructions for installation and connection
Often, glue is used specifically for repairing a pond. After all, not every aquarist has the opportunity or desire to purchase a new tank if the old one is damaged at the slightest. Silicone sealant can help with many problems associated with an aquarium.
The most common problem is leaking. It can occur due to several reasons:
- Incorrect installation of the aquarium. In a reservoir located at an angle, improper distribution of water occurs, which affects the uneven pressure on the walls of the aquarium. Because of this, the seams burst and water begins to leak out.
- Poor quality seam material.
- Destruction of the seam by fungi or bacteria.
- Age of the aquarium. If the reservoir is already more than 7 years old, then the occurrence of a leak cannot be considered a deviation from the norm. After all, during this period, even the highest quality seams wear out and begin to require replacement.
After identifying the problem, you need to immediately begin repairing the aquarium. It consists of several stages:
- Emptying the aquarium.
- Identification of a damaged area that is leaking.
- Preparing for repairs.
- Applying glue.
- Completion of repairs.
Emptying the Aquarium
During repairs, it is strongly recommended to relocate the inhabitants of the aquarium, remove all equipment and equipment, and remove soil so that the tank is completely free. This is done to maintain the health and safety of fish and plants.
Then you need to thoroughly wash the aquarium and let it dry well, or wipe it thoroughly dry.
Identifying the damaged area
To check the tightness, the aquarium is filled again with clean water. Next, you need to attach a sheet of paper or paper towel to each joint and wait about 3-5 minutes. Even a small amount of moisture will indicate damage that needs to be repaired.
After checking, all water from the container must be drained.
Preparation for repair
You cannot apply new glue over the old one without first preparing the aquarium for repair. Before this, you need to clean the seam joint from the layer of previous sealant. For small areas you can use a blade, for larger areas you can use a knife.
Next, you need to treat the damaged areas with a degreasing solution. Alcohol, white spirit or acetone are suitable for these purposes. After this treatment, the quality of adhesion of the sealant to the surface of the aquarium increases.
To make the new seam invisible and have a neater appearance, it is recommended to seal the walls of the reservoir during the repair.
Applying glue
The glue is applied using a special “syringe”
In this procedure, it is also important to know when to stop, since an excessive amount of sealant not only does not reduce the likelihood of leakage, but, on the contrary, increases it
To ensure that the glue fills all the holes, you need to push it through with nail scissors or a nail file.
Completion of repairs
The sealant takes from 24 to 40 hours to dry, depending on the layer of application and the volume of the repair area. After this, a new leak test should be carried out. If the test was successful, the repair can be considered complete.