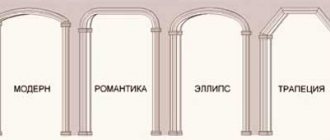
The arch is installed, but it also needs to be decorated in accordance with the rest of the interior. When choosing a coating, do not forget that in this place those living in the house will often move and carry various objects, contact with which can cause damage. What is the best choice?
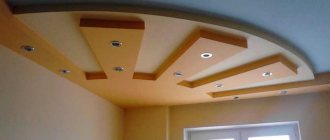
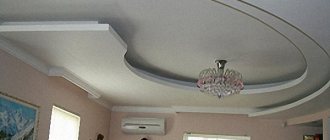
Modern designers very often make arched ones from plasterboard structures instead of ordinary interior doorways - it is this material that makes it possible to conduct experiments using different geometric shapes. But installing such a product is only the beginning of the work; then you need to decide on the finishing option. At the same time, we must not forget that it not only performs a decorative function, but also solves practical issues.
Finishing can be made from a wide variety of materials that meet certain requirements. Firstly, the color scheme and style should fit into the overall design. Secondly, the finishing material must be durable and cleanable, since frequent movement of people and objects in the opening can lead to contamination and deformation. The requirements described above can be met by using high-quality paint, cork panels or thick wallpaper. If the arch leads to the bathroom, it is permissible to use tiled mosaic as a finishing material, but it is necessary to calculate whether the structure can withstand the weight of the finishing.
Coating with water-based paint
You can settle on the most practical option - painting with water-based emulsion. It washes well and does not require additional care. It is advisable to choose a more expensive and, accordingly, high-quality material - due to the small area of the work being performed, you won’t need a lot of it. Light-colored paint is more suitable for openings.
Such an arch can be washed, and it will suffer less damage.
With indefatigable imagination and some artistic skills, you can paint along the entire bend of the arch.
Preliminary preparation
There's no need to rush. The sooner you start painting, the more errors you will need to correct later. Before painting plasterboard walls or sheets, you should examine the surface for unevenness and gaps. This procedure is necessary to achieve high-quality and even coverage. First of all, you should pay attention to the joints between the sheets.
In the video: sealing drywall seams.
They must be thoroughly puttied. This procedure should not be neglected, since even ten layers of paint will not be able to hide the seams; gaps between the layers of drywall will clearly appear on the surface.
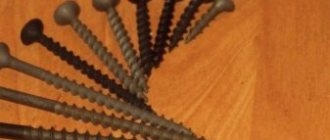
If the heads of the self-tapping screws are visible, they can be carefully driven deeper using a screwdriver. After such preliminary rituals, you should arm yourself with a spatula and putty the sheets.
Then you should glue all joint lines with reinforced tape and go over the surface again with putty. After drying, the surface is carefully polished and primed. Acrylic primer applied in a couple of layers is well suited for these purposes.
Then you should get rid of dust, dirt and various debris. You can walk with a cloth soaked in water. Before painting, be sure to test on a small area. It is better to choose the junction point. The dye should be applied thinly and allowed to dry completely, then you can take a closer look at the result. This procedure will allow you to evaluate the transparency of the paint and its masking properties.
Framing the opening
The ends and corners of the plasterboard structure will need additional protection - finishing in the form of a frame, which can be made with your own hands or ordered from a construction organization engaged in the construction of arches. Installation of the frame is carried out after finishing of all surfaces.
Most often, the ends are covered with thin plastic panels, and plastic corners are glued to the corners of already painted or glued walls. The glue is used with caution; you must first protect the walls with masking tape. Manufacturers of corners and panels have taken care of a variety of colors, so there should be no problems when choosing. All panels have a maximum length of three meters, which is a slight drawback in finishing a semicircular arch, since the presence of joints in this case is inevitable.
What to use for unusual decor
Decorative plaster is probably the second most popular and accessible material for decorating arched openings. With its help, with a little imagination, you can create a unique arch design. The advantages of this finishing material:
- ease of use, the putty is simply applied to the wall, does not require special construction skills;
- the ability to create relief patterns or textures;
- low cost.
Stone finishing in the interior
Plaster also has disadvantages:
- it is difficult to repair a separate area without changing the entire design of the arch;
- due to its embossed texture, decorative putty is difficult to care for;
- like wallpaper, decorative putty is afraid of excess moisture.
If for some reason the previous building materials are not suitable for finishing the arch, try using natural stone. This finishing material has many advantages:
- combines with other building materials, emphasizing the design of the room;
- is not afraid of a humid environment and is quite resistant to damage, does not require maintenance;
- durable, capable of maintaining its original appearance for a long time;
- a wide variety of textures and color variations.
This building material also has disadvantages:
- complexity of installation; decorating a decorative arch with stone will not be possible without knowledge in the field of construction;
- the high price does not always allow the use of this material for finishing.
Functional partition in the living room.
Additionally, decorate the plasterboard arch with the help of figured stucco molding, spotlights or cornices.
Decorating an arch with a brick:
Finishing with plaster stucco
If the arch is made in a room where the classic style predominates, which involves the use of luxury elements, polyurethane or gypsum stucco is used. It is used to decorate walls and ceilings.
Sometimes stucco is decorated using gold leaf.
This interior is distinguished by a special “antique” luxury. You can finish it in Baroque, avant-garde, retro style.
If you want to understand the gypsum stucco finish in more detail, watch the video:
What should the varnish coating be like?
High quality varnish coating is characterized by high elasticity. Various types of solutions are applied to door panels:
- matte varnishes;
- semi-matte coatings;
- glossy (shiny) solutions.
Varnishing of veneered interior arches and doors can be done with colorless varnish. Another good option is a tinting coating that can give the product a different shade.
Acrylic water-dispersion coatings have a lot of positive characteristics. They increase the wear resistance of the material, have excellent elasticity, and are low in cost. Also, varnishes can have varying degrees of gloss.
Wallpapering
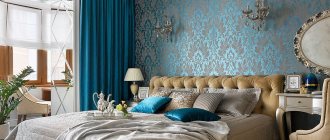
Produced very often. Thanks to the huge range of materials, you can make everything interesting and exclusive. Practicality will depend on the quality of the wallpaper chosen. It is recommended to opt for vinyl ones with a non-woven backing - they are the most durable and reliable. A three-dimensional drawing will look great on the design you made.
Arch installation
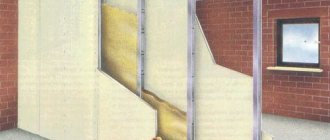
If the owner of the apartment decided to make an arched structure. then initially you need to make a sketch of the arch and clear the doorway. If necessary, you can increase its area, but the final decision will depend on the shape and size of the arch. If the product is made of plasterboard, then you need to purchase the appropriate building materials (dowel, screws, drywall, self-tapping screws). Then the owner needs to take measurements according to the sketch. Based on the obtained dimensions, a frame is made from a metal profile. The necessary pieces are cut out using metal scissors. After this, you need to secure the profile around the perimeter of the arched opening with special dowel screws.
Next, a sheet of plasterboard of the appropriate shape is prepared. It is advisable to cut the workpiece with a jigsaw. In this case, the drywall must be attached to the metal profile on both sides of the arch. Self-tapping screws are used to secure the workpieces. The distance between them must be at least 15 cm. To seal the surface of the vault, it is necessary to make additional profile blanks. For an arched arch, you need to make a cut on the profile so that it can be bent. It is advisable to make the distance between the cuts no more than 12 cm. After this, the workpiece must be attached to the drywall from the inside using self-tapping screws. The profile blank is attached in a similar way to the other side of the arch. As a result, the workpiece should follow the contour of the previously cut sheet of drywall.
Arch in the process of installation
The final stage involves fixing the lower element. First you need to use a tape measure to measure the size of the required strip. Then a corresponding piece of drywall is cut out. To bend the workpiece you need to make cuts on the inside. The interval between them can be 7-10 cm. After this, you can screw the workpiece to a metal profile, which is screwed to the inside of the side strips of drywall. Now you can safely decorate the arched opening. To perform the work you need the following tool:
Stages of wallpapering arches
First, the walls located on the sides of the arch are pasted so that the ends of the glued wallpaper do not touch the opening. The next strip is glued with a slight overlap onto the doorway (up to three centimeters); the excess must be cut off with a knife or scissors. The allowance strip should be well lubricated with glue and pressed to the inside. The last strip covers the area of the arched vault.
To match the pattern, you need to apply the wallpaper to the place where it will be glued, select a pattern that matches the one already glued, and mark the desired place with a pencil. When gluing the cut-out fragment, do not forget about the need to remove bubbles that form under the strips of wallpaper .
Do this with a rag, sponge or rubber spatula. With wallpaper that does not require matching patterns, things will go much faster.
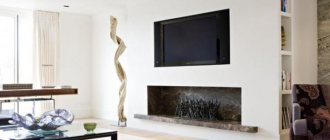
Arches in the interior of premises
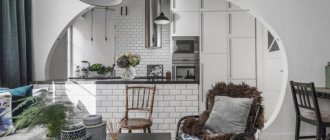
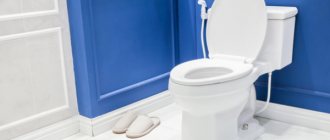
Most rooms do not initially require arches, but they can be used to decorate any room in the house: living room, bedroom, corridor, bathroom or kitchen.
Arch-shaped partitions are appropriate in living rooms. This is especially true in small apartments, where the living room simultaneously becomes a study. In such cases, plasterboard arches are used to zone the room. Usually, it is easy to fit an arched vault into the design of a living room, since, in addition to its functional purpose, it also has a decorative role.
Fabric covering
This decorative technique will look very unusual and elegant. The upholstery can be linen, satin, brocade, viscose, etc. All fabrics are different in texture, pattern and color. This decor option, with all the variety of materials, must be chosen with caution, having weighed all the points that have already been mentioned above. In one setting, fabric covering will look perfect, but in another it will look ridiculous.
How to paint an MDF arch
Some items are produced only if the product is ordered in bulk in quantities of 30 or more pieces. You can view a list of such articles in the summary table of types of arch finishes. The name comes from the Latin Simplex - simple. The width of the casing is 70 mm.
Search data for your request:
Wait for the search to complete in all databases. Upon completion, a link will appear to access the found materials.
Go to search results >>>
WATCH THE VIDEO ON THE TOPIC: How to paint a door correctly?
How to decorate an arch with decorative stone?
This type of finishing began to be used quite recently, but it has already proven itself to be a very practical option. The advantage of this method is that the finishing surfaces do not require special treatment.
The use of decorative stone, when installed correctly, will provide your chosen finish with a long service life, incomparable to any other material. But, despite all the advantages described above, we must admit that decorating with decorative stone is a very labor-intensive process. It is especially difficult to finish the inside of the arch vault. It is imperative to take into account the weight of the material, remembering that drywall is not the strongest and most reliable material and may not withstand a lot of weight. If the structure is overloaded with weight, the arch may become deformed or even collapse.
Materials for decorating an arched plasterboard partition
The properties of drywall allow any finishing materials to be applied to it. Thanks to this, there are many options for how to decorate a plasterboard arch, but the most common methods of decoration are using wallpaper, decorative plasters or natural stone.
Each of these materials has its own advantages and disadvantages, so we will tell you more about them.
Decorative plaster design option
Wallpaper is a finishing material that is affordable and easy to work with. Suitable for decorating plasterboard arched partitions in dry rooms. The positive aspects of wallpaper as a finishing material include:
- Variety of textures and colors. In every hardware store you can easily select an option that will fit into the design of a particular room;
- Finishing a plasterboard arch with wallpaper is not difficult even for an inexperienced craftsman.
Disadvantages of the material:
- relatively short service life;
- not always amenable to restoration;
- not suitable for use in areas with high levels of moisture.
How to choose the right wallpaper: useful tips
You can decorate the arch with different materials, but when choosing suitable wallpaper it is better to choose durable, washable ones. The following types are suitable for these purposes:
During the operation of the room, the opening always experiences heavy loads, regardless of the purpose of the rooms, so the surface must be periodically wiped with a soap solution. The right decision would be to abandon paper forms. This is dictated not only by their low wear resistance - the paper may wrinkle after pasting. Usually the surface levels out over time, but sometimes it becomes severely deformed at bends.
When pasting, it is quite difficult to match the patterns, so it is better to choose wallpaper in solid colors or with rare small illustrations.
Companion wallpapers are very popular today for decorative decoration of premises - they go well with each other, but have different designs. Thus, you can paste wallpaper with any pattern on the facade of the arch, and cover the inside with plain, but compatible colors.
There are often other solutions - when, regardless of the texture and color of the facade, the vault is finished with wallpaper in a contrasting color or kept in the same color scheme. For example, the vault can be covered with wallpaper in a neutral shade or a contrasting palette can be used, but the color of the vault should be combined with the baseboards, sockets and switches.
We use decorative plaster
Today, finishing arches with decorative plaster is not so rare - people often choose just such a cladding for their structures. And there are reasons for this, which we will talk about right now:
This is what a blank arched opening made of wood looks like
- Applying decorative plaster to an arched opening is very simple; no difficulties arise here. The finished finish will be durable - you can’t argue with that;
- Among the disadvantages, it can be noted that work aimed at restoring the finish is not so easy to carry out. In addition, keeping the relief clean is not as easy as just washing it. Keep this in mind if you decide that finishing the arch with decorative plaster is exactly the solution from which your interior will benefit.
To cover the surface of the opening with decorative plaster, you will need relief stamps or rollers.
Please note: using slow-drying mixtures for finishing arches (we are talking about ready-made compounds) is the right option to make the whole process easier. While the plaster is damp, it is easy to create relief on it - any craftsman will confirm this.
Execution order
- The mixture must be distributed over the surface. To avoid mistakes, carefully read the instructions: the recommended layer thickness is given there. As a rule, this figure does not exceed 15 mm;
- Then, using relief stamps or rollers, the relief is created. Rollers are generally a very convenient option for such work - they will help save not only time, but also the material itself. The same cannot be said about stamps;
- When the above procedures have been completed and the relief has already dried, the arched opening is primed (more precisely, the finish that was applied to it).
Then you have to wait - usually at least twenty hours. And you can color it. There is a special scheme here:
- To effectively highlight the relief, first apply dark paint with the roller that has a longer pile;
- The organization of the second layer looks like this: light paint is applied with a roller (the tool has a shorter pile than in the first case).
Sometimes they even choose a rubber tool. That's all - only one thing remains: you need to paint all the tops of the relief so that the work looks finished.
How to paint drywall yourself
Drywall is a very popular option for constructing partitions, leveling walls and arranging ceilings. This material can be wallpapered or tiled. But the RMNT website decided to tell you how to properly paint drywall, because this is a very common type of finishing.
First, let's decide on the choice of paint. Let us immediately note that due to the chemical composition of oil-based paints, it is not recommended to use it on drywall! They can simply ruin the surface.
Therefore, choose one of the following options:
- Water-dispersed.
- Enamel.
- Water-based paints.
The most popular are water-based paints, although their consumption is slightly higher than that of enamel paints. They perfectly hide small defects, small irregularities, and are odorless, unlike enamel ones, which contain a solvent. Water-based paint is very easy to wash off and wash, so cleaning up after painting will be simple.
Important! For the bathroom and kitchen, choose moisture-resistant water-based paint.
Paint consumption can be calculated using online calculators. On average, painting an area of 10 square meters in two layers takes 3.2 kilograms of water-based paint. Take plenty! Especially if you plan to add color. It will be incredibly difficult to create the same shade again, even if you dye it first.
Important! There are acrylic, silicate, silicone and mineral water-based paints. All of them are suitable for painting drywall.
Of course, before painting, a plasterboard wall or ceiling will need to be prepared. The Rmnt.ru portal has already told you how to putty a plasterboard surface using the example of a ceiling. Work on the wall is carried out in a similar way, it will be even easier here. Then you need a primer. Don't skimp on this process! The paint will adhere better, and its consumption will be noticeably less.
To apply paint to a prepared plasterboard wall or ceiling, you can use:
- Spray gun. An ideal choice if there is a large amount of work to be done.
- Roller. For enamel paint with a pile of no more than 4 millimeters, for water-based paint - up to 8 millimeters. Use the same roller attachment to paint surfaces in the same room. If you want to get texture, choose a nozzle with a pile higher than 8 millimeters.
Important! We do not recommend choosing a foam roller for painting drywall!
- Brushes. Needed in any case. With a narrow brush, you can paint places where a roller cannot cope, including in corners, on foam or polyurethane baseboards.
In addition to the basic tools listed, you will need a roller tray. Yes, you can cut a plastic bottle horizontally, but in a special tray it will be easier to remove excess paint by rolling the roller along the corrugated surface. Additionally, if you need to protect adjacent areas or if the paint color is different, you will need masking tape.
To work on the ceiling, you can use a roller with a telescopic long handle, but a stepladder or construction trestles are still needed to work with a brush on corners and baseboards.
We recommend starting from the corners, where you will have to work with a brush. Circle the entire perimeter of the area to be painted. Now we take a roller, dip it in paint and roll it over the surface of the tray three or four times to evenly distribute it and get rid of excess. We paint the walls, of course, from top to bottom.
Roll the roller over the surface in one direction three to four times. Then, before the paint has had time to dry, we advise you to go over it again with a practically dry roller in order to accurately get rid of drips and evenly distribute the finish.
Important! Drywall is always painted with at least two layers, when the first is completely dry! Under one layer of paint, the putty will definitely remain visible. According to experts, it is better if there are three layers, but this is at your discretion, depending on the result obtained after the second application of paint. By the way, the second coat of paint takes noticeably less.
We advise you to check the quality of the painting using a bright lamp, a flashlight, which should be directed at the wall or ceiling at an angle. This way you will definitely notice problem areas that will have to be repainted.
As you can see, there is nothing difficult in painting prepared drywall; even a beginner can handle it. Putty usually takes longer.
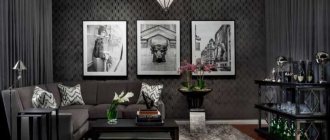
Tips for choosing an arch for different rooms of the house
Arch option for the living room
For the living room, discreet, simple and concise options are most often used. We advise against using extravagant solutions, since the living room should be a compromise choice between the different taste preferences of all family members. Installing an interior arch made of plasterboard, the photo of which is presented below, is the optimal solution that will help find reconciliation in tastes.
Restraint is a sign of the refined taste of the owner of an apartment or house, which guests will appreciate
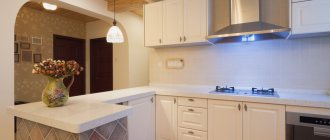
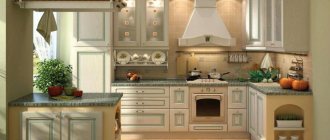
Choosing an arch for the kitchen
Almost any solution will look good in the kitchen, especially refined and sophisticated options. Neutrality will add additional space to the kitchen and visually make it much larger. In addition, we advise you to install a door in the arched opening.
Helpful advice! Installing a door in the opening will help you avoid the spread of food odors throughout the house, and will also protect the rest of the rooms from high humidity.
The photo shows a laconic arch in a bright and spacious kitchen
We select the optimal solution for the hallway
The hallway is what a guest sees first when they come to your home. That is why, when choosing a future design, focus on the impression you would like to make. If you want to gain a reputation as a sophisticated person, choose a modest and sophisticated option; if you want to be known as creative and creative, feel free to choose any original design.
An original solution with decorative elements
Painting an MDF door: choice of paint and coating technology
Unfortunately, you did not indicate how you painted it, presumably with a brush. It is better to apply tinting compounds with a spray gun, spraying them, and all other technologies only bring this result closer. You can try to do a test painting of the arch on the inside with a piece of foam rubber or a short-haired foam roller, applying layers, and if the quality suits you and the uniformity of coloring improves, tint the front side. MDF and fiberboard are wood sheet materials that absorb all types of paints and varnishes well, even water-soluble ones, so they are first primed and then painted in layers. It is advisable to take the primer from the same manufacturer as the paint. Transparent finishing for these materials is rarely used, giving the surface uniformity by tinting.
Painting tools
Painting a plasterboard sheet is simple and easy; for this you will need the following tools:
Tools for painting drywall: a, b - metal spatulas; c, d - wooden spatulas; d — fly hand; e - maklovitsa; g - handbrake; z - flute; i, k—panelled brushes; l - trimming; m - spray bottle from the kit of a household vacuum cleaner with a can; n - roller.
A traditional tool such as a brush is used to process corners and other hard-to-reach places. It is extremely difficult to paint the entire surface even with a very good brush, and the quality will not be the best. Although today, even for corners, it is already possible to purchase special corner rollers that provide quick and high-quality painting.
A simple and convenient tool, such as a roller, consists of two parts: a clasp and a fur coat.
A fur coat is the material with which paint is applied to drywall. In this case, a medium-pile roller is more suitable. If the pile is too short, the painting will not be of such high quality; there will be bald spots and unpainted areas. If the roller has a long pile, there may be traces of long fibers sticking together, and applying paint will be difficult. The roller model is determined based on what coloring composition is used.
The fur coat should not be afraid of solvents; for example, painting with water-based emulsion can be easily done with foam rollers. The clasp is the basis of the roller; it must be strong, reliable, and convenient to use. It is best to paint with clasps with a length of 18-25 cm; for walls this is the best option. To paint an arch or ceiling, you can use longer tools. On sale you can find very convenient and high-quality rollers with a telescopic tube. This makes it possible to paint without using a stepladder. Choosing a brush is much easier, since it is only used for painting corners. Brushes with a width of 5-10 cm, thin flute brushes are excellent.
How to paint an MDF arch?
We will make an interior arch from MDF in the apartment. What is the best way to paint it, and how to prepare the surface before painting? It is much easier to make an arch from any other material that bends more easily and is much cheaper, for example plywood or drywall. MDF is a porous material and to fill all these pore pits you need a primer, most likely you will have to prime it two or even three times, only in this case the paint will lie smoothly and beautifully. You can paint MDF with alkyd enamel, if you have experience in painting from spray cans and do not have a spray gun, then buy automotive enamel, it fits perfectly on MDF, the spray can will create the necessary pressure.