Why putty drywall?
When performing repairs using gypsum board, many people wonder whether it is necessary to plaster drywall under the wallpaper. Its surface is already smooth, is it possible to seal the joints and immediately glue the wallpaper, they will adhere well.
But during repeated repairs, when you need to remove the old wallpaper, they will be removed along with the cardboard, and the plasterboard sheet will be damaged. One layer of gypsum will remain on the surface. There will be only one way out: glue new wallpaper on top of the old ones. But if the wallpaper had a textured surface, it will show through under the new material.
To avoid problems during subsequent repairs, plasterboard sheets must be plastered and coated with a primer. Only after this do they begin wallpapering.
Advantages of plasterboard partitions
More profitable use of space
Partitions made of plasterboard allow you to divide the area in a room into zones, turn one room into two, or move a wall to a more advantageous location.
Correction of defects in construction
Often in residential buildings during construction they do not pay attention to the evenness of the corners relative to the walls or ceiling, or the evenness of the walls themselves in the room leaves much to be desired.
Footage savings
The thickness of a brick wall is at least 15 centimeters, while plasterboard structures can be from 7.5 to 12 centimeters thick. Of course, the difference is small, but if we are talking about a room with a small square footage, it is of great importance.
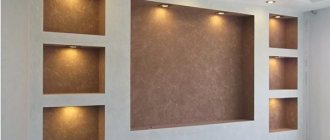
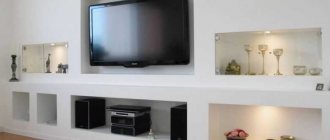
Creating additional vertical surfaces in the room
For placing shelves, souvenirs, flowers and other things.
In addition, the structure can be easily moved, altered or removed.
The entire installation process is divided into two stages:
- construction of a metal frame;
- covering the frame with plasterboard.
The main stage is the frame. The future evenness of the walls depends on the correct dimensions and correct installation of the partition.
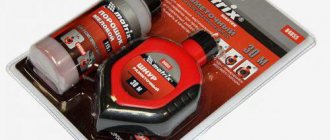
Tools required for the construction of the partition:
- ruler;
- roulette;
- building level;
- construction plumb line;
- knife for cutting drywall;
- screwdriver
Materials for putty
To seal seams and finish plasterboard walls under wallpaper, you will need materials whose properties are described in the table:
| № | Type of material | Characteristics, application. |
| 1 | Dry putties | They are the optimal material for plastering drywall. They have a sufficient shelf life, can retain their properties after opening the package, and can be diluted in small quantities. |
| 2 | Ready mix for putty | Once opened, the can has a limited shelf life. If it is not used in time, the material will dry out and become unusable. |
| 3 | Serpyanka ribbon | Performs the function of a fastening reinforcing element of joints between plasterboard sheets. Its inner part is made of a sticky base. The optimal material that can close and strengthen large defects at the joints of gypsum boards. Sold in rolls. |
| 4 | Starting putty | It has a coarse-grained structure and is used to eliminate damaged areas and places on the sheet that have defects. Apply the first layer to the primed surface. |
| 5 | Primer | The optimal composition will be deep penetration. It increases the strength of the processed material and promotes better adhesion of the layers. |
How to decorate the walls is up to everyone to decide for themselves. When choosing materials, it is not recommended to purchase cheap brands from unknown manufacturers. Materials that weigh down the surface are also not worth buying. Here you need to maintain a golden mean.
When performing work in rooms with high humidity, it is better to use cement-based solutions, since gypsum mixtures crack with changes in temperature and humidity. The polymer mixture is universal. It is flexible and has a more economical consumption.
How to finish drywall - overview of options
Let's talk about what products are used today for finishing drywall.
Wallpaper on drywall - a decent finish
If we talk about what surface for applying wallpaper can be considered ideal, we can say with confidence - a plane lined with plasterboard. As we mentioned above, the walls covered with plasterboard sheets become perfectly smooth, that is, they do not need to be primed.
Wallpaper is often applied to gypsum boards
The wallpaper adheres perfectly to a uniform surface. All that remains to think about is to putty the joints that exist between the sheets of material.
Puttying drywall - the video will explain the entire procedure of work much better than any words, and we suggest you watch it.
As you have already seen while watching the video, puttying drywall is done using tile adhesive. Be sure to also putty the heads of the nails or screws on which the material was attached - otherwise, after some time, rust may appear: this will definitely not make you happy.
Before covering drywall with wallpaper, it is important to choose the optimal material for this. To produce a finish of this level, you can safely use all types of wallpaper that are sold today.
Before applying wallpaper to drywall, it is important to prepare the surface. The same can be said about coloring. Of course, the preparatory stage here is not very difficult, but you still can’t do without it.
- It is customary to glue the joints with serpyanka.
- It is important to fill the holes and seams from the screws with putty.
- When the putty dries, it is recommended to clean the surface: sandpaper is most often used for this.
- Now the drywall putty is done again.
- The surface is cleaned again.
Painting drywall
If you are planning to paint drywall, it is important to seal the joints first. Almost any putty will be suitable for solving this problem. However, to eliminate unevenness, it is still recommended to use a special mixture: when such a mixture dries, cracks will definitely not appear.
Painting drywall is another popular finishing option for this material.
Decorative plaster on plasterboard sheets
Another option that many owners use nowadays is that when asked how to finish drywall, they answer directly: decorative plaster should be used. To get a decent result, it is enough to apply only one layer.
What’s most interesting is that decorative plaster is a material that opens up truly impressive possibilities for room design. The buyer has a wide choice of colors, textures, even application methods - due to all this, the wall can take on almost any look.
When plaster has been applied to the wall, you need to go over its surface with a special textured roller. As a result of this technique, you can perform stylization - drywall on the wall will look like an imitation of wood, stone, or some other popular material.
Finish drywall with ceramic tiles
If you haven't yet decided what to finish your drywall with, it's time to consider ceramic tiles. To work with this material, the surface is coated with a primer, and then the ceramic tiles are fixed to the drywall using tile adhesive.
In what cases should this finishing option be used?
Then, when leveling the walls is done in the kitchen or bathroom (especially near the sink). Of course, in this case it is worth using only moisture-resistant plasterboard of special brands. In terms of installation technology and appearance, this material is exactly the same as the simplest drywall. The moisture-resistant analogue is perfect for laying ceramic tiles on it.
Finishing drywall with ceramic tiles
Drywall Putty Tools
So that during the work you do not have to run to the store for the missing tools, you need to prepare everything in advance.
You will need:
- soft spatula for sealing joints;
- metal spatulas of medium hardness: wide for working on the main plane, medium for applying putty to working tools, narrow for working in corners;
- a 10 liter bucket is suitable as a container for preparing the solution;
- construction mixer or drill with a special attachment;
- roller with tray;
- wide brushes for applying primer and wallpaper paste;
- To clean the putty you will need sandpaper.
If the room is 3 m or more in height, you will need a stepladder or wooden trestles.
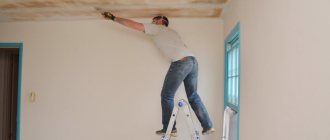
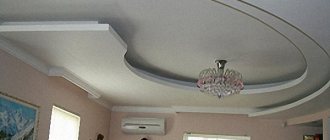
The figure shows the process of puttingtying a plasterboard ceiling for further wallpapering:
Drywall partition design
As for the design of structures, only your imagination can limit it. You can create a continuous partition or a discontinuous one. It all depends on the desire of the person or on the design features of the room. You can even build a lace structure, weightless and attractive, with elements of varying complexity. GKL partitions have their own varieties:
- Wavy structures involving the installation of a curved frame.
- Straight partitions in which the profile is not subject to deformation.
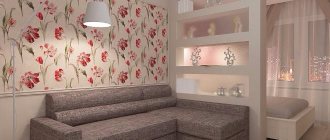
Openwork partitions fit very well into any interior, making it attractive and unusual, which significantly diversifies the overall interior of the room.
An example of an openwork partition design
The aesthetic side of plasterboard partitions is only one part of the advantages. Besides:
- partitions made of gypsum plasterboard are prefabricated;
- hide communications;
- have a small specific gravity;
- the surface does not require rough finishing;
- Making a partition from plasterboard with your own hands is not difficult.
Important! If you intend to hang heavy objects on the structure, then it is worth strengthening the interior partition made of plasterboard as much as possible; this can be done by using more profiles and several layers of material.
Putty consumption
The mixture consumption depends on the quality of the surface. If there are many defects, the consumption will increase accordingly. The surface will have to be finished with a thicker layer.
Starting putty will need 1-1.2 kg per square meter. m, the finishing mixture consumption will be less - 0.5-1 kg per m2.
Ready-made mixtures have a higher consumption, since they contain plasticizers, glue, oils and other binders.
Typically, manufacturers indicate on the label how much material is consumed per 1 square meter. m. surface with a layer thickness of 1 mm.
To independently calculate how much material to purchase, you need to know:
- The area to be plastered, which can be calculated by multiplying the length by the width and height. Then calculate the area of plasterboard sheets used for finishing. Divide the larger value by the smaller one.
- Number of defects. Typically, gypsum boards form a flat surface, due to which the consumption of materials is small.
- Coarse-grained materials are applied in a thicker layer, so the consumption of the starting mixture will be higher than the finishing mixture.
To the result obtained, 10% is added for unforeseen expenses.
Final actions
After the profile is completely covered, the entire drywall should be primed. After priming, putty is applied. During puttying, plasterboard sheets are carefully aligned at corners and joints. To achieve a better effect, you can use a reinforcing mesh. The plasterboard interior partition is complete, now you just need to decide on the decorative covering and install it.
The flexibility of plasterboard sheets allows you to create shaped partitions. Partitions in the form of arches will fit perfectly into the interior of any room. Complex designs of partitions, due to their beauty and originality, will certainly justify the time spent on them. Partitions can be made either as a solid wall between rooms or with openings of various shapes. Thanks to the use of this material, you can create an extraordinary room design.
Surface preparation
Before performing finishing work with your own hands, you need to properly prepare the surface. To do this, carry out an external inspection: if there are protruding screws, you should screw them well into the sheet so that the head is level with the wall surface.
There should be no peeling of the cardboard from the plaster at the joints. If the paper comes loose, it is carefully torn and re-glued. If this is not done, the coating will bubble and the plaster will fall off along with the peeling paper or crack.
To ensure there is less debris on the floor, you need to prepare a bag or container into which to dump the dried putty remaining on the spatula.
Do you need a room partition made of plasterboard? Create it yourself
Drywall has gained rapid popularity in the construction world. Although this material appeared on the market recently, it has managed to become indispensable in repairs or remodeling. Nowadays, rare repairs are completed without the use of this material. For this reason, many have already installed or are planning to install interior partitions made of plasterboard.
Do-it-yourself interior room partitions made of plasterboard will help you increase the area, make two rooms out of one, or create an original design in a room.
Sealing joints
Joints can be sealed in two ways:
- Serpyanka tape is glued to the joints of the sheets, and starting putty is applied on top, driving it into the joint.
- Hammer the putty into the joint, and then stick the tape, embedding it in the mixture.
The fiberglass tape is glued so that its center is located exactly in the middle of the joint.
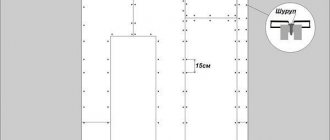
The process of gluing serpyanka tape is shown in the figure:
The putty is diluted in small portions, as it hardens very quickly. The diluted volume must be consumed within 20-30 minutes.
You will need two spatulas: wide 30-35 cm and medium 12-15 cm.
Apply the solution with a medium spatula and spread it wide over the entire joint surface so that lumps and protruding irregularities do not form. Wait until the layer is completely dry and sand the surface.
The screws are puttied in a crosswise direction, first the mixture is applied lengthwise, then crosswise, smoothed well.
To prevent lumps from forming, you need to make sure that no old mixture remains on the spatula while you are scooping out a new portion.
Attaching gypsum boards to the frame
The final stage of leveling the wall with plasterboard has arrived. It should be started from a corner, 5mm away from the floor. If there are outlets for sockets or switches, they should be marked.
The gypsum board sheet should be screwed along all edges and in the center, the screw pitch is 10-15 cm. Their arrangement among themselves should resemble a checkerboard pattern (the whole sheet is attached from below, the remaining part is covered with a piece cut to size, then the whole sheet is on top, etc.) . This is necessary so that there is no long horizontal seam along the entire surface. Self-tapping screws are screwed into the gypsum board so that the head is slightly recessed into the plaster, but does not damage its paper.
Working with corners
They putty the corners with their own hands using reinforcement with sickle tape. You can glue it both before applying the solution and after. Here everyone decides what is more convenient for him.
Rules for puttying corners:
- first apply and distribute the mixture on one side of the corner;
- After the first half has dried, the second part is puttied.
Finishing corners using a corner trowel
Apply putty to a spatula with a volume half as large as when working with wall finishing. Distribute the composition only onto the corner of the spatula. This will require more movements, but the consumption of the expensive mixture will be reduced.
A perforated corner is secured to the outer corners of walls, window and door slopes using self-tapping screws. Then it is lined with the starting solution.
DIY installation of a decorative plasterboard partition
When a person thinks about renovation, the first thing he wants to do is update his interior, making it more attractive and ergonomic. This can be done using decorative plasterboard partitions. This is a universal material with which you can assemble multi-level, soaring ceilings, make partitions with smooth curves or with various built-in shelves and niches, and zone the space.
Original design of a decorative plasterboard partition
If you try and create an individual design for a gypsum plasterboard partition, you will get a work of art in your apartment, made by yourself.
Full contents of the material
Dividing a room into two parts using drywall
Depending on what exactly the property owner wants to get at the exit, it is necessary to determine how the division of the gypsum board space will be. Zoning using a partition in the living room There are two types of zoning of rooms in an apartment using plasterboard: Closed zoning is the installation of a solid wall, which is functional and divides the room into two separate ones. The issue of dividing a room into two zones is especially acute for people living in one-room apartments . After all, despite the small area, everyone wants to have a corner and feel harmonious. Dividing one room into two zones is not an easy task if you have not had experience in such matters before. A light and thin material, such as drywall, will help solve the problem.
With a plasterboard partition you can effectively zone a room and get two rooms instead of one. If a decision is made to implement closed zoning, it should be understood that this design requires special care from the property owner. Closed zoning in the interior This design should have good sound insulation, and also act as a full-fledged wall with an exit connector (door or arch).
GKL - partitions for different purposes
We use a metal frame as the basis for assembling various types of partitions. If desired, we can reinforce the constructed wall with sheets of plywood, and you can attach any size cabinet or shelf to it. If you install partitions from high-quality building material, plasterboard and tongue-and-groove blocks are suitable for such needs. Due to the low cost of materials and installation work, every owner of an apartment, private home and office can afford them.
We offer services for the installation of plasterboard partitions in apartments, offices, industrial or other premises, followed by turnkey finishing works at affordable prices. For several years he has been installing interior plasterboard partitions in private houses, apartments and offices. They can be erected almost instantly and have good sound insulation properties.
We offer installation and subsequent work with post-payment for work at the best prices and high quality. Find out more about the installation of dividing gypsum boards - partitions in the apartment. Plasterboard structures are assembled quickly using simple operations. If you want to change the layout, then moving such partitions is quite simple. All procedures allow for a minimum installation time.
Our master is able to install even the most complex option within a short time. Find out more about demarcating gypsum boards - partitions.
Do-it-yourself plasterboard partition: step-by-step process for installing a partition
The ability of plasterboard sheets to undergo planned plastic deformation allows the installation of partitions with voluminous edges and the construction of original shelves that can support rows of books or the installation of household appliances in them. Holes are drilled in metal profiles through which wires are pulled, enclosed in insulating corrugated or smooth tubes. The ends of the wires are left outside. These two lines are very important, since the verticality of the future wall will depend on them.
Therefore, their markings must be carried out with special care.
- The next step is to install the guides on the walls along the previously marked vertical lines. During the installation process, the position is constantly checked for level to prevent even the slightest play to the side.
Another advantage of all materials for creating plasterboard partitions is that they will not pollute the premises of a house or apartment in the way that, for example, concrete mortars can do.
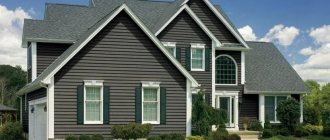
Finishing walls with plasterboard in a wooden house
Everyone chooses for themselves... the house in which they will live. Someone builds a house from concrete blocks, despite the horror stories told about concrete structures, someone prefers a house made of brick, and someone prefers to build from environmentally friendly wood, without fear of fire.
Fire danger is perhaps the most serious and severe drawback of wooden houses, despite all its advantages. And although building materials are treated with fire retardants, they partially solve the problem.
Another disadvantage is the instability of the walls due to fluctuations in humidity in the wood. A new home is especially unstable. Several years will pass before the new building settles down and all the logs (beams) fall into place.
Assembling a partition from plasterboard
Dimensions of rack profiles: 50×50, 75, 100 mm. For single-layer partitions, the 50th racks are rather weak, so we advise all of you to take the 75th or 100th. In the walls of the Knauf rack profiles there are 3 pairs of closely spaced holes with a diameter of 33 mm for laying wires.
It is necessary to make at least three attachment points per profile. Even if it is 30 cm long. Usually the pitch of the fastenings is made around 50 cm. If the floor is uneven, the pitch is reduced.
Sometimes you even have to divide the PN into several segments. We do the same thing on the ceiling. Then we unscrew the pieces of plasterboard, but do not throw them away, they will be useful to us later. We cut out the rack profiles to the height, insert them into the guides close to the walls and drill holes in the walls directly through them.
Try to maintain a step of about 50 cm, no more. We hammer the dowel nails into these holes again. Don't forget to seal the profile walls with sealing tape! And control them with rules, they should not bend. By the way, the height of the PS should be less than the height of the ceilings in the room by at least 1 centimeter.
They should not support the ceiling. All that remains for us is to make a lintel for the doorway. It is made from a guide profile by cutting its shelves obliquely and bending part of its length by 5-7 cm. The slide clearly shows how it will look. That is, you will need to cut a piece of PN 10-14 cm longer than the width of the opening.
Cut and bend it symmetrically. On each side, the jumper is attached to the side posts using 2-3 LN self-tapping screws. We do not unscrew the pieces of plasterboard from the profiles until we secure the PN at all the necessary points. There are often situations when the holes available in the PN are not enough. In these cases, they should be drilled independently, and this can be done in one step - through the profile into the base.
The main thing is to carefully ensure that the boundaries of the gypsum board pieces clearly coincide with the marking lines. After securing the guides on the sides of the doorway, I advise you to check them with the rules and make sure that they lie strictly on the same line.
Plasterboard partitions in the room
- We fasten the guide profile along the line on the floor with self-tapping screws;
- We insert vertical guides into the lower profile near the walls, which we fasten to the walls with dowels strictly vertically. The step between the fasteners should be no more than 30 - 50 cm. At the joints of the profiles we use ordinary self-tapping screws to fasten them together or a cutter;
- When installing a plasterboard sheet, you need to provide a certain gap from below. To do this, we install identical stands. Do-it-yourself plasterboard partitions, the installation videos of which are very numerous, tend to settle over time. The gap is needed so that the sheets do not become deformed;
- We soundproof the partitions using mineral wool or isover, which is placed between the sheets.
As a rule, the width of the passage room is 3-3.5 meters. The ceiling height in standard-produced houses is 2.45 – 2.55 meters. This partition is standard, and if increased sound insulation is not required, then there is no point in making it thicker than 7.5 cm. This is also due to the fact that the thickness of the door frame is 7.5 cm.
If the partition is wider, the installation of door panels will be required. Helpful advice! In those places where you plan to nail shelves, hooks, niches, and similar objects, you need to install wooden embedded bars in advance.
Subsequently, these measures will greatly facilitate the fastening of furniture.
- 65 cm long pieces are made from the rack profile, the edges of which are cut so that they can be secured to the vertical posts;
- When the frame is assembled, we lay electrical wires inside it. For this purpose, the profile manufacturer has provided special holes in its products;
Installation of an interior partition made of plasterboard
It is necessary to insert racks to strengthen the structure. They are inserted in increments of 40 to 60, depending on how the drywall sheets will be attached later. The fact is that the joints of the sheets must fall on the profile.
Typically, racks are installed in increments of 60 cm with the expectation that the entire structure will be additionally reinforced with jumpers. If the vertical racks were installed in increments of 40 cm, then you can do without jumpers. If the pitch is 60 cm, then you need to install several horizontal jumpers for greater structural stability.
Simply cut a profile from guides that are mounted horizontally between the vertical posts. The fastening step is 50-60 cm. The jumpers are also fastened with bugs or using a cutter. In most cases, the cavity is filled with soundproofing material.
Therefore, vertical racks are often installed in increments equal to the width of the soundproofing material. Then it fits without the need for additional trimming and does not tilt to the side. Soundproofing of interior plasterboard partitions should be carried out after one side of the structure is sheathed with plasterboard. Any design must have a number of positive qualities in order to be used in practice.
Let's consider what advantages plasterboard partitions used in an apartment room can provide. When you assemble interior partitions from plasterboard with your own hands, they usually have a doorway, although not always. The space under the doorway also needs to be marked in order to know where to place the profile on the floor and where to insert additional racks with mortgages.
Wooden frame
A wooden frame is easier to install, but is not as stable as a metal one. It can only be arranged in a well-maintained house. All beams for a wooden frame must be dry and treated, like the walls, with a fire retardant and antiseptic.
Wooden beams are attached in the same way as metal ones. Through eyes are cut into the beams. The hole for the self-tapping screws must be countersunk so that the head of the screw is recessed and does not protrude above the beam.
Sheathing features
GKL finishing cannot be done without black self-tapping screws, which are specifically designed for metal. You need to count on the fact that 100 pieces of self-tapping screws are enough for 2.5 meters of drywall. To strengthen the entire structure, and also to prevent too long joints, it is customary to place the sheets adjacent to each other, in other words, in a checkerboard pattern. You should always start from the top left corner and work your way to the right until you reach the end of the row. Even if the walls and ceilings are measured correctly, there will still not be enough sheets. All additional inserts are installed later, and you always need to start with solid sheets. When working with a screwdriver, you need to understand that the screws go in literally like clockwork, that is, one extra movement will lead to damage to the material. Accordingly, you should act extremely carefully and screw in the screws to a depth of no more than 1.5 mm.
The distance along the screws relative to the horizontal guides should be 600 mm, and along the upper posts - 35 mm. If there are external corners, they will need to be protected with a perforated profile.
After covering the wall with plasterboard, it is necessary to perform preparatory finishing and then finishing
Frame arrangement
It is no coincidence that the frame is called sliding. It is designed in such a way that the shrinkage of the external walls does not affect or displace the internal cladding. You will learn about the intricacies of installing such a frame below.
Metal carcass
The metal frame consists of the following elements:
| Name of parts | Options | Where are they used? |
| Horizontal guide profiles | 28×27 mm | They guide and guide the racks along the floor and serve as supports for the main racks |
| Vertical U-shaped racks | They form the basis of the frame on the wall. | |
| Ceiling profiles | 60×27mm | Hold the frame, serve as load-bearing |
| Self-tapping screws with washers | D=4 mm, Length - 50–100 mm. Depends on the distance of the profile to the wall. | Necessary for attaching the frame to the wall. |
| Small screws | The frame parts are connected to each other. |
The following tools are required for work.
- Roulette,
- Level,
- Screwdriver,
- Grinder for cutting profiles,
- Step ladder,
- Pencil or marker.
First, a horizontal guide profile is attached to the floor. Then areas for installing vertical posts are marked. They are located at a distance of 40 or 60 cm from each other, so that every second (third) rack falls on the joint of the drywall sheets. The length of the racks should be 10–12 cm less than the distance from the floor to the ceiling. It is advisable to choose the thickness of the profiles for the racks at least 0.6 mm.
Next, take each rack, mark the attachment points on it so that they do not fall between the logs (beams) of the wall, and so that there are no gaps or cracks at the attachment point. From the marking down, use a grinder to cut a groove, the length of which should be 10 cm and the width about 5 mm (slightly larger than the diameter of the screw).
The cut is made in such a way that the marking point is approximately in the middle of the cut. The edges of the groove should be smooth and even. Therefore, they must be cleaned with sandpaper. There should be at least 3-4 marking points, and accordingly, grooves on each rack. All racks and their installation locations must be numbered.
Where the racks are not tightly adjacent to the wall, it is necessary to secure stops made of plywood or pieces of timber at the fastening points so that all the risers are in the same plane. Simple self-tapping screws can be used as stops. Now that the marking is completed, all the racks are marked and numbered, you can begin to install them.
The racks are attached to the wall with self-tapping screws with washers, which are screwed into the upper part of the groove, with an indentation of 1 cm. The self-tapping screw should hold the racks tightly, but you should not tighten them all the way; the washer under the screw head should turn.
Next stage. The same U-shaped profiles are attached to these racks, but inverted towards the first ones. Fastening is done with self-tapping screws on the side. Stiffening ribs are laid across the wall. Thus, the metal frame for covering the walls with plasterboard is ready.
There is another way to install a frame under drywall. It is suitable for log walls, walls with large irregularities.