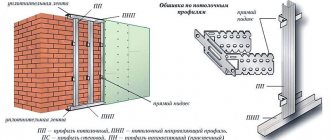
False walls, suspended ceilings, boxes and slopes are all, as a rule, frame structures covered with sheet materials. The most common frame for drywall is made of profiles, but wooden frames are also found. The frame for plasterboard (lathing) carries a serious load, so it is advisable to assemble it, adhering to established rules and recommendations.
What elements are the frames made of?
The fundamental component is a metal profile. Depending on the type of structure being created, it is selected according to dimensions, shape, and metal thickness. In general, when assembling the frame the following is used:
- Profiles – partition, ceiling, guides, rack;
- Connectors – straight (“extensions”), single-level (“crabs”), two-level;
- Straight perforated (universal elements) or anchor hangers;
- Self-adhesive sealing (damping) tape;
- Dowels, dowel-nails;
- Self-tapping screws are universal, as well as sharp with a press washer or with a drill.
There are often cases when a frame made from a profile for plasterboard is assembled without some elements or they are changed in some way. However, they are all sold in stores and are quite affordable. Therefore, there is no need to deviate from known schemes and methods. It is worth taking a closer look at each detail of the metal sheathing.
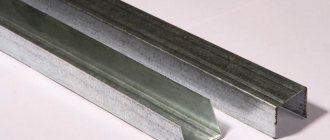
Metal profile
Almost any metal profile has a U-shape in cross-section. The purpose of the product is determined by the presence of additional stiffening ribs (“rolling”) along the edges. The profiles reinforced by them are called “rack-mount” (or “racks”), the functions of which are to carry the load and join gypsum board sheets.
The guide metal profile connects the structure with the base and serves as a “beacon” indicating the correct location of the racks. A frame for plasterboard without such a basic profile is simply impossible. As a rule, the compliance of the assembled structure with the level and plane depends on the adjustment of this component. Reliability of fastening is very important here, although the rigidity of the “guide” itself plays a lesser role.
The division into “partition” and “ceiling” is associated with the size of the profiles and the thickness of the metal. Since frames are often filled with insulation, their “depth” (thickness) must correspond to the thickness of the heat-insulating (sound-proofing) material. If there is a door in the partition, the dimensions of the door frame, as a rule, determine the dimensions of the metal profile. As for the thickness of the walls, it is obvious that it directly affects the rigidity of the frame for plasterboard made of metal profiles.
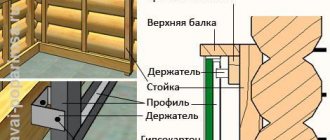
Connector
The connectors are made of thick metal and equipped with special tongues that ensure reliable fixation. Their shape and dimensions correspond to the profile parameters, which helps maintain the specified plane. Install the connectors as follows:
- The more massive part is inserted inside the racks “until a click”, connecting them together;
- The fixing tabs are bent at the desired angle;
- Screw self-tapping screws into the existing holes, securing the connection.
Extensions are used to connect two racks along the length. “Crabs” - to create a “grid” (cross-shaped knot) by perpendicularly connecting three or four posts. A two-level connector is used to connect racks located one above the other. For example, when assembling a multi-level ceiling. Therefore, it is extremely difficult to imagine a frame for plasterboard on the ceiling without the use of “crabs”
Instead of connectors, jumpers, “ears”, “tongues” cut from the profile are often used. Sometimes this approach speeds up the assembly of frames and saves screws.
Suspension
Its functions are to ensure rigidity and strength of the structure, as well as plane adjustment. Most often, direct hangers are used - a perforated tape, about 30 cm long, conventionally divided into three parts. The central part is more rigid, and there are fewer holes on it. Its function is to connect the suspension with the base (for example, with an interfloor ceiling). The two outer parts are bent to fix the racks and screwed on, adjusting the profile according to the level (along the cord). The excess is then folded to the side or cut off. That is, the working shape of the suspensions is U-shaped. Such a suspension is used not only to assemble a frame for drywall on the wall, but also for ceiling work.
The anchor suspension does not allow you to adjust the height and level of the resulting plane. Therefore, it is used where the base has already been brought to the desired horizon (or vertical). For example, when installing the lower level in a two-level ceiling. There is no need to bend, adjust, or cut anything - just screw on the suspension and “click” the stand. The time savings are obvious. So if the anchor suspension is only suitable for a frame for plasterboard made of metal profiles on the ceiling, then the U-shaped suspension is suitable for vertical surfaces.
Please note: as a rule, you have to use a lot of suspensions (both of them). On average - 3-5 pieces per rack.
Sealing tape
The damper tape resembles a door seal roll. Its thickness is 2-10 mm, roll width is 2-5 cm, the adhesive side is protected by an easily removable film. The function of the tape is to absorb vibrations intensely transmitted by the metal frame. Thus, this component performs the following functions.
- Reduces the level and quantity of extraneous sounds.
- Reduces the likelihood of “cracking” of the final surface.
- Protects the base to which the “guide” is screwed from scratches.
Damper tape is used to connect profiles to each other, to the base or to plasterboard, gluing them to metal. The tape has not found wide distribution, as it requires a lot of time. Moreover, the effect of its use is not always noticeable.
Please note: there are often frame structures that “ring” from a light blow. The damper helps to avoid such manifestations.
Dowels
The function of dowels is to ensure reliable fastening of guide profiles and hangers. Standard models are used for connection with solid foundations - brick, concrete. Anchor type dowels (“moth”, “moth”, “butterfly”) are used when the base is empty inside.
A dowel-nail is a modification consisting of a plastic dowel and a metal nail with thread. Their use significantly speeds up the process of installing a frame under plasterboard on the wall. However, a standard dowel with a self-tapping screw is usually more reliable. Therefore, it is advisable to fix the critical nodes with them.
The most common model is a 6 * 40 mm dowel-nail; a hole for it is drilled with a hammer drill with a 6 * 110 mm drill. You can hammer this nail in with a hammer, but it’s more convenient and faster to use the same hammer drill (switching the mode). The thread helps to unscrew the product if necessary.
Self-tapping screws
Not a single frame made of a metal profile for plasterboard can do without self-tapping screws. Universal screws are used to connect with a standard dowel. Metal self-tapping screws with a press washer are designed for connecting profiles to each other, as well as for fixing hangers. There are two common types: “sharp” self-tapping screws and those with a drill (special tip). The latter are used when the sheathing is assembled from a thick-walled metal profile, but they fix the assembly less well. Therefore, the “acute” modification is more popular.
Please note: sometimes it is possible to save screws, avoiding negative consequences. For example, when installing a “crab”. But, nevertheless, such savings are undesirable.
Assembling a metal frame for a suspended ceiling in stages
The first stage of work is project development. Even if you are planning a simple single-level ceiling frame made from a plasterboard profile, it is worth drawing the sheathing on paper, to the correct scale. This is the only way to calculate the exact number of required elements. Especially when the layout is more complex than the following example (3 * 4 m room, located perpendicular to the window wall):
- PN (27 * 28 * 3000 mm) – 5 pcs;
- PS (27 * 60 * 4000 mm) – 10 pcs;
- “Crabs” - 26 pcs;
- Straight hangers – 54 pcs;
- Dowel-nails 6 * 40 mm – 150 pcs;
- Self-tapping screws for metal, sharp 3.2 * 13 mm – 350 pcs.
Dowels and screws often fail during installation or turn out to be defective. Therefore, they are purchased with a reserve of 10–30%. Pendants are a universal element, so their supply (10%) will not be superfluous. Most likely, it will not be possible to buy the exact quantity of metal profiles due to the length being a multiple of 3 or 4 meters. Therefore, they are also brought in more than needed.
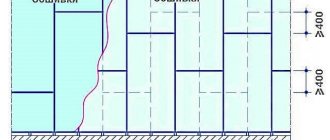
Drywall, as a rule, is placed so that the longitudinal joints “run along the light,” that is, perpendicular to the window. The transverse joints are shifted by 60 cm. This serves two purposes. Firstly, they “get into the grid” with a cell of 60 * 60 cm, and secondly, they eliminate the formation of long joints “across the light”.
The dimensions of the gypsum board are 1200 * 2500 mm, and the dimensions of the mesh cells are 600 * 600 mm. Therefore, the sheets are trimmed, leaving 1200 * 2400 mm, or the “squareness” of the outer cells is sacrificed, making their size 600 * 700 mm.
Drawing the wireframe
Before making a frame from a drywall profile, you need to draw a work plan. Drawing begins with the “tapping” of the level, in our case, the horizon. The most convenient way is to use a laser building level. When it is turned on, a horizontal line is visible on the walls, located at an arbitrary height from the floor. In the corners of the walls, along this line, mark with a pencil. They are then transferred to the desired height using a tape measure.
To connect the marks, use a “beating” paint cord, into the body of which colored chalk is poured. It is difficult to perform this procedure alone, but it is possible by screwing the end of the cord to the wall - at the level of the mark. Then, stretching the cord to the end of the wall and pulling it to the height of the second mark, a “click” is made. As a result, the chalk leaves a noticeable mark along which the guide profile will be screwed.
In addition to the laser level, hydraulic and bubble levels are used. They give approximately the same results, but have their own advantages and disadvantages.
Having drawn the “directions”, they place Fr. Solid products are usually installed along long longitudinal plasterboard seams. Therefore, they start from the window or the opposite wall, marking every 60 cm from the corner. Then they place marks on the remaining two walls, also starting from the corner. It should be remembered that the size of the outermost (for the sheet) cells is 60 * 70 cm.
Many installers draw a frame made from a metal profile under plasterboard on the base ceiling in order to immediately attach the hangers. However, this is not necessary, especially since sometimes during the installation process you have to move something and change the diagram. However, attaching guide profiles and hangers is the dirtiest and noisiest part of the job. Therefore, it is advisable to do it all at once.
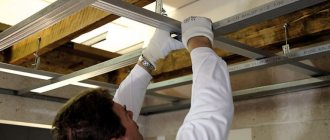
Installation of hangers and guides
If a decision is made to secure hangers at an early stage of work, their location is marked on the base base. In our case - on the surface of the interfloor ceiling. Technologically correct placement - on each rack profile, every 40 - 60 cm. The displacement associated with the installation of “crabs” and jumpers should be taken into account. Holes are drilled about the profiles and the spaces between the hangers, nailing these elements with dowel nails.
They make frame lintels for drywall on the wall from the profile. Essentially, jumpers are pieces of a stand that form two (or one, if the cell is extreme) sides of a grid cell. As a rule, their length is 52 – 53 cm, and they are fixed using “crabs”. It is advisable to “hang” each jumper. Especially those that will become the basis for the gypsum board joint. The more suspensions, the more reliable the design will be.
It is advisable for two people to secure the guides, although an experienced installer can easily do it alone. Assembling a frame from a drywall profile can be a difficult task for one person with minimal repair experience.
The profile is held along the line and “drilled”, immediately driving in the dowel-nails. To make it smoother, fixation should begin from the edges. Then they “drill” the center, and then the rest of the nails, every 40-50 cm. A total of 6-8 holes are required per metal profile.
Having secured one “stick”, the next one is mounted end-to-end with the first one. The important point is their connection. In order to maintain a straight line, the metal profiles are connected with a piece of the same “guide”, 20-30 cm long, inserting it into the nailed “sticks”. These “extensions” can then be removed. It is not necessary to connect the guides to each other at the corners, but it is advisable. For this, metal screws are used.
Installation and adjustment of the rack profile
Having a reliable horizontal frame and screwed hangers, you can begin installing the racks, without which not a single installation of a frame made from a profile for plasterboard is complete. To level the plane, fix the cord by pulling it between the walls perpendicular to the window. Screw the cord to the underside of the “guide” with a metal screw, roughly dividing the room into 3-4 parts.
- The stand is slipped under the cord, and its ends are inserted into opposite “guides”, “centered” along the drawn marks. One - central - metal profile will be enough for a start.
- To prevent it from pulling the lace down, the middle is raised above the thread by 5-10 mm and temporarily fixed with a suspension. The remaining hangers are attached to the profile, placing it 1-2 mm above the cord. When all the fastenings have been made, the middle is unscrewed and fixed again - “catching” the level along the thread. As a result, the central rack metal profile is “perfectly” adjusted relative to the guides. For control, you can use the building level and the “rule” (a trapezoidal paint strip taken as a standard). A deviation from the level within 1 mm per 1 m of surface is considered acceptable.
- Installation of the remaining racks of the wall frame from the plasterboard profile is now simplified. After all, you don’t have to look at the lace, using a “rule” or a profile placed on the edge for control. One end of the “rule” is pressed from below to the “guide”, and the other - to the adjusted stand.
- The remaining racks are fixed with hangers, guided by the “rule”.
- Looking at the drawing, install the “crabs” without screwing them in first.
- Jumpers, cut in advance or along the way, are inserted into the “crabs”.
- The jumpers are “suspended”.
- Screw 8 metal screws into each “crab”. Sometimes they are passed “through one”, saving screws, but this should not be done.
- As a rule, a control check is carried out “for the sake of the soul”, because hardly anyone will redo anything. The “rule” or stand, turned edgewise, is applied to the sheathing at different angles.
The worst thing is when making a frame from a profile for plasterboard leads to the appearance of significant bumps. Theoretically, you can try to hit the frame in those places where the “rule” swings, but it’s better to partially touch it. If a hole is found, you should not pull the sheathing down - the reliability of the fastenings will be impaired. It will be easier to then level it with plaster (on drywall).
Why profile
When assembling the frame, we have to choose between an inexpensive bar with a section of 40x40 - 50x50 mm and a profile. I strongly recommend choosing this profile for the following reasons:
- It always has perfect geometry . The block usually has to be sorted out, with a significant part of the material going to waste due to bends and “propellers”;
- The geometry and dimensions of the galvanized steel part remain constant regardless of any fluctuations in humidity. Wood swells in damp weather (this, in particular, is associated with jambs being rubbed with a wooden door on rainy days) and warps when dried. Deformation of the frame often leads to the appearance of cracks in the drywall at the seams;
Deformation of the sheathing on the ceiling led to the appearance of a crack.
Reinforcement of seams solves the problem only with minor deformations. Significant bending of the block will inevitably lead to damage to the final finish.
- Galvanization in a residential environment lasts indefinitely . The timber cannot boast of this: mold, rot and insects often lead to the loss of strength of the structure or even its destruction after 10-15 years. Of course, methods for protecting wood from these factors exist (for example, sequential impregnation with an antiseptic and drying oil), but they deprive wood of its main advantage - low cost - and significantly increase the time spent on assembling the frame or sheathing.
Woodworms can render a wooden frame unusable in just a few years.
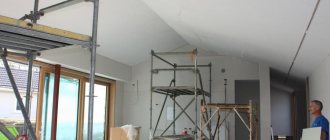
Features of assembling false walls and partitions
False walls are a vertical analogue of a suspended ceiling, the base for which is an existing wall. The assembly technology here is similar to the ceiling one, but the mesh does not need to be assembled. Firstly, the height of the ceilings rarely exceeds 2500 mm (the length of the plasterboard), and if it does, it is not by much. Secondly, a sheet standing vertically will not tend to sag. Here, rather, it is necessary to strengthen its resistance to “pushing”.
This can be achieved by installing rack profiles vertically every 40 cm. There will be no savings on metal profiles, but “crabs” will no longer be needed, which will significantly speed up the process. If you need to join the sheet, you can install and “hang” jumpers at the joints.
The frame of a partition made from a plasterboard profile can also be a grid of vertical posts and horizontal lintels. Such a device is justified when their height significantly exceeds the length of the drywall sheet. In most cases, it is more convenient to use more frequent installation of rack profiles - every 40 cm. Jumpers then become necessary only at the joints of the gypsum boards.
For ease of laying communications, partition racks are often equipped with special holes.
Suspensions are not used in partitions - after all, there is no support for them. Therefore, such parameters of the metal profile as wall thickness and dimensions are of decisive importance here. Also, in order to increase the rigidity of the structure, more durable sheet materials are used than for the ceiling. Including thick gypsum board (12.5 mm), GVL (gypsum fiber sheet), SML (glass-magnesium sheet).
If you have figured out the usual lathing on the wall, then assembling a frame for a plasterboard partition will not be difficult.
Door (window) opening
If the partition has a door, then a gap of the appropriate length is made in the lower guide. Then they proceed according to the following scheme:
- The racks adjacent to the doorway are aligned vertically using a level. They are attached with self-tapping screws to the frame guides and then reinforced with wooden beams.
Note! The distance between the posts forming the doorway should be 2 cm greater than the width of the frame.
- The upper jumper from the guide profile is installed. It should be located 1–1.5 cm above the future door structure.
- An additional vertical post, cut to size, is attached to the gypsum board joining line above the door.
The window opening in the partition is made in a similar way, only another horizontal lintel is added at the bottom.
USEFUL INFORMATION: Do-it-yourself portal for an electric fireplace made of plasterboard (video instructions)
Features of wooden frames
The use of battens made of timber or slats is justified where compactness of the structure is important. After all, the lath can have a thickness of only 10 mm, while the minimum metal profile is 27 mm. By the way, in the early 2000s, thinner products were sold in stores, then for some reason they disappeared. Additional benefits of wooden blocks:
- Environmental friendliness;
- Low thermal conductivity;
- Ease of processing;
- Rigidity.
A wooden frame for drywall has its advantages due to the use of wood. Such advantages of wood determine its use when installing, for example, partitions that are not tied to the base on all sides. The block is also used in insulated frames (to prevent “cold bridges”) and when finishing with clapboard. However, the disadvantages of wooden products are significant - susceptibility to rotting, burning, and deformation. Therefore, nevertheless, their use is quite limited.
Types of structures
You can build any structure from plasterboard sheets if you know how to make the base. The most common types:
- Walls and ceilings . The design evens out all the unevenness formed during the construction process.
- Partitions in the room . They make door and window openings, as well as additional decorative elements.
- Boxes , thanks to which you can hide communications carried out in the room.
- Niches, shelves, cabinets and decorative fireplaces.
Niches and shelves in the design solution Source mr-build.ru