Making a suspended ceiling from plasterboard with your own hands or simply sheathing it with plasterboard yourself is a great idea and a simple job that requires care.
At the very beginning, you need to draw up a sketch of the frame if the ceiling is below the floor plane. To create ceiling structures, you need to buy sheets of plasterboard, selected in thickness and properties, based on the requirements of the room, but the method of attaching plasterboard can be different.
- There are three ways to install plasterboard sheets on the ceiling:
- Using special glue. For example, if reducing the ceiling height is undesirable, this option is acceptable.
- Sometimes they make lathing for plasterboard on a wooden ceiling.
If there is old stock of lumber in the attic. It should be taken into account that slats with a cross-section with a minimum side of more than 40 mm are damaged by ants and other pests. Wood burns, special impregnation is needed. There are fire-fighting compounds, but they last up to 4 years. - The best option is to assemble a ceiling frame made of metal profiles for plasterboard. The supporting structure can be easily mounted in one or several levels, at the desired height from the floor. Of course, if the distance to the ceiling allows.
But in practice it is very inconvenient. The glue sets within 20 minutes. It is necessary to fix the material with special masts; you cannot hold it with your hands. It is impossible to lay wires over drywall. The absence of an air gap reduces the thermal insulation properties of the upper structures of the house. Fastening drywall with glue is usually used when leveling walls.
It remains to figure out how best to make a suspended ceiling from plasterboard with your own hands. Let's consider the most common and universal option for installing a frame for a plasterboard ceiling when a metal profile is used.
Why do you need a frame?
The need to make a frame for the ceiling under the gypsum board arises in the following cases:
- When the surface has level differences of more than 4 mm;
- When arranging two-tier or multi-level structures;
- If necessary, laying ceiling insulation, sound insulation;
- If it is necessary to significantly reduce the height from floor to ceiling.
Frame materials
Any frame for a plasterboard ceiling can be:
- Wooden - that is, assembled from wooden slats. The advantages of such a base include cost-effectiveness; such ceiling lathing under plasterboard will cost much less than from a metal profile. But at the same time, it is much less durable, afraid of moisture and tree-eating beetles, and is susceptible to rapid rotting, swelling and deformation due to exposure to a humid environment, as well as the appearance of mold and mildew. It is necessary that the bars are well dried, the slats are almost perfectly even and do not even have such flaws as microcracks or small beetle passages.
Before installation, they are treated with specialized solutions and antiseptic liquids.
- Metal - more expensive, but at the same time convenient, practical and durable material. Metal profiles do not swell from dampness, are not susceptible to the appearance of fungus or mold, and what is also important, they do not require any pre-treatment.
What you need to stock up on
Lathing the ceiling requires only a hammer drill or screwdriver on hand. But you will have to stock up on materials. So, from all the variety of building materials for installing a frame under drywall, you will need:
- wooden slats or metal profiles. From the profiles, you will need to purchase elements of the D series (racks and guides). Take the thickness to 25 mm. But for multi-level ceilings, it is better to take the W series, and the thickness is at least 50 mm;
- fastening elements: dowels, screws, U-shaped or wire hangers, as well as crabs.
With this kit you will definitely make the lathing correctly, efficiently and very quickly.
Types of frame
According to the structure of the profiles, the following types of bases are distinguished:
- Cellular - when the profiles and accompanying jumpers form one-dimensional cells - 60x60. This type of installation of a hanging frame is suitable for those who doubt that they can install a reliable simple frame under drywall with their own hands. It will be somewhat more expensive in cost, but it is easy to install and there is practically no need to calculate the load-bearing properties. Also, this design is very durable;
- Transverse - when gypsum board sheets are attached exclusively to transverse profiles. However, it is worth performing such work only when the master is confident in his calculations and abilities.
Based on the number of tiers, you can make a frame:
- Single-level - the easiest to assemble, as well as the location of the profiles, since in this case, they will all be in a single plane;
- Multi-level - more difficult to install, since you will have to install and calculate 2 or several tiers of the frame at once. at the same time, a multi-level design is also called an independent structure when the mounted area is not entirely covered with gypsum board. That is, you can attach the planned elements to the base ceiling without covering it completely, but only partially covering it with a geometric figure;
- With a box - in fact, this is the same two-level design, only the elements protruding onto the 2nd line are often of a rectangular perimeter type, usually used as camouflage for wiring and hiding other communications. Also, the installation of a plasterboard box on the ceiling can be done solely for decorative purposes, for example, when installing lighting around the perimeter.
Wooden or metal?
There are several options for making lathing for attaching gypsum boards to the ceiling.
It can be made of wood or metal profile. The main advantages of a wooden frame are environmental friendliness, availability of material and ease of assembly. But there are also many disadvantages:
- As a rule, such a frame is used only with a flat base surface. Using it to level walls or ceilings is a real pain.
- Before assembly, all structural elements must be thoroughly treated with an antiseptic solution. Otherwise, their long service life cannot be guaranteed.
- Wooden lathing is not used in rooms where humidity exceeds 12%. At high rates, structural elements will swell and warp.
- During installation, it is necessary to leave gaps between the wall and the bars, compensating for the displacement of the geometry of the latter under the influence of temperature and moisture.
- A wooden frame is considered less durable than a metal profile structure.
The metal frame does not have these disadvantages. It is resistant to the external environment and microorganisms, durable and practical. If you have minimal construction skills and the necessary tools, it is not difficult to assemble it yourself. Installation of a profile frame will require careful calculation of the required material and various auxiliary elements: hangers, crabs, connectors.
Preparation of materials and tools
Before installing any frame, be sure to prepare all the required tools. They must be clean, working, and accurate in operation.
This:
- Roulette;
- An ordinary carpenter's ruler;
- A simple construction pencil;
- Screwdriver or drill with carrying case;
- Metal scissors;
- Spirit level or better yet, a level;
- Hammer;
- Ladder;
- Painting cord;
- Plumb.
Required materials:
- Aluminum or galvanized ceiling guide profiles (PPN-UD) - 27×28 mm, with stiffeners; ordinary ones with corrugated rolling are not suitable, they are intended for plastic cladding;
- Load-bearing (CD-PP) - 60×27 mm;
- Anchor dowels;
- Sealing tape;
- "Crabs" (connectors);
- Extensions for supporting profiles;
- Self-tapping screws (TN 0.35*2.5 cm) for securing the guides to the hangers;
- Self-tapping screws for fastening load-bearing profiles - “bugs”;
- Primer, putty, etc. to prepare the base;
- Insulation, optional (fixed in the cavities of the frame).
You can also use the gypsum board calculator for ceilings:
*Attention ! All results are approximate - accuracy depends on the wall material, condition and shape of the room
What you will need for installation
Accessories for installing a plasterboard ceiling with your own hands:
- Guide profiles KNAUF (or Gyproc) PN 28×27 mm
- Ceiling profiles KNAUF (or Gyproc) PP 60×27 mm
- Sealing tape Dichtungsband
- Separator tape
- Ceiling anchor wedges 6×40 mm
- “Dowel-nails” (another name for “Quick installation”) 6×40 mm (ordinary dowels and screws will not work, since the holes in the profiles are larger than the screw heads - 8 mm)
- Cord release device
- Laser level, or bubble level, or, at worst, a hydraulic level
- Aluminum rule 2.5 m
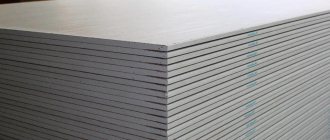
- Gyproc plasterboard sheets 2500x1200x12.5
- Seam putty (we work with Danogips Superfinish)
- Reinforcing tape for seams KNAUF Kurt
- Roulette
- Hammer
- Stationery knife (or special knife for cutting HA)
- Hammer + drill
- Screwdriver
- Metal screws 3.5×25-35 mm (black, frequent pitch)
- Self-tapping screws with press washer 4.2x13mm or shorter
- Deep penetration primer (Knauf Tiefengrund, Feidal Tiefgrund LF)
- Direct hangers
- Single-level connectors CRAB
- Metal scissors or grinder
- ISOVER or KNAUF Insulation mineral wool 50 mm thick (if sound insulation is required)
- KNAUF profile extensions (if required)
- Narrow and wide spatulas
- First aid kit, because with a high degree of probability you will cut yourself on the profiles, and this is not a joke
Well, don't take cheap profiles
Before starting installation, you need to clarify some points in the previous chapter. For example, we write – KNAUF profile. This means that you need a Knauf, not an Economy or some other crap, because you can’t assemble a good ceiling out of crap and sticks. Otherwise, at the checkout counters of all sorts of Merua Lerlens, you can often see people with these “wonderful” profiles for 40 rubles. I just want to shout to them, “What are you going to make out of this garbage?” No, seriously, you can tie this profile into a knot with your bare hands! Don’t you even think about why there’s a profile for 110 rubles lying nearby? Have you really decided that this is a markup for the brand? No, it’s just that the Knauf profile contains metal.
It’s easy to distinguish a KNAUF profile by its markings
Now, what is Dichtungband, that is, sealing tape. It is glued to the back of the guide profile for a tighter connection to the wall. This ensures better sound insulation. You can, of course, do without it, but you will save a little, and the sound insulation will worsen.
Sealing tape Dichtungsband
The plasterboard ceiling is not tied to the walls
Why do you need separation tape? It is glued under the guide profiles along the perimeter of the room, the plasterboard rests against it, the junction of which to the wall will subsequently be puttied. So, the putty does not stick to this tape, and our connection turns out to be sliding. This is otherwise called a “controlled crack”. The whole point of creating plasterboard cladding is that they must be decoupled from the enclosing structures, so our ceiling should hang stupidly on hangers, but in no case should it be attached to the walls. Yes, we attach profiles to the walls, but the drywall itself should not be screwed to these guides! Now this was the most important information that 95 percent of the “masters” do not understand. It seems to them that it would be safer to screw in more self-tapping screws anywhere, but in fact, this only makes things worse, because then deforming forces begin to act on the drywall, hence the cracks. We'll talk more about this later. By the way, if you are unable to find such tape in hardware stores, you can use regular (not masking) transparent tape instead.
Surface preparation
When all the materials and tools are ready, you can begin preparing the room and foundation. This process is also the same for all types of installation.
For this:
- It is necessary to remove from the room all furniture that may interfere or become damaged during the installation process;
- Also, it is necessary to carefully inspect the surface of the ceiling for leaks, cracks and other things. If the roof is leaking, it should be patched first, since due to leaks, the sheathing material will subsequently swell - an irreversible process that requires replacement, or the base, and this can lead to the fact that the frame for the plasterboard ceiling will be weakened;
- Cracks may indicate a violation of the strength of the load-bearing floors and this is already dangerous not for the suspended structure, but for the safety of the people living in the house;
- Non-dangerous cracks and depressions are simply sealed with putty;
- Next, you need to note the location of the load-bearing floor beams (if it is wooden);
- Clean the surface from crumbling elements - plaster, etc., and prime;
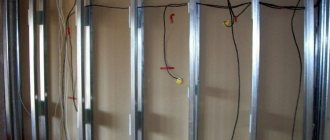
- Remove all subceiling wiring, providing it with a protective corrugated tube if necessary and insulating all connections. It should be positioned in such a way that the metal sheathing under the plasterboard on the ceiling does not come into contact with it in any case. Although many people advise sticking wires into profile grooves, this should not be done.
Frameless method
Let's consider three options for installing gypsum boards without a profile:
- On glue.
- On polyurethane foam with screws.
- On top of a wooden floor.
When attaching plasterboard to a ceiling without a frame, surface preparation will be required. The ceiling is cleaned of old paint, whitewash or other finishing. Seal all cracks and depressions, and level the ceiling if necessary. Then they are coated with a deep penetration primer, which strengthens the surface and improves adhesion.
Attention! Drywall cannot be glued directly to wood - it is movable and changes size with fluctuations in humidity. A smooth concrete surface is also not suitable, since the adhesion will be insufficient; notches are made on such a ceiling.
Gluing sheets of drywall with glue
For gypsum boards, a special gypsum-based adhesive is used (for example, Knauf PERLFIX). The composition is diluted according to the manufacturer's recommendations, which is indicated on the packaging. Then the glue is applied to the wrong side of the sheet: along the perimeter with an indentation from the edge and pointwise along the surface (at a distance of at least 40 cm between “portions”). After this, you need to lift the drywall to the ceiling, align it with the adjacent sheets and press it.
Important! GKL sticker is not a very reliable method. For safety, only professional formulations should be used. But even with them it is not recommended to use large sheets.
Fastening gypsum boards to polyurethane foam
This method is more reliable. Installation takes place in several stages. First, drywall is applied to the ceiling and holes are drilled for dowels. The step is about 50 cm. Then polyurethane foam is applied to the gypsum board and screwed to the ceiling, adding washers under the screws.
Use a level to check whether the drywall is installed level. If necessary, adjust the position of the sheet. In a day the foam will harden. Unscrew the screws, remove the washers and screw them back in again.
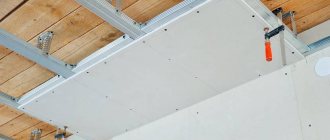
Plasterboard covering of wooden floors
The frameless method is also used in private houses with wooden floors, if the joists are even. Drywall is screwed with self-tapping screws directly to the beams of the rough ceiling, in this case the logs act as a frame. Follow the same rules as when installing on a lathing.
Important! Be sure to wait for the house to shrink. Otherwise, the geometry may change greatly and the skin will not hold up.
Read more: Finishing the ceiling with plasterboard in a wooden house
Lathing scheme
First you need to draw up a diagram that will show the places where the profiles pass, and also the points of their attachment. The drawing is drawn up with a simple pencil on a regular sheet of paper.
The dimensions, of course, should be scaled down.
The diagram should include:
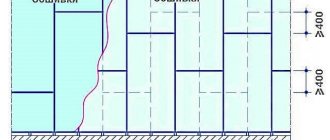
- Places for attaching guide profiles (starting strips running along the perimeter), marked in increments of 30-40 cm (the scale, of course, needs to be reduced on the sheet);
- Ceiling profiles and their cross members - in increments of 60 cm;
- Passage points for intra-frame lighting fixtures, wires and other communications.
To do this you need:
- Measure the length from edge to edge of all (namely all, not one or two) walls. You cannot measure a wall and then simply multiply its length by 4, since the level may not be the same, errors in calculations will subsequently lead to curvature of the frame;
- Measure the height of all corners, as well as from the floor to the central part of the ceiling;
- From the lowest angle, you should then measure the distance between the base and the suspended ceiling to determine the accuracy of the choice of communication devices or ceiling design. At this stage of measurements, it is also recommended to measure the location of not only the lamps, but also the junction boxes.
Tips on how to make lathing for plasterboard on the ceiling
The standard distance between profiles is 60 centimeters. This is an ideal option for ceiling plasterboard, even with additional load. If in the future it is planned to install a second and additional levels, then it is better to reduce the step to 40-50 centimeters.
The beam is laid in the center of the room (you can cross it). That is, on average 1m2 will require 4 meters of profile for the sheathing.
Does it matter how the drywall sheets are placed? In principle, the sheathing scheme will remain the same. You just need to take into account the places where the sheets are attached.
For example:
- If an indent of 2-5 centimeters is made from the edge (for example, for lighting), then you will have to move the beginning of the sheathing by the same distance.
- The depth of “insertion” of screws into the profile is from 10 to 15 millimeters. Of course, you need to select profiles such that when fastening even a sheet of drywall, you won’t get a through hole.
- The depth of the guide profiles is 40 millimeters. The main level is set based on them.
Installation of a single-level cellular frame made of metal profiles
In order to install a ceiling frame under cellular plasterboard, as mentioned above, no special experience is required. However, careful preparation for such work is still required, as is care and accuracy during installation.
The work plan consists of several stages:
- After the drawing is ready, using a tapping cord or pencil, as well as a tape measure and a level, you need to transfer the markings to the walls and ceiling;
- On the guide profiles, holes for fasteners are drilled in increments of 30-40 cm (if they are not in the factory version);
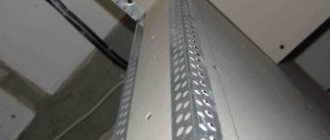
- A sealing tape is glued to the back side of the YD shelf. This metal profile is fixed along the marked line to the walls with anchor dowels;
- With a distance of 30 cm from the wall, fixed with self-tapping screws or 6 mm dowels (depending on the surface material), U-shaped hangers, every 60 cm. They should be located in the central parts between the jumpers;
- The supporting profiles are also covered with sealing tape on the back side of the shelf and secured with self-tapping screws to hangers bent in the shape of the letter “P”. If the length of the carriers is not enough, they can be extended with connectors;
- The jumpers are fixed with “crabs”. They should be located in increments of 60 cm, at the places of future joining of gypsum board sheets, and in a checkerboard pattern.
Throughout the installation of the entire structure, it is very important to check the vertical-horizontal evenness and control it using plumb lines and a level
Suspensions and connecting elements
The profiles act as beams; they must not only be attached to the ceiling, but also connected to each other, otherwise they are useless. Suspensions and connectors ensure the assembly of a frame for plasterboard from a metal profile on the ceiling.
The next most important after profiles is the U-shaped suspension; it is a bracket made of rolled steel, the width of which is 27 and the height is 60 millimeters. Its width is similar to the width of the PP profile.
Along the entire length of the “legs” of the suspension there are a large number of paired holes located at equal intervals. On the base of this element there are mounting holes for fixing anchor bolts on concrete floors and self-tapping screws on a wooden base.
It is the hangers for the metal profile frame on the ceiling that bear the greatest load, so experts do not recommend saving money on their use.
The function that connectors must perform is clear from their name. They are used to connect profiles in a certain position to each other.
Manufacturers produce many different connectors:
- Longitudinal
. Intended for connecting PCBs to each other. Using this type of connector, you can create structures of greater length than this parameter for one profile, if it is not enough. - Corner
. It is a section of a profile that has a cut in the center and a bend in the same place. Such an element is used to connect PP at different angles - acute, obtuse, straight, which depends on the structural features of the ceiling frame made of a plasterboard profile. - T-shaped
. This product is necessary for joining adjacent profiles. It is permissible not only for the perpendicular arrangement of the PP and the T-shaped connecting product, but also at an angle of different sizes, since this element has bends. - Crab type element
. It provides the connection of three to four ceiling profiles with each other at the same level or crosswise. - Two-level connector
. It is intended to perform the same task as for the “crab”, but the profiles in it are located one above the other.
When calculating the required amount of materials, you should remember that profiles, hangers and connecting elements must be purchased with a margin of 10 - 20%. Having a reserve allows you to immediately replace a damaged or defective product.
Transverse single-level frame. Installation features
Among the advantages of this method is the absence of the need for some elements - crabs and jumpers, which reduces costs. This method is also called rail due to the parallel running profiles.
- At stage 1, the frame of a two-level ceiling is also shown schematically with a step of transverse profiles of 50 cm;
- In the corner with the lowest height from floor to ceiling, a mark for the location of the structure is placed and a line for the passage of the guides is marked along the perimeter from it. It is difficult to do it with your own hands without help, it is better to use the help of a second person or use a level, marking the lines with a pencil;
- Guides are installed along this mark, with pre-glued sealing tape;
- Next, load-bearing transverse profiles are inserted into their grooves, fixed to hangers and to the starting ones themselves.
Just as in the case of a cellular frame, it is necessary to constantly check the level of maintenance of the structure.
So you can quickly, independently, install a metal frame under plasterboard sheathing on the ceiling using one of the methods.
Preparation is the key to success
To equip a specific structure, it is important to make the correct measurements, selecting only high-quality materials, because the durability of the entire structure depends on this. Among the materials chosen when creating a frame, one can note high-quality wood or metal.
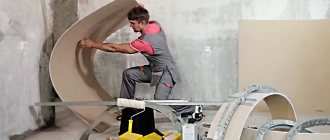
Drywall lift
It is important to note that if preference falls on a wooden frame, such a structure should only be built in a room with a low level of humidity. Otherwise, in the external environment, due to high humidity and temperature changes, such lathing will quickly become unusable, this also applies to interior rooms with high humidity. If this is not taken into account, such structures will easily swell and the wall will change its original shape, acquiring a wave-like appearance.