About Rotband plaster
Dry mixture Rotband is a type of gypsum plaster mixture intended for leveling the surfaces of walls and ceilings.
According to the instructions and if you have experience working with gypsum mixtures, Rotband quality allows you to skip the puttying process and immediately paint or wallpaper the plastered surfaces.
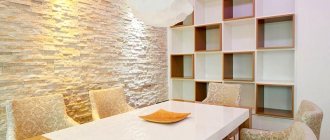
The mirror-smooth surface of Rotband is achieved by rubbing and smoothing the surface. However, such a smoothed surface is not needed for laying tiles; it is enough to bring the walls of the bathroom or toilet into the correct geometry according to the levels.
Tools and materials
Materials:
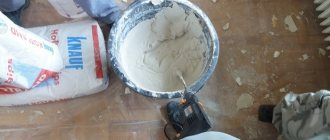
- Gypsum mixture.
- Antifungal mixture.
- Primer.
- Adhesive mixture.
- Tile.
- Crosses.
- Grout for seams.
Tools:
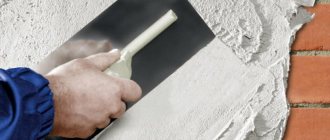
- Set of spatulas.
Tools and materials - Construction knife.
- Roller and brush.
- Fine mesh for grouting, sandpaper.
- Construction level, meter, pencil, ruler.
- Tile cutter
- Notched trowel.
The problem of laying tiles on Rotband gypsum plaster
Conventional gypsum plasters have one drawback: they are afraid of water and strong humidity. That is why gypsum plasters are not used outdoors, but only indoors.
It’s worth stopping and clarifying here. Usually, bags of gypsum plaster do not say “for dry rooms.” More often .
By definition, gypsum plaster is not a finishing material; it is used to prepare surfaces for finishing. In damp rooms and wet areas of the apartment, special finishing materials are used, which should protect the walls from moisture and water. Therefore, a priori, correctly laid tiles will protect Rotband from moisture.
In addition, the bathroom has so-called wet areas. These are places of direct contact of walls with water - shower, sink, possibly toilet, the junction of the floor and walls. According to the rules for decorating and renovating a bathroom, these wet areas must be covered with waterproofing compounds.
Read: Do-it-yourself plumbing cabin dismantling
We are not talking about bitumen or roll waterproofing. In apartments and stone houses, coating or coating compounds are used for waterproofing. The first ones resemble liquid rubber of pink, blue, and gray colors. They are universal and can be applied to any surface, both plaster and cement. The second ones are very similar to a cement mixture and are sold as a dry mixture. They are applied only to cement bases. For example, Sika waterproofing.
So, returning to Rotband, waterproofing will protect the gypsum plaster from moisture and water.
In addition, a normal tiler will use only moisture-resistant tile adhesive in the bathroom, which will also protect the gypsum plaster from moisture.
It is important to note that there are reinforced tile adhesives on sale that say that they are intended for laying tiles on gypsum bases. For example, glue K 80 is recommended for gypsum panels, gypsum plaster and other anhydrite substrates.
To protect the plaster from moisture, I would add the use of high-quality grout for the joints between the tiles. For complete peace of mind, additionally use a protective coating for grouted joints between tiles.
You need to prime gypsum plaster twice, each time waiting for the primer layer to dry completely.
Do you think that double priming and using a special adhesive for gypsum plasters will not protect the gypsum plaster from temporary destruction? Perhaps, especially since it is not always possible to find this special glue K 80 Litocol Litoflex. In this case, take UNIS Plus tile adhesive. It is suitable for gypsum bases.
For complete protection against possible problems in the future, the surface of dry gypsum plaster can be covered with a layer of tile adhesive, 1-3 mm thick. The glue is diluted to a more liquid state and applied to the double-primed surface with a spatula (like putty) or a rule (like a covering).
Read: Where to start renovating a bathroom
Marking
Since the tile consists of individual fragments of a clear geometric shape, the correct placement of the material is of great importance. You can avoid common mistakes only if you apply preliminary markings to the surface with the installation of beacons and certain control points.
Experts prefer to create a rough sketch of the cladding, which is especially suitable for creating a pattern on the surface. Gradually, the drawn up diagram is transferred to the wall, but taking into account the required gaps for the seams.
Using plumb lines and levels, a straight line is applied to the surface dividing the rows. It is imperative to maintain the integrity of the ceramics of the top row, which is why the laying should begin from the bottom.
You can learn more interesting facts from the video:
Laying tiles on Rotband gypsum plaster
The use of a layer of tile adhesive will not cancel the waterproofing of wet areas. The complete, correct cycle of preparing gypsum plaster for laying tiles looks like this:
- Prime the layer of gypsum plaster, not rubbed, generously with a deep penetration primer for wet rooms twice. The interval between priming cycles is 5-6 hours.
- Coating the surface of wet areas (preferably the entire bathroom) with coating polymer waterproofing such as Knauf Flachendicht or weber.tec 822.
- Tightening (applying a thin layer of glue) the surface of the walls with tile adhesive intended for wet rooms;
- After gluing the tiles, it is mandatory to seal the seams with good quality grout solutions.
The role of the primer.
The importance of pre-applying a primer solution before directly laying the tiles is explained by the ability of this mixture to have a beneficial effect on the properties of the surface. Gypsum plaster under tiles using a primer provides the most effective result. Thus, penetrating into the structure of the surface coating and creating a protective film on it, the primer allows:
- Significantly reduce porosity;
- Creates a water-repellent and impermeable film, thereby preventing moisture from entering;
- Significantly increases the strength of the coating;
- Improves the adhesion of building materials, resulting in increased adhesive properties;
- Helps strengthen the gypsum layer so that it remains stable even with increased load on it;
- Strengthens protection against fungus.
The optimal tool in this case is a roller, and hard-to-reach places, including corners, are additionally treated with a brush.
The method of using a primer for plaster under tiles on a non-absorbent surface is as follows.
Since the primer includes a polymer component and quartz sand, which have the undesirable ability to delaminate, it must be thoroughly mixed after opening the bucket.
Using a brush, distribute the composition evenly over the surface. Such work, as a rule, does not require highly qualified craftsmen. It is mandatory to thoroughly rinse the brush after completing the work, otherwise you can only throw it away.
Ready-made primer is sold in very large containers, and a huge part of it remains unused. The cost of tile primer varies depending on the manufacturer and composition. In view of this situation, some experts prefer to prepare it themselves. To do this, take tile adhesive and mix it with a primer that has deep penetration properties. The result should be a mixture whose consistency will resemble sour cream. As a result, the mixture obtained in this way replaces a very expensive polymer primer, which contains a quartz filler.
Before starting work, it is necessary to sweep or vacuum, and also remove peeling areas from the walls, especially those coated with oil paint, using a steel spatula. Carrying out the next stage will require the presence of some tools, namely, the roller itself and the tray intended for it, thanks to which you can remove excess primer, as well as a hand brush.
The next steps in this process are:
- Diluting the purchased concentrate with water according to the instructions;
- Wetting it in the solution and then lightly squeezing it out with a roller, apply primer from the upper sections to the lower ones, carefully observing the thickness of the layer. If the layer forms too thick after drying, there is a possibility of slight peeling;
- After drying, you need to run your palm along the wall. If a mark appears on it, priming is repeated, and if the result is negative, they begin laying the tiles.
Rotband and load
However, besides moisture, there is a more serious problem, and ignorance of it can ruin the laying of tiles on gypsum plaster. These are the load restrictions on a plastered wall.
In theory and in practice, a violation of the plastering technology with gypsum solutions can collapse your laid tiles along with the layer of plaster.
To prevent this from happening, remember and follow these rules.
— To level the walls with gypsum mixtures, the walls in the bathroom must be cleaned of old paint, whitewash and any other finishing material. Cleaning is carried out down to the basic rough foundation of the walls.
— When working with Rotband and other gypsum mixtures, do not take risks; clean the walls conscientiously. Using a primer such as Betonokontakt applied to old durable paint or plaster may not help and the Rotband will eventually fall off along with the tile due to moisture.
By the way, after Roband has completely dried, tap the plastered wall. If instead of a ringing sound you hear a thumping sound, then Rotband has not stuck to the wall and everything needs to be redone.
— To remove paint from walls, the recommended methods are annealing the paint with a torch (dangerous), heating it with a hair dryer (does not always work), or painstakingly stripping off the paint and layer of putty under the paint with a knife and spatula, or scraper. Some people beat off the paint with a punch, but this is a living hell for the neighbors. You can use the method of peeling off the paint using an angle grinder with a diamond bowl.
Read: Demolition of the plumbing cubicle partition
— The last layer of primer is applied to the wall on the day the plastering or tiling begins. This way it is guaranteed not to get dusty.
Advice. Never leave beacons in the plaster layer. Knock them out of the plaster layer the next day and cover the grooves with Rotbanod after priming.
Now comes the most important part! According to the manufacturer's instructions, the layer of Rotband gypsum plaster , for area plastering, for laying tiles should be from 10 mm (1 cm) . By the way, cement moisture-resistant plaster mixtures are also applied from 10 mm.
Instructions for using Rotband
— The time for complete drying of a 10 mm layer of Rotband in summer in dry weather is 2 days. When plastering large areas (the entire bathtub), it is better to lay the tiles after a week or 10 days.
— The layer of tile adhesive when laying tiles on Rotband should not exceed 5 mm. Therefore, using particularly heavy tiles on gypsum plaster will be difficult and is not recommended.
Distinctive characteristics of gypsum plaster
Gypsum is an unusual component that is used to create a large number of materials used to repair interior surfaces.
The mixture obtained from it has a homogeneous consistency, has good plasticity, and does not leave any roughness when applied. The shade of the solution is white, which is very convenient when applying a plaster layer before finishing with a transparent coating. The plaster layer dries faster than other analogues.
With all the positive qualities, there are also some significant disadvantages:
- plaster is porous, and this feature has an ambiguous effect on the covering layer;
- the plaster layer quickly absorbs water, which creates the preconditions for the appearance of mold and mildew;
- the solution does not have sufficient strength, after a slight mechanical impact it crumbles, leaving dents on the wall;
- when unprotected metal comes into contact with such a solution, after some time it becomes covered with a coating of rust.
Before applying the gypsum-based plaster solution, the wall is subjected to a thorough examination, and preliminary work is carried out to prepare it for finishing.
How to use tile adhesive instead of regular plaster
Situations often occur when the materials used for repair work were carried out incorrectly, and unused tile adhesive remains. Many buyers then wonder - what if they use the remaining adhesive mixture instead of plaster?
Experts say that this can be done with the resulting residues, but you need to know some of the features of such work:
- The wall with this coating looks much rougher, so you will need to additionally use finishing putty.
- The advantage of this coating is that the glue adheres well and is able to hold tightly.
- For work you need to use a medium-sized spatula and an angled one; they are more convenient and can be useful not only for such work.
- With tile adhesive you can not only firmly lay tiles, but also prime a plaster wall with it.
To lighten the load on the foundation, tongue-and-groove blocks or GGP are used - they are environmentally friendly, affordable and easy to use. To process them you do not need to use a lot of materials; one layer of putty is enough.
Preparing a gypsum surface for laying large ceramics
If you plan to lay porcelain stoneware or glue other heavy tiles on the rotband, then the surface preparation is carried out more thoroughly. In addition to the above-described priming with two types of primer, the load-bearing capacity of the plaster can be increased significantly in another way.
Holes with a diameter of 5 mm are drilled over the entire surface of the walls in a checkerboard pattern in increments of 15-20 cm using a concrete drill.
The depth of the holes should be 2-3 cm greater than the thickness of the rotband.
Snipes of the appropriate size are inserted into the holes until they stop, to which a fiberglass or galvanized steel mesh with a mesh size of 2x2 or 3x3 cm is attached with screws with wide heads.
For cement-sand plaster, it is initially better to fill the mesh and plaster
Plastering is done over the stretched mesh with a thin layer of cement-sand mortar; finishing grouting of the plaster is not necessary. Now most of the future load from the weight of the tiles will be borne not by the rotband, but by the main material of the wall. At the same time, the bonding strength of the ceramics will be increased due to changes in the base material.
The plaster is allowed time to harden and dry by wetting it with water for the first few days after application.
Then wetting is stopped, and the plaster, after complete drying, is primed with one layer of Ceresit ST-17 waterproofing primer. A day after priming, the tiles are laid using moisture-resistant tile adhesive “Unis Plus”, “Unis Pool”, “Litokol K 80” or “Ceresit SM 11”, after which the tile joints are filled with moisture-resistant grout Ceresit CE 40 aquastatic.
Surface Features
Gypsum is a fairly popular material in the construction industry; it has found its application in the category of plaster mixtures. This finish is mainly used for walls in living rooms. Often craftsmen use a mixture of the Rotband brand.
A huge advantage is that the gypsum mass is very easy to work with - it is plastic and homogeneous, without rough impurities, generally has a pleasant white color and therefore allows even thin non-woven wallpaper to be glued on top of it. With its help, you can perfectly level the surface, it dries quickly and allows you to maintain the microclimate in the room. However, it also has its drawbacks, which may affect the decision to glue tiles to the surface:
- Porous structure. When used as plaster, gypsum does not lie tightly, forming a porous surface, which affects other characteristics of the coating.
- Absorbs moisture. Due to its porosity, plaster is very susceptible to changes in humidity in the room; it absorbs water well and can also lose it. Moisture can soften the base layer, create movement under the cladding, and even lead to the formation of fungus and mold.
- Not strong enough. Despite the fact that gypsum mixtures harden quickly and seem quite durable in appearance, when pinpoint impacts or other mechanical damage are applied, marks, dents remain on the surface, and even chips can form.
- Has an adverse effect on metal. When using metal objects in contact with a plaster wall, such as nails, screws or mesh, they gradually deteriorate due to corrosion.
Gypsum plaster is usually used for subsequent finishing with wallpaper or paint.
If a gypsum surface is ideal for gluing wallpaper or paint, in the case of tiles you should first analyze the condition and quality of the surface, otherwise the work may not be successful.
Due to high humidity, gypsum finishing is generally not recommended for use in the bathroom or kitchen, but if you properly prepare the plaster, it can change its quality characteristics.
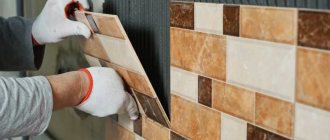
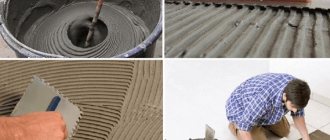
Ceramic masonry technology
Installation of tiles must begin by applying high-quality adhesive to the entire surface of the wall. For these purposes, you can use a notched trowel. A small amount of the solution is applied to the back surface, since in this case the adhesion of different surfaces significantly increases. To avoid unwanted overload of the plaster finish, you need to use a low-tooth trowel, which can be used to reduce the layer of adhesive.
The tiles should be laid in neat rows in accordance with the classic layout pattern. If one of the elements needs to be trimmed, then it is better to do this at the final stage. If necessary, you can drill small holes. For example: for fixing sockets and switches. This approach will help protect the plaster from stress.
At the final stage, be sure to seal all the seams between the tiles with a special grout, and then thoroughly wash the tiles. The installation process itself is practically no different from construction manipulations with other types of foundations. If you properly prepare the walls, the final result will certainly please you with its quality and durability.