Applying primer
Another stage without which the preparation of walls before wallpapering cannot be considered complete is priming.
If you managed to completely remove the old paint, a regular wall mixture will do to improve surface adhesion. It is recommended to apply compounds specifically designed for this purpose on top of painted surfaces, for example, VGT VD-AK-0301 or Neomid. It is advisable to purchase a white primer, as it evens out the color and prevents the base from showing through the new coating.
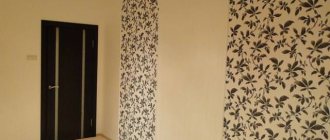
This is especially important for thin non-woven wallpapers
White primer - the optimal solution for walls
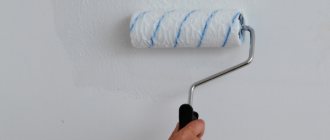
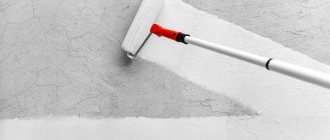
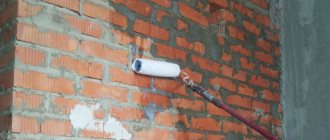
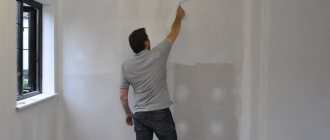
The composition is applied to leveled and dust-free walls from top to bottom, evenly distributing it with a roller. If there are hard-to-reach areas (near the radiator, window sill, pipes), it is better to use a paint brush. To ensure high-quality adhesion of surfaces, the primer is applied twice, waiting for each layer to dry.
The time after which you can apply wallpaper varies depending on the composition of the primer mixture, temperature and humidity in the room. But to be on the safe side, it is recommended to wait at least a day.
Instructions for applying primer to the wall
How to prime walls before wallpapering? The whole process consists of 3 technological operations:
- preparing the wall for taping;
- preparing the primer mixture;
- directly to the primer itself.
Preparatory work
The surface of the walls can be treated with primer only after they have been prepared for wallpapering. At the same time, preparatory work in a new building and a lived-in apartment can differ significantly.
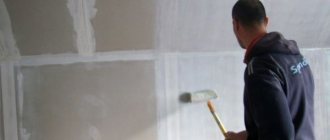
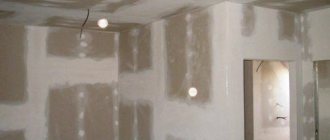
In a new house, the walls are cleaned of construction dust and, if necessary, leveled with plaster or gypsum plasterboard (GVL). If an already occupied living space is being renovated, it will take much more time to bring the walls into working condition. Necessary:
- remove old finishes (paint or wallpaper);
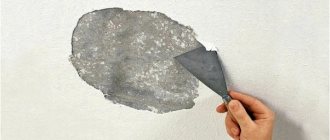
- check the plaster, if it was previously applied, for any loose spots from the wall and, if necessary, remove it completely;
- inspect the walls for microcracks and repair them;
- plaster the surface of the walls.
Detailed instructions for this item are given in the material: “How to prepare walls for wallpapering.”
Preparing the priming mixture
Depending on the form in which the primer is purchased, the technology for preparing the mixture depends.
- The finished primer does not require additional manipulations to bring it into working condition (just shake). However, when working with concrete or reinforced concrete walls, experienced craftsmen dilute the primer for the first layer - acrylic compounds with water, alkyd compounds with white spirit.
- Concentrates are diluted according to the recommendations printed on the packaging.
- To prepare a primer solution from dry mixtures, you will need a mixer, a bucket and a solvent (water or white spirit). The dry mixture is poured into the poured water in the proportion specified in the instructions and stirred with any object (trowel, stick, etc.) until lumps of the dry mixture disappear from the surface of the water. After this, the solution is kneaded with a mixer until a homogeneous mass is formed.
Primer of walls
The priming stage consists of a cycle of sequential work.
- A plastic film should be spread along the wall to protect the floor from splashes that are generated when working with a roller or brush.
- The primer is poured into the cuvette up to the level of the ribbed area.
- A roller is lowered into the primer solution and wetted around the entire circumference.
- The roller is wrung out on the ribbed surface of the bath - otherwise a lot of the mixture will end up on the floor.
- Priming starts from the bottom and works upward - in this case, drops of primer flow down the wall rather than flying onto the floor.
- The soil must be rolled out into a thin film, avoiding traces of drips. It is necessary to go over the leaked solution with a roller again.
- In corners and hard-to-reach places, the wall is primed with a paint brush.
- The second layer is applied after the first has dried.
Finishing work begins after the primer has dried.
How long does it take for primer to dry?
This question worries many who have started renovations or are decorating premises. It is not advisable to start working with wallpaper on walls that are not yet finished because the repair will take a long time. Four hours is the minimum primer drying time, and 24 hours is the maximum.
What affects the drying time of the soil mixture?
First of all, it depends on the consumption of material and the thickness of the applied layer on the working surface. There are some walls that need to be primed more than once, or the surface needs to be covered with a thick layer of the compound.
Acrylic impregnations dry very quickly - approximately 3-4 hours. Contact and oil dry for a day. The drying time also depends on what kind of surface you are working with: dry and porous ones dry out quite quickly, and recently applied plaster takes 12 hours.
One important factor is room temperature and humidity. Let's give this example: when applying impregnation to a surface at a temperature of 23 degrees and a humidity of 50%, you need to glue the wallpaper only after 12 hours. The lower the air temperature and the higher the humidity, the longer the drying time will be.
How long does it take for wallpaper impregnation to dry?
Under normal conditions, the acrylic composition on brick, concrete, chipboard is ready to work with wallpaper after five hours. Using a glyphthalic primer, you can start painting wallpaper only after 24 hours. The water-based perchlorovinyl composition dries completely after 20 minutes, after which you can proceed to wallpaper.
Primer drying time
The minimum period of time during which the primer composition dries is 4 hours, the maximum is a day. Despite the fact that the packaging necessarily contains information about how long the primer takes to dry, the waiting time after its application can vary, and quite significantly.
Factors affecting the drying speed of the primer:
- Mixture consumption and layer thickness depend on the condition of the surface being treated. There are walls that require repeated priming or application of the composition in a thick layer.
- Type of primer - acrylic emulsions are quick-drying and require 3-4 hours to dry; oil or contact emulsions dry up to 24 hours.
- The type of surface being treated is porous and dry, it dries quickly, and with freshly applied plaster – about 12 hours.
- Temperature in the building and humidity level - the lower the air temperature in the rooms and the higher the humidity, the longer the drying period of the primer composition. For example, after applying Betonokontakt to the walls at a temperature of 23°C and a relative humidity of 50%, you can begin gluing wallpaper after 12 hours, and if the temperature drops to 20°C and the air humidity rises to 65%, finishing work can begin only after 24 hours.
Tip: You can speed up the drying time of the primer by increasing the temperature in the room using heating devices. To reduce humidity, simply open a door or window and provide natural ventilation.
Recommendations for applying primer for fast drying
To preserve all the beneficial properties and characteristics of the primer mixture, you must strictly follow the instructions for its use. Each manufacturer indicates exactly how to use this or that type of primer. Thus, it is recommended to follow the rules that will help reduce the drying time of the material:
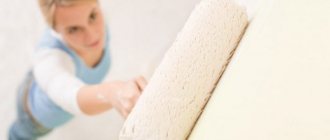
- Primer layers should be as thin as possible. For application, you should use appropriate tools such as brushes and rollers. You can also use sprayers, as they allow you to quickly apply an even layer of material to a large surface. You can also use a spray gun for this.
- Strictly following the instructions will lead to excellent results. It is necessary to dilute the primer according to the instructions on the packaging. And also find out how and how much you need to prepare the surface before application.
- It is necessary to prime from top to bottom. This will eliminate drips and product buildup in some areas.
- It is recommended to apply several rows. The minimum number of layers applied is two. This figure can also be increased due to the characteristics of the surface. For example, porous planes are primed more than 2 times.
- Before applying another row, you need to wait for the previous one to dry.
Is it possible to glue wallpaper to a plasterboard wall without applying putty?
In principle, it is possible to paste directly onto walls finished with gypsum plasterboard; the surfaces are smooth, and the material itself seems to facilitate the process. However, not all so simple. There are some nuances here that make work difficult.
It is advisable to familiarize yourself with them at the beginning of the entire process.
- The plasterboard wall is reinforced, primed, and puttied. If under ordinary trellises it is possible to leave minor defects, then for photo wallpaper the surface should be smooth and made to zero. Every small missed defect will spoil the created picture, in a certain light.
- Glue for this type of coating can only be purchased as recommended by the coating manufacturer.
- For LED wallpaper, the correct electrical wiring is carried out, according to the electrical diagram supplied with the trellises.
To hang trellises with photo effects, you should not only prepare the surface, but also decide on the wallpaper option. Photo wallpapers are diverse, in addition to the usual created photo on the wall, there are many 3D options, as well as LED coating. They are sold by construction stores and online resources on order.
Accuracy and accurate calculations are required when purchasing photo wallpaper. The bright tone of the wallpaper may not suit the overall interior of the room, thus the entire plasterboard finish of the wall or partition will be damaged. The question often arises of removing wallpaper from plasterboard surfaces, how can this be done without damaging the top layer of cardboard?
The traditional method will not work; moistening with water is also quite problematic; it will simply be absorbed by the plasterboard sheets.
The need for priming
Many self-taught craftsmen have doubts about the need to prime drywall. And this is not surprising, because the material does not like moisture. However, if the mixture is applied correctly, no harm will be caused to the drywall.
Let's look at the main advantages of gypsum board processing:
- Improves adhesion of finishing material to the surface when you need to glue tiles or paint the ceiling
- The foundation is strengthened
- The consumption of finishing is reduced - we are talking about wallpaper glue, paint and putty
- When painting is required, the primer promotes uniform application of paintwork
- Extends the service life of cladding
- Protecting surfaces from mold and mildew
In addition, it should be noted that thanks to the primer, drywall acquires new and useful qualities:
- The material becomes water-repellent
- Adhesive
- Fireproof
- Antiseptic
Why do you need a primer?
A primer is a special emulsion, the main purpose of which is to improve the adhesion, or adhesion, of the coating to the surface being treated. In addition, a special primer composition impregnates the upper layers of the base, enhancing strength and increasing wear resistance. It is used for treating floors, ceilings and walls, when working inside and outside buildings. It must be applied to the surface before painting or wallpapering.
Additional Primer Features:
- protection of metal from rust;
- development of designs on wooden materials;
- reduction in the absorption capacity of surfaces;
- preventing the development of mold and mildew under the wallpaper;
- providing traction for smooth-slippery surfaces.
The composition of the primer emulsion includes natural, synthetic, liquid or solid film-forming materials: drying oil, alkyd and epoxy resins. Sometimes fillers are added - talc, chalk.
The primer is applied to the base to be treated with a spatula, roller, or brush. The process of applying the emulsion is called priming.
Before priming, preparatory work must be carried out - cleaning the surface of the walls from paint, old wallpaper, and, if necessary, degreasing with a solvent.
Types of primers
Today in construction supermarkets you can find dozens of types of soil from different manufacturers, very different in cost. In order not to overpay or buy the wrong consumables, you need to be familiar with the types of soil. There are not many main types of soil:
- acrylic;
- alkyd;
- latex;
- adhesive.
Acrylic primer
Acrylic primer is ideal in 90% of cases. It has many advantages over other types of primers: it creates a breathable surface, adheres to most building materials, does not emit harmful substances, and dries quickly. Acrylic primer is available in different versions. Deep penetration primer is suitable for not very well prepared surfaces and creates a stable base to a considerable depth. An antibacterial or fungicidal primer will prevent mold from occurring. The only limitation for using acrylic primer is metal walls or walls with metal exposed on the surface: acrylic primer will promote corrosion, and rusty spots may appear on the wallpaper.
Alkyd primer
This type of primer is indispensable when priming walls before wallpapering metal and wood. Alkyd primer is widely used for exterior work, so it is optimal for wallpapering on a country veranda or attic that is not heated during the cold season. The main disadvantages of alkyd primer are its unpleasant odor when drying and its dark color: it is not suitable for light-colored wallpaper, as it can show through them. Often on construction websites you can find glypthal primer as a special type of primer. However, this is not true: glypthal primer is alkyd. Alkyd primers are divided into glypthal and pentaphthalic; they are marked with the appropriate marking: GF or PF.
Latex primer
Latex-based primer is similar in properties to acrylic, but the adhesive properties of latex are lower. But if you have a loose gypsum base (old drywall or gypsum plaster), latex primer will work best. It will effectively bind the gypsum-based material and make it water-repellent.
Universal primer
This type of primer is suitable for strengthening all types of surfaces, including dilapidated and crumbling ones. The universal primer is based on acrylic copolymers with the addition of resins that enhance the quality of the material. This primer is diluted with water and has the property of deep penetration into the structure of the materials being processed, making them moisture-resistant and adhesive to any finishing materials.
The best choice is universal primers
The universal primer is suitable for treating walls both outside and inside the room, increasing their resistance to various types of influences and increasing the service life of the decorative coating.
This primer is well applied to foam and aerated concrete walls, plasterboard sheets, reinforced concrete structures and other surfaces.
This composition is also applied in one or two layers, and its consumption is minimal and amounts to only 100÷120 grams per square meter of area.
Adhesive primer
Sometimes you can limit yourself to applying wallpaper glue as a primer if the wall surface is of very high quality. In this case, 3 conditions must be met for the wallpaper to hold up well:
- the type of wallpaper glue should be suitable for the type of wallpaper that will be glued;
- the primer layer and the adhesive layer must be made with the same glue;
- the glue must allow the possibility of application as a primer (this must be specifically stated in the instructions on the package).
Once you have decided on the choice of soil, you can carry out the preparatory work necessary before priming the wall.
When to wallpaper
Priming the walls before wallpapering is done a few days before installing the decorative covering. Therefore, you should be patient and be sure to wait until the impregnation has completely polymerized. Otherwise, priming will not have the desired effect - better retention of wallpaper on the wall. After which you can safely glue it.
You need to choose the right mounting solution for the appropriate wallpaper. Paper, thin and light wallpaper can be glued with regular wallpaper glue. For non-woven wallpaper - non-woven glue (on a non-woven base). For vinyl, textile and embossed – vinyl. For heavy ones, it is necessary to choose a special mounting solution of increased strength and resistance to moisture. But the most important thing is that priming increases the installation properties of the adhesive.
From all of the above, it becomes clear why there is a primer under the wallpaper. Correctly selected product and high-quality work done with your own hands are the key to the durability of the finish.
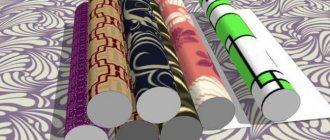
Wallpaper among finishing materials has reached a height inaccessible to competitors. And there are many reasons for this:
- variety of types and types (paper trellises, non-woven wallpaper, glass wallpaper, vinyl, liquid, etc.);
- all kinds of design solutions;
- a range of prices available to different categories of buyers, literally from pennies to very expensive ones, when one tube costs several thousand rubles;
- simple gluing technology, which allows you to do the finishing yourself.
And it’s very disappointing when work done with your own hands requires redoing after a couple of years - the sheets began to fall off, dark spots appeared in some places, etc. The reason is not bad glue or lack of experience of home decorators. Simply, no primer was applied to the surface of the walls before wallpapering.
How to glue wallpaper on drywall
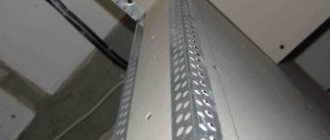
The most important step. Corners and joints are weak points. They are reinforced by reinforcement with metal corners and sickle mesh.
The mesh is made from different materials: fiberglass, lavsan. The width is also different
It is somewhat similar to a medical bandage. Important! There is a little trick that will help you save some money.
It is enough to buy a concentrated primer. It is diluted before application, increasing in volume.
- The surface of the gypsum board is thoroughly cleaned.
- The wallpaper is chosen to match the color of the drywall. You should not choose products that are too thin and light.
- The container in which the glue will be diluted is thoroughly cleaned and rinsed with water before use.
- All defects, marks, cracks and other defects on the plasterboard are eliminated. When purchasing non-woven wallpaper, this is not necessary.
- Treat the joints between them with sickle tape and fill them. The same applies to corners and screw heads.
The final result depends on the correct execution of the work, consistency and effort. In addition, you cannot do without well-selected tools and materials. According to manufacturers, wallpaper can be glued to plasterboard sheets.
But, before this, the surface should be carefully prepared. Without following all the instructions, you cannot avoid the following consequences:
Tips for carrying out work
Experts in the construction industry give beginners useful tips and recommendations:
- You should not use different types of primers to treat the same surface.
- It is recommended to treat raised areas, corners and joints with a brush
- A roller is used to process plasterboard, plywood and other sheet materials. It will ensure uniform and economical application of the material.
- the choice of primer is carried out only according to GOST
- When working with a spray gun, you must additionally protect your eyes, hands and respiratory tract (wear safety glasses, a respirator and gloves)
- After applying the primer to walls and ceilings, you must wait until it dries completely. Then you will see whether a second layer will be required or not.
In conclusion, it is worth noting that the process of priming the walls before wallpapering is one of the most important stages in the renovation. Here you need to correctly select the primer composition depending on the material of the wall surface, dilute it correctly and apply it to the walls. If you understand this process with full responsibility, then the process of priming walls and ceilings before gluing wallpaper will go quickly and quite easily.
What affects the drying of the primed layer?
The time for which the mixture should be left after application depends on further actions:
- Wallpaper or paint should be applied after the primer has completely dried;
- It is also impossible to putty and plaster on a wet composition. Otherwise, the putty or plaster will peel off in a couple of days;
- The paint is applied no earlier than every other day.
The manufacturer prescribes in the instructions for use methods that reduce drying time. You can use a heat gun, adhering to the following rules:
- Do not dry individual parts at temperatures above 300 C;
- Air pressure is minimal;
- The device is installed at a distance from the surface;
- Do not forget to ventilate the room in which the gun is working;
- Use the device only if permitted by the instructions on the ground.
If you don’t have a heat gun, and you don’t have time to wait for the primer to dry, purchase special quick-drying compounds. They dry in a couple of hours at any temperature. The downside of the coating will be an unpleasant, pungent odor. The mixture may not give the next layer sufficient adhesion to the surface.
If you don’t have a heat gun, and you don’t have time to wait for the primer to dry, purchase special quick-drying compounds.
To reduce drying time without additional exposure, follow these rules:
- Apply a thin layer using a roller or spray;
- Before starting work, read the instructions carefully and strictly follow them. This applies to the preparation of the composition, preliminary preparation of surfaces. If these recommendations are not followed, the soil will lose its beneficial properties;
- Watch for smudges, the mixture should not accumulate, the composition is applied evenly;
- If priming is carried out in several layers, each new one is applied after the previous one is ready.
Apply a thin layer using a roller or spray.
Features of application
Now let's look at some points that relate to the use of primers for wallpaper.
How best to apply: we take into account a number of features
The question of how long the primer for wallpaper should dry is of interest to people for a reason. The fact is that an accurate understanding of how quickly the material can dry makes it possible to calculate all the step-by-step work. This helps to better organize all the work, thus saving a significant amount of time. By the way, the technology for applying the composition largely affects how quickly polymerization will occur. Here are some features you should think about when carrying out work:
- The first step is to take into account the fact that the material is applied in a thin layer. At the same time, there should be no smudges or droplets left.
- It should also be taken into account that before starting work, you need to start studying the instructions and recommendations in advance.
- In the case of using a composition with a high level of penetration, it is necessary to apply several layers of it alternately, one after another. It should be understood that the next layer is applied only after the previous one has practically dried.
Other recommendations
So, when drying the primer before gluing wallpaper, as well as during all other work with it, you need to take into account a number of important points:
- If diluted wallpaper glue acts as a primer, then you can stick the wallpaper even when it has not yet completely dried.
- When using other materials, it is advisable to apply them in the evening or in the second half of one day, and glue the wallpaper the next morning.
- Avoid sudden changes in temperature during the drying process.
- In addition, it is advisable to avoid drafts.
- Do not use artificial “accelerators” that would allow the soil to dry faster, as this may slightly reduce the level of adhesion of the working surface.
Correct use of primer
Do not start decorating the wall until the primer material has completely dried. To find out exactly how long it will take for polymerization, study the information on the packaging.
To speed up the drying process of the primer, provide good ventilation in the room, lower the humidity level, increase the temperature, use a high-quality mixture, and distribute it over the surface using a sprayer.
The correct application technique is as follows:
First prepare the surface. It is cleaned, degreased and dried. The surrounding areas are covered with paper
Before preparing the solution, it is important to read the instructions on the package so that it does not turn out too thick or liquid. The primer material is applied to the wall in a thin layer. If a secondary coating is used, the primer mixture is applied immediately before the first layer has completely dried. After priming, they begin to apply decorating materials.
The correct technology for applying deep primer:
- Before starting the process, prepare the base: remove the old coating (plaster, paint, etc.), because The mixture should only be applied to a clean, hard and stable surface. There should be no dust, grease or dirt on the wall, otherwise the mixture will not be able to properly attach to the base.
- Do not apply material that has expired.
- The mixture is applied to the surface at a temperature of +5…+25°C.
- To distribute the mixture on the wall, use a special brush or plush roller.
- During finishing work, use protective glasses and gloves.
Helpful Tips:
Experts recommend using a dehumidifier when working to reduce the humidity level in the room. It is recommended to open windows to allow free air flow in the room. To create a thin layer on the surface, use a sprayer. It is very important to avoid any, even the slightest, drafts. Otherwise, the primer layer will not be able to dry evenly on the surface. It is not recommended to use dryers and other devices that produce hot air to speed up the polymerization process (by heating the wall)
This procedure will not reduce the drying time, but will only worsen the adhesive properties of the material.
Types of primer compositions
The building materials market offers a solid selection of primers from different manufacturers. Primer mixtures differ in composition, purpose and drying time; they can be universal or special, for interior or exterior work.
Based on their properties and purpose, primers can be divided into the following types:
- Concrete contact - the mixture includes quartz sand, cement, and other fillers; an acrylic binder is the basis of the composition. Designed to increase the adhesion of smooth, weakly absorbent surfaces (concrete, tiles, old paint) with plasters, putties, and ceramic tile adhesives.
USEFUL INFORMATION: How to paint a ceiling with water-based paint correctly and without streaks
- Penetrating universal – prepares surfaces before tiling and painting. Strengthens loose, crumbling substrates and reduces their absorption capacity.
- Colorless - used for treating wooden surfaces in order to preserve the natural structure of the wood. Forms a waterproof film that protects the wood from rotting.
- Contact – enhances the ability of a hard surface to “adhere” to various solutions (paints, adhesives).
- Film-forming – used when working with problematic surfaces. Strengthens the base, creates a film that limits the flow of moisture. Can be applied to any surface, from cement floors to fiberboard. It dries quickly, which is convenient when deciding to put wallpaper on the walls.
Types of primer for drywall
Usually the packaging indicates what kind of work the liquid is intended for and the primer consumption. To decide which composition is best to choose, it is necessary to familiarize yourself with this information. The primer must have the following basic characteristics:
- a brush that is convenient for treating corners and areas near a plasterboard floor or plasterboard ceiling;
- with a roller you can quickly apply the composition to large surfaces;
- primer tray.
- Good penetrating ability.
- Increase the adhesion of the base.
- Bind dust.
- Resistant to chemical influences.
- Not toxic.
- Ensure continued uniform application of the finish.
- Reduce consumption (per 1m2) of paint or wallpaper glue.
- Dry quickly.
The use of different types of compositions leads to the fact that less materials are wasted, and the finish lasts better. Which liquid works best and where is easily determined by the chemical composition of the solution. This factor determines the surfaces on which the composition is most effective. Griftal primer for drywall sheets
Selecting a primer based on the type of wall surface
In terms of popularity, depending on the type of walls, the following primers are leading among buyers: “Ceresit” and “Knauf”. Their comparative characteristics are given in the table (prices taken for St. Petersburg as of mid-summer 2021).
| Primer name | Packing | Primer type | Surface type | Consumption per 1m2 | Price from, rub. |
| Ceresit CT 17 | 10 l | acrylic | concrete, brick, plasterboard, wood, plaster and putty, gas silicate blocks | 0.05-0.25 l | 510 |
| Ceresit CT 19 | 15 kg | acrylic adhesive | concrete walls, glass, tiles, plastic | 0.3-0.75 kg | 1165 |
| Knauf "Tiefengrund" | 10 kg | alkyd | GKL, GVL, gypsum putties and plasters | 100 gr | 690 |
| Knauf "Grundirmittel" | 15 kg | alkyd | gas and foam concrete, sand-lime brick | 0.2-0.3 l | 3000 |
| "Optimist" | 10 l | acrylic | tree | 0.1 l | 547 |
To summarize: primer for wallpaper, which one to choose? This is an acrylic primer: universal, easy to apply, odorless and non-toxic.
If you are not satisfied with the choice or want to save money, then you can prepare your own soil.
Do I need to prime the walls before puttying?
When asked whether the walls are primed before puttying, experienced craftsmen unanimously answer: “Yes.” Otherwise, if you immediately putty the walls without priming them first, they will crack, crumble, and crumble. This leads to the fact that they will soon have to be repaired again, which requires much more time, money and effort than preliminary priming.
Subscribe to special issues of the magazine “Home” and receive a GIFT!
Therefore, putty should be applied only on top of the soil layer, then it will remain firmly and long on the surface, without crumbling and protecting the wall from destruction.
How to prime the walls before wallpapering?
For indoor work, there are different types of primer compositions, which differ in the type of binder. Let's look at their main types.
- Acrylic primer mixture. It does not have any specific odor and can be used on any type of surface (concrete, plaster, brick and others).
- Alkyd primer material. Designed for wooden walls (ideal for country houses). The treated surface becomes susceptible to many finishing coatings.
- Glypthal primer. Used when working with wooden or metal surfaces. Its peculiarity is that it is permissible to work with it in rooms with low humidity levels.
- Perchlorovinyl solutions. Allows you to process brick and concrete walls. The main advantage is that such compositions tolerate cold well.
Whatever primer mixture is required, it must be worked correctly. Let's look at some simple recommendations that will allow you to do this.
- If the mixture smells very similar to PVA, then you should refuse to purchase it. The fact is that this is the surest sign of a fake.
- If the walls have not been puttied beforehand, it is advisable to apply two primer layers.
- How long the pasted wallpaper will last depends not only on the amount of primer applied, but also on the quality of the prepared surface. Therefore, before starting work, it is important to thoroughly clean the walls from debris, splashes, fungus and other defects.
- When working with primer compositions, it is imperative to use personal protective equipment. This is explained by the presence of harmful chemicals in any type of primer. Attention! Do not allow primer materials to come into contact with skin or mucous membranes. If contact occurs, the contact area must be urgently washed and treated, and the victim must be referred to a doctor for further instructions (people prone to allergic manifestations are in the risk zone).
- The use of primer solutions for walls painted with oil-based paint is useless. This rule also applies when using light non-woven wallpaper. The fact is that in such situations the walls are treated with water-based paint, and, therefore, there is no need for an additional layer.
- Diluted PVA is a budget analogue of primer. The problem is that, in addition to the poor quality of the coating, the use of this option does not protect the apartment owner from fungus, mold and other parasites. Why such ineffective savings?
Why do you need primer for walls: characteristics
In order to make wallpapering more practical, it is necessary to prepare the surface of the walls, for this they must be:
- cleared of old wallpaper;
- puttied;
- primed.
If everyone is sure of the need for the first two stages, then some people may neglect such an important process as priming.
The priming process is necessary:
- to create a dust-free surface that has maximum
- ability to bond;
- prevents the spread of mold or mildew;
- filling microcracks and micropores on the surface of walls, forming a monolithic film;
- improves the adhesion of wallpaper to the wall surface.
The primer is a water emulsion based on adhesive components.
Primer of walls
The process of priming walls and ceilings is quite simple. A small amount of primer is poured into the prepared container, into which the roller or brush will be dipped. If the surfaces are treated with a spray bottle, then a container will not be needed.
The solution is applied to the prepared walls in a thin layer so that there are no gaps. In this case, it is necessary to avoid smudges on the walls. If only walls and ceilings are primed, it is advisable to cover the floor with polyethylene. The primer is applied to the walls from top to bottom. After applying the first layer, the material should dry well. Next, apply a second layer if necessary.
Compositions of primers and their setting period
The primer material plays an important role in the finishing process, so when choosing, you should carefully pay attention to its composition and properties. The choice of a particular product depends on the room, type of surface and many other factors
The following types of solutions can be found on the market:
- Acrylic. Manufactured on the basis of acrylic resins. Suitable for almost any substrate, the primer is evenly distributed over the surface, hiding minor defects. The technology allows the mixture to be applied to the wall in a thick layer.
- Alkyd. Most often, such coatings are applied to textured solid substrates (PVC tiles, steel, wood, metal, etc.).
- Alcohol. Suitable for finishing wooden walls.
- Colorless primers (water-based). Designed for treating interior walls.
- Mineral. Produced on the basis of cement and mineral elements. Suitable for priming brick, concrete and other types of walls.
- Anti-corrosion. Manufactured on the basis of polyvinyl resins. Provide good adhesion to various types of surfaces and are highly resistant to corrosion. It is recommended to apply the mixture in a thin layer (as opposed to an acrylic primer). The material is suitable for coating steel, aluminum and galvanized substrates.
- Primers for dry walls. The compositions are most often used to coat drywall. The mixtures perfectly close pores and provide an even layer on the surface. The primer helps seal the drywall, prevents it from cracking, and prevents the penetration of solvents contained in the finish coat.
- Epoxy. Made on the basis of epoxy resin. The compositions are highly resistant to mechanical damage. An epoxy mixture is used to coat steel and concrete walls. The composition contains anti-corrosion additives and components that ensure good adhesion of the primer to the base. The mixtures are widely used both in the automotive industry and in construction.
The main advantages of epoxy primer:
- insulating and anti-corrosion properties;
- good adhesion to various types of substrates;
- Suitable for application on steel, zinc and aluminum.
When choosing a primer material, not only climatic conditions, the type of base, but also the composition are taken into account.
The wrong choice of primer can negatively affect both the quality of repairs and health (there are building materials that are not intended for use in residential premises).
You need to know how long it takes for different compositions to dry:
- Acrylic primer requires a minimum of 8 hours.
- For oil solutions, the time is more than a day (quick-drying oil primers that can dry in 6-7 hours are also available for sale).
- Alkyd solutions dry in 10-12 hours.
- The drying time of the epoxy primer is 90 minutes at a room temperature of + 20°C and 30 minutes at a temperature of 60°C.
- Water-based latex primer polymerizes quickly (in 30-60 minutes, for some formulations - in 1-2 hours). The rate of polymerization also depends on the thickness of the applied layer.
- Primers for dry walls dry within 30 minutes, for some manufacturers - within 2 hours, there are also compositions that require more than a day. Environmental conditions such as temperature and other factors play an important role in the polymerization rate of the primer material.
What are the compositions?
Priming the walls before gluing wallpaper is one of the important stages of intermediate work on finishing indoor surfaces with wallpaper with your own hands. Types of primers, as mentioned, are classified according to composition and properties. For example, heavy wallpaper materials (glass wallpaper, non-woven wallpaper, bamboo, textile) need stronger adhesion to the base than traditional paper.
Types of wallpaper primers are divided into several groups:
- Based on acrylic - used for intermediate work on old plaster, cement and concrete, brick and stone, wood, plasterboard, chipboard and fiberboard. Also applied to putty. Complete drying of the impregnation is achieved after a maximum of 35 hours. Can be used in residential areas due to the absence of a specific odor;
- Based on alkyd resins - more often used for treating wood and metal surfaces, as it has anti-corrosion properties. But it is better not to use such a primer on plaster and plaster. The polymerization period depends on the presence of rapidly volatile substances;
- Glypthal primers are applied to metal surfaces. After impregnation, you can proceed to further finishing no earlier than a day later. Most effective use in dry, warm rooms;
- Perchlorovinyl mixtures are intended for processing mineral bases and metal. However, this type of impregnation is not recommended for indoor finishing work. The polymerization time is short;
- It is better to use polyvinyl acetate (PVA) based if the following material is of the same composition. As for the drying period, this is one of the fastest-drying primers: under proper conditions, this process lasts only half an hour;
- Polystyrene compounds can be used on wood and plaster. But the composition contains organic solvents, so it is better not to use such a primer in residential areas;
- Phenolic compounds are intended for impregnation of wood and metal.
Another question about the composition: what acts as a diluent? Primers are divided into water-based and organic solvent-based. The former are safer for DIY indoor repairs. However, in some cases it is much more effective to use a solvent-based solution (for example, for deep penetration).
There are also universal soils that combine the best properties of this group of building materials. To choose the right one, you can consult with the seller or a familiar specialist in repair matters.
How to choose?
How long it takes for the primer to dry on the walls is not affected by its cost. We do not recommend purchasing cheap impregnations, especially those that do not have manufacturer’s instructions.
Pay special attention to those where there is one entry “for wallpaper” without indicating on which surfaces the impregnation should be used
Large quantities of water and PVA glue indicated on the package should also alert you, and if there is also a note “For all types”. Remember well that each surface should have its own approach. We advise you to calculate in advance how much finishing material you will need, and take into account the type and porosity of the surface.
Of course, it is better to order the work to be done by professionals who will ideally calculate the amount of material. But you can do the primer work yourself, you just don’t need to rush. The best option is to start priming in the afternoon and leave the surface to dry overnight, and in the morning you can glue the wallpaper.
We use acrylic primer
Acrylic primer is used for processing plaster, putty, drywall and concrete. It is a mixture made from acrylic and latex. Its peculiarity is that it penetrates deeply into the surface, dries quickly, has no unpleasant odor and is ideal for wallpaper.
According to types, acrylic primers are divided into:
- strengthening. They strengthen the surface from gluing, but do not penetrate into the deeper layers. Used to work with high-quality and smooth walls and ceilings
- adhesive. Increase adhesion between finishing materials and the base
- deep penetration. Penetrates 10 cm into surfaces, thereby strengthening them. Most often they are used to treat low-quality surfaces (for example, if the walls are plastered with cement with a large amount of sand). Also suitable for surfaces that highly absorb moisture (plasterboard, foam concrete, gypsum boards)
Acrylic primers are also divided according to their composition into:
- water soluble. They are environmentally friendly and lack a strong odor. When dry, the material forms a transparent film on the surface
- organic. They are resistant to various contaminants, negative factors and prevent the formation of unfavorable microflora
The most common are universal compounds that are used to treat different types of surfaces (concrete, metal, wood). They are perfect not only for wallpapering walls, but also for painting them.