We install the ceiling plinth with our own hands
Ceiling plinths (curbs, fillets, cornices) give the ceiling surface a complete look. They allow you to remove those irregularities that arise when joining the ceiling and wall, and also close the technological seams between the wall and the suspended ceiling system (see Ceiling plinth for plastic panels: installation technology). Our article is about how to install a ceiling plinth, and is it possible to do such work yourself without involving specialists?
"Ceiling plinth"
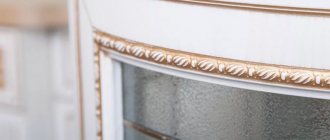
Ceiling plinth is a wonderful finishing material that masks all errors and irregularities at the ceiling-wall boundary. It is also called a cornice, baguette, border or fillet. Most often, skirting boards are made of polyurethane, polystyrene foam and polystyrene foam.
The installation of these elements is the final, final note in your work. You don't know how to fix the ceiling plinth? No problem! Please read these instructions carefully and repeat each step yourself.
Basic installation methods
There are various methods that are used when gluing ceiling plinths. It is customary to distinguish two main technologies that allow the installation of the most popular product options: polyurethane and foam.
Method one - using putty
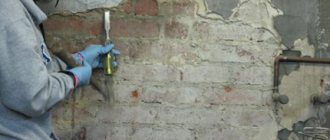
This option is great for situations in which wallpapering has not yet been done. Many masters rightly consider this method the most acceptable. The fact is that an untreated surface allows you to achieve the best grip.
Gluing ceiling plinths using putty is done on walls that do not have decorative finishes
Preparation
To work you will need the following set of materials:
- Directly fillet. It is very convenient that this method is universal and practical for all varieties.
- Putty. The process uses the most common mixture, which is sold everywhere in stores; you can use leftovers from previous repairs. It is important to pay attention to the expiration date and integrity of the substance. If the material is not friable, it is rejected.
On a note! A gypsum composition can be selected for the job. But it has one big disadvantage - quick setting. This limits the time the solution can be used, and also does not make it possible to correct any defects that have arisen.
- Priming. Used to increase surface adhesion. It is better to choose formulations with deep penetration.
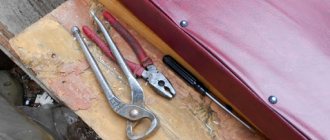
To glue the ceiling plinth, select the necessary set of tools:
- Trimming of parts is carried out using an ordinary hacksaw for metal. You need to use a stationery knife only when the width of the elements does not exceed two centimeters, otherwise the quality will not be as intended.
- To form an angle, they resort to the services of a primitive, but very effective device - a miter box.
- A medium-width spatula – 8-10 cm – is suitable for applying putty.
- It often happens that the surface of the fillets has a very noticeable roughness, which interferes with high-quality work. It is removed using sandpaper.
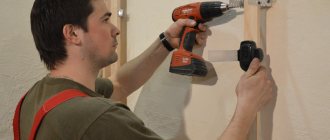
Tools required for installation of ceiling plinth
Before installing the plinth, check the availability of all materials and tools. The work is much more efficient when there is no need to search for the necessary devices during the process.
Fixation
The fillets are glued according to a specific pattern, which consists of several stages. It should be borne in mind that when performing work, all actions are adapted to the specific situation.
Stage one:
- It all starts with inspecting the area where the molding will be installed. It often happens, especially after finishing, that small defects and irregularities remain on the surface. To remove them, sandpaper is used, which is attached to a special block. Of course, it is better to do such preparatory work in advance.
- The walls and ceiling are treated with a primer. It is important to consider that even this composition needs preparation. The simplest option is to simply stir, but if a concentrate is used, it must be properly diluted. Further procedures can be carried out only after the surface has completely dried.
- Marking is required. The simplest way is to apply the part to the desired location. A line is drawn exactly along the edge that will serve as a guide.
Marking the wall surface
- Many craftsmen advise measuring the length of fillets in advance. That is, measurements of all areas are taken, and fragments are calculated. It is much more convenient to draw up a diagram on a piece of paper. You can skip this step, then the marking will have to be done for each individual element when direct fixation is performed.
- Parts are being trimmed. It is this process that can cause many problems. You need to be especially careful when working with polystyrene foam, which easily crumbles from improper exposure. To form corners, use a miter box. It’s better to practice a little to determine the correct placement of the products in this tool.
Cutting the baseboard at an angle
Stage two:
- Installation of the ceiling plinth begins with the preparation of the putty mixture. It should be noted that it is mixed immediately before work to prevent loss of properties of the finished solution. This process is quite simple: a dry substance is poured into a container, which is diluted with the required amount of water. The mixture should be thick and well mixed.
Advice! It is important to avoid the appearance of lumps or dry residue in the mixture. Therefore, it is recommended to first add water, and then add putty. Each manufacturer places instructions on the label that must be strictly followed.
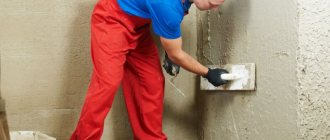
- Now comes the most crucial moment - fixation. To do this, use a spatula to collect a small amount of the prepared solution. It is evenly distributed over the entire surface of the baguette, which will directly interact with the ceiling and walls. This procedure is not complicated, but care must be taken to ensure that excess does not get on the front part.
Applying putty to the fillet surface
- Installation starts from one of the corners. It is believed that it is better to choose an area for this that is in the field of constant visibility. But before gluing the ceiling plinth, check that the applied mixture is not too much. Otherwise, there will be too many leftovers that will be difficult to deal with.
- The part is pressed to a specified location. It is at this moment that those lines that were previously drawn will come in handy. They are used to verify the correct installation. There is no need to press too hard; fresh solution allows you to fix the element very quickly. In any case, excess mixture will appear from under the edges. Until the solution hardens, it is removed.
Exposed putty solution
Advice! Removing excess is not always advisable. It often happens that there are minor unevenness on the surface, in which case the putty fills them perfectly. Thus, fillet edges are formed that do not have any defects.
- When attaching the second fragment, a logical question arises: how to join the ceiling plinth correctly? Many people make a typical mistake - they forget to apply the solution directly to the end part. The mixture requires a small amount so that the excess is completely absent or minimal. The product is pressed into place and combined with the first element. It is important to achieve a perfect match, because any distortions will be obvious.
Each glued part must be installed clearly along the line. It takes time for the material to adhere well and dry completely. This takes about a day. Further work consists of cleaning out possible flaws caused by mixture residues. If necessary, the fillets are primed and painted. To avoid painting adjacent surfaces, apply masking tape along the edges of the ceiling plinth.
On a note! When work is carried out with fillets that are highly fragile, pressing is carried out with the back of the hand, without a point stop. This will help avoid dents.
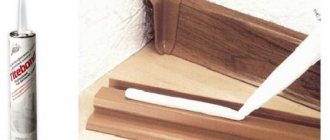
Method two - using glue
This option is usually used when you need to glue the ceiling plinth onto the wallpaper. Although this does not mean that it cannot be used on bare walls. An important condition in this case is that the wallpaper must be glued very securely, because you can diligently and carefully install the fillets, but due to defects in the main coating, they will begin to lag behind the wall.
Installation of the ceiling plinth using glue can be done over the finishing finishing: painting or wallpapering
Glue selection
Before gluing the skirting boards, you need to decide on the choice of adhesive composition. Currently, there are many options that are suitable for this task. So, among all the diversity, the following stand out:
- Universal substances. This category includes solutions that have a very viscous and transparent mass that hardens for a very long time. The most popular options are called “Titanium”. These products are recommended for working with polystyrene and its varieties, and are suitable for any foamed materials. But they are quite inconvenient to use: they take a long time to apply to the surface, and the fixation is not always of high quality; you have to hold the parts for several minutes.
- Liquid Nails. These are very convenient compositions, to which many masters give the unconditional palm. Available in tubes for a construction gun. But when choosing this option, it is necessary to take into account that the composition must have an inscription confirming that it can be used with polystyrene foam products.
- Acrylic sealant. Quite an original solution that helps to find a way out when it is not possible to purchase one of the above materials. But in this case it is very important to choose proven formulations.
Fixation
Now you need to figure out how to properly glue the ceiling plinth with glue. The instructions are:
- The surface is being prepared. It is necessary to carefully inspect it for any irregularities or defects. If there are any, they are completely eliminated. This is required to ensure that the planks are pressed tightly and that strong bending does not occur.
- Markings are being made and parts are being prepared. It is better not to neglect this procedure, it allows you to perform work with better quality.
- Next, begin applying the adhesive. It is most convenient to distribute it in the center of areas adjacent to the surface.
Applying glue to the fillet
- The parts are applied to a given area and pressed. It is important to follow the instructions that come with each glue. Thus, different types of compositions require a different approach: holding, tearing off and re-gluing. It is better to strictly adhere to the specified scheme.
Advice! It is these parameters that you should pay attention to before purchasing. They help you understand how to glue the ceiling plinth as quickly as possible.
- The remaining elements are stacked. After which the fillets are left until completely fixed. This time is determined by the composition used. If there are cracks, they are sealed with sealant. Joints that are not always able to fit tightly are also sealed.
Repairing cracks with sealant
- When you have to correct a large number of defects, it is better to carry out subsequent staining. It will help hide conspicuous flaws.
Indeed, glue helps to significantly reduce the time required for work, but it is important to take into account the features of each composition.
Currently, many popular solutions have similar names, but differ in manufacturer. Therefore, the manufacturer is the main indicator of quality.
"Types of skirting boards"
It is necessary to take into account that in a large room with high ceilings, the use of a small plinth may not look very beautiful, and the element itself may simply “dissolve” in the interior of the room. To ensure a certain harmony, use the ratios suggested in the table.
| Approximate proportional matching table height of the ceiling plinth and room dimensions | |||
| Room area | Room height | ||
| 2.5 m | 2.7 m | 3.0 m | |
| up to 15 sq. m. | up to 9cm | up to 10 cm | 10-15 cm |
| 15-23 sq. m. | up to 9cm | 9-14 cm | 15-21 cm |
| from 23 sq. m. | up to 9cm | 15-21 cm | 15-21 cm |
For example. For a room with a height of 2.7 m and an area of 20 sq.
m. The recommended height of the plinth is 9-14 cm. You can take a value of 12 cm.
“Cutting skirting boards using a miter box and a hacksaw”
Cut off the baseboard. Cut off the front part if the corner to be pasted is internal.
Cut off the back of the fillet if the corner is external. What to do if the angles are not right? Set the miter box aside; you won't need it.
First, place the first baseboard against the wall on one side of the corner. Draw pencil lines along the sides all the way to the corner.
We got two straight lines. Take the second baseboard and attach it to the adjacent wall. Draw two more straight lines along the sides with a pencil.
Correct formation of corner and intermediate joints
It is this procedure that causes the most problems: it only takes a small mistake to irrevocably damage the workpiece. Therefore, it is impossible to talk about how to properly glue skirting boards to the ceiling if there are no concepts about the formation of joints.
So, there are a number of tips that will help in this situation:
- For such work, a miter box is used, which has a set of stencils at different angles. To create a 90-degree angle, you need to trim two parts at 45-degree angles.
- The internal corner is obtained if the fillet is placed pressed against the bottom and side of the miter box. In this case, the surface of the part that will be adjacent to the ceiling should be located on the bottom of the tool.
- To obtain the left angle vector, the element is located on the same side, and the knife must enter the stencil from right to left. If you need to get the right vector, then everything is done in reverse.
- But how to glue the plinth to the ceiling when you need to get an external corner? In such a situation, the cut must be directed differently. That is, to obtain the right vector, you need to position the knife from right to left.
If you don’t have a miter box on hand, you can resort to creating a stencil with your own hands. To do this, the baguette is placed on a table on which two lines are marked corresponding to its width. So, for example, with a fillet width of 80 mm, both lines will be located exactly at this distance. A square is drawn between them, which should have all sides of 80 mm. It contains diagonals. They will form an angle of 45 degrees. Now all that remains is to place the part on the desired side and cut it. This option is bad because the fragments are difficult to fix; any shift can lead to an uneven angle.
Attaching the ceiling plinth is also complicated by intermediate joints. There are several recommendations:
- Baguettes made of plaster and foam are best laid at right angles, especially when using putty. It should be noted that a thin layer of solution is applied to the joint of the second (next) element.
- Trouble can arise if the edges are damaged. Then it is necessary to cut the part so that it is possible to form a complete pattern in two fragments.
- Polyurethane products need more attention; their joints work better when they are made at an angle. The bias stitch will be less noticeable.
Indeed, cutting corners is not the easiest task and requires concentration and care. To better understand the whole process, we suggest watching the video below.