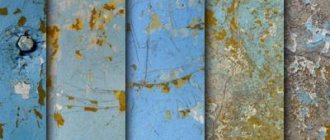
Clay walls are found not only in old houses. The tradition of plastering walls with this environmentally friendly material is gradually being revived due to the property of the material to retain heat indoors in winter and cool in summer.
Puttying clay walls has its own characteristics that must be taken into account when performing work. Surfaces can only be finished with compounds that are lighter in weight than clay, otherwise they will fall off.
Preliminary processing
How quickly you can remove old plaster from a wall depends a lot on the pre-treatment. Gypsum and lime mass tend to absorb moisture and lose internal bonds. Old lime or gypsum materials saturated with moisture swell, after which they easily yield to the pressure of a spatula or scraper. To make it easier to remove old materials from the wall with your own hands, the surface is well saturated with hot water 15-20 minutes before dismantling begins. If necessary, the surface is wetted again during removal.
wetting the wall surface
On facades, you can use hot water from a hose. In rooms, water is applied with a sponge, rag or roller. If the layer of plaster to be removed is less than 6 mm thick, you can use a garden sprayer or spray bottle.
Another method of pre-treatment is the application of a special composition that softens the old material. As a result of its application and impregnation of the plaster mass, its adhesion to the base is disrupted and loosening occurs. To prepare, dilute 2 tbsp in a liter of water. spoons of starch (corn or potato). The resulting mixture is generously spread on the surface. Softening duration is approximately 10-15 minutes.
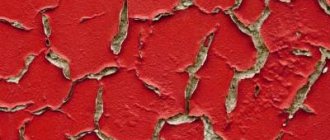
It may be necessary to remove the paint before removing the plaster compound. Water-based paint is “soaked” in water with iodine added to it. To remove water-dispersed enamel, special removers are used. Nabel is washed off with water.
Tools
Plaster removal can also be done in several ways and with different tools. Removing plaster and choosing tools depends on how firmly it adheres to the wall. We list the main tools that may be needed when removing old plaster.
- Hammer.
- Putty knife.
- Bulgarian.
- Scraper.
- Axe.
- Spatula.
- Special machine for removing plaster.
- Hammer.
Preparing the premises
It’s worth noting right away that no matter what method of removing plaster you choose, you are guaranteed a large amount of dirt and sometimes dust. Lime or gypsum plasters are susceptible to moisture. You can take advantage of this fact to make your work easier. Many experts recommend generously moistening the wall with hot water 15-20 minutes before starting work before dismantling. This will worsen the adhesion of the solution to the base and make it more loose. A thin layer can be moistened using a spray bottle, and more than 6 mm thick will have to be well soaked using a roller, sponge or rag. Just imagine the puddles that will form on the floor. Take care in advance not to damage other surfaces, especially if the apartment is already partially livable:
- Be sure to cover the floor with thick oilcloth so that its edges touch the walls;
- If somehow you already have a finishing coating on the floor, and now you decide to knock off layers of plaster from the wall, take care that when they fall, they do not damage the floor. You may have to lay thick cardboard or an old droshky under the oilcloth;
- If there are sockets on the walls, they must be plugged and protected from moisture. Seal them with masking tape and oilcloth;
- Cover the window sills with newspapers or cloth;
- If the interior doors have already been replaced, do not be lazy to wrap them with a special stretch film;
- It is also worth closing the lighting fixtures;
- De-energize the room in which the work is planned to be carried out;
- Try not to pollute adjacent rooms. To do this, close the doors, tape them around the perimeter with masking tape, and lay a damp rag on the floor in front of the door, which will close the gap and minimize the ingress of dust;
- Leave free access to the window to ventilate the room;
- Take out all equipment such as radio, telephone, etc. from the room. Dust can affect their performance.
All this must be done, even if you decide to slowly remove the plaster with a hammer and do not plan to raise dust. During the work, using a drill or hammer drill may simply become a necessity, but you will already be ready for it, and then you won’t have to spend a painfully long time cleaning absolutely everything around from the corrosive dust.
Repairing the walls of an old house
Before us, the brick walls of the house were plastered for restoration. In some places the plaster fell off, in some places we tore it off, in some places it sat as if chained and nothing could dislodge it from its place.
We decided that leveling the walls, in our case, was too expensive in terms of finances and labor costs, and it would also steal several centimeters from the walls.
This moment most clearly reflected our approach to repair work: environmental friendliness, efficiency, simplicity.
In the process of restoring a private house, it was decided to clean the walls, apply a thin layer of gypsum plaster and paint with water-based paint. When we started applying the gypsum mixture, we tried to coat the walls with our hands, without a spatula, and it turned out that this way the appearance of the brickwork would be preserved. This made us happy, especially because the vaults that we were unable to save when repairing the windows now delight us with their designs.
The absence of a stereotype about the evenness of walls and the desire not to create problems for ourselves with interior decorative decoration helped us preserve the ancient beauty of our home.
Personal protective equipment and safety precautions
Now it's time to take care of your own protection. In any case, small pieces of plaster, breaking off from the wall, will fly in different directions.
- Be sure to wear safety glasses. But as practice shows, it is better to use models that fit tightly to the face, for example, a scuba diving mask. Because when using a power tool, grains of sand can ricochet and slip even between your glasses and your face;
- The use of a respirator is mandatory. Not only will it help you inhale less dust, but it will also protect the rest of your face. Let us immediately warn you that when working with a hammer drill or grinder, even a respirator may be ineffective;
- Wear closed clothing with long sleeves and trousers;
- Also wear closed, hard shoes. House slippers or flip-flops are not an option. Even sneakers will get small fragments and a huge amount of dust. You will have to constantly stop working and shake out your shoes, because the discomfort will be noticeable. Old tall boots that you can tuck your trouser legs into are best;
- Don't forget your hat;
- In addition to the fact that you need to de-energize the room, it is also necessary to determine the location of the hidden wiring. Of course, if you are going to change it, the damage may not be unwanted.
DIY wooden floors in a private house
The dismantling of the old floor happened quite quickly, the boards rotted into dust due to excess moisture, since the floor was not ventilated, because it was covered with linoleum and the vents were closed.
How did we arrange the “cellar”?
They removed the fertile layer of soil, leveled the ground, and dug a hole for the “cellar.” They placed a wooden box there, tarred the outside, and filled the bottom with concrete.
How did we waterproof the subfloor?
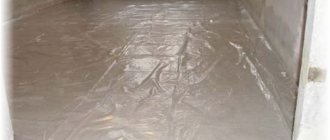
Thick film was spread over the entire area. It cuts off excess moisture from the ground; a 5-centimeter layer of sand was poured over the entire area.
What to put the logs on?
When dismantling the old floor, we discovered columns made of oak logs. These posts rotted into dust, so we didn’t want to use wood, and initially we didn’t want to mess with bricks, it was a lot of hassle. It was decided to use used car tires, since we are always for saving resources, financial and natural.
Why tires? They do not rot, do not allow moisture to pass through, excellent formwork, and cost absolutely nothing.
The tires were set up. We filled them tightly with sand, compacted them well, poured a 5-centimeter layer of concrete into the tires
How to make a subfloor?
After placing the logs according to the level. Transverse joists were secured in them and everything was worked off.
Next, the skull blocks were filled and the subfloor was laid. It was made from old boards left over from the veranda, which had been dismantled by that time. They were treated with iron sulfate.
How to insulate a wooden floor in a private house?
Lay glassine for waterproofing. The cells were covered with a 10-centimeter layer of sawdust, which was mixed with lime, ash and salt (from mold and mice). Let the sawdust dry thoroughly.
How to make a floor from planks?
Finished floors were laid from 25-gauge natural-drying edged boards. Next is sanding the wooden floors with a grinder. How to cover a wooden floor in a house? To be cheap and environmentally friendly? We used linseed oil and did not regret it. It is perfectly absorbed into the wood and polymerizes the coating, leaving no greasy marks. The only thing they would do differently now is add a coloring pigment to the oil to make the floors darker. Still, light wooden floors are not easy to care for.
Laying pine flooring
At this stage of interior decoration, we moved into our house. Where there were only floors and a stove.
Methods for removing plaster using hand tools
The room is ready, you are fully equipped, you can safely get down to business. The topic of how to remove old plaster from walls on many forums is called hackneyed and “worn to holes.” Indeed, nothing new has been invented yet, so we will try not only to list possible methods, but also to give some recommendations that we have collected based on user reviews.
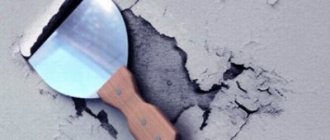
- Layers of plaster, which have already begun to fall off in whole layers, are usually first tapped with a hammer, and then the edges are pryed off with using a spatula. Sometimes you can tap the handle of the spatula with a hammer to drive it deeper under the plaster and thereby chip off a larger layer. To facilitate the process and reduce the amount of dust, wet the surface periodically. If in some places fragments of the old coating cannot be touched by a spatula, leave them for later. Removing them will require other methods;
- Old plaster will fall off equally well from both concrete and brick bases. But what to do if it is put on drywall? Under no circumstances should the integrity of the sheet, much less its paper layer, be damaged. Therefore, it is impossible to strike with a hammer to destroy the plaster layer. It is almost impossible to tap a plasterboard wall, especially one that is hollow inside, to determine where the putty has already peeled off. Therefore, start from some corner, carefully pick out a small fragment with a knife or screwdriver. Now use the cycle. This tool resembles a spatula, only sharpened. With its help, you need to pick out the putty little by little, pushing it as carefully as possible under the solution. Sometimes you can use a chisel, but you need to hold it at an acute angle;
- If you need to make a big effort, use a chisel and a hammer. With its help you can remove the coating, which holds more or less firmly. To make the work easier and faster, divide the surface into small fragments. To do this, lean the chisel against the surface vertically at one angle and strike from above. You will tap the outline of the fragments in this way. Then tilt the tool at an angle of 45 degrees, placing it in the resulting groove, and start knocking, moving in one direction;
- The favorite “old-fashioned” method is to remove the mortar using a hatchet. In much the same way as notches are applied to a painted surface before tiling, it is necessary to apply oblique blows to the plaster. Many argue that this method allows you to get the job done fairly quickly.
All of the above methods are the quietest, the work is not accompanied by an enormous amount of dust and does not require special skills or the purchase of expensive tools. Plus, their implementation requires less physical effort. Is there a difference between wielding a small hammer or even a hatchet, or a four-kilogram hammer drill? The only drawback will be the low speed of work performed, of course, if the plaster does not fall off at the slightest touch. There are places where you can’t reach with a hammer, for example, in the corners, you will have to combine several methods.
On many resources you can find recommendations that it is best to start work at the top and work your way down. In fact, the following picture emerges: you tapped the corners, along the way, some layers of plaster fell off by themselves, began to move down, passed 2/3 of the wall and stopped. We stopped because a sufficient amount of construction debris had already accumulated on the floor, which simply did not allow us to reach the lower part of the wall. You will have to stop, shovel it to the side (or better yet, straight into a bag, so as not to do the same job twice), and only then continue. Therefore, it is better to start from the bottom of the wall. Even if you need to prop up a stool, the chipped fragments will not bother you.
You will place it close to the wall, it will simply be inconvenient to work, since everything will fly into your face.
DIY stove restoration
We were lucky; in our house there was a Russian stove with a flood, although it was not in the best condition. The stove was missing, the ash door was missing, the bed was slightly dented, and there were two rather frightening cracks. The cracks appeared because the previous owners of the house, trying to make an underground floor, dug a hole right next to the stove; due to the instability of the soil, the back wall began to collapse. In the street part of the chimney, the upper rows of bricks had crumbled due to age and the fact that the stove was heated for many years only in the summer when making jam, that is, very rarely. In addition, the space between the chimney and the roof was not sealed, water flowed, destroying everything in its path.
Initial view of the stove
The slab near the firebox was cracked and moved, the bricks fell through
We lit the stove for the first time after cleaning the chimney and wells to check the draft.
The stove maker advised us to clean off the old plaster, open the seams by 0.5 cm, buy clay mortar and cover the cracks with it. Then re-plaster.
Our actions for the restoration of the Russian stove were as follows:
- We cleaned the stove and sewed up the seams. We did this for four days to the accompaniment of Figaro's aria, which relieved the melancholy a little. Repairing a stove in a house with your own hands is a very tedious and dusty job.
- Next is the chimney. Re-folded the top rows of crumbled bricks
- In the attic, the chimney was plastered with clay mortar, using fiberglass mesh for reinforcement
The final result after the restoration of the stove:
We closed the cracks with the same clay mortar; by the way, we did not buy it. It turned out that in our area it is possible to dig up white clay. With the help of the knowledge of our good neighbor, his book “How to fold a stove?” and stove maker forums, we identified the individual ratio of parts of the solution. To do this, we had to conduct several experiments and draw conclusions. True, making the solution yourself turned out to be a whole story; in addition to experiments, it is necessary to grind the accumulated clay through a fine mesh, which requires a lot of time, patience and fingers. The sand for the mixture is sifted through a fine sieve, it is also washed with water to remove fine organic matter, but we decided that this would be too good. The solution turned out to be successful, the seams do not crumble, no cracks have appeared in two years.
We installed the slab somehow intuitively, on the same clay mortar, trying to keep it level. Same thing with the blower, secured with wires and covered with mortar.
They primed it so that nothing would fall off. The metal elements were painted with heat-resistant paint. At this stage, the restoration of the Russian stove was completed.
We did not plaster the stove; we wanted to preserve the appearance of the brickwork. This added another interesting texture to the interior, natural and natural.
After the restoration of the Russian stove, we also used it as a fireplace!
Wooden walls
In old houses, wooden walls were often plastered using reinforcing structures in the form of metal mesh and other materials. If you plan to leave the retaining structure, then the old coating is removed using a chisel and hammer.
If you need to completely replace the coating, including reinforcement, then you need to make a wide vertical furrow in the middle of the wall. Afterwards, the mesh is dismantled right along with the old plaster.
If there is no reinforcing structure, then the old coating from wooden walls can be removed with a sharp scraper or spatula.
Features of plastering wood outside the house
How to plaster wooden facade walls? The technology for preparing the solution and applying it to the wall is the same as inside the building. The same applies to shingles. There are two differences:
- External plastering work cannot be carried out before plastering work inside - moisture will be trapped in the walls, which will cause rotting and mold growth;
- the solution cannot contain gypsum and clay.
After the mortar has fully gained strength (about 28 days), the house can be covered with natural stone or decorative plaster can be applied to the façade walls.
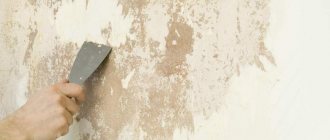
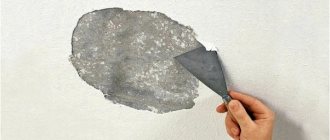
Is it possible to dismantle old plaster with a spatula?
Among many pieces of advice, we came across this one. Old plaster can be easily removed with a thin spatula. Is it possible?
In fact, if your plaster is peeling, it will not be difficult to dismantle it with an ordinary spatula and hammer. However, only you can draw final conclusions, because everyone has their own characteristics of the walls and everyone chooses the appropriate tool for these characteristics. It’s impossible to say for sure without looking whether this method will suit you.
Why do you need to shoot?
The putty is removed from the walls to ensure the reliability and strength of the new layer. Depending on what material the plaster is made of, as well as on the basis on which it is fixed, the further scope of work can be determined. This is a very important point, which determines not only the volume of subsequent operations, but also their complexity. The putty tends to collapse entirely or partially, showing characteristic signs or not showing them at all.
To ensure that the new coating does not crumble when the old putty is destroyed, it is necessary to clean the wall surface. However, such an event will result in additional repair costs.
Finishing materials
Lime mixtures are used for external work.
Clay walls are plastered on the outside with lime mortars, and gypsum or clay mixtures are used for internal surfaces.
Cement compositions are immediately excluded, as they will crumble due to their heaviness.
The technology requires the application of a rough, finishing and decorative layer.
The table shows the components of the solution for the rough layer and their characteristics:
| № | Components | Characteristic |
| 1 | Clay | Most often it is red, sometimes gray, yellow, white, black. By weight it is divided into light (0.17 -0.27) and heavy, more than 0.27. |
| 2 | Sawdust | They serve as a reinforcing component and give reliability to the solution. Waste wood from lumber production must be well dried; it is not recommended to use fresh sawdust. |
| 3 | Sand | Sand of medium fraction is used, large particles are sifted out. |
First, sand and sawdust are mixed, then clay and water are added.
The quality of the solution is checked by rolling a ball. Its components should not stick to your hands. If, when pressed, the ball changes shape without cracking, it means that the solution is quite elastic.