Drywall corner - types of products and features of their use
Don’t know how to make perfectly even corners in plasterboard structures? Then this review is for you, in it I will talk about the types of corners used in the work and show you step by step the process of installing them. By following simple recommendations, you can easily make strong and perfectly even corners.
There are corners for both flat and arched structures
Types of products and features of their installation
I will tell you about 4 types of corners, and then I will consider the process of installing elements on the corner of the wall, this is the most common type of work.
Types of corners
The following product options are available for sale:
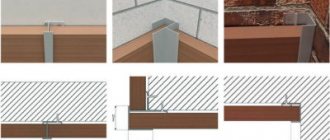
| Image | Description |
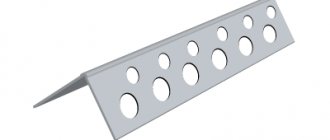
Metal perforated corner. The most common option, which is an element made of thin metal with perforation and a stiffening rib along the edge. Products can have a length of 250 and 300 cm, they are light, but poorly resistant to deformation during transportation and storage.
| |
| Plastic products . They differ from those described above in the material of manufacture. This option is not afraid of moisture and is not subject to corrosion, but its resistance to deformation after installation is lower than that of metal products. The main advantage of this solution is its low price. | |
| Arched corner . The name makes it clear what this group of products is intended for. The elements bend, and this is their main advantage over all others. They are made of plastic, as this material provides the necessary flexibility. | |
| Products with mesh . Such elements are indispensable where you need to strengthen corners and make them resistant to damage. Most often they are used outside buildings, but they can also be used successfully on plasterboard structures if the corners are uneven and fragile. |
If you need a 90 degree corner connector for drywall, then this item has nothing to do with corners. It refers to the elements of the frame construction and is used when assembling the structure.
Corner connector has nothing to do with corners
How many profiles do you need per sheet of drywall?
The number of guides per sheet will depend on its overall size. As we have already said, it is recommended to install transverse profiles in increments of 40-60 centimeters, which will allow for effective joining of products. In this case, the outlines of the sheet will be located on metal profiles. With a product width of 1.2 meters, 3 pieces of transverse guides are required.
Longitudinal profiles of the frame are installed every 50 centimeters. This step is suitable for plasterboard sheet lengths of 2.5 and 3 meters. For standard dimensions of 2.5 * 1.2 meters, you will need three longitudinal and six transverse guides.
How to carry out work
Before starting the workflow, you must stock up on everything you need:
- Corner . The quantity and type of products are calculated based on the fact and purchased with a small reserve, since waste will inevitably be generated;
- Putty . I recommend using “Vetonit” compounds, they are easy to use and of high quality;
Vetonit brand compositions are of high quality
- Primer , with its help, drywall is strengthened. The putty surface is then processed.
The tool you need is the following:
- Metal scissors . With their help, you can cut elements quickly and perfectly smoothly, without disturbing the geometry of the product;
- Brush . Used for applying primer;
- Wide and narrow spatulas . With their help, putty is applied;
It is convenient to level the surface with a wide spatula, and to distribute the composition over the main device and apply it to the corners with a narrow spatula
- Sanding block. With its help, all imperfections on the surface are removed, and the angle is leveled to a perfectly flat state.
Instructions for doing the work yourself consist of the following steps:
This is what the workflow diagram looks like
The perforated corner for drywall is installed like this:
| Illustration | Description of the stage |
The surface is primed, the corner is tried on. Everything is simple here: a strip of at least 30 cm of soil is applied to the corner on both sides. Then you either place a corner or measure with a tape measure to know exactly the length of the elements you need.
| |
| The corner is cut . To do this, take metal scissors and cut the element on both sides according to the marks. After this, it will break very easily, and you will get a smooth and neat end. | |
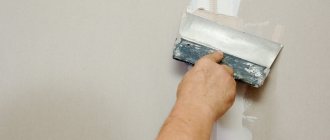
| Putty is applied to the corner . A small amount of the composition is prepared, after which it is distributed in a layer of 3-4 mm over the entire joint on both sides. This work is most conveniently done using a narrow spatula. | |
| The corner is pressed . This must be done carefully so that the element is even along its entire length; putty should come out of the holes, as in the photo. Align it and check that it adheres well to the joint everywhere. | |
| Putty is applied over the corner . The composition is distributed over a width of up to 10 cm; if you have a slope corner, then you can finish the entire slope. Don't worry about the amount of putty - you can remove all excess without any problems. | |
| The angle is leveled . To do this, use a wide spatula, which is best worked from bottom to top. You evenly distribute the composition over the entire length and immediately remove the excess that inevitably forms. The spatula is positioned at an angle to the surface and applied with slight pressure. | |
| This is what the result of the first stage looks like . The putty is distributed in a strip of approximately 10 cm, do not pay attention to the sagging along the edges, we will remove them in the next step. | |
| The corner is polished . A special bar is used for this. You carefully remove all sagging and irregularities and prepare the surface for finishing. | |
| After sanding the first layer, the second is applied . The composition is distributed even wider, this will eliminate the difference between the wall and the putty. The application width should be already 20-30 cm. | |
The angle is leveled. The process looks like this:
|
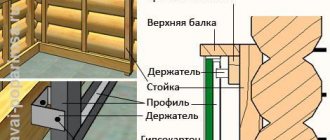
Installation of plasterboard profiles.
The profile for plasterboard is mounted in several stages:
1. Surface preparation;
2. To install guide profiles, you need to apply marking lines;
3. Installation of guide profiles;
4. Lines are drawn on the surface of the ceiling or wall in increments of about 6 cm;
5. Places for attaching hangers are marked on each line in increments of approximately 5 cm;
6. Suspensions are installed and PS or PP profiles are mounted;
7. The metal structure is covered with plasterboard sheets.
When performing installation, it is important to remember: for each sheet of drywall there must be 3 profiles, which determines the step of their installation. So, if the standard sheet width is 12 cm, then the step is 6 cm. In this case, the edges of adjacent plasterboard sheets should always be located on one profile.
Perforated corner for plaster
Home renovation is a desire for beauty and comfort. And it’s not scary if the walls are not level or there are differences in plane. The main thing is that it is visually smooth and beautiful. How to achieve this?
Few people know that the secret to the visual beauty of walls lies in a straight, clear edging. This concept refers to the following areas of application of plasters and putties:
- external and internal angles;
- junctions of walls at ceilings and floors;
- protruding parts of any structures (arches, boxes, other structures).
All these places (edges) must correspond to the intended design. Straight should be straight, oval should be oval. The former plasterer-painter achieved acceptable quality with almost his bare hands. But modern accessories simplify and speed up the process.
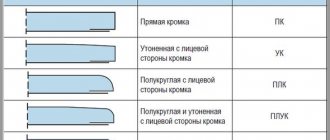
In fact, all of them are perforated corners for plaster. There are only two varieties of it - straight and arched, and there are many more subspecies. They are used almost everywhere where plaster mixtures with putty are used.
Right angle.
A right perforated angle can be used for internal and external corners. It can be of different widths, as well as aluminum, galvanized or plastic (polyvinyl chloride). In general, there is no difference. You can’t say that one is better or worse. But galvanized corner is more rigid than others. Especially the wider one. Therefore, it is convenient to use it as a plaster beacon.
Tip: Use good, sharp tin snips to cut the corner, as the bent edges will get in the way. On the other hand, plastic products can be cut perfectly with a regular stationery knife. If you don’t have a knife, scissors, or grinder at hand, then you can simply break the perforated angle. Uneven edges can be easily straightened with pliers, a hammer or just your fingers.
Any straight corner for plastering corners is a V-shaped profile. Its sides (shelves) have many holes throughout their entire plane - perforation. The top of the corner stands out, that is, it sticks out relative to the shelves by approximately 1 mm. Moreover, at the inner corners it sticks out inward, and at the outer corners it sticks out. Perforation is needed for reliable fastening, the top is like a guide for a spatula.
Tip: In order to cut a dozen perforated corners of the same length, you can fold them one into one, then, after measuring with a tape measure, cut off the entire pack, say, with a grinder. And 2-3 pieces will be cut through by metal scissors.
The purpose of the perforated corner and how to install it
Depending on the task at hand, this finishing accessory can be installed in two ways: on a curved corner and on a leveled one.
How many screws do you need for a sheet of drywall?
Before purchasing fasteners, you need to calculate their total number. The basis for calculations is the number of screws per individual sheet of drywall. In this case, it is necessary to have information about the pitch of the guide profiles.
It should be noted that the first fastener is screwed into the drywall at a distance of 10 centimeters from the corner of the product. Along the perimeter of the sheet at the edges leave a step of 15 centimeters. In the middle of the product, the distance between the clamps is increased to 20-25 centimeters. Such installation can increase the service life of the structure.
Another nuance of counting self-tapping screws is the number of drywall sheets to be attached. If with a single-layer system with an average pitch of 25 centimeters the number of fasteners per sheet will be 70-75 pieces, then in a two-layer structure the screws are screwed in differently. On the first sheet every 60 centimeters, on the second sheet at intervals of 35 centimeters. In this case, you will need 110 self-tapping screws per sheet of drywall.
The corner is a beacon.
In the first case, the product will serve as a plaster beacon. To install it, a plaster mixture is applied to the base corner. By the way, it is more convenient to work with gypsum plaster than with cement plaster. It should not be applied along the entire length of the edging, but in such flat cakes - for the convenience of adjusting the angle along the plane and level. This adjustment is made using a building level and a plaster rule.
Tip: If you add a handful of cement or any cement mixture to gypsum plaster, the plaster beacon will set in a matter of minutes. You can continue working immediately. Where perpendicular planes intersect, it is advisable to cut the overlapping corners at 45 degrees to avoid overlap.
It should be noted that the internal perforation angle is extremely inconvenient to use as a beacon for plaster. It is only suitable to emphasize the straightness of the edging.
In walk-through areas where external corners may be subject to more intense mechanical loads, it is recommended to install a corner with a mesh under the plaster. Fiberglass plaster mesh, firmly connected to a plastic or metal corner, serves as a means of reinforcing the corner.
This type of perforated corner is used precisely as a beacon. After all, it is almost impossible to hide the mesh under a layer of finishing putty, since about 5 mm of plaster must be applied on top of it
Advice: If you want to reinforce a regular perforated corner, you can cover its shelves with a sickle mesh, covering the wall. Strips of non-woven fabric or fiberglass are also perfect for this purpose. The same putty can be used as glue.
Features of choosing a profile for drywall.
To choose a suitable profile for drywall, you should consider the following parameters:
- thickness and size of plasterboard sheets;
- the width of the room (when finishing the ceiling) or the height of the walls (when finishing);
- number of layers of cladding.
The choice of standard size of rack profiles is directly influenced by the weight of the sheathing (unlike PP profiles, because the weight of ceiling plasterboard is standard and is about 22 kg/sheet). Accordingly, the greater the mass, the wider the PS wall should be. PS 50x50 mm (50x40 mm) will be sufficient for single-layer light cladding (with a sheet of plasterboard weighing up to 8.5 kg/sq. m). When installing heavier materials (high-density plasterboard or gypsum board), it is recommended to use plasterboard profile .
When installing partitions and performing two-layer cladding, it is optimal to use PS profiles with a wall width of 75 or 100 mm. Guide profiles must be purchased according to the standard sizes of the selected racks. The choice of the length of PP or PS profiles when finishing the ceiling is influenced by the width of the room or the height of the walls. For example, if the wall height in a room is 2.8 m, then standard racks measuring 3 m should be purchased. But when the wall height is 3.6 m, then profiles need to be purchased - 4 m, since it is undesirable to build them up during the installation process.
Corner - protective cover.
If the wall, along with all its corners, is already well-plastered, then the purpose of the perforated corner will be to protect the corner from mechanical damage and emphasize a straight line.
The technology for its installation is basically the same as the first option. Only the layer of the solution used should be minimal, the consistency of the mixture should be more liquid.
To achieve this goal, a plastic or aluminum corner for plaster is ideal. In addition, it is not at all necessary to fix it with a plaster mixture or putty. After all, the base is already straight, which means that the corner should be pressed tightly against the base, hugging it.
Such installation is possible using small screws, nails or staples. You just need to make sure that the corner itself and its shelves are not deformed in the process.
Tip: Often, protruding screws and nails interfere with puttying with their heads. To avoid this, they can be removed after the corner has set.
In addition, installation of a perforated corner with a minimum layer of mortar is necessary, as a rule, when finishing gypsum plasterboard structures. Of course, provided that they are assembled with more or less high quality.
In this case, a self-adhesive perforated corner is perfect - it has strips of glue on the inner sides of the shelves, which are activated by ordinary water. If there is a need to join corners, it must be done using the same materials: plastic ones are connected to plastic ones, etc.
The fact is that different corners for plaster may differ in size, which will affect during finishing.
Fastening drywall - how many screws and profiles are needed?
In practice, there are two main methods of attaching plasterboard sheets to the base surface - framed and frameless. In the first case, the finishing material is fixed using self-tapping screws to a pre-installed metal profile, which ensures high strength and reliability of the structure.
The second method, frameless, is used to secure drywall to surfaces with minor height differences. In this case, the material is attached to the base using an adhesive mixture. In our article we will get acquainted with the main characteristics of drywall and consider the technology of frame fastening of sheets.
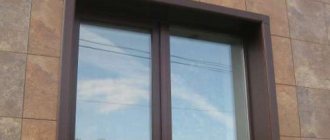
Plastering slopes.
Slopes on windows, doors and other openings are especially important places, since a person looking there automatically compares them with a window or door. That is, with straight lines. This means that no deviations are allowed - deviations from the lines of the window or door. As for matching the level, the windows can easily be slightly blocked.
Therefore, slopes are plastered mainly according to level. It is recommended to use a corner for plastering slopes. And, again, as a plaster beacon. If the slopes were mounted from gypsum fiber board or gypsum board, and not of very high quality, then a perforated corner will help eliminate all the shortcomings.
By the way, before installing gypsum plasterboard or sandwich panels on slopes, the basic brick slope, according to technology, must be covered with plaster. The perforated corner installed at the same time will help to correctly align the sheet of drywall.
Theory
Drywall calculation
We determine the area of the wall (ceiling) and divide it by the area of the selected standard size of plasterboard sheet. The resulting result is rounded up. If we are talking about a partition, then we double the number of sheets (since there is drywall on both sides), and then round up to the nearest whole.
Profile calculation
Total length of guide profile
equal to the perimeter of the structure.
For cladding walls and ceilings, a guide profile of 27×28
, and for the construction of partitions -
50×40
.
Rack-mounted
and
ceiling profiles
are calculated based on the standard of one 3-meter profile per square meter of structure plus one profile.
For cladding walls and ceilings, a 60×27 ceiling profile
, and for the construction of partitions,
a 50×50 rack profile is used
.
Calculation of the number of hangers and connectors
The calculation of the number of hangers (straight hanger) is calculated as follows: 4 hangers per 1 m² of structure. The number of crab connectors is calculated as follows: approximately 2.4 crabs per 1 m² of structure.
They are usually not used for the construction of partitions.
Calculation of hardware
Self-tapping screws for drywall
The number of screws for attaching drywall to a frame made of profiles is determined as follows:
- for cladding walls and ceilings: 34 screws per 1 m² of structure
- for partitions (gypsum board on both sides): 50 screws per 1 m² of structure
Self-tapping screws for profiles
Determined based on the number of profiles, hangers and connectors:
- 4 self-tapping screws for connecting the ceiling or rack profile with guide profiles.
- Two screws for each direct hanger.
- 8 screws per crab connector.
Dowel-nails
Dowel nails are used to secure the guide profile to the concrete surface (one every 50 cm) and to attach direct hangers (two for each).
Arched corner.
Everything is clear with the finishing of right angles. How are various arches, multi-level ceilings and other figured structures brought to perfection? After all, neither the plaster rule, nor the building level, nor even a straight perforated angle will help here.
For this purpose, a slightly modified perforated corner for plaster is used - arched. Firstly, such a corner is always plastic. Secondly, one of its shelves is cut crosswise into petals. This solution allows this accessory to be so flexible that it can follow the shape of almost any smooth curves.
Tip: When installing arched corners under plaster, you need to remember that you cannot adjust them with a level or rule. This is done exclusively visually, by eye. Help from another person and good lighting will be a good help. Before installing the corner, you need to compress it a little so that the petals do not stick out from the plaster.
The arched corner, depending on the manufacturer, can be hard or soft.
Hard is usually more expensive. But, when finishing large-scale structures with smooth shapes, it is indispensable. The fact is that his desire to straighten ensures the ideal roundness of the lines and the absence of “angularities”. But attempts to use such a corner on small decorative elements with sharp bends will lead to its fractures, which cannot be corrected.
A soft arched perforated corner for plaster allows you to finish sharper turns, for example, arches with a small radius of a circle and other curves. However, the lack of rigidity in the profile of such a corner threatens the appearance of bumps and depressions on the lines being processed. To avoid this problem, it is recommended to install soft arched corners using a plaster mixture.
With this method of fastening, firstly, there remains a chance to correct visual defects during plastering. Secondly, screws and other fasteners will not pull the bend lines towards themselves. To make the arched corners look smoother, they should be mounted slightly under tension.
Drywall sheet parameters
When decorating residential premises, many consumers try to purchase products that are as easy to install as possible. The standard length of drywall can have 2 parameters; 2.5 and also 3 meters. The products under consideration are not limited to the given dimensions, so some manufacturers adjusted the length of the sheet to the height of living quarters - 2.7; 3.3 and also 3.6 meters. However, this is also not considered a limitation; some manufacturers provide their customers with the opportunity to purchase products according to predetermined overall dimensions.
The width of the plasterboard sheet has standard parameters - 1.2 meters. Due to these dimensions of the product, the frame guides are fixed to the wall every 40 or 60 centimeters. Construction technologies are developing more and more every year. Today, plasterboard sheets with reduced overall dimensions have appeared on the construction market; their standard length is 1.5 or 2 meters, their width has been reduced to 60 centimeters. Thanks to these dimensions, wall plasterboard can be transported in a car trailer, and the material in question will not exceed the dimensions of the vehicle.
The thickness of the sheets can be different, it depends on their purpose:
- moisture-resistant plasterboard for the construction of arches has a thickness of 6 millimeters;
- the standard thickness of products for ceiling installation is 9 millimeters;
- The thickness of the wall plasterboard is 12.5 millimeters.
You can find high-strength boards in hardware stores. This is fire-resistant red plasterboard with a thickness of 15-25 millimeters.
Corners - savings or waste?
An accessory such as a corner for plastering slopes or any other perforation angle has a low cost: the price of a regular aluminum perforation angle is only about 40 rubles. The plastic one costs about the same. Galvanized - a little more expensive, 60 rubles. But you can buy rigid arched or straight reinforced corners for about 150-200 rubles.
And if, initially, we are talking about decorating an entire house, then you will have to order more than a dozen of these corners. Docking them is not always appropriate, so quite a lot can go into waste. Accordingly, the costs will be considerable.
But the protection for the corner that the described device provides also costs a lot. Not to mention speeding up the process of applying plaster or the visual effect. In addition, by replacing plaster beacons with corners, you can really save money on this.
Tip: Many people, far from finishing work, confuse a perforated corner with a regular finishing corner. Their main difference is that the second option is exclusively a finishing element. If the question arises of how to attach a plastic corner to decorative plaster, it can be solved with the help of liquid nails. By the way, finishing angles are also different.
When undertaking a large-scale renovation, you must definitely consider purchasing perforated corners. Trying to do without them will definitely backfire. It is better for the master to decide which corners to purchase, because he guarantees the quality.