Most pieces of furniture can be transformed with a can of paint and some step-by-step instructions. You can do all this yourself at home. Painting furniture is also one of the best ways to give an old piece of furniture a new life.
But honestly, there is so much information out there on how to start painting that it can be difficult to understand at first. This guide will help you explain step by step what you need to know when painting and how to paint furniture correctly .
PREPARING FURNITURE FOR PAINTING
There are quite a few brands of furniture paint that claim that they do not require any preparation. This sounds amazing because who doesn't want to skip all the boring stuff and start coloring right away? It can be tempting to skip the preparation and get straight to the point, but don't do it! You're just asking for trouble if you start painting furniture right away. You won't get a nice, durable finish this way. And if it doesn't look nice, what's the point of doing it?
You may be interested in: Paint for wood: which one to choose and how to easily paint wood with your own hands?
WHAT PAINT SHOULD I CHOOSE?
Before painting laminated furniture (in artificial, wood-like veneer - the so-called laminate), a two-component primer (industrial primer used for MDF, HDF, wood, plywood, laminated boards) should be applied to the surface of the board. This is a product that has exceptional adhesion to any type of surface.
There are also products on the market that do not require pre-sanding of furniture, such as repair paints and chalk paints. Both products require only preliminary cleaning and degreasing of the surface. They can be used to cover various surfaces and, for greater durability.
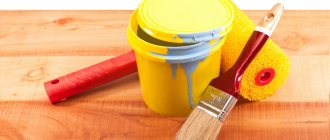
Required materials and tools
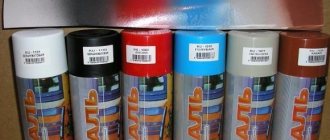
As for the choice of paint, preference should be given to water-based compositions. These include:
- Acrylic paint – does not have a nasty pungent odor, is easy to apply, dries quickly;
- Toxotropic - has a dense consistency, after drying it is similar to plastic, and leaves virtually no streaks.
Before purchasing either paint, you need to familiarize yourself with the rules of use. There are types designed for painting garden furniture, but they are not suitable for home use.
Varnishes also vary in composition and chemical properties. The following are most suitable for restoring home furniture:
- Water-based varnishes are non-toxic, odorless, suitable for any surface;
- Nitrovarnishes - used for painting those surfaces and parts that are most often used by humans;
- Shellac is the most expensive coloring composition. Gives a perfectly smooth and shiny gloss, durable;
- Polyurethane compounds are quite wear-resistant, create a good gloss, and lie easily and evenly on the surface. It must be diluted with a solvent before use.
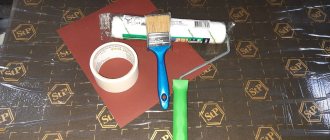
In addition to coloring compounds, the restoration of old furniture will require:
- Masking tape;
- Rollers and brushes;
- Paint bowl;
- Latex gloves;
- Protective glasses;
- Putty;
- Sandpaper;
- Solvent for degreasing;
- Sprayer if you need to paint large objects.
Before you begin the process itself, you should conduct a thorough analysis of the furniture for delamination, chips, and damage. If there are such defects, they should be eliminated by simple puttying, sanding and priming. Old furniture repainted in a monochrome shade, such as black, will look beautiful and stylish. Moreover, it is very fashionable today.
CLEANING
The very first thing you need to do before cleaning any piece of furniture is to give it a thorough cleaning. No matter what type of paint you use, it will not stick to grease, dust or other dirt. Another option is to just use warm water and dish soap because it's cheap, easy to have on hand, and amazing at removing grease and dust.
UPDATE
Once your furniture is clean and dry, it's time to give it a good update. If something is loose or needs repair, this is the time to do it. Fill all holes and deep scratches with wood filler . Remove any surfaces or fittings that you do not want to paint.
If you plan to replace drawer drawers or handles, check to see if the location of the screw holes will need to be changed. If so, fill the old holes with filler.
GRINDING
Most of the time, you don't really need to sand your furniture before painting it. If you are restoring furniture, you should first completely remove the old finish, but not the previous paint. This is certainly one of the reasons why painted furniture has become so popular lately - it's a much easier way to bring old furniture back to life.
Even if you don't need to remove the old finish, you need to make sure you have a good surface to start painting. If your furniture has any rough spots, you can sand them down. Additionally, if it also has a shiny, glossy finish, you will need to start by sanding it to rough it up a bit. After sanding, be sure to remove dust with a damp cloth.
PRIMER
Many furniture paint manufacturers also state that you can skip the primer. This is actually true...but there are some important exceptions.
If you are painting wood furniture with very dark or reddish wood, you should really start with a good oil primer. Wood furniture has tannins, which are natural oils in wood. When you paint wood furniture, moisture in the paint can cause the wood grain to open and release tannins. This is especially true for some types of wood that are often used for furniture, including redwood, cherry, and knotty pine. When you paint furniture white or another light color, these tannins will make your beautiful paint look yellow and mottled.
If you have raw, unfinished wood, it's also a good idea to use a primer first. In this case, any primer will do. Latex is a good choice because it's easy to clean using just water, but oil-based ones are also great.
White paint has very little pigment compared to other colors and usually requires many coats to get good coverage. Starting with a coat of white primer can really cut down on your paint use. This can be a big time and money saver since paint is typically much more expensive than primer.
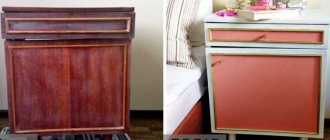
Interesting color solutions
You know that painting wooden furniture is done not only for reasons of economy and interior renovation, but also to create a unique style. Fashion and its trends have taken over wooden furniture, and even an old Soviet wall can look great with a modern renovation if you work on it a little.
It will be enough to repaint it using the instructions given in this article. The main thing is that you immediately decide on the design. In the photo on the Internet you can see how to transform boring furniture.
DIY furniture painting
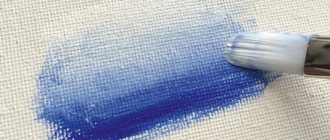
It's easiest to paint large, flat surfaces such as countertops and the sides of dressers. You can use a brush for small sections. It is important to use a good quality brush to paint furniture well and if you want a smooth finish. When painting furniture, be sure to use long, even strokes.
You will most likely need two coats of paint, but sometimes you may need more coats, especially if you are using a very light paint such as white or a very rich color. Be sure to let the paint dry thoroughly between coats
Whatever paint you choose, be sure to follow the instructions on the can. Some brands come with a brush, some with a sponge, and some with a rag.
Which furniture paint is suitable for children?
In the interests of healthy development of babies, choose furniture paint that is odorless and safe. What does it mean? This furniture paint should not contain solvents or ammonia. It is worth betting on a product recommended by the Society of Allergists - then you will be sure that it does not contain ingredients that cause allergies. Certified children's furniture spray paint works great.
Coloring techniques
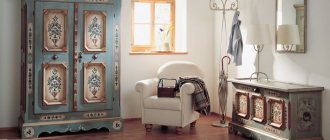
Vintage effects
Artistically aged pieces of furniture fit into a Provencal-style interior, look harmonious in a Mediterranean setting and, of course, suit boho and eclectic decor.
- First, remove the hardware and cover the parts that do not need to be painted.
- Before applying each new coat of paint, the previous one must be completely dry.
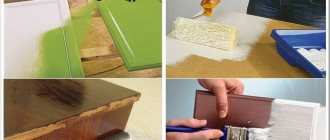
- The easiest way to give furniture a vintage look is to paint it with matte paint, cover it with dark wax and lightly sand it to create scuff marks.
- You can use contrasting colors: first coat the product with a darker shade, and then a light one on top. Use sandpaper, a dry brush or a damp sponge to make abrasions. They look natural where they would appear from old age: around handles, on corners and curves of furniture.
- Wax or varnish is used as a finishing coating to protect the surface.
How to paint veneer furniture?
Veneered furniture (usually antiques) should be placed in the hands of professionals who will return it to its former elegance and quietly replace the loss of veneer. However, if the damage is minor and you have experience with painting, you can try to repair the worn parts of the furniture yourself. How to do it?
First of all, when repairing furniture covered with a layer of veneer, use adhesives made from natural resins (preferably so-called pearlescent glue). This condition is due to the fact that any actions performed on furniture using organic glue are reversible. If you make a mistake, your furniture will still have a chance to look its best. All synthetic glues (including popular wood glues from hardware stores) will make the damage permanent and permanently penetrate the wood. Veneer fragments that are wrinkled due to excessive moisture and protruding pieces - if you decide to leave them, carefully moisten them with water at the first stage of work.
But be careful: don't pour water on the furniture! The damaged veneer must be soaked by applying a moistened (wrung out!) cotton cloth or sponge to the selected fragment. Wet material should be left on the furniture for several hours. After this time, the veneer should gain plasticity, which will allow you to glue it in the right place without unnecessary damage to the original fragment. The veneer is glued dissolved and a heavy (preferably brass) object is pushed through the material, leaving it to dry for at least 24 hours.
And now you know how to paint furniture. You can be sure that your painted furniture will turn out beautiful and last for many years by following our recommendations.
Coloring stages
All work is carried out in several stages. It is not recommended to cover furniture with new paint without removing the varnish - this will greatly deteriorate the quality of the finished surface. It is better to carry out the restoration in accordance with the advice of professionals, which will make the result beautiful and durable.
Surface preparation
Removing the old coating is the main stage of preparing furniture for repair. You can remove varnish in different ways - mechanical, thermal and chemical. Experts prefer to use a hair dryer for thermal removal of varnish. The procedure is as follows:
- put on a protective suit and gloves, not forgetting about glasses;
- run a hairdryer over a small area of the surface, warming it up well (instead of a hairdryer, some use a blowtorch, but this method requires extreme caution so as not to damage the wood);
- take a spatula or knife and scrape off the varnish coating.
The mechanical method is more labor-intensive. You should proceed like this:
- remove drawers from furniture, remove all fittings;
- Wash fasteners, handles and other accessories well with soapy water, use soda if necessary;
- wipe the furniture with soap and powder to degrease it and remove dirt;
- rub off the varnish using a scraper, coarse sandpaper, or a metal brush;
- sand the surface with fine-grain sandpaper or a sander.
You can also get rid of the coating using a chemical method; for this purpose you will need a solvent that does not harm the wood. The remover is applied to the surface of the object with a brush and left under the film for 3 hours. Afterwards, using a spatula, carefully remove the old varnish.
Putty damage
To accurately assess the condition of the furniture, it is recommended to disassemble it into as many elements as possible. This way it will be possible to treat even the most inaccessible places and replace all the old, broken, ugly fittings. After sanding is completed, get rid of dust (wipe the furniture with a dry cloth or vacuum it). Next, an antiseptic is applied so that the product is not damaged by fungus in the future.
All large and medium-sized defects must be thoroughly puttied. It is better to buy transparent putties - they are suitable for any type of wood and do not change its structure. The putty should be applied in a thin layer and leveled well so that the surface remains smooth. After allowing the layer to dry completely, apply it again if necessary. At the end of the work, the treated area is sanded again.
Degreasing
Carrying out this procedure increases the service life of repaired furniture. Also, degreasing significantly improves the adhesion of paint to the surface and makes the coating layer uniform. To do this, use any detergents. They are diluted in water, wiped over the surface of the product, and washed off.