Tools for applying plaster
To work you will need:
- A stationery or wallpaper knife to cut off the foam.
- Roller or brush for applying liquid primer.
- Metal spatula (narrow and wide) – the wide one is used to scoop up the plaster, and the narrow one is applied. Using a narrow spatula, you can also seal corners, thin seams, and hard-to-reach places.
- A gray rubber spatula is useful for rubbing sealant into joints and processing arc-shaped and round seams. Relevant for windows and walls with finishing, where it is important not to scratch the surface.
- Containers for solutions.
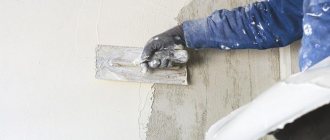
- A trowel for leveling the applied solution.
- Gloves, a bucket of water to immediately wash the tools and floor.
- A drill with an attachment or a construction mixer - mix dry mixtures.
- Masking tape to cover areas that do not need to be plastered and to ensure a straight seam line.
Preparing the surface for plaster
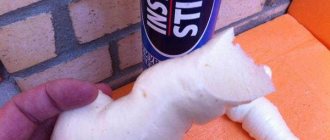
Only hardened foam can be plastered: at least 12 hours must pass from the moment of its application. Excess foam must be cut off so that a 5 mm recess is formed. Then we will fill it with plaster mortar. Plaster will not stick to smooth, uncut foam.
Clean the foam from dust and dirt with a vacuum cleaner and prime it in a convenient way:
- When finishing window and door openings, the seam is sealed with compressed sealing tape (PSUL) and the joint is treated with a deep penetration acrylic primer with an antifungal composition. When treating seams in old buildings, membrane waterproofing tape can be used.
- In other cases, acrylic sealant mixed with a hardener is applied to the joints, or the seam is treated with a deep penetration acrylic primer.
The primer improves the adhesion of the composition to the surface. After it dries, this can take from 6 to 12 hours, we begin to plaster.
Putty on mounting foam
When performing construction work, you have to deal with the installation of doorways, windows and roofs. Currently, craftsmen widely use foam for installation functions, which has a number of advantages. The product saves a lot of time and makes repairs easier. The substance is used to fill large voids and cracks. The hardened material firmly holds structures with medium and heavy weight, such as windows, doors and other elements. After polymerization, stable temperature and humidity levels are observed in the room, which is especially important for residential buildings. The mounting tool performs several important qualities. It is simultaneously a sealant, a heat insulator and a fixative. The material based on polyurethane foam serves for many years without losing its properties.
How to plaster polyurethane foam
Ceresit, Forward and Rotband plaster works well on the foam. These are compositions based on cement, gypsum, silicone. The Ceresit mixture contains polymer-based rubber additives; its elasticity improves adhesion and acts as a shock absorber between the foam and the plaster layer. Therefore, craftsmen often use “Ceresite” as a buffer layer in the “foam - Ceresite - Rotband” cake.
There are several more rules for choosing plaster based on foam (in the table below).
Place of application
Type of plaster
Exterior finishing (facades, balconies)
Water-repellent and frost-resistant facade plaster based on cement or polymers
Cement based plaster - it is not afraid of moisture
Living areas with normal humidity
Compositions for interior work based on gypsum
Window or doorway
Silicone plaster - it can be easily painted over with acrylic or silicone paint to match the color of the frame or trim
You can also use gypsum plaster, but then first apply a primer layer of cement-based plaster, and then gypsum. It will hold better and won't crack.
Seams between thermal insulation boards
Adhesive plasters and putties
Is it possible to apply plaster on polyurethane foam?
The smooth surface of plaster foam is not entirely suitable for applying plaster. But after preparation, it can be sealed even with a simple cement-sand mixture.
Pros and cons
Plaster is a universal material for protecting foam. Its advantages:
- vapor permeability;
- high-quality adhesion;
- strength;
- tightness;
- highly decorative;
- suitability for any further finishing.
The only argument against foam plaster is the risk of damage if the mixture is chosen incorrectly and the technology is violated.
Calculation of plaster consumption for working with polyurethane foam
Consumption data is indicated on the packaging. Let's give some examples of calculations. Suppose we need to seal a window installation joint 1.5 meters long and 0.25 meters wide.
Example 1. Ceresit cement plaster
The manufacturer claims a consumption of 1.5–1.8 kg/m2 for a layer of 1 mm. A layer of at least 5 mm must be applied to the foam, that is, in our case, the consumption is 7.5 kg per 1 sq. meter (1.5*5).
The seam area is measured in a standard way: the width is multiplied by the length, and when measuring the width, they take a couple of millimeters from both edges. If the seam width is not the same, you need to calculate at the widest point.
- Seam width: 0.25 m + 4 mm (2 mm from each edge) = 0.254 meters.
- Seam area: 1.5*0.254 = 0.381 sq. m.
- Plaster consumption: 0.381*7.5 = 2.86 kg.
- Add 10% to the final value as a reserve. That is +
Example 2. Gypsum plaster "Rotband"
We take the same seam. The manufacturer claims a plaster consumption rate of 8.5 kg per 1 sq. m. meter with a layer thickness of 10 mm. We need a layer of 5 mm, that is, about 4.5 kg per 1 sq. meter.
- Seam area: 1.5*0.254 = 0.381 sq. m.
- Plaster consumption: 0.381*4.5 = 1.72 kg.
- Plus 10% in reserve
200 g = consumption 1.9 kg.
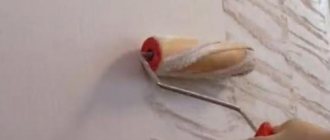
How to apply plaster
The dry mixture is diluted according to the instructions on the package and applied with a spatula.
In rooms with normal humidity, it is better for inexperienced craftsmen to work with gypsum composition. Cement plasters require absolute adherence to proportions when diluting; if the solution is made too liquid or thick, the applied plaster may subsequently crack.
- Apply the composition in 2–3 layers at time intervals: for gypsum plaster 30–120 minutes (check the degree of setting), for cement plaster – 120–180 minutes.
- The minimum thickness of the general layer is 5 mm.
- To ensure better adhesion of the composition to the surface and prevent the appearance of cracks, you can use a serpyanka mesh for interior or exterior work. It is applied to the first layer of plaster, slightly recessed, and the remaining layers are applied on top.
Apply the plaster over the wall 2 mm on each side. When the composition begins to set, go over it with a trowel to level it out.
When the plaster is dry, it needs to be sanded with P120/P150 sandpaper. Cement plaster dries in 2–4 weeks, gypsum plaster – 4 days. Drying speed depends on humidity and ambient temperature.
Further actions depend on the type of finishing: before painting or wallpapering, the surface must be puttied, before applying decorative plaster to the facade of the house, it must be primed.
When plastering foam joints near a window or under a window sill, we recommend providing additional protection against cracking. To do this, the plaster should not be applied flush against the frame or window sill, but with a gap of 2–3 mm. Fill this cavity with silicone or acrylic sealant, the shade of which can be matched to the color of the frame and slopes.
Polyurethane foam and plaster - how to make them friends?
I want to understand how to plaster cavities filled with polyurethane foam? What sticks to her? What kind of plaster should I use to cover it?
I have several sockets set on foam, next to it there is a cavity the size of another socket, also filled with foam. The main problem is damage to the wall from stripping the socket boxes. The frame doesn’t completely cover these potholes, how should I fill/cover them, taking into account the fact that the wall turns into plastic sockets and foam? For some reason, it seems to me that just putting alabaster there and filling it up is a bad idea.
The same question about ordinary fines, with wires. They are quite deep in places, like corrugated tubes. Can they be sealed with a banal universal mortar and topped with thin putty like Shitroka?
You can safely work on polyurethane foam with gypsum plasters. base (Rotband, Goldband, for example), as well as pure gypsum. For plaster with any interior putty, you can also use shitrok
Thank you! I rummaged through the materials here and looked at what I inherited. Opened packs of Pufas and Rothband, a bucket of Sheetrock. And a bag of cement-sand mixture. This needs to be repaired: fines with wiring, seams with foam, and most importantly, this mess around the sockets.
Tell me what should I put, where, in what quantity and consistency?
How can I fix the wall so that it doesn’t leak into the socket boxes?
Everything is written on the packages with the mixtures, detailed instructions. Remove the sockets so that there are only socket boxes, put the spatula in your hands and off you go. (Don’t forget to turn off the machines while working) Use a spatula to make it as even as possible, so that there are no bulges relative to the general plane walls. First, use gypsum mixture, and when it sets, use the same spatula to trim off the unevenness. The rest has already been said.
A little to the side. I read the cover of the Pufas pack, there is the text:
Shelf life is at least 5 years from the date of manufacture. Made in Germany.
Insist on her, or what?
Is it generally normal that I will essentially put putty on plastic and foam? There are deep skerries in the foam between it and the socket box. Will the putty really stick? For this, what is better suited - Rotband, Pufas or a cement-sand mixture to fill especially deep potholes?
Socket boxes cannot be planted on foam. Foam is a very dangerous and flammable material; before you have time to move, everything will burst into flames.
hoochie wrote: You can safely work with polyurethane foam using gypsum plasters. basis
Only with plaster. I now have broken slopes after installing windows, and there was a large space under the window sill - I was thinking of foaming it, cutting off the excess, and plastering it with a cement mixture (under the wallpaper). And if plaster, will there be a strong joint with the old plaster? And won't the wallpaper float?
nastasija wrote: And if they are plaster, will there be a strong joint with the old plaster? And won't the wallpaper float?
No foam needed! As little of it as possible, plaster everything with a rotband - nothing will float anywhere.
2nddn You don’t have any problem. Push the foam a little inside so that there is 1 - 1.5 cm to the wall plane. Cover with “Rotband” or “Pufas”. Both materials allow a thick layer. Everything will stick without problems. Don’t doubt it. Same “Use a rotating band to seal the grooves with the wiring. Don't forget about
hoochie wrote: Remove the sockets so that there are only socket boxes, put a spatula in your hands and go. (Don't forget to turn off the machines while working)
Once it’s dry, apply a finishing layer of putty on top. The same “Pufas”, for example.
nastasija wrote: Only with plaster. I now have broken slopes after installing windows, and there was a large space under the window sill - I was thinking of foaming it, cutting off the excess, and plastering it with a cement mixture (under the wallpaper). And if plaster, will there be a strong joint with the old plaster? And won't the wallpaper float?
We do this with a rototband, if the gap is deep, we first foam it. There have been no complaints so far.
If your sockets are not a purely decorative element of the interior, but will actually be used, then if I were you, I would remove all the foam, clean out the cavities and install the sockets in a new way, as it should be: on plaster, alabaster or (I prefer) Perflix and seal them all the cracks according to Rotband are not such a big expense, considering the consequences of landing on foam. If you insert tight plugs into your sockets several times, which are pulled out with force, then your sockets will first become loose and then fall out along with the plug (and possibly together with the sockets). And you will have to redo everything again, but at great expense. Well, for fire safety reasons, foam is also not the best material for attaching sockets.
From preparing materials to applying the solution
Is it possible to putty polyurethane foam? It’s not just possible, but even necessary. This is done to achieve two goals:
- Protection from the harmful effects of ultraviolet radiation . Despite a lot of positive performance characteristics, polyurethane foam has one fatal drawback: it crumbles when exposed to the sun for a long time;
Polyurethane foam exposed to the sun will not last long
- Decoration . Yellowish clouds of frozen mass around a door or window do not look very aesthetically pleasing. It is better to cover them with something more attractive to the human eye.
A window blown out with polyurethane foam can hardly be called beautiful
In order to complete the task, you need:
- Prepare tools and materials , visiting a hardware store if necessary ;
- Prepare the surface to be treated , that is, bring the dried substance into a form suitable for puttying ;
- Apply putty.
Stage No. 1: preparation of tools and materials
Before starting work, make sure you have on hand:
- Primer . Will the putty stick to the foam without prior priming? It will be, but much worse, plus the level of danger of its detachment in the future will increase. Why take the risk?
I recommend choosing acrylic primer, as it has high performance properties, environmental friendliness and reasonable cost.
Acrylic primer does not release toxins and has a high drying speed
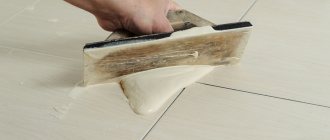
- Two spatulas:
- Wide – for applying the solution to the surface to be treated;
- Narrow - for applying the solution from a container onto a wide spatula;
Wide and narrow spatulas are used in pairs
- Putty . Depending on the location of the work, use the following rules when choosing a suitable solution:
- Street - facade mixtures based on cement or polymers. As an example, consider the technical characteristics of NEOMID putty:
The prices in the article are current in the summer of 2021.
Neomid putty is specially designed for sealing polyurethane foam
- Room - gypsum putty for interior work. As an example, consider the technical characteristics of the Knauf Uniflot mixture:
Knauf Uniflot has increased strength characteristics
If we are talking about a room with high humidity, then it is also better to use façade compositions, since gypsum ones are deformed and destroyed in such an environment.
- Ceramics or heat-insulating boards - adhesive putties. As an example, consider the technical characteristics of the Weber Vetonit product:
- Putty knife;
- Spray
Weber Vetonit can be applied using mechanized methods
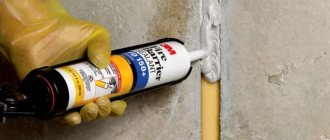
If we are talking about sealing slopes, then you can additionally purchase sealant and reinforce the edges of the polyurethane foam with it so that they do not begin to crack over time.
- Serpyanka tape for reinforcing the putty layer;
- Gloves . The price of such an accessory is low, but your hands will remain clean;
- Assembly knife for trimming excess dried mass.
Stage No. 2: preparation of the surface to be treated
Putty will not lie on polyurethane foam without its preliminary preparation:
Trimming and priming are the two main preparatory steps.
Plastering on foam: selection of composition and tools, preparation of the base and work process
It is impossible to imagine modern construction without the use of polyurethane foam: this material serves a wide range of jobs and is used to seal almost any cracks and cavities in the building. The foam hardens quickly and provides reliable protection, but the appearance of the joints is not very attractive, and in order for the foam to last as long as possible, it must be protected from adverse influences.
The heat retention and sound insulation properties of a material can be maintained for many years only if it is reliably protected from the ultraviolet radiation of the sun, which can destroy the composition in just a few years.
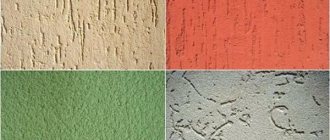
In the photo: all finishing work is very simple, and you can easily master this process
Methods for protecting polyurethane foam
There are many options for protecting polyurethane foam coatings:
- putty;
- finishing plaster;
- cement-sand mortar with the addition of white grout;
- polyurethane sealant;
- acrylic paints and varnishes;
- liquid plastic;
- putty.
So, based on the above, the answer to the question of whether putty can be applied to polyurethane foam is obvious and positive.
Advice! Before applying protective material to the polyurethane foam, it is recommended to lay it with pre-compressed sealing tape (abbreviated as PSUL). This tape is specially designed for filling irregularities in new structures. For old structures, it is preferable to use a membrane-type diffuse waterproofing tape.
How and with what to putty polyurethane foam in 3 stages
The putty protects the mounting foam from the harmful effects of sunlight
Don’t know what and how to putty the polyurethane foam? The experience I have accumulated allows me to say that all the necessary materials can be found in the nearest hardware store, and anyone can cope with the task. Detailed illustrated instructions will help me prove this.
Workflow Features
Puttying polyurethane foam can be divided into several important stages, where direct surface treatment takes only part of the time.
Selection of composition and tool
Before starting work, you need to prepare the necessary set of tools, which includes a knife, a container for the solution, two spatulas (wide and narrow) and work gloves. As for spatulas, the solution is taken out of the container with a narrow tool and applied to a wide one, which is used to treat the surface. A narrow spatula is also used to seal corners and hard-to-reach places.
In addition, you need to purchase a putty compound. When choosing it, you need to take into account the following circumstances:
- Location of treated surfaces. For work inside a building, certain compounds are needed, while for work with a facade or wet rooms, others are needed.
- Layer thickness and slot width. If surface defects are too deep, it may be better to plaster such cracks first. The fact is that the putty is designed to hide relatively small defects and is applied in a thin layer, but with the help of plaster you can seal recesses up to 15 centimeters deep.
Examples of reliable compositions for dry rooms include Rotband gypsum plaster and Fugenfüller putty. Moreover, the choice is far from limited to these mixtures. You just need to know the conditions under which the coating will be used and select the composition taking them into account. For example, mixtures based on cement or polymers are suitable for facades, and adhesive putties are suitable for tiles and thermal insulation boards.
The amount of the required mixture is determined depending on the area of the room and the consumption per square meter of the millimeter layer. Material consumption will be discussed in more detail below.
You also cannot do without a primer. The primer additionally protects the putty and ensures better adhesion of the coating to finishing materials. We can recommend the use of acrylic primer as it has the largest list of positive characteristics.
When it comes to finishing slopes, the joints of window frames and plaster will require an additional level of protection, since it is in these places that cracking usually appears. A paintable sealant can be used as a protective agent. The price of this product is not too high, but the benefits are very noticeable. The sealant is used simply: after applying the main composition (plaster, putty) to the surface, the finishing material is partially removed from the seam (3-4 millimeters from the edge). The sealant is poured into this cavity.
Preparing the base
This stage is especially important, since the final quality of the putty depends on the thoroughness of the preparation of the base.
Preparatory activities are as follows:
- Using a knife, remove all protruding pieces of foam. As a result, the surface should become smooth, without any obvious defects or depressions.
- If the coating does not adhere securely somewhere, it is better to remove it completely and replace it with cement mortar.
- We clean the surface from dirt and dust. You can use a vacuum cleaner for this operation.
- We prime the surface.
Applying putty
The work is performed in the following sequence:
- Mix the solution. The proportions of the components are indicated on the packaging. It is recommended to take a very prudent approach to determining the total volume of the batch. If there is too much solution and it hardens, it will not be possible to revive it with water, which means that the unused mass will simply have to be thrown away. The solution should be enough for about 30 minutes of work.
- Apply a starting layer of putty to the foam. If defects on the surface are noticeable after the first coat, an additional coat will have to be applied. The thickness of the layer depends on the type of putty (for example, for acrylic mixtures the maximum layer thickness is 3 millimeters).
- When the starting layer has dried, it is recommended to sand it and prime it.
- Finishing putty is applied to the dry surface. The dried layer is sanded again (with fine-grained sandpaper) and primed. Now the surface can be wallpapered or painted.
So, there is nothing special about puttying on foam that would distinguish this process from processing other types of surfaces. For a high-quality result, you only need strict adherence to the technological process in terms of surface preparation and applying putty.
Features of the work
Consideration of the question of how to plaster polyurethane foam should begin with the process of selecting materials and preparing tools . Using the right tools makes the job much easier and allows you to achieve excellent results, even without construction qualifications.
Selection of composition and tool
So, how to plaster polyurethane foam to make the coating reliable and durable?
The following factors should be taken into account:
- Where the finishing will be done, for indoor work many compositions are suitable, while for external putty the solution must have water-repellent properties, withstand temperature changes well and not be destroyed by the sun.
- Layer thickness and slot width. As you know, putty should be applied in a thin layer, while plaster can be used to level out even significant differences. This aspect is easy to determine by looking at all the places that require treatment; we note that most often it is advisable to use a plaster solution.
Large areas with complex terrain can only be covered with plaster mortar
- Features of the room in which sealing areas are sealed. For example, in a bathroom, a cement composition is best suited, which is not afraid of moisture and is highly reliable; in ordinary rooms, gypsum compositions can also be used.
Advice! The choice of a specific option depends on you, we only note that Rotband gypsum plaster, Fugenfüller joint compound and other similar solutions with increased strength properties are very suitable for finishing foam. For exterior finishing, facade plaster on a cement or latex basis or an adhesive composition for tiles or heat-insulating boards are suitable - it also has high properties.
What do you need to purchase before starting work?
Everything is quite simple here:
- The required amount of mixture is purchased (it all depends on the volume of work, and determining how much composition is needed is quite simple, even by eye). As noted above, gypsum plasters are well suited for interior decoration, but for the exterior it is better to use weather-resistant compounds, otherwise the repair will not be durable. Any plaster on top of foam primarily performs protective functions, so high demands are placed on it.
Remember that there is a separate group of compositions for gas silicate blocks
- To treat the base you will need a primer. The choice of a specific option depends on the characteristics of the base; you can easily select the desired type in any hardware store. As a last resort, you can use a universal acrylic composition that penetrates deeply into the structure of the base and strengthens the surface.
- If slopes are to be finished, the joints between the frame and plaster need additional protection, as cracks most often form there. It is best to purchase a paintable sealant - its price is low, but the benefits are undeniable. It is applied simply: after finishing with a knife, the plaster is removed along the seam at a distance of approximately 3-4 mm, and this cavity is sealed with sealant.
Acrylic sealant perfectly protects joints, has good adhesion to a wide variety of materials and can be painted over with any composition.
Advice! The easiest way to apply the composition is to use a narrow and wide spatula. The narrow solution is applied to the wide one, and with its help the mixture is distributed over the surface. The work is quite simple, and the main thing in it is accuracy.
- The solution must be mixed in a clean, convenient container.
Preparing the base
This stage is quite simple, but its importance is very high, so do not neglect the following operations:
- First, use a sharp knife to cut off all excess pieces of foam - the surface should be smooth without protrusions or depressions.
Excess foam can be easily cut off with a sharp construction knife
- If there are unreliable areas and pieces of old coating, they should be removed, and all problem areas should be sealed with cement mortar, since applying too thick a layer of plaster is strongly not recommended.
- The surface is thoroughly cleaned of dust and dirt; it is better to do this with a vacuum cleaner - it will remove dust from all irregularities.
- Before starting work, the base is treated with a primer; it will strengthen the base and balance the absorption in all areas - the plaster on the mounting foam will lie much better and dry evenly.
The working process
Let's look at how to plaster polyurethane foam with your own hands:
- First, the solution is mixed as required by the instructions. You should not prepare too much mixture; it should be enough for about half an hour of work.
- Next, the composition is applied to the surface; if the layer is 1 cm or more, it is better to finish it in 2-3 layers, so the surface will be much stronger. Remember that the minimum layer must be at least 4 mm, otherwise the composition will not protect the foam properly.
- After drying, the surface is sanded and processed at your discretion: you can putty, paint or wallpaper.
At the seams between the slabs, it is better to cut the foam with a small indentation - so that the layer of mortar is thick enough and the surface is even.