Technology of work and surface preparation
To apply the sand base to the surface, it is necessary to prepare the base for finishing. It should be smooth, without stains, unevenness or traces of previous coatings.
Preparing the base
The preparatory activity consists of the following stages:
- Cleaning the base from old plaster that is crumbling. If the layer holds up well enough, you can leave it.
- Treating a surface to remove dust, dirt or stains. Ignoring this step will worsen adhesion due to insufficient adhesion of the paint composition to the coating.
- Applying plaster. Both cement and gypsum compositions are suitable for this task. The second option is more in demand due to the high drying speed.
- Puttying. The procedure consists of eliminating minor irregularities and final leveling of the wall structure. The final stage requires sanding the wall and applying a deep penetration primer.
Applying paint
Before using paint to decorate walls, you need to choose the optimal application method. The coloring composition is sold ready-made, but sometimes it has to be diluted with water or mixed with a composition of a different color.
To apply the first layer, use a paint roller, fur roller or thread roller. The layer thickness is 1 – 3 mm. The second layer, which gives a texture effect, can be applied with a brush after waiting for the first to dry.
Then the coating is smoothed using special tools, dispersing the sand over the surface. If you want to give the walls a pronounced relief, it is better to use a roller with a fine structure.
The drying time for the painted surface is at least 24 hours. You can begin installing decorative elements after the coating has completely dried.
Application technology
Before starting to work with the coloring product, it must be prepared and thoroughly mixed. In some cases, the paint must be diluted with water.
To ensure that the result does not disappoint, you must follow the following steps when applying a decorative coloring product with your own hands:
- preparation and leveling of the plaster layer;
- application of deep penetration primer in 2 layers. You can replace the primer with water-based paint, identical in color to the textured material;
- The initial layer of decorative paint is applied with a roller. The method of application and manner depend on the desires of the owner and the design idea. In this case, a coating design is created;
- The second layer of paint with sand is covered with a brush. On a non-dried surface, smooth the walls using special tools.
Advantages and disadvantages
Before applying a decorative coating, you should evaluate all the pros and cons to avoid unpleasant surprises and cost overruns.
• versatility of the coating (to obtain a decorative effect, you do not need to purchase several types of materials, one paint is enough);
• preservation of color and texture during operation due to resistance to UV and other external factors;
• strength and wear resistance;
• the ability to tint with pigments to obtain the desired shade;
• long service life (the coating retains its presentable appearance for about 10 years);
• resistance to microbiological processes;
• high aesthetic indicators;
• easy maintenance (wet cleaning can be done).
The decorative coating has practically no disadvantages. The only important condition is the requirement to prepare the working surface for painting. Unlike decorative plaster, paint does not hide minor flaws on the wall
Therefore, during the preparation process it is necessary to pay special attention to leveling the planes
Advantages and disadvantages
Painting products with sand have a number of advantages:
- Long service life. Walls painted with this paint can last up to 10 years, unlike wallpaper coverings, which last up to 5 years;
- Versatility. The use of decorative paint is possible in any room due to its composition (kitchen, bath, bedroom, living room);
- Wear resistance. Are not subject to deformation under the influence of UV rays;
- No special care required. Textured paint contains antistatic components that do not allow large amounts of dust to settle. To remove heavy dirt, it is enough to wash the wall with clean water;
- The structure of the product contains special substances that prevent the formation of mold and mildew;
- Environmentally friendly coating. Does not contain components harmful to human health (does not cause allergic reactions);
- The structure of the paint consists of small particles that have their own protective shell. Thanks to this design, mixing of particles does not occur. This is how the decor is multi-colored.
Like all finishing materials, sand-based paints have disadvantages:
- High cost of production. Some types of such decoration are more expensive than conventional painting materials;
- Painting of the surface is carried out only on a spotlessly clean base coat.
Basic principles of working with decorative “sand” coating
Since decorative paint with the addition of sand or other particles to give the appropriate effect hides minor flaws in the walls, you do not have to first bring their surfaces to a perfectly smooth state. However, it is still worth cleaning off the old coating, eliminating cracks and loose areas, and priming the walls. By treating the surface with a primer before finishing, you will increase the adhesion of the layer to the base and significantly extend the service life of the coating.
The quality of the repair as a whole will depend on the quality of preparation of the walls for finishing.
After the preparatory stage, you can begin applying decorative paint with a sand effect. First, the first layer of coating is laid using a roller. At the same time, the nature and method of application depends only on the wishes of the master.
The fact is that at this stage of finishing the desired effect is not reproduced.
After the primary layer has dried, take hold of the brush and apply the final coat. Then, without allowing the coating to dry, it should be smoothed using special tools. For example, using a roller with a fine structure at this stage, you can get a more noticeable relief on the surface.
The coating will dry for at least 24 hours, after which it will be completely ready for use.
To summarize, it is worth noting the popularity of such paints, which is ensured by their versatility, practicality, as well as the extraordinary effect obtained when working with the coating. This finishing option is perfect for a wide range of people who want to change their environment.
Additional information: Painting walls with decorative paint and sand
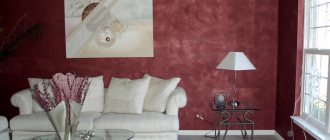
Matte finishes look ideal in spacious rooms and give the interior lightness and airiness. Reflective particles of mother-of-pearl products visually expand the volume of a small room. Also, this type of paint brings luxury and high cost to the interior of historical styles.
Both river and quartz sand can be used as filler. Decorative plaster with a sand effect has properties inherent in both plaster and high-quality painting, so the surface obtained as a result of such finishing does not require additional work to create a finishing coating.
- Mother-of-pearl - the composition contains sparkling elements and substances that shimmer on the surface and look different depending on the angle of refraction of light, giving the walls a velvety feel.
- Matte - similar to textured, has no glare. The walls take on a rough appearance.
Decorative sand-effect wall paint is produced in a wide range of shades. On sale are not only compositions of the main color palette, but also paints that imitate a metal surface - bronze, silver, gold. If desired, you can order the white paint to be tinted in the shade you need.
Advice! Before choosing one or another option, it is necessary to look at application samples, since it is impossible to imagine the final result only by the composition of the paint. If the seller does not have samples, you should at least look for them on the Internet, so you will clearly understand what you will get in the end.
The structure of the heterogeneous consistency of the product creates the feeling of a complex work technology, performed with special difficulty over a fairly long period of time. After applying the paint, patterns reminiscent of dunes appear on the surface, adding mystery and magic.
- Walls covered with such a mixture will delight household members for many years, since the rough paint is considered very durable. According to many experts, you won’t have to repaint the walls for up to ten years.
- Sand paint is considered universal in many respects. It is ideal for painting walls in any room, including the kitchen, living room and bedroom. Painting walls with water-based paint on cement plaster? In addition, such decorative plaster is not at all afraid of moisture, which is why many designers choose it for painting walls in bathrooms.
“Independence” and versatility. With proper surface preparation, paint can be applied with your own hands, without the help of a professional, and a variety of waterproof paints makes it possible to choose a material for areas of high humidity.
Varieties
To understand what sand-effect decorative paint is, you need to study its types:
- Mother of pearl. The paint contains special components that give the product shine and shine. High-quality products of this type are considered safe to use, because the composition does not contain harmful and dangerous elements. Pearlescent paint is more expensive than other types of paint products. This is due to the fact that manufacturers use only natural ingredients (sea shell) when making paint.
- Matte. The matte paint product does not sparkle, but gives a special special effect to the roughness of the surface. Looks great in modern interior decoration. These variations with the addition of white sand look perfect in spacious rooms.
Pearlescent and matte textured coatings have a good texture, so they won’t cause any difficulties when applied independently.
Such coatings can be chosen to suit every taste and color. There is the ability to mix different colored shades, allowing you to obtain an individual surface color. Also among the huge assortment there are unusual colors interspersed. The walls, which are covered with a textured product, resemble Venetian plaster. Silver, bronze and gold colors imitate metal.
How to apply?
Despite the simplicity of the process, it is worth repeating the obvious truths once again, which will protect you from possible mistakes in the plastering process. There are really no difficulties during application, but careful preparation of the walls may come as a surprise to someone.
- First of all, the wall is thoroughly cleaned. In this case, even small contaminants should be removed, since they do not promote adhesion. To remove stains, special chemicals and industrial vacuum cleaners are used. If the base of the wall itself is cracked or looks loose, the damaged areas must be carefully cleaned.
- All significant surface irregularities are sealed with relatively inexpensive gypsum plaster (it is not recommended to use a cement-based analogue: it takes too long to dry). As an alternative, you can also use acrylic-based putty.
- For greater durability of the repair, the wall must be primed in two layers. What’s interesting: instead of a primer, you can use ordinary water-based paint, but then you will have to select the shade as accurately as possible so that it matches the subsequent finishing.
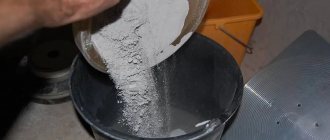
- The purchased mass must be prepared for application. Exactly how to do this will be written on the packaging. Usually the procedure is not complicated: the mass just needs to be thoroughly mixed, in some cases adding a little water.
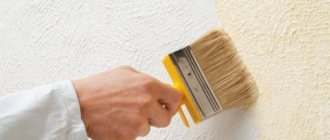
- The plaster itself is usually applied to the wall using a stiff brush. If, when working with other types of finishing, a stable direction of movements is usually provided, then in this case, on the contrary, it is not welcome - the movements should be chaotic, since this allows you to create a complex and unpredictable pattern.
- The application of plaster usually occurs gradually, in pieces of 2-3 square meters, but the next piece must be started before the previous one is completely dry - this is the only way to hide the joints.
Plaster consumption
Before calculating material consumption, study the recommendations on the packaging. Each manufacturer has its own parameters.
At Dali Marrakesh, for example, the consumption is 1 kg per 3 m² if the plaster is applied in two layers.
But theory does not always coincide with practice for several reasons:
- The base is poorly aligned and has many defects. In this case, the first layer is made with a regular mixture, and only then with sand.
- Walls made from different materials take on different amounts of mortar. To reduce plaster consumption, the surface is carefully treated with a primer in 2-3 layers.
To accurately calculate the required amount of mixture, make a test application on an inconspicuous area measuring 1 m². The resulting material consumption is multiplied by the number of squares of the working plane.
To calculate the required amount of putty, it is recommended to apply the prepared solution to an area measuring 1 m²
Applying decorative plaster
The technology of applying plaster was discovered in ancient times. Over the past period, many different methods have appeared. The most common method of applying decorative sand is “Spraying”.
Before you start directly applying the decorative material Sand, you need to prepare the surface, as well as the entire set of tools that will be required during the work process.
Tool used
If a material such as decorative plaster is chosen for finishing, then you need to stock up on the following set of fixtures and tools:
- spatulas of various types and sizes;
- scraper;
- grater;
- trowel;
- a drill with an attachment for thoroughly mixing the solution;
- rollers of various sizes;
- container for convenient mixing of the solution;
- brushes, brushes, baths, combs.
The most suitable material from which tools are made is stainless steel. When using other tools, rust may leave marks on the applied material and it will not be possible to remove them in the future.
Surface preparation work
Regardless of the methods of applying the material, the original surface must undergo very careful preparation. Old debris and dust must be removed from the surface. Repair all cracks and other damage and, if necessary, level the surface to be treated. After this, to give the surface good adhesion and durability, it must be treated with a primer.
Attention! In addition to the work described above, additional preparatory measures are possible. If necessary, they will be indicated in the instructions included with the Sand decorative plaster
Applying plaster using the spray method
Applying decorative plaster to the surface using the “Spray” method is the simplest and fastest. The application process is very simple and is carried out as follows - after the first layer has been applied and dried, a new one is applied to it.
To give the second layer an unusual texture, many different devices and tools are used. The simplest option would be a regular broom. To do this, you need to take a broom in one hand, and an ordinary stick in the other, lower the broom into the prepared solution, and then hit it on the stick, so that the entire solution flies onto the prepared wall, just as shown in the photo. As a result, drops of solution or whole flakes should appear on the surface. Their formation depends on the consistency of the mixture, as well as on the broom itself.
The popular “Italian” wall decoration is also made using the same technology. The only difference is that the first layer is immediately followed by the second, without waiting for drying. The layers must differ from each other in colors or at least in shades.
Properties of the sand range
The neutrality of the nature of sand coloring is the main advantage when using options for the interior. Beige tones can set a different mood. It all depends on the style, decor, color accents used.
The ability to pacify is an important property of the color of sand. The predominance of beige tones evens out the character of the room. The sandy atmosphere is always cozy, striking with calmness and comfort.
The versatility of the color palette of sand indicates the possibility of creating interiors using different style directions. Moreover, by alternating details, it is possible to actually make changes to the existing situation. This makes a room with a predominance of beige tones incredibly practical.
Sand color makes an excellent background. Although beige is also popular as an addition. The neutrality of the palette can simultaneously focus attention on bright details and mute their activity.
Sandy notes are ideal for those who do not have a clear preference for decoration. It is recommended to fill the interior with beige paints if difficulties arise when choosing basic schemes. Sand will balance flashy, poorly compatible color splashes.
When choosing sand shades as the basis of the interior, the task of decorating the room is simplified. It is easier to select materials for renovation, furniture for furnishings, and accessories for decoration. This is due to the versatility and demand of the beige color scheme.
What effects can be created using a decorative sand mixture?
Applying sand plaster yourself is not a difficult task for anyone. But if you want to decorate the interior with intricate patterns, then you will have to use the tips of the masters. Having decided to create textured walls, you need to select “sand” plaster with the appropriate components. The application sequence is the same, but the technique for creating the drawings is different.
If desired, if one layer is not enough, you can apply a second one, and sometimes the presence of a second layer is mandatory.
Before starting work on the wall, be sure to practice. Decorative sand can be applied to small pieces of fiberboard or drywall.
So, the effects of sand decor:
- Decorative plaster sand dunes associates this pattern with the desert. The effect is created using a brush.
- Using movements of the hand, cross-shaped strokes are applied, from side to side. Hold the brush at a gentle angle, as if working with a spatula;
- Until the surface has dried, you need to carefully inspect it for missing areas and correct if necessary;
- The dried surface must be shaded with a clean brush to avoid a sloppy look (if you use a dirty brush, the result will not be a beautiful drawing);
- If necessary, you can add another layer that will increase the density of the “sand vortices”.
- Decorative plaster sand swirl effect. This style is very similar to the previous one.
- It is carried out according to the scheme of chaotic “swirling” application (circular movements are added to the cross movements).
- Disperse the material throughout the entire volume of the wall. Do not overload the brush with material to avoid large “blunders”.
- Next, use a clean brush to blend the sand in the same direction.
- If you come across areas with no plaster, you can go through this place again.
- Rain effect.
- The design is applied evenly with a wide brush in one direction, it can be diagonal or perpendicular to the floor.
- Cover the surface in small sections, as sand plaster dries quickly and seam joints may remain.
- After drying, use a clean brush to lightly move it along the wall to remove excess material.
- Pebbled leather is applied in two layers. The second row is made using a stencil. Upon completion, the surface is sanded.
- For the burlap effect, you will need a fine-bristled brush. The direction of brushing gives the appearance of the design.
The last two effects are rarely used or performed by other structural mixtures.
When working with large areas, you need to apply the material in pieces of 1 - 1.5 m2. The edges of the applied surface should remain uneven, as if torn, so that when work continues, joints are not noticeable.
How to apply
The application technique is not too complicated, but requires care and careful adherence to the manufacturer's instructions. First you need to prepare the surface.
Preparation consists of several operations:
- Cleaning the base from dust, dirt, grease and oil stains. If this is not done, then the adhesion (adhesion) of the paint to the surface may be insufficient, which will significantly deteriorate the strength qualities of the decorative layer.
- Removing crumbling plaster. Durable plaster does not need to be removed.
- Plastering the surface. Both cement and gypsum compositions can be used. Gypsum plaster dries faster; it is advisable to use it if finishing work needs to be completed in a short time.
- Puttying. At this stage, minor defects in the walls are repaired and the surface is finally leveled. Final leveling is carried out using a sanding block.
- Application of deep penetration primer. The primer is applied to clean, smooth walls.
Proper preparation of the base will ensure a long service life of the decorative coating.
Methods for applying paint with sand are chosen depending on what texture you want to get as a result. Usually the paint is sold ready for use, only sometimes it needs to be diluted a little with water.
The first layer is done using a paint roller, fur or thread. The layer thickness varies from 1 to 3 mm.
There are variations of this stage among different masters. Most often, the base is applied with non-textured paint, tinted in a color close to decorative paint. Some craftsmen simply tint the primer.
The second layer, which actually gives the effect, is applied with a brush after the first has dried. Then the coating, preventing it from drying out, is smoothed with special tools, most often with a brush - dispersing sand over the surface, decorating it. If the walls should have a pronounced relief, you can use a roller with a fine structure.
If you haven't worked with sugar paint before, try doing the whole process on a small test surface first. How the master does it in the video.
The painted surface dries for at least a day; you can decorate the walls with interior items only after it has completely dried.
What is decorative plaster “sand” and its composition
Mostly decorative plaster is found with quartz sand, but sometimes with fine river sand. Finely crushed shells and shimmering mother-of-pearl particles are added to the overall mixture for a luxurious and shiny effect. Sand plaster is more suitable for interior finishing, but if you plan finishing work outdoors, it is necessary to add protective impurities.
Decorative plaster with sand effect is divided into two types:
- The mother-of-pearl coating has the appearance of velvet combined with silk. This shimmer is characterized by the addition of those same shimmering particles and shells. Only silk plaster itself is more similar to noble fabric.
- The matte finish resembles sandstone (natural stone). But using such natural stone in apartments is impractical, especially due to cost, so decorative “sand” is a good option for simulating natural stone.
Properties
Decorative paint with sand effect has many advantages that even picky buyers simply cannot help but like:
- Walls covered with such a mixture will delight household members for many years, since the rough paint is considered very durable. According to many experts, you won’t have to repaint the walls for up to ten years.
- Sand paint is considered universal in many respects. It is ideal for painting walls in any room, including the kitchen, living room and bedroom. In addition, such decorative plaster is not at all afraid of moisture, which is why many designers choose it for painting walls in bathrooms.
- Due to its excellent properties and characteristics, the paint will not need to be regularly updated and additionally taken care of. In addition, it is believed that walls with such finishing are not as dirty as those on which wallpaper is glued.
- Most brands offer only high-quality decorative paints that do not contain synthetic substances or any harmful or toxic components. They cannot harm the health of others.
- Thanks to the perfectly selected composition, mold will not grow on painted surfaces. In addition, it will not be difficult for you to wash the paint after work, because all you need is plain water.
- Decorative paint is also very relevant due to the fact that when it is distributed on the wall, no joints will form, resulting in a solid picture that will please your eye.
Despite all the positive properties of the decorative coating, its minor disadvantages include the fact that before distributing the mixture on the wall, it will have to be carefully prepared. This is done for the best adhesion of the material to the wall.
Today, many domestic and foreign brands can offer a lot of different painting options for walls. To have a more detailed idea of what sand effect paint looks like, you should consider its main varieties.
Decorative paint for painting walls with a sand effect is:
- Mother of pearl. The mixture with mother-of-pearl contains special components that give it a special shimmer and shine. High-quality paints of this type are considered completely safe for humans and the environment, since they do not contain any harmful components or additives.
Basically, this kind of building materials are more expensive than conventional ones. This depends on the fact that they may contain real ingredients that are obtained from sea shells, as a result of which such mother of pearl is most valued. Options with quartz sand are also highly valued, as they look very unusual.
- Matte. This paint does not shine, but creates an unusual rough effect on the walls, which looks very advantageous in many modern interiors. Be sure to pay attention to matte options with white sand, they are ideal for very spacious rooms.
Both pearlescent and matte varieties have a very good texture, which spreads over the walls without problems and does not cause unnecessary problems even when painting it yourself. In general, their manufacturing technology is no different.
In addition to the main varieties of paint of this type, it can be found in a wide variety of colors and shades, but if you want to get something unusual, then feel free to purchase several options and mix them. This method will allow you to get an individual color of sand paint.
Among the large assortment you can also find unusual colors with splashes.
Preparing the wall
Careful treatment of the walls will save you from further troubles and will be the key to successful plastering. Preparation for decorative plaster will help avoid swelling and peeling of the sand decor.
- Preparation. The first step is to clean the entire surface of previous coatings. If necessary, remove loose old base. Clean all greasy dirt using chemicals, and remove dust and small particles with a vacuum cleaner.
- Alignment. Next, the wall is leveled with gypsum plaster until it is smooth. In the case where the defects are very large, you can use a cement-sand mixture.
- Primer. After applying a deep penetration primer, which strengthens the base, it serves as a fastening element with sand plaster. To ensure durability and ensure good adhesion, the wall is coated with primer twice. The primer should dry for 5-6 hours.
Examples in the interior
Before buying paint, you should consult with experts and take into account a few tips. First of all, you need to choose a suitable color scheme, guided by the general style of the interior. The texture and pattern are determined later.
When decorating a bathroom, delicate shades of white and beige are used. The green color of the walls allows you to divide the room into zones, and the blue colors provide a shading effect. If the bathroom is quite large, there are no special requirements for the color of the walls.
When understanding the specifics of choosing paint for the kitchen, you need to take into account that the color of the walls can affect the feeling of hunger. There is an assumption that bright colors awaken the appetite. Designers advise sticking to grey, white and blue tones.
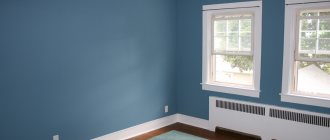
Blue tones are recommended for the living room. Moreover, they can be either pearlescent or matte. This color scheme gives the interior a feeling of lightness, airiness and ease. Staying in such a space provides comfort and coziness.
A living room in a salad or multi-colored design also looks presentable. If the paint is chosen to match the baroque or classic style, it is advisable to choose mother-of-pearl coatings. The interior in a modern high-tech style looks beautiful with matte tones.
Sand paint is an excellent finishing material that turns any interior into a cozy, stylish and modern place.
Sand paint: interior solution
Sand paint has a wide range of colors.
Deep tones are suitable for the living room; they make the room cozy. It is not advisable to use bright colors for the kitchen. They get dirty faster and cause appetite. It is better to use darker colors, dark blue works great. Such shades hide imperfections, dust is invisible on them and, moreover, reduce the feeling of hunger. Gray and white shades look harmonious.
Beige and light colors work well for the bathroom. Greens and blues in reflection change the tone of the skin. If the bathroom is large, then with good lighting any shade will look great.
What tools will you need?
The preparation of tools must be approached no less responsibly. During work, everything should be at hand; I would like to avoid partial “repurchase” of equipment in the future. Tools must be of high quality; when purchasing, you must inspect them for irregularities and nicks. A special tool is produced for applying decorative compositions. When using conventional tools, defects may occur when working with structural plaster with your own hands.
Required set of accessories:
- Spatulas of different sizes, 3-4 pieces are enough;
- Scrapers for cleaning old materials;
- A trowel for uniform application of the building mixture;
- Venetian trowel;
- Drill with attachment or construction mixer;
- Rollers of different sizes;
- Container for the solution, if a roller is involved in the work;
- Brushes and brush;
- Bucket for water;
- Rags for removing excess plaster and moistening tools;
- Covering material;
- Masking tape.
Advantages and disadvantages of texture paint
Texture paints are indispensable in decorative repairs. But before making the final choice in their favor, it is advisable to learn more about the positive properties, as well as disadvantages of such dyes, and their differences from other methods of decorating ceilings and walls.
- This paint and varnish material, as mentioned earlier, creates a special texture and hides defects, irregularities and cracks. Before applying texture paint, surfaces do not need to be leveled, as in the case of using traditional materials, especially glossy paint.
- A layer of textured paint applied to the ceiling does not reduce the height of the room. This method is preferable and looks better than tension and suspended structures.
- Textured dyes are vapor-permeable and at the same time moisture-resistant, which is undoubtedly convenient for use in finishing bathrooms and kitchens, where not just any material is suitable. Moreover, the walls and ceilings under a layer of this paint are protected from damage by mold and fungi.
- The reason for using a textured material for outdoor work is its resistance to the effects of destructive ultraviolet radiation, the vagaries of the weather and the vicissitudes of the climate. To the positive qualities one can also add long service life, stability of decorative, physical and other parameters over time, in particular color characteristics.
- Only environmentally friendly components are used in the production of texture paints. Their harmlessness is confirmed by certificates. And people prone to allergies do not have to worry about exacerbation of the disease when living in apartments with walls and ceilings covered with such materials. The protective paint layer is resistant to alkaline and other chemical influences. At the same time, the surfaces are kept constantly clean and are easy to maintain.
- When renovating, applying one coat of paint is enough to achieve the desired result. And the color scheme of the surface, if desired, can be easily adjusted by adding the required color in the required proportion.
Against the background of a significant number of advantages, the negative aspects of this material are lost and seem not so important. But they must be taken into account when using them.
- The disadvantages of the material include its significant consumption during use, because for 1 m2 of surface area you need to spend about a kilogram of dye. The reason is that it is necessary to apply a thick layer for high-quality relief decor and volumetric texture of patterns, but significant differences in height and unevenness still cannot be hidden.
- In wooden buildings, it is undesirable to use texture paint. The applied layer of material is elastic, but under these circumstances, cracks will certainly creep along the surface over time. In addition, this type of finishing ultimately visually compresses the space, which is bad for houses with small rooms.
Advantages of sand-based paints
Sand paint compositions are water-soluble paints, so they are easy to apply. Stains that accidentally end up on the floor can be easily cleaned without using solvents.
- High adhesion. Good adhesion to the prepared base ensures a long service life of the coating.
- Ecological cleanliness. The ingredients contained in the paint will not harm health, so it can even be used in children's rooms.
- Immunity to mold and fungi, as antiseptic additives are added to the mixture.
- At the base preparation stage, there is no need to use finishing putty, which reduces the cost of preparatory work.
- Simple application process. Even an inexperienced craftsman can paint walls with sand paint.
- Durability and abrasion resistance. Correctly applied paint ensures the service life of the decorative coating up to 10 years.
- Fade resistant. The finish retains its original shade and stylish appearance throughout the entire period of use.
Painted walls are easy to maintain. Dirt can be easily removed with ordinary detergents. If you want to give your apartment a unique look without spending a lot of time and effort, then sand-based paints are an excellent choice.
Technology of applying decorative plaster with sand effect
The method of application depends on the effect you would like to achieve, but the general sequence will be the same.
- Surface preparation.
- Preparation of the solution and its tinting. Sand mixtures for the most part do not require any additional preparation other than adding color, because sold ready-made. The only recommendation here is to strictly follow the instructions given by the manufacturer.
- Applying the base layer. The base is tinted to match the color of the base coat, but two shades darker. The base contains paint or primer and a tint of the desired color. The primer will level and smooth out all small cracks and irregularities. Apply two layers with a fur roller, there should be a period of drying time between them, 30-40 minutes is enough. When the paint has dried, you can apply the main decorative layer.
- First stage of application. The prepared solution is applied with a stiff brush or roller with a fur cover. After gradually applying the first layer, wait a few minutes.
- Second stage of application. Next, apply the second layer. It will take a day for it to dry completely, but to use the wall it is better to wait a week.
Regarding the choice of colors, you can choose the color yourself; the most common are pastel colors (yellow, beige, light brown).
Often the base is applied using acrylic paint and a velor roller, rather than the decorative sand itself.
Designers are developing new ideas for decorating living spaces. In this regard, the use of sand plaster mixture for decoration is completely justified. The result is stunning. The main condition is the choice of high-quality equipment and materials, which will greatly speed up the process.
Stylistic decisions
Sand color is universal. Palette options are used as backgrounds and details in any style. Beige tones are good for the bedroom, living room, kitchen, nursery, office, bathroom, corridor and other rooms. For rooms of different purposes, designers highlight some nuances of using sandy shades.
Living room
The mood of the living room is created purposefully. The use of warm shades will help make the room incredibly cozy and attractive for home gatherings. The atmosphere of such a living room will be peaceful and calming. This option is good for those who are used to getting together with the whole family in the evenings after busy working days.
If the living room is rarely used, then you can set a moderate, slightly pompous mood. Shabby chic, art deco, oriental style are suitable. A warmer atmosphere is formed by classics, country, and chalets. Minimalism and hi-tech will become universal.
Bedroom
The special climate of the bedroom is created by the warm shades of sand. This role will be played by cream, champagne color, caramel. Thick brown curtains will dilute the monochromatic palette. Good color accents would be: bright orange, red, turquoise.
When choosing a style for a bedroom, they often opt for the classics. Designers recommend decorating the walls with wallpaper in beige tones, and choosing furniture from brown options. To decorate a bedroom, it is popular to use Provence, eco, modern and even loft. Everyone chooses a close direction that will provide a reference point for the design.
Kitchen
It is recommended to make a small kitchen bright. The use of warm sandy shades will help to visually enlarge the space. A set with glossy light beige facades is a good choice. The best example of a dominant style will be any direction that obeys minimalism.
When decorating a spacious kitchen, sandy tones can be transferred to the walls. A panel with a cup of cappuccino, coffee beans, and cinnamon sticks will highlight the mood. Excellent additions are energetic yellow, cheerful orange, brutal red, calm blue. The theme will be supported by Mediterranean, country, and English styles.
Children's
In a children's room, the use of sandy shades is aimed at calming the raging psyche of the little inhabitants. A room with a calm design calms children, allowing them to fall asleep faster. A neutral environment promotes better concentration when doing homework.
Bright pictures on the walls and decorative pillows in rich colors (coral, turquoise, lemon) will help diversify the interior. For design they prefer style trends: minimalism, hi-tech, eco. You can create a themed design. For a boy they make a sea or pirate interior, for a girl - a princess castle.
Bathroom
Decorating a bathroom using sand tones is a good solution. Light shades of beige can increase the space. Caramel and straw colors are more suitable for a spacious room. The decor can be created using brown, salmon, khaki and even black undertones. Additional colors are often introduced locally. Although sandy tones can also be used only for decoration. Plumbing fixtures made of brass and bronze look original. Among the styles they choose are classics, minimalism, modern, ethnic trends (Italian, Japanese, oriental design).
Creating patterns
Although patterns in general seem intricate and unpredictable, professionals certainly know how to achieve a specific type of pattern. Those who want to make repairs themselves also have the right to know this.
Sand swirls on the wall are perhaps the most popular motif in modern renovations. To achieve this effect, you usually have to plaster the wall in two layers, of which the first is the main one, and the second is a decorative layer. “Storm” is created on the wall with wide cross-shaped strokes, and for greater spectacle it is recommended to choose plaster for these purposes in similar, but still slightly different tones. The dried surface must be sanded, otherwise the finish will look more like dirt than a work of art.
Many people associate sand with the desert, so dunes created using decorative sand plaster are also in great demand. To create this effect, the plaster is applied in the same way as in any other case, but an additional step is required - opening the dried surface with a special pearlescent paste. This mixture increases the shine of the quartz particles in the plaster, making the wall seem truly made of sand.
There are no strict restrictions regarding the use of such an effect in the interior, but it would look especially impressive in combination with some ethno-style: primarily with the African or Mexican design of the entire room.
Finally, quite often customers, when choosing decorative “sand” plaster, want to end up with a wall that would resemble the alluvium of ordinary river sand. To create such a design, craftsmen usually resort to a fairly simple method: simply apply the mass to the wall in diagonal movements.
For a detailed master class on applying decorative plaster “Sand”, watch the video below.
Advice from professionals
- Prime the first layer with gypsum-based plaster, so it will dry faster. At the final stage, acrylic putty is perfect; it has antibacterial properties.
- To work with sand paint, use a wallpaper spatula.
- If desired, you can create the main shade yourself: mix the desired colors. The main thing is to use paints of the same brand and consistency.
- There should be no drafts in the room while the coating is drying. When the coating has dried, it is advisable to apply a protective agent or varnish the surface.
Sand paint is a versatile and durable material. With its help it is easy to create a unique interior.
What are sand effect paints?
Sand paint is a simple yet stylish wall covering. The material gives the walls texture and different shades, which is due to the presence of varnish and plaster elements in the composition.
The processed structure receives a natural pattern (imitation marble texture, sand velvet or cut of minerals). To achieve this effect, innovative technologies and materials are used, but in the case of the paint described, other costs are excluded.
Sand paint is in demand both among professional designers and among ordinary people who take a responsible approach to interior design. The composition has a high aesthetic value, as it allows you to create elegant variations of the coating through various methods of applying the mixture to the wall surface.
Stages of work
1. Work begins by preparing the surface; if necessary, fill cracks and depressions with putty. For minor unevenness, you can apply sand-like paint to a concrete wall without preparation. The walls must be clean, free of adhered specks, remnants of wallpaper, and poorly adhering old plaster.
2. The walls are primed with materials recommended by the paint manufacturer. Wait until the soil dries.
3. Sometimes it is necessary to apply background paint in some shade. If the paint manufacturer recommends this, then it is necessary to achieve an aesthetic effect. The first layer of paint is applied with a roller. Usually the background is made in a more saturated shade than sand paint, adding the same toner, and diluting the background with water.
4. Add colorant to the base, creating the desired shade. It is better to use a toner recommended by the paint manufacturer. Calculate the amount of paint on all walls in advance with a margin. This can be done by looking at the paint consumption in the documentation. And paint the entire volume at once, because if the paint of a mixed shade runs out, it is almost impossible to create the same color. At least a little, but the new shade will be different.
5. Paint with sand is applied with a brush. The drawing is created with short strokes in a chaotic manner. The application areas are small - 0.5 m2 each, and the boundaries between the areas are uneven. Smooth transitions are a guarantee that the boundaries will not be visible after drying.
Paint applied to a concrete wall without preparation
6. The final layer is compacted with a regular wallpaper spatula.
7. Allow the paint to dry for 24 hours. During this time, drafts are excluded.
8. It is possible to cover the walls with a final protective coating if recommended by the manufacturer.
Following the recommendations, a little training - and a novice master will definitely be able to create beautiful walls with the effect of sand.
Still have questions? Ask them to our specialists at tel. 296-21-20.
Texture paint painting technology
Having chosen the type of textured paint and proceeding directly to the repair, you should immediately divide the upcoming work into two stages. And the first of them will be carrying out preparatory activities. And the final result depends on how carefully and accurately this is done.
- To prevent possible troubles that may appear in the future, it is better to immediately examine the structure of the house, its ceilings and walls for the stability of surfaces intended for finishing, expected deformations and possible vibrations that may cause the paint layer to fall off in the future.
- Next, the surface itself is prepared for repair. It should be cleaned with the obligatory removal of coatings made earlier, plastered with filling of potholes and cracks, achieving evenness with a height difference of no more than a few millimeters.
- Make sure that the decorative layer of paint lies on the surface and stays in place.
The best way to achieve this is to pre-coat the ceilings and walls with an even layer of acrylic primer. At the same time, its color must be combined with the texture dye chosen for decorative work.
After applying the primer, you should wait for it to dry completely, so the final stage of finishing can be carried out only after a few hours.
- Before use, the dye should be placed in a convenient container and heated to 20°C. Then move, after which fillers are used in the required proportions, and the working material is brought to the desired consistency.
The final stage of decoration will be the application of textured paint. Therefore, you should consider the ways in which this can be done, choose a tool for applying paint and varnish material that is most suitable in a certain situation for high-quality completion of the work.
A roller for texture paint will provide a durable and reliable application. In this case, to prevent subsequent shedding, it is better to use latex-based acrylic material.
Before covering the surface, the paint is mixed and applied in two layers: first from bottom to top, and again in the opposite direction.
It is more convenient to use a brush if the area to be painted is small or there are many hard-to-reach places on the surface to be treated. Having mixed the paint, it is first applied, making strokes vertically, but the second layer is applied horizontally, and the third time it is painted from top to bottom.
For simplicity, you can use a spray bottle. After working for 24 hours, the applied material has time to dry completely, although primary hardening occurs already in the first quarter of an hour.
If you want to get a drawing in the chosen style, you can apply chaotic stains with a soft brush on a surface that has not yet had time to dry. Imitation of bamboo stems is achieved with a cylindrical object wrapped in rope.
Having artistic talent and an abundance of imagination, it is possible to come up with your own, the most incredible patterns and designs, applying them using cellophane, crumpled paper or a wet rag.
Main types
Sand paint has a rich variety of shades. In addition, not only the main range of colors are available on the market, but also rare models with a metallic texture - silver, gold or bronze. If desired, you can tint the white mixture.
There are two types of paint mixtures:
- Mother of pearl. The paint contains reflective components that provide a characteristic shine of the coating, which can vary depending on the angle of viewing the wall.
- Matte. Such finishing materials are not diluted with reflective fillers and are intended for wall finishing in a calm palette. The coating has a rough texture.
Both types are characterized by a high-quality texture that is evenly distributed over the wall and retains its original appearance for a long time. To complete the finishing, you don’t have to use specialized equipment and do some of the work yourself.
Possessing high strength and reliability, textured paint is suitable for both interior and exterior finishing work. The relatively high cost of the mixtures is justified by the long service life and original design of the coating.
Characteristics
Sand paint can be:
- Mother-of-pearl - the composition contains sparkling elements and substances that shimmer on the surface and look different depending on the angle of refraction of light, giving the walls a velvety feel.
- Matte - similar to textured, has no glare. The walls take on a rough appearance.
This coating is versatile and wear-resistant. Does not require careful maintenance, just washing with detergents is enough. The composition contains substances that prevent the formation of mold. The material is environmentally friendly and safe.