Andrey
23481 0 24
Andrey October 6, 2016Specialization: facade finishing, interior finishing, construction of dachas, garages. Experience of an amateur gardener and gardener. We also have experience in repairing cars and motorcycles. Hobbies: playing the guitar and many other things that I don’t have time for :)
Nowadays, building materials are very expensive, so it is not surprising that many homeowners try to save on everything possible during renovations. To prevent the desire to save money from leading to a deterioration in the quality of repairs, in this article I will tell you how to make putty with your own hands, which in terms of performance is not inferior to many store-bought analogues.
The putty has a paste-like consistency
Gypsum putty
To prepare gypsum putty you will need:
- chalk – 2-3 kg;
- gypsum – 1 kg;
- wood glue solution 2-5%.
The amount of glue solution is determined during mixing.
The necessary tools are shown in the photo:
- container for mixing the solution;
- electric drill with a stirring attachment. If the volume of the mixture is small, you can stir with a spatula;
- gauze bandage to protect the respiratory tract from fine dust.
Preparation of the putty mixture:
- Mix the plaster and chalk thoroughly.
- Pour the resulting mixture into the adhesive solution.
- Stir the mixture until smooth.
The peculiarity of this putty is its rapid hardening. If you need to treat minor defects, it is logical to mix a little material and use it immediately.
Gypsum-based material is used:
- for finishing concrete surfaces;
- for eliminating plasterboard seams;
- for sealing walls or ceilings in rooms with low humidity.
Preparation of putty mixture
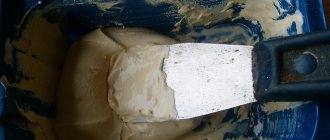
Mixing the solution can be done manually or using a power tool. In any case, the finished composition must be plastic, homogeneous, soft and pliable when rubbed over the surface. It is important that there are no lumps or foreign impurities in it.
Mixing the mass by hand
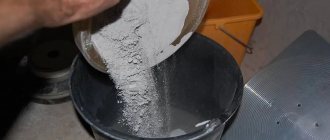
If you don’t have professional tools, you can dilute the putty in the simplest way. It is best to proceed this way with starting mixtures that do not require high quality mixing. For work, prepare a bucket, another container and a wooden spatula or stick.
6-8 trowels of dry putty are poured into a bucket, water at room temperature is gradually added. When mixing by hand, it is allowed to introduce water into the powder, and not vice versa. It is only important to mix the composition very thoroughly so that there are no large lumps left in it. If necessary, add more water or dry putty mixture to give the mass the consistency of thick sour cream. Then leave it for 5 minutes, mix again and get to work.
Using a construction mixer
To mix putty, it is very convenient to use a special tool - a construction mixer. It can be completely replaced with a drill with a mixer attachment, which can maintain an optimal rotation speed of 600-800 rpm. If the speed is higher, the solution will spray; lower, the quality of work will suffer.
A strictly measured amount of water is poured into the container (no more than ¼ of the bucket’s volume). Pour in the amount of dry mixture corresponding to the instructions (usually it is one third higher than the liquid level). When the putty is partially covered with water, carefully lower the mixer attachment into it and begin “beating” the solution.
It is important that there are no dried drops of the composition on the nozzle, which can spoil the finished mass. After making the mixture homogeneous, leave it for 5-10 minutes under the lid, then puttying begins.
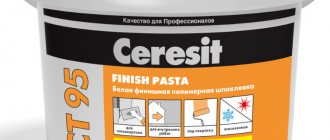
Glue-based putty
Adhesive putty is used to cover both ceilings and walls after plastering.
To prepare the material you will need:
- drying oil – 25 g;
- glue solution 10% – 2 kg;
- sifted chalk – 2 kg.
Preparation:
- Heat the glue. Mix with drying oil until the solution is homogeneous.
- Add chalk and stir until a suitable consistency is formed.
To make the putty spread easily over the surface, laundry soap is added to the mixture.
Tools and consumables for work
To make a perfectly smooth and high-quality puttying mass, you need to immediately prepare all the necessary tools and equipment.
Mixing bucket
An ordinary household bucket made of metal or plastic or other hard materials will do just fine as a container for mixing the solution. It must be clean, without remnants of the old mixture, sediment, or impurities. If the bucket is dirty, pre-soak it with water and scrape off all residues with a spatula, scraper, or clean with a hard plastic brush. Then rinse the bucket and dry it.
When you plan to dilute the material in small portions, you should take a small bucket (5-6 liters). For larger portions, use a standard 10-12 liter bucket. After applying the first batch of solution, the container is washed again, and only then the next putty is applied.
Electric drill or screwdriver
If you do not want to mix the solution manually, you can use one of the indicated tools. Both of them greatly facilitate the task of the master. Tool attachments must be clean, without any adhering mixture that may remain from previous work. It is equally important to ensure that there are no traces of rust on the metal nozzle.
During the process of mixing the composition, you should not use a high rotation speed of the nozzle. In this case, too many air bubbles will remain inside the material, and it will splash out. It is better to mix the solution at moderate speed in three steps, assessing its consistency and adding water or powder. After completing this stage, rinse the nozzle well, preventing the composition from drying on it.
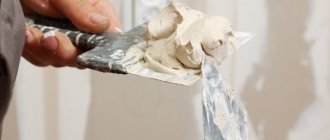
Putty knife
A spatula is one of the most popular plasterer tools. It is suitable for placing dry powder in a bucket, for manual mixing of the product, as well as for directly applying putty to the surface. In any case, you should only use clean tools that have been washed and dried in advance.
When manually mixing the solution, move the spatula in the bucket with intensive circular movements in a clockwise direction - this will help get rid of even small lumps. To knead the mass, purchase a medium-sized tool (about 30 cm wide, up to 12 cm long). It will serve as a universal device for all stages of work. However, a small spatula is more suitable for breaking up small lumps. It is also useful for cleaning dry composition from the walls of the container.
Running water
To prepare the putty, you need regular running tap water. There should be no impurities in it - only using clean water will you be able to create a high-quality solution. A liquid with a temperature of +15...+20 degrees is best, although cooler water can be used.
Ice liquid allows you to slow down the setting of the solution and prolong its viability, so when preparing a large portion, it is worth using it. In addition, if the solution thickens sharply, you can pour a little cold water into the solution - this will give additional time for puttying the walls.
Dry mixes
It is recommended to purchase the required amount of dry putty in advance so as not to be interrupted during work. The product is selected in accordance with the requirements, purposes, conditions of application.
Latex putty
Latex paint is elastic and wear-resistant, easily comes into contact with any surface. Latex putty, which is easy to prepare with your own hands at home, has similar properties.
Required components:
- CMC adhesive solution 8% – 20%;
- latex glue or latex paint – 6%;
- soap solution 10% - 1%;
- chalk paste – 1%.
Preparation:
- Mix liquid ingredients in a container.
- Add chalk paste, mix thoroughly until smooth.
If you prepare the putty as described above, it can be used as a finishing coat.
Each composition has its own purpose
Before applying the finishing putty for painting with your own hands, you should select the desired composition of the solution.
- Oil-glue. This is the cheapest option, but not entirely safe. Drying oil can negatively affect modern wall finishes and appear as stains during subsequent repairs. However, it is advisable to use it in storage rooms, basements, and bathrooms.
- Gypsum cement. Sold in the form of dry mixtures that need to be mixed with water. Not so cheap, but suitable for residential buildings and rooms with high humidity.
- Water-dispersed. It is mixed with a polymer emulsion at the production stage, so it is sold in buckets. It does not require additional preparation and is perfect for beginners.
- Acrylic. It has many advantages, but is completely unsuitable for cheap paint that does not stick to it.
Knauf products
Finishing putty for painting, carried out in compliance with technology, will make the wall perfectly smooth.
PVA and chalk putty
The composition of chalk and PVA glue is quite simple. Ingredients needed:
- PVA glue;
- chalk;
- sawdust.
Preparation:
- Dilute crushed chalk in PVA. Stir the composition until smooth. The consistency of the mixture should resemble sour cream.
- If you need to eliminate seams, add sawdust to the mixture.
The applied layer of putty will dry within 24 hours.
Correct proportions
Before diluting the putty, you need to carefully read the instructions. Manufacturers always indicate on the packaging the mixing proportions of the components - dry powder and water. If you add too much base material, the solution will be too thick and will dry out quickly. Gypsum compositions will turn out to be irretrievably damaged: you can only work with them for 15-30 minutes, and the time and labor costs for applying an excessively thick mass will increase greatly.
When putting putty, beginners often make another mistake - pouring a large amount of water into the composition. The liquid mixture will drain from vertical bases, harden poorly, and the quality of the finished finish will also decrease. Most often, it is recommended to dilute a 25-kilogram package of putty with ten liters of water, although the proportions indicated by the manufacturer may differ from these figures.
It is important not to take too much mixture and liquid at once. Otherwise, it will be very difficult to mix the putty. If the mass turns out to be inelastic, after kneading, you can add a little PVA glue into it (about a tablespoon per bucket). This will help make the putty soft and easily spread over the base.
Putty made of varnish and chalk
A mixture based on water-soluble varnish can be prepared without large financial outlays. In this option, inexpensive varnish is used instead of PVA. To give the solution color, you need to add color.
Required components:
- water-soluble varnish;
- chalk;
- sawdust;
- color;
- water.
Preparation:
- Mix varnish and chalk to form a dough-like mixture;
- If the mixture is too thick, add a little water;
- Add sawdust if you need to seal seams and do other starting work.
It is better to mix the ingredients in the evening so that you get the finished mixture in the morning. This putty can be used to work with chipboard or OSB. Drying time – up to 12 hours.
Procedure for working with homemade putties
Working with mixtures that you made yourself is not difficult. The main thing is to follow the order of actions, then you can say with confidence that everything will work out as planned.
- All necessary ingredients are prepared. It is best to use simple formulations, then you can be sure that the mixture will turn out as it should. If you have no experience in cooking, then it is better to practice a little - prepare a small amount to understand the procedure.
- As with all finishing work, the surface is prepared. Working with wood requires great care. All damaged areas are cleaned, rotten fragments and protruding nails are removed.
- The mixture is prepared with your own hands in advance. If sawdust is added, it takes time for it to swell.
- After preparation, the putty should be used within one to two hours. Then she loses all her qualities.
- The applied solution dries. The time for complete drying depends on the type of putty prepared.
- After this, you can begin sanding the surface. During the initial work, the walls are prepared for further processing.
- You can cover the tree with protective materials.
The remaining mixture is disposed of. It is not possible to store it. It is advisable to do this with a small margin.
Many people still wonder: how to make a mixture that will meet all the necessary qualities for woodworking? There's nothing complicated about it. Do-it-yourself putty will be an ideal solution for working on a wooden surface. The main thing is to prepare the solution correctly and apply it on time. Any purchased materials often do not live up to the expectations placed on them. Homemade mixtures are another matter. It all depends on the person himself; if he shows patience and does everything efficiently, then he will enjoy his work for many years.
Benzene based putty
A unique putty composition can be prepared using benzene. Suitable for wooden and concrete surfaces, as well as plasterboard walls.
Required components:
- rosin – 50 g;
- benzene – 130-150 g;
- castor oil – 25 g.
Preparation:
- Stir rosin and castor oil in a container.
- Add benzene in a thin stream. Mix the solution thoroughly.
This putty can be stored for several days. Therefore, knowing the amount of work, you can prepare the required amount of composition the first time.
Features of preparing mixtures for various purposes
The process of preparing putty depends on the grain size of the solid components that make up it. Materials can be starting and finishing. The former are used at the roughing stage, the latter are applied immediately before decorative finishing.
Starting lineups
The peculiarity of starting building mixtures is that they have high mechanical strength, are not subject to cracks, and at the same time contain a filler of a coarse fraction. It is better to dilute such compositions using a drill with a special attachment or a construction mixer with a speed of at least 800 and a power of 500 W or more.
If power tools are not available, you can stir the mixture by hand. After obtaining a homogeneous mass, cover it with a lid, leave for 5-10 minutes, then mix again and put it to work. Repeated kneading will make the putty more elastic.
Finishing putty
The technology for preparing the finishing mixture is the same as for mixing the starting mixture. The only difference is that when beating again, you need to put in more effort so that not the slightest lump remains inside. Otherwise, the quality of the finish may suffer. The better the solution is mixed, the smoother the surface will be, and the thinner the putty layer can be made. An evenly applied composition will dry out faster and last longer.
Some manufacturers advise making the finishing putty more liquid than the starting putty. This will help to perfectly level the putty layer and smooth it with minimal effort. To obtain a solution with an even texture, it is important to check for old dried mixture on the tools and in the container. To prepare the solution, it is permissible to use only clean tools, otherwise defects will remain on the wall. In general, in order to get a decent repair result, you must strictly follow the technology for preparing the composition and apply it correctly, because responsibility is in many ways the key to effectiveness.
Wood putty
A common material option for coating wood surfaces is with nitro varnish.
Required components:
- nitro varnish;
- chalk;
- sawdust;
- construction pigment or gouache;
- solvent No. 647.
Preparation:
- Chalk is mixed with crushed sawdust.
- If you add gouache or building pigment, you get a colored mixture. In addition to the dye, you should add a little solvent.
The advantage of a mixture based on nitro varnish is that it dries quickly on the surface.
Disadvantage: toxic composition with a pungent, cloying odor.
Wall putty tools
To complete the finishing putty you will need a number of tools:
- respirator;
- wide spatula 35-60 cm;
- narrow spatula 10-18 cm;
- putty;
- rectangular container for putty;
- rag or sponge;
- spray bottle with water;
- wide brush;
- high-quality light source, for example, a spotlight;
- pumice, sanding block or sandpaper;
- drill or screwdriver with mixer attachment.
Important! To keep all the tools needed for putty work at hand, put them in one large tray. When performing work at height, it is convenient to place it on a stepladder or table for repairs. This approach will save time and effort on constant distraction from work in order to go down to get the tool.
Also, to work with corners and slopes you will need:
- rule or leveling ruler;
- corner spatula.
Important! Before starting work, install the light source so that you can clearly see all the irregularities and chips on the surface. Without sufficient lighting, the quality of work will be far from even low standards.
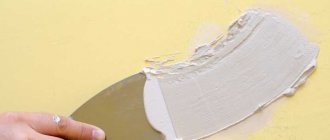
How to apply putty - expert advice
The putty material is applied to the wall using a wide spatula. Scoop the mixture from the container with a medium-width spatula and transfer it to a wide one.
What experts advise:
- start puttying from the corner;
- layer thickness from 1.5 to 3 millimeters;
- hold the spatula at an angle of 45° relative to the wall. This way there will be no traces left;
- apply layers of putty overlapping by 80 millimeters;
- use the rule to level the wall;
- Remove excess compound using a lathe. There will be noticeable places where more putty is required;
- use a corner spatula to work on the corners of the room;
- Apply a second layer after putty to level the surface. After the first layer, grout using circular movements.
The second layer is called the finishing layer. Thickness – up to 2 millimeters. Before applying, it is advisable to turn on the light to clearly see imperfections. Apply the finish with great pressure using the spatula.
The final coating is applied in two stages:
- Wait until the previous layer dries, then grout using sandpaper.
- Apply primer in two layers.
There are many ways to make your own putty. When choosing your option, you need to take into account the type of surface, operating conditions, availability of necessary components and the ability to purchase them. Everything will work out if you follow the above recommendations.
Post Views: View statistics 1,359
Starting, finishing and universal putty
Putties are divided into three groups:
- starting;
- finishing;
- universal.
Starting
This name of the material corresponds to its purpose. The starting viscous mixture has increased granularity. This property gives the product such a quality as increased filling of the volume of the putty layer. They are made on a gypsum, cement and polymer basis.
The surface of the walls is puttied with a starting mixture in those places where surface curvature, cracks and through holes predominate. The leveling mixture has increased adhesion.
Apply the starting mixture with large spatulas.
Before diluting the dry mixture with water, you should read the instructions on the package. The instructions indicate the time during which you need to use a certain amount of the prepared solution.
Timely production of the mixture will avoid losses in the form of frozen solution residue.
Apply the solution with spatulas of different sizes. For large areas, use wide spatulas. Small cracks and small surface defects are covered with putty using a narrow tool.
Finish
The finishing mixture is less durable than the starting mixture.
It is applied before the final coating of the walls and ceilings of the premises. It is the finishing putty that forms a perfectly flat and smooth surface of enclosing structures.
Typically the topcoat is applied with a thickness of 0.5 to 2 mm. Although there are exceptions, and the coating can be about 4 mm thick.
The finishing coat has much less strength than the starting putty. The finished processed surface can be easily sanded with abrasive materials.
Universal
This product, in accordance with its name, is used to level surfaces both as a starting and as a finishing coating.
The universal putty is applied in one layer, forming the final leveling layer.
Let's present the qualities of these three types of putty in the table:
| № | Name of putty type | Application | Flaws |
| 1 | Starting | Deep unevenness | Forms a porous surface |
| 2 | Finish | Final smooth surface | Gives more shrinkage |
| 3 | Universal | Used as a starting and finishing coating | High price |