In the construction market, lime paint takes its place of honor. Walls painted with this dye “breathe.” A loose coating is formed on the surface that can withstand temperature changes, high humidity, and exposure to sunlight. It is often used for painting facades. Lime paint is an inexpensive painting material and therefore has a wide range of applications.
Paint Specifications
The paint composition is based on limestone. In terms of composition, it belongs to mineral dyes. Minerals in crushed form act as pigments. And slaked lime (the name makes it clear) is a binder. Lime can be added in liquid form: limestone milk. To increase the water-holding properties, the following are added to the composition: setting accelerator - calcium chloride, minerals of natural origin - aluminum alum and table salt. Limestone pigment is light.
Although lime paint is not durable as a coating, it improves the performance of the building through its lime carbonization process. Cement plaster cannot be used as a basis for applying CM. It is applied to a brick base, stone, plaster, or concrete base. Limestone dye is used for both exterior and interior work.
They cannot be used to paint metal surfaces. The material can be purchased ready-made: Tikkurila Finngard dye for painting indoors and outdoors. Apply to limestone or cement-limestone plaster. The paint is tinted. Water is used as a diluent, which makes CM harmless to health. The material dries quickly and can withstand temperature changes from -60 o C to +60 o C.
But there are many recipes for making it yourself.
What to add to lime for strength. Whitewashing walls with lime at home
Whitewashing walls: how and how to whitewash correctly
Whitewashing the walls is an important stage in any cosmetic renovation. Since the quality of the material used affects the appearance of the surface and resistance to external influences.
Advantages of whitewashing
To apply whitewash to walls, it is not necessary to undergo special training. You can understand the intricacies of the work, the undeniable advantages and disadvantages in the process of work.
Along with the accessibility of the technology for a beginner, there are a number of advantages of whitewashing over other surface treatment methods:
- Whitewashing becomes indispensable when budget funds are limited. Since the price on the market for the material is the lowest;
- ease of use. Even a schoolboy can handle whitewashing the walls and ceiling. However, it is important to adhere to technology and maintain the required proportions;
- beautiful smooth surface of a monochromatic fresh shade;
- environmental safety, absence of harmful substances that plague modern finishing materials;
- Whitewash has bactericidal properties, which allows it to be used when budgets are limited, for example, in various educational institutions, hospitals, and on private plots.
Preparation for work
Before removing old whitewash from the walls and ceiling, you need to know what was previously used - chalk or lime. The check will not take much time. It is enough to moisten the surface with water. If lime was used, the wet area will darken. Or just run your finger along the wall. If the surface was whitened with chalk, the finger will turn white. After lime it will not color.
The success of whitewashing is primarily influenced by careful surface preparation. To do this, just follow simple rules:
- empty the room of household appliances and furniture. If it is impossible to do this, you need to cover them with polyethylene film and secure it with tape to prevent it from slipping;
- if you wet a section of the wall in advance, it will be easier to remove the old layer of whitewash;
- to wash off the old layer, it is recommended to use a soap solution, plain clean water with the addition of citric or acetic acid;
- The old whitewash is removed with a spatula and collected in a special container. If this is not done, the cleanliness of the room will be at risk;
- When the old whitewash is removed, the wall is washed with a sponge to remove any residue.
- to remove stains from rust, grease, and soot, copper sulfate, soda ash, and hydrochloric acid are used;
- cracks and dents (depending on the size of the defect) are puttied or plastered;
- After removing the old whitewash and leveling the surface, an antiseptic composition is applied - a primer. You can either make it yourself or purchase it ready-made;
- After the surface has completely dried, we begin whitewashing.
DIY technology
The most common recipe for making 10 kg of limestone:
- dry lime pigment – 1500 g;
- combined drying oil – 100 g;
- kitchen salt – 100 g;
- liquid – 8.5 l;
- bucket or basin made of plastic.
Dry lime is poured into a container, liquid is added, and mixed thoroughly so that no lumps remain. Drying oil is added to the mixture. The addition of table salt is done in the form of a saline solution. It pours in last. Everything is stirred until smooth. The mixture will turn white if blue is added to it. Before use, the resulting mixture is filtered.
Interesting video on the topic:
The second recipe for preparing 10 liters of coloring material:
- quicklime – 1500 g;
- liquid – 5 l+4 l;
- natural drying oil – 0.5-1.0 kg;
- dye.
The lime is diluted with 5 liters of water, drying oil is poured in, and everything is stirred. The mixture is filtered and 4 liters of water are added. As a result, 10 liters of lime CM are ready and dye is added.
Third recipe for 10 liters of KM:
- limestone dough – 3000 g;
- liquid – 5 l+5 l;
- salt – 100 g;
- pigment – 400 g.
The first 5 liters of water with added salt are poured into the dough. Everything is thoroughly mixed and filtered. A fine-grained sieve is used. Liquid is added until 10 liters of paint are formed. A pigment substance is added to it.
A lime dye with an adhesive base is produced. Dilute chalk with water to a paste consistency. In this state, it is left to settle for a day. After time, the composition is thoroughly mixed and checked for density in a simple way. A stick is lowered into the container with the solution. The composition is used if it flows down the stick like honey without interruption. Another option for determining the consistency of a solution suitable for use: a piece of glass is installed vertically. A drop of the mixture is applied to it. There should be a trace of the movement of the drop no more than 3 cm on the glass.
The resulting paint colors the surface gray. Adding dye is done as desired. It should be taken into account that the dried dye becomes lighter.
To paint the ceiling with lime paint, it is recommended to add 10% bone glue to its composition. Then the dye will not crumble after drying. Before starting work, the fixation of the resulting adhesive composition is checked. To test, a layer of dye is applied to the glass and allowed to dry.
Preparation of lime-based paint
To prepare 10 kg of lime paint with your own hands, you need:
- 0.1 kg of combined drying oil;
- 0.1 kg table salt;
- 1.5 kg lime
Pour 8.5 liters of water into a bucket with a measured amount of lime, stir thoroughly, then add drying oil or salt.
Salt is introduced into the mixture separately, in the form of a pre-prepared saline solution. When it is necessary to add whiteness to this mixture, you need to add a small amount of blue to it and stir. After mixing, the lime composition is filtered.
We must not forget that the shade of the composition made and the tone of the painted walls will vary significantly.
After pouring in the blue, you need to stir the mixture again and strain through a fine-mesh sieve.
One of the varieties of lime paint for exterior use is adhesive-based compositions. To prepare any of them, you need to dilute the chalk in water to the consistency of a paste and leave the solution to settle for a day.
Then stir and check the density of the composition using one of the following methods.
Method one. Dip the stick into a bucket of solution. In a situation where the solution flows from it in a continuous and viscous stream, the composition can be used.
Method two. Apply a drop of the prepared solution to glass installed vertically. If it has the required consistency, then the length of the trace of the drop that flows down the glass will be no more than 3 cm.
In order to accurately determine viscosity, a simple device called a viscometer is used. This is a vessel with a capacity of 100 ml, with a narrow and long spout, the diameter of which is 0.4 cm, through which the solution flows, which is tested for viscosity. But do not try to make a viscometer at home: in order to get the correct results, you must maintain the precision of the surface of the device and the mathematical accuracy of the dimensions.
If desired, it is possible to obtain lime colored façade paints. To do this, prepared dyes are added to the whitewash in advance.
The pigments that are added to the mixture must be filtered, first diluted to a milky consistency.
Please also note that pigmented whitewash becomes lighter as it dries, so when choosing a color you need to do a test color.
For this purpose, the dissolved paint is applied to the glass in a thin layer and allowed to dry.
Important! It is not recommended to mix the entire solution at once.
If you want the ceiling not to chalk or crumble over time, you need to add ten percent bone glue to the lime mortar. When pouring glue, carefully check the level of whitewash fixation. This is done in the same proven old way - by applying smears of solution to the glass.
The ceiling industry produces semi-finished adhesive-based paints and whitewash. Instructions for using each are on the packaging.
Lime-based paint is especially popular primarily due to its low cost. In addition, coatings made from this material have a number of other undoubted advantages:
- Temperature resistance.
- Resistance to increased humidity.
- Excellent air permeability.
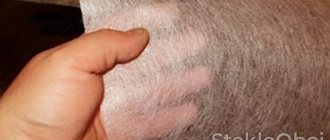
Most likely, everyone has come across walls painted with lime paints for interior work. If you accidentally touch this wall with your sleeve, there will be marks on it. The whole point is that previously salt or drying oil was not added to paints for lime plaster, and precisely by using them, the painted surface does not stain clothes.
We have already mentioned adhesive paints, which are a type of lime-based paint. To prepare them, you need to dilute the chalk to such a thickness that a paste comes out, then leave the resulting solution for a day to settle. After this period, dip a stick into the solution container and watch the liquid drain: a continuous viscous stream indicates that the solution is ready.
Pros of using limestone
The material was used by our grandmothers to add freshness to the rooms in the house. Of course, compared to modern paints, limestone has significantly fewer advantages, but it still has:
- accessibility, low financial costs for component elements;
- there are no toxic components in the composition;
- strong disinfectant;
- a feeling of freshness is brought into the room;
- can be applied to most surfaces;
- vapor permeability of the material;
- withstands climatic influences;
- moisture tolerance;
- The material is easy to work with.
The disadvantages include the material peeling off over time. To prevent the dye from smudging, salt and drying oil are added to its composition. Lime paint for exterior use is an economical option.
How to prepare lime paint
In ancient times, the main method of finishing rooms was whitewashing; it was widely used for interior and exterior work. Later it was replaced by more modern materials, and whitewashing faded into the background. But you should know that whitewashing was used not only for a beautiful appearance. A type of whitewash – lime paint – has unique abilities to protect premises from harmful biological influences. The surface painted with this paint will be reliably protected from the effects of fungus, mold, and parasitic insects. In the modern paint market, stucco paint is very popular, which, in fact, is a lime-based material. In its modern version, such paint includes slightly different substances, but, nevertheless, it can be easily prepared with your own hands, having previously purchased the necessary substances. The recipe for making lime paint is as follows:
☑ Dilute the lime with water, while varying the proportions, to obtain the substance of the required thickness.
Typically the percentage of lime and water is in the range from 1:2 to 1:5. In this case, water with a small amount of soap performed especially well. ☑ Add chalk, marble dust and glue to the resulting substance. The proportions of chalk are 0.5 kg per 10 liters of water, marble – 0.3 kg per the same amount. ☑ No dye is added to the solution for applying the first layer. This solution is dark in color due to the components it contains, and this should not scare you. ☑ For the second layer, you need to add dye to the solution. But its specific content should not be higher than 20% of the total mass, otherwise the solution will take a long time to dry. Sometimes paint fixatives are added to speed up drying. ☑ For complete readiness, the resulting composition must be infused for at least 12 hours. Therefore, it is better to prepare “stucco” the day before the scheduled start of painting. The technology for working with lime paint is very simple. Before painting, the surface is sprayed with water, and the first layer is applied using a roller, brush or spray gun. When the first layer has dried well, you can apply the second one, with the color pigment already added to the paint. When carrying out work with lime mortar, it is necessary to observe safety measures, because lime has a “corrosive” effect. Therefore, it is highly advisable to use safety glasses and closed clothing.
Conditions for work
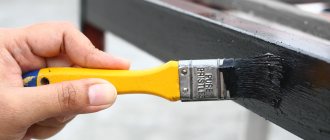
Working with limestone is not difficult. The material is applied with a roller, brush, or spray gun. Preparatory work is carried out on the surface before applying paint. Uneven surfaces are removed, dirt and dust are removed. Unevenness cannot be leveled with cement compounds. The surface is not primed. Be sure to remove moss, mold, and grease stains. Organic paint is removed before painting with lime material. The old lime coating is removed with a copper brush in places where it does not adhere well. After this, the surface can be sprayed with a stream of water.
Dyeing technology
You can paint the walls from the outside inside with Tikkurila Finngard dye.
- A 25 kg can of paint is diluted with 16 liters of clean liquid.
Important : undiluted composition cannot be used.
- While working with CM, you need to stir it so that the mixture is homogeneous in consistency.
- The area to be painted is moistened before applying limestone. This procedure is repeated as many times as the paint is applied.
- The dye is applied to the surface in 3 layers. Use a brush or brush. Each subsequent layer is applied after the previous one has dried. On average, a time interval of 24 hours is maintained.
- The surface is moistened after each layer.
Important : it is recommended to paint the surface with one portion of the lime composition. If two portions are used, then a mixture consisting of one portion of one composition and one portion of a second composition is applied to the boundaries of the joining strips. It is important to place connecting boundaries in places that are not immediately noticeable.
- It is recommended to paint from corner to corner, continuously. To ensure that limestone paint looks even on the wall, small areas should not be repainted. The shade of the painted surface changes depending on the humidity and temperature in the room. Each subsequent layer of CM that is placed on the wall darkens if the previous already applied layer is moistened.
Interesting video on the topic:
conclusions
Lime paint has been used as a surface dye for a long time. Main components: lime, liquid, dye. It is produced as a ready-made version of the CM, so it is possible to make it yourself. To work with it, you don’t need to have any special painting skills. This is a very important plus of lime dye.
Among the large number of varieties of paints, lime paint takes its place of honor. The peculiarity of the paint is that after its application a loose layer is formed, which has a high air vapor permeability. The paint is used for facades, so it perfectly withstands temperature changes, humidity and other environmental conditions. The compositions gained their widespread use due to their low cost.
However, there are some nuances regarding working with it. If, when applying paint and varnish material, you do not add salt or drying oil in time, then the finished surface will constantly stain your hands and clothes. What is limestone paint made of? What is it and how to make it with your own hands? Let's look at the answers to these questions.
Quicklime
It is used as a binder for cement mortars and various types of plasters. It increases adhesion between coatings and the treated base, gives plasticity to the materials, but is absolutely not suitable for whitewashing wall surfaces. If for some reason there is no ready-made fluff in the form of dough or powder, the lime is slaked.
On an industrial scale, lime is slaked in large special pits, into which the mixture is poured and water is poured. You can carry out the extinguishing procedure at home. The amount of water is calculated depending on what consistency the material needs to be obtained - thick or milky. In both small and large quantities, the extinguishing process takes 36 hours. You can reduce it to a day, but this will affect the quality of the resulting whitewash.
During the slaking process, the lime boils and splashes in different directions, but requires constant stirring. The mixture exhibits activity from 5 to 30 minutes, during which it must be stirred. To prevent the caustic solution from getting on the skin and mucous membranes, it is necessary to use personal protective equipment and a long object for mixing.
What is limestone paint
The limestone-based composition is a type of mineral paint. This means that the pigment is well-ground minerals. As the name says, the binder is slaked lime. Sometimes it can be added in the form of limestone milk. To increase water-holding capacity, during manufacturing you need to add kitchen salt, calcium chloride and aluminum alum. Limestone paint can be produced using inorganic pigments. The color range of limestone compositions is light.
Note that in itself it is short-lived, however, due to the process of lime carbonization, the operational characteristics of the room will improve over time. Paint cannot be applied to cement plaster. This is an affordable and cheap mixture that is widely used for finishing facades and performing restoration work. Limestone painting can also be done inside. The surfaces processed are very different:
But metal cannot be painted with a limestone composition. It is noteworthy that lime-based paint can be purchased ready-made or prepared independently. It is clear that the first option is simpler, but it is cheaper to do it yourself. Moreover, the process is not that complicated.
There are many lime-based products on the market. A well-known example is Tikkurila Finngard paint. This is a lime paint for exterior and interior use. Used for coloring limestone and cement-limestone plaster. The shades are light, the paint can be tinted. Since the thinner is water, these paints can be called safe. It dries quickly and can withstand temperatures from -60 degrees to +50 degrees Celsius.
What can we say about homemade limestone paint? How to make it?
Briefly about paint
This composition, created on the basis of limestone, is classified as a type of mineral paint. From this it follows that the pigment in this composition is crushed minerals. From the name it is easy to understand that the binder is slaked lime.
Sometimes it is added to the solution in the form of limestone milk. To increase water-holding capacity, kitchen salt, aluminum alum and sodium chloride should be added during production. You can also get lime paint for interior work by adding inorganic pigments. Mostly the color scheme of such compositions is light.
I would like to note that it itself is short-lived, but due to the carbonization process of the main component, performance characteristics will improve over time. Painting on cement plaster is prohibited. The mixture is considered cheap, accessible and is often used for facade finishing and restoration work. Limestone staining can also be done inside.
Surfaces to be treated with this composition can be as follows:
Plaster.- Concrete.
- Brick.
- Stone.
The only thing that cannot be painted with lime paint is metal. It’s interesting that you can buy this paint ready-made, or you can make it yourself. Naturally, the first option is much simpler, but if you have a limited budget, you can work with your own hands, and the result will be no worse, especially since it is not difficult.
You can find many types of lime-based compositions on sale. A popular option is Tikkurila Finngard paint, which is considered a lime paint for exterior and interior use. It is used for coloring cement-limestone plaster. The paint shades are light, but you can add color if desired. Water is used as a diluent, and therefore the paint can be confidently called safe. It dries very quickly and can withstand temperatures from -60 degrees to +55 degrees.
What can you say about homemade paint? And how to make it?
DIY limestone paint
The cooking process is not as complicated as it might seem. The main thing is to prepare everything you need and follow the instructions. To prepare 10 kg of limestone mixture, you will need:
- 1.5 kg of lime;
- 100 g combined drying oil;
- 100 g of boiled salt;
- water;
- plastic container for mixing (bucket, basin).
Instructions for preparing limestone whitewash:
- Pour the measured amount of lime into a plastic bucket.
- Pour 8.5 liters of water inside.
- Stir the contents thoroughly.
- Add salt and drying oil.
- Stir.
As for salt, it should be introduced separately. Don’t just fall asleep, but prepare a saline solution. If the mixture requires whiteness, then a small amount of blue is added to the composition. After which the contents are thoroughly mixed. All that remains is to strain the resulting mixture.
Advantages and disadvantages of limestone paint
It’s not for nothing that our grandparents used such limestone solutions. We can say that this was a primitive way to add freshness to the room. That is why among the lists of advantages we will not see many positions, like other, newest compositions. Although limestone compositions have few advantages, they do exist:
- Low cost. This is almost one of the cheapest paints.
- Since there are no toxic substances in the composition, it is environmentally friendly and safe for health.
- Can be used for different types of surfaces.
- Limestone paint is vapor permeable.
- Resistant to low and high temperatures.
- Resistant to moisture.
This is where the advantages end. If we note the disadvantages, then this is the peeling of lime particles after drying and fragility. And the treated surface can hardly be called beautiful. Many have encountered walls decorated with similar paint. After it, one could observe a smeared sleeve or side of clothing. True, this phenomenon can be avoided if you add drying oil and salt to the composition. This is a good option for utility and storage rooms. Still, if you are doing renovations in a residential building, then it is better to spend a little more money and buy high-quality paint and varnish material.
Applying limestone paint
The dyeing process itself is very simple. You can work with the composition either using a roller or paint brushes, or using a spray gun. Before painting, the wall needs to be prepared. Preparation is the same as when painting with other paints: the surface is cleaned of dust and dirt, all irregularities and protruding parts are removed. A similar solution is used for repair seals. Compositions with cement are not allowed. There is no need to prime the base. If moss, mold and mildew are found on the surface, work is carried out to remove them. The same goes for greasy stains.
If limestone paint was previously applied to the surface, then only the layers of paint that adhere weakly and have peeled off need to be removed. A steel brush made of copper or stainless steel is suitable for the job. Alternatively, rinse the surface with a powerful stream of water.
Working conditions are taken into account. For example, when painting, the room temperature should be more than +5 degrees Celsius. If the weather is warm and windy, then the surface needs to be moistened before and after painting. It is prohibited to carry out work in rainy weather. It is recommended to work in cloudy weather, when the surface is not exposed to direct sunlight. When painting walls indoors, the optimal temperature is no more than +20 ºС.
Enamel paints
Let's consider whether it is possible to mix water-based paint with lime mortar. Enamel paints are colorful compositions prepared from a mixture of pigments and varnishes by grinding in paint grinders. For enamel paints, the pigment is diluted in oil varnishes.
The shelf life of enamel paints is from six months to a year. Their compositions may thicken over time, so before starting work it is recommended to dilute the paints with some kind of solvent. Different solvents are suitable for different enamel paints, and only white spirit (universal solvent) is suitable for all types of enamel.
White spirit is a purified solvent for thinning oil and alkyd paints.
Dyeing process
Let's look at it using the Finngard limestone paint from Tikkuril as an example. It must be diluted with clean water before application. The proportions are as follows: a 25 kg can of paint will require 16 liters of water. Do not use it undiluted. During the coloring process, the mixture should be stirred frequently, as heavy rocky particles constantly sink to the bottom.
Painting with limestone paint is carried out in at least 3 layers using a brush or brush. In this case, the interval between applying the next layer is equal to its drying and is a day. The wall is moistened with water before and after each layer is applied.
And the border between surfaces, covered with compositions from different batches of preparation, is treated with a solution of 1 part of the old batch and 1 part of the new one. At the same time, plan everything so that the junction is in the most inconspicuous place.
If the surface is solid and small, then the work is performed continuously. The end falls on the corners of the room, borders with windows, doors, balconies, etc. A uniform result can be obtained if you avoid repainting finished surfaces in small areas. The ideal way to process a work seam is to apply gentle pressure. It must be remembered that with fluctuations in humidity and temperature in the room, the color and shade may change in places. And subsequent moisturizing will make the color darker.
When the job is done, you need to thoroughly clean the tool. It is washed immediately after use with running water. You can use a weak aqueous solution of vinegar and then rinse with running water. This video contains detailed instructions on exactly how to paint a surface with limestone paint.