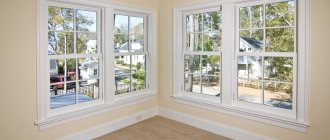
A frame for photo wallpaper is an original way of decorating surfaces, which has recently been gaining popularity. This solution allows you to create an interesting accent on the wall without spending a lot of effort. Moldings make it possible not only to decorate a room, but also to divide it into functional zones using various patterns and shades. Modern designers often use frames to give the space expressiveness and a certain structure. A new original decor option can be used in almost any room, both in an apartment and in a country house.
Framing materials
It is quite possible to make a small picture in a frame from photo wallpaper yourself, using available materials. Of course, an easier way would be to buy a finished product, into which the image is simply inserted and secured from the inside. A baguette frame is suitable for this; such options are available for free sale. If you need a more accurate match between the size of the frame and the wallpaper, you will have to think about a hand-made product. It can be made from the following materials:
Polyurethane plinth for ceilings; Wooden baguette; Wooden multi-colored slats; A strip of wallpaper that is already on the wall; Fake diamond; Parts of small twigs; Gypsum or decorative putty.
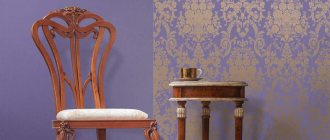
The selection of material is carried out depending on the overall style of the interior. Artificial stone is perfect for the country style, and the elegant wooden frame looks decent in the classic design of the room.
Natural materials require a corresponding picture plot. Products made from branches and wood will harmoniously combine with landscapes and rustic motifs.
If you plan to create a frame from plaster and putty, you should think in advance about the method of performing the work. Not everyone can make a neat outline and apply a drawing in the process, so you should calculate your capabilities and skills. If in doubt, it will be easier to take a plywood frame and distribute the material over it, and then fix the resulting picture on the surface.
What can the frame be made from?
There are a lot of materials suitable for solving this problem. You can take the simplest route by purchasing a ready-made framing frame and securing it in such a way that the photo panel is inside. However, such a solution would be too common and simple. For those who want the dimensions of the frame and the wallpaper to match as well as possible, another method is suitable - a self-made frame for photo wallpaper on the wall. It can be made from the following materials:
- Ceiling plinth made of polyurethane
- Wooden baguette
- Simple slats made of wood, painted in the desired color
- Decorative strip made of the same material as regular wallpaper pasted onto the wall
- Decorative artificial stone
- Sections of branches of the required thickness
- Gypsum or decorative putty
You have to choose the right material option based on the general idea of the room’s decor and in accordance with it. For example, a frame for photo wallpaper on the wall made from decorative stone will fit perfectly into a country-style interior, while a frame made from a beautiful wooden baguette is more suitable for a classic design.
Important: if you are going to assemble a frame from branches or other natural materials, you need to be very careful in choosing the theme of the wallpaper - it must coincide in meaning with the intended frame.
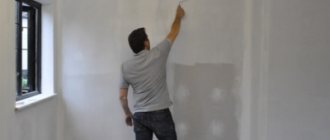
To work with plaster or putty, you will need some experience, since you will have to create the frame outline and decorative design directly in the process of working with the material. Perhaps, in this case, it is better to make a base of suitable size from plywood and apply plaster or putty on it, and only then fix your work on the wall.
Required Tools
Devices for work are selected based on the selected material. To make a neat cut on wood, a hacksaw for metal or wood is suitable. Such a tool must have small teeth for an ideal result. Polyurethane can be processed with a hacksaw or an ordinary construction knife. To accurately trim joints at corners, you will need to purchase a special tool called a miter box. It greatly simplifies the creative process and is sold in many construction stores.
Artificial stone does not require the use of special devices, but it is applied to an adhesive composition, which requires a mixture for dilution. Gypsum and other dissolving materials also require a container to hold the mixture.
At the final stage, you will need glue or other fasteners for the frame to fix it to the surface. You can use “liquid nails”, which reliably hold even relatively heavy elements. The ability to fix heavy objects is usually indicated in the instructions for the composition, so you must read it before starting work.
What tool will you need?
Everything here will depend on the selected source frame material. If it is wood, then you should definitely prepare a hacksaw for metal or wood with a fine tooth to get a neat cut. A hacksaw also cuts polyurethane perfectly, however, in this case you can even get by with an ordinary construction knife. In addition, to accurately trim corner joints, you will need a special device - a miter box. It is very easy to work with, and you can buy it at any hardware store.
For decorative stone you do not need a special tool, but it is glued to a special adhesive composition, which must be diluted in something. It is necessary to ensure that there is a special container for this. The situation is the same with gypsum or another similar solution - you will need a container for diluting the mixture.
In addition, you need to prepare glue or another type of fastener with which the photo wallpaper frame will be fixed to the plane. An excellent option would be the so-called “liquid nails”, which can hold even massive decorative elements. When choosing, you should pay attention to the fact that not all such compositions are capable of fastening heavy parts, as stated in the description.
How to make a frame
When making a blank, it is important to monitor the dimensions of the frame so that it exactly matches the wallpaper contained inside. To do this, it is important to measure the size of the picture and cut the material according to the data obtained. Do not forget that the painting will be placed inside the product, so all parts must be measured from the inside. It is also important to make the corners correctly so that they are absolutely the same. To do this, use a miter box and set the tilt to 45 degrees.
The parts are sawed off and then the corners are checked for exact fit. After this, the product can be fixed on the surface. Any method will do - first stick a frame and then add a canvas, or first place a picture and then decorate it with a frame. Focus on your own habits and convenience.
When you can and cannot use moldings
In most cases, molding is perfect for wall or ceiling decoration. Its main functions:
Hiding surface irregularities; Decoration of the junctions of walls and ceilings; Smoothing the surface; Room decoration; Identification of functional areas; Visual change in the size of the room.
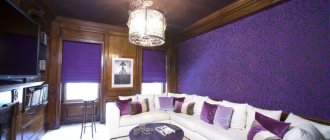
Vertical molding makes ceilings appear higher, while horizontal stripes effectively expand the space. If the room is large enough, then you can use wide stripes with bright images. Such an interior will look very elegant and even aristocratic; creativity and art will be felt in it. But still, this option is not suitable in all cases - in small rooms the space will be overloaded.
It is not advisable to glue molding over wallpaper. In such a situation, it is difficult to predict its durability, and the risk of ruining the design with glue also increases. In addition, subsequent painting of the product may be necessary. If there is still such a need, then it is better to choose lightweight materials - for example, polystyrene foam or polystyrene.
Decorating a room with molding
A frame for photo wallpaper on the wall is one of the most interesting design solutions for home decoration. A few years ago, only dull and inexpressive paintings could be found on sale, but nowadays the situation has changed dramatically. The construction market offers a large number of bright options for every taste, so each user can choose the most suitable product.
Photo wallpapers can become an expressive accent and add originality to your home. The modern manufacturing method assumes the wear resistance and durability of this material. For a painting to look beautiful on the wall and attract everyone’s attention, it is not enough just to stick it on. It is also necessary to take care of the appropriate decor for the image and frame it in a suitable frame.
Selection of performance technique
Most often, designers design a picture in two main ways:
The easiest way is to frame the entire image at once; A more interesting method involves creating a driptych or triptych - sticking several sections of a painting in a certain shape and sequence.
Each method has its own advantages and is suitable for decorating a specific type of interior.
Selection of technology
When choosing a frame for photo wallpaper, you need to decide on the further use of the picture. You can order printing of image details that fit a specific frame or cut out elements from a large canvas. Next you need to do the following:
The first stage of work consists of cutting and preparing the necessary parts from the whole canvas. Marking the location of the future placement of paintings and deciding on the method of their arrangement. Installation of frames on the prepared surface. This action depends on the purchased material - it can be gluing the frame, puttying and painting the stucco, or decorating any other suitable base. At the last stage, the details of the photo wallpaper are glued inside pre-fixed frames.
Color selection
Interesting solutions for color design of frames:
Contrasting combination of white planks and dark wall. For better effect, transitions to the ceiling, window and door openings, furniture contours and other noticeable interior details are finished in the same way. In this way you can visually expand the space and add light to it. White or light planks on pastel walls. This solution looks good in large rooms, such as a living room. The shade is suitable for decorating walls, paintings and mirrors, as a result the room looks more sophisticated and sophisticated. Multi-colored planks are often used for children's rooms and hallways; they can also be used to create a bright accent or highlight certain items. For the same purpose, choose contrasting strips or several shades darker than the main shade.
A specific color scheme is chosen based on the overall tone of the interior and the tasks facing the designer.
Wallpaper framed on the wall - photos of interesting solutions
When finishing walls, special attention is usually paid to baseboards. Floor skirting boards play an important role - they close the unaesthetic gap between the wall and the floor or ceiling. You should consider other decorations that help create a non-trivial, elegant decor. Wall moldings will completely help satisfy this task.
In classic interiors
Moldings are associated primarily with the traditional design of palaces and residences of wealthy nobles. Today we can buy almost any decor with imitation stucco, adapting them to classic and modern interior design. They act as a magnificent baroque or discreet accent in a vintage style, and will be a great way to emphasize the elegant, classic character of the interior. You can install them on:
- walls of the same color,
- the junction of different wallpapers of contrasting shades.
Decorating walls with moldings - photos of classic interiors
A beautiful and bright interior in a classic style with a fireplace in the foreground and an additional stripe on the wall provides the basis for wallpaper with a classic, rich pattern. Moldings and classic stucco on the fireplace thrive here.
Wall elements can also span the ceiling, forming a thin base. Light decor will lighten dark, patterned wallpaper in a classic style.
The decor will make the room cozy and elegant. In a classic interior, decorative shelves, pillars and portals are used, and window and door openings above the passage to another room are decorated with flexible moldings.
Wall elements will decorate the staircase in a classic style, providing protection to the walls, combining the space of the staircase into one whole with the hall.
In modern interiors
Moldings look great in an eclectic, hipster room that combines different styles.
Is there something missing in a minimalist interior? Delicate wall decor can warm up a plain wall surface and enliven the interior with a small amount of detail.
Decors are especially relevant in Scandinavian-style interiors, on white walls, which look too boring without spectacular 3D Decor.
Main types of frame materials
There is a huge variety of solutions, each of which has advantages and disadvantages. Let's look at the main varieties.
Wood
This is one of the oldest decorative options; it has been used to decorate the interior for many centuries. Traditional material is perfect for classic design trends; it can be decorated in various ways and painted. Before painting, the wood is treated with an antiseptic and varnished. The strips are fixed with self-tapping screws or an adhesive base.
Advantages of the material:
Easy processing; Durability and reliability; Possibility of painting and fixing with glue; Long service life if treated correctly; You can create openings for cables and other purposes.
Disadvantages of the product:
Poor resistance to moisture; Expensive; Heavy weight of planks.
Gypsum
Gypsum stucco molding is also a popular solution for room decor. You can install it yourself using gypsum or alabaster mixture.
Pros of gypsum:
Large selection of shades, shapes and patterns; Durability.
Among the disadvantages:
High price; Heavy weight; Fragility; Complexity and high cost of installation.
Polyurethane
The main advantage of polyurethane is its flexibility. For this reason, the material can be used to decorate surfaces of various shapes. Other advantages of this option include:
Smoothness and lightness; Possibility of painting and varnishing; Easy to use, can be glued to wallpaper and various other materials; Durability, which allows the use of polyurethane frames for about 30 years; Affordable price; Similarity to plaster products; Easy to care for.
Polystyrene
Frames for photo wallpapers can also be made from another plastic material - polystyrene. It is generally similar to the previous one and has the following advantages:
Easy to make cuts due to the smoothness and evenness of the material. This characteristic allows the product to be used for decorating complex shapes of surfaces and objects. Polystyrene is easy to paint in the desired shade. Simplicity and ease of care, moisture resistance and the ability to easily wash the material. Light weight and affordable price.
Despite all the described advantages, polystyrene also has a disadvantage - a grainy surface.
Styrofoam
Foam plastic decor attracts users with its cheapness and availability, but at the same time it cannot be called a quality product. Buyers choose it because of the following properties:
A light weight; Easy installation; Flexibility; Affordable price.
Among the disadvantages are:
Fragility and lack of strength; Insufficient clarity of the pattern and unexpressed surface relief; Unresistant to many paints and varnishes; Does not tolerate exposure to solvents and some types of cleaning products.
Metal
This material is not very often used for wall decoration; it is usually used for places where one finish transitions into another - on thresholds, steps, in corners and areas where elements join. At the same time, the metal performs not only a decorative function, but also protects surface joints from mechanical loads. You can fix the metal frames with glue or self-tapping screws. The trim should be placed over the outer edge of the material.
Other materials
The traditional choice for many homes is still plaster, which is fixed with alabaster mortar. This technology came to us from the last century and is still successfully used by craftsmen in construction. It is quite difficult to fix stucco molding yourself, since it is very fragile and requires careful handling. Most often, such work is performed by trained professionals. Also, gypsum decor is difficult to repair - falling off material threatens rapid destruction of the created frame and requires the purchase of a new product.
Wooden moldings are very rigid and also require a professional approach during installation work. But they are quite versatile and can be used in almost any room. For fixation, thin nails and special wood glue are used to strengthen the fastening.
Polyurethane frames have become increasingly popular recently due to their light weight, easy mounting, environmental friendliness and safety in use. The products are fixed to the surface with acrylic glue. Using polyurethane is simple and convenient, since the material easily transfers coloring to any desired shade.
How to install molding
There are special construction rules for fixing baguettes and other home decoration elements. They should be followed so that the final result is a correct and beautiful decoration using a frame or molding. To glue structures, you need to use special compounds; you can also use liquid nails. Before installation, it is recommended to keep the planks for a day inside the room in which they will be installed. This is necessary to adapt the material to the existing microclimate of the room.
Installation must be carried out in the following sequence of work:
Thorough plastering and priming of the wall panel; Applying markings in areas of subsequent fixation of elements; Treatment of parts with mounting adhesive solution; The elements are secured starting from the corners; Checking the symmetry of the frames and the strength of fixation of the parts; You can then leave the surface for the glue to dry. This will take about 6 hours. Puttying cracks and cracks between the plank and the wall or ceiling; Clean off excess putty using sandpaper.
Frames for creating style
Molding in the interior is used for various tasks - creating a decorative surface, framing pictures, complementing an existing composition, dividing a room into functional zones or, on the contrary, combining the space into a single whole. Frames also effectively change the height of the ceiling, visually expanding or narrowing the room. It all depends on the purpose of their use and the choice of the appropriate type. Among the most important tasks of molding is the creation and addition of a certain style in the interior:
Baroque. It is difficult to imagine this style of style without numerous skirting boards and baguettes, frames with rich stucco molding and gilded corners. Floral ornaments and relief carvings are harmoniously combined with panels of wallpaper and decorative plaster. All these elements are framed with light light strips.
Provence. This style is characterized by simple, straight lines, there are no elaborate shapes, you can see a relief molding at the junction with the ceiling and floor. There are no unnecessary elements here, the walls are free of stucco and other details. Light shades predominate as the general background; white, as well as pastel gray and cream tones are most suitable.
Scandinavian style. In this direction, the walls are not decorated with moldings, only occasionally they use frames near window and door openings, and also mark the transition zone to the floor and ceiling. The shades are light, white and beige tones predominate, which do not stand out against the background of the general colors of the room.
Mediterranean. In such interiors, you can use various design options using moldings - decorations for cornices, ceiling moldings, highlighting windows, doors and arches with decorative details with stucco. Curved shapes and lines predominate, and there are often many small carved elements. The brightest accent of the interior is usually a large painting depicting the seashore, a garden, or an exit to a balcony or porch. For such an element, photo wallpaper in a beautiful carved frame is used. Columns in antique style will complement the design of the room.
English. The most important thing here is to decorate the fireplace correctly; this can be done with the help of decorative decorations. Planks separate the joints of the wallpaper, and also place a cornice along the entire perimeter of the ceiling. The fireplace is decorated with the same elements. At the same time, the details should have a simple geometric relief and calm pastel shades. Classical. Some apartments in old buildings are designed in this style. They are distinguished by high semicircular window openings, arches, columns and various options for moldings. All interior elements are decorated, and the ceiling is also separated using baguettes. The classic allows for the decoration of walls with wooden panels, so here you can use various carved decorations in all sorts of variations.
Framing photographs in baguettes and mats: create the world of your photographs
Start printing photos by choosing a suitable frame, because the place of each frame in your life depends on this!
Photos with a frame will immediately match the atmosphere of the house, which will be filled with emotional memories, and a spectacular photo masterpiece, intended for admiring glances at the living room interior, is worthy of being framed in a luxurious baguette. The style of the image, its character and depth depend so much on the design that the true value of the photo sometimes remains hidden until the right photo frame is found. Want to see her right now? Upload one of the special frames to the online editor to admire your photo in a simple baguette or with a mat.
Very soon, a unique interior detail and an original gift will be in your hands. And the time that would previously have been spent walking along store shelves or hassling with an order at a framing shop can be devoted to many new bright moments, the beautiful design of which we are already ready for!
Give cards as souvenirs
Printing a photo in a frame turns a professional photo into a complete artistic object, and a small amateur photo in a perfectly selected frame can become a treasure. Framing photos in a baguette is a new option every time and a fresh idea for an amazing gift. A respectable hero of the day will appreciate a breathtaking landscape in a luxurious frame, a reliable friend will be happy to put the most accurate shot from the best party on the desktop, a reliable friend will be happy to put it on the desktop, a grandmother will not let go of the portrait of her beloved grandson in a reliable mat until she shows it to all her friends.
Give worthy awards
Ceremonial events associated with major personal victories in career, study or sports are almost always captured by cameras. Such photographs deserve special treatment, especially if they become part of the wall of fame or the award ceremony itself, where they are presented to the participants. Selecting and ordering frames and mats that suit the format of the celebration and the significance of the event, taking into account the proportions of the frames and the quality of the shooting, and carefully storing the photographs under glass is not the easiest task, especially if we are talking about a whole team of champions. We will help! All you need to do is decide on the number of copies and order photo printing in a baguette, right away - without leaving your computer.
How to make a frame from wallpaper with your own hands
If there is any unused wallpaper left after the renovation, do not rush to throw it away. This detail can also be used if you include imagination and a little creativity.
Wallpaper history
In the first millennium BC, the first analogues of modern wallpaper appeared in the territory inhabited by the ancient Assyrians. For a long time, such products were black and white, and only in the 11th century AD technologies appeared that made it possible to make them color.
Paper wallpaper was first made by the ancient Chinese, who kept the method of its production a secret. It is only known that the material for them was rice paper. In the 6th century AD, Japan came up with its own technology for making wallpaper. It reached European states only in the 8th century.
Despite the novelty of the invention, the quality and durability of woven wallpaper was far superior to its paper counterpart. In addition, they had a high cost, as they were decorated manually. After some time, the Englishman Tsaner invented a method of making wallpaper using silk threads. Already in the 14th century, a wooden stamp appeared, which began to apply patterns to the surface of the product.
Additional options for using leftover wallpaper
Before considering the actual creation of frames, it is worth dwelling a little on alternatives to this use of material. For example, you can come up with various interior details or transform pieces of furniture. Some ideas for application:
Pasting the back surfaces of shelving, hanging shelves or open cabinets. A solution with a pattern in the form of a decorative lattice looks great. This way it is easy to change the appearance of furniture with minimal effort, in addition, it is a very cheap and easy to implement option. If you want to add bright accents, you can use several different colors or types of paper, this design will be much more expressive. If desired, you can decorate the outer surfaces of furniture and interior items. In this case, all that remains is to ensure that the design is combined with the overall style of the room. To give an original look to a dressing table or coffee table, wallpaper is laid on the surface and covered with glass. This makes it easy to change the design of the furniture. Create interesting accents on your walls with framed wallpaper. Here there is room for imagination - to decorate the surface with frames of different sizes, but of the same tone, or to use different color compositions for maximum expressiveness of the decor. For those who love creativity, you can try to design the frame yourself. To do this, use a baguette, which can be purchased at any hardware store. If you cover cardboard or plywood with paper wallpaper, you will get an original handmade panel. There may be several of them from different types of paper, or products of the same color can be made. If one of the walls in the room is covered with wallpaper, an unusual accent made of the same coating will look beautiful on the opposite surface.
Making Photo Frames
There are a huge number of options for making frames, and you can even come up with your own, guided by your imagination. Let's look at a few original ideas for example.
Frame made of tubes
This is a very simple method, but the result is always stylish and interesting. Technique:
Paper strips with a width of 2 cm are cut out, their size depends on the desired size of the future frame. Then tubes of equal thickness are made from the strips and glued together with office glue. After the glue has dried, the next stage of manufacturing begins. The tubes are placed side by side and cut on each side at an angle of 45 degrees. The edges must be made very carefully so as not to spoil the appearance of the workpiece. Then the entire structure is glued and reinforced with a piece of cardboard. The final stage may be decoration with sparkles and other decorative details.
To keep products in their original shape and prevent damage from moisture, cover them with paint and varnish. The paper must first be thoroughly primed with an acrylic-based solution.
Volumetric frame
Using this method, you can make an original frame using scissors and a small piece of paper. To do this, follow this procedure:
Take a piece of paper and draw four lines on each side, slightly indented from the edge. Then the lines need to be pressed a little, but this must be done carefully so as not to accidentally damage the material. Keep in mind that the size of the future frame depends on the size of the sheet. Then, where the lines intersect, the sheet needs to be cut. After trimming, notches are marked on the outer parts, which are also cut out. The last step is to fold the frame and enjoy the worthy result of the work done. This product will look great in any interior.
Classic frame
A fairly simple manufacturing method consists of making a frame onto which wallpaper is subsequently glued. The work is very simple and the process does not present any difficulties:
The frame is cut out of thick cardboard, then wallpaper is glued on top. A cardboard wall is installed at the back, then the product is glued and the work is completed. You can add decoration and coloring, for example, gilding will look great.
Among the advantages of such products is their low weight. This property allows you to attach frames without nails, using only double-sided tape.
How to make a frame for photos or other works
In fact, there are a huge number of manufacturing options, and we will consider only a few of them; you can use the methods discussed above or, after familiarizing yourself with them, come up with your own. It all depends on your imagination and desire (find out here how to wallpaper an arch).
Frame made of tubes
A very simple option, but the resulting products look very, very attractive.
The technology for carrying out the work is quite simple:
- Strips are cut from 2 centimeters wide and wider, depending on the size of the frame that will be made.
- Next, all the strips are twisted into tubes of approximately the same thickness; it is best to glue them together using PVA glue.
- After the glue has dried, you can proceed to the next step, during which several tubes (depending on the width of the frame) are laid and cut on both sides at an angle of 45 degrees. End connections must be precise and even, as sloppy joints will ruin the entire appearance of the product.
- After this, the structure is glued together to ensure rigidity; you can use a little trick and strengthen the frame on a cardboard frame.
- The finished product can be decorated with sparkles and other decorative elements.
Advice! To preserve products and increase their resistance to moisture, the surface can be varnished. But to prevent it from corroding the paper, it must first be coated with an acrylic-based primer.
Volumetric frame
Using this method, you can make a beautiful frame with just a pair of scissors and a piece of wallpaper.
- Take a piece of paper of the required size and draw it as shown in the figure; you can follow the lines with the blunt side of a knife to press through the surface, but you should not be too zealous so as not to damage the material.
The sheet size depends on the desired frame size
- Next, the sheet is cut as shown in the photo.
After the first cut, notches are marked that also need to be cut.
- After that, all that remains is to fold the frame and admire the excellent result of your work.
The resulting frame will decorate any interior
Classic frame
Another simple way: you need to make a frame, stick wallpaper on it - and the frame is ready.
Let's take a closer look at the process:
- A frame is cut out of thick cardboard and covered with wallpaper.
- A cardboard wall is placed on the back side; after gluing, the product is ready.
- If desired, you can paint and decorate; gilding is very suitable.
Important! The advantage of such frames is that they are very light in weight; to hang a photo on the wall, you don’t need to nail any nails; the structure holds up well even with double-sided tape.
Features of interior design work with moldings
When planning to do interior decorating work with your own hands, take into account the important features and nuances of this process in order to ultimately obtain a completely satisfactory result. This will not only get rid of common mistakes, but also give the room originality, and also extend the life of the products.
Wallpaper sticker
The color of the molding must be chosen not only based on the shade of the wallpaper on the wall, but also depending on the overall design of the room. As a result, the entire interior should look like one whole, without unnecessary irritating elements.
In a spacious room, light shades of wallpaper will match the same light shades of planks. This combination will be very appropriate and harmonious.
If the interior contains dark shades of furniture or other objects, they can be emphasized by a contrasting combination of light wallpaper and dark planks.
Wallpapering
After all the finishing work is completed, it’s time to glue the wallpaper. 24 hours after the plank has been glued, it is painted in the required shade and left to dry. Then they grout and remove all excess. And only in the next step can you glue the wallpaper directly. The work is done very carefully to get into the joint with the frame. It is imperative to ensure that the edge of the canvas is smooth and does not go beyond the bar. Otherwise, the appearance of the product will be damaged.
Interior decoration with molding: features of the work
When decorating an interior, there are a number of features and nuances that you need to become familiar with. This will eliminate a number of mistakes, make the appearance of the room unique, and extend its service life.
How to paste under wallpaper
Basically, the color of the molding is chosen not only so that it matches the wallpaper, but also emphasizes the design of the room.
If the wallpaper is light in color, the room is large and spacious, then light-colored planks are used.
However, when introducing dark tones into the design, for example furniture, they create a contrast - highlighting the light wallpaper with a dark finish.
When and how to glue wallpaper
Wallpaper is glued when all finishing work is completed. That is, a day after gluing the plank, it is painted in the desired tone. After drying, grout is done, removing all excess. Only after this the wallpaper is glued. They must be glued carefully butt-to-metal with the molding. You need to make sure that the edge of the canvas is smooth and does not overlap the bar. Otherwise, the appearance will be spoiled.
How to properly glue frames made of different materials
Almost all planks are glued to the base, with the exception of wood. It is secured with self-tapping screws. After the markings are made and the planks are cut according to size, the corner parts are glued first. You need to make sure that the angle is even. Afterwards, horizontal and vertical strips are attached to the corner elements.
Frames made of various materials
Most types of planks are glued at the base; only wood is treated differently. This material is fixed using self-tapping screws. First, the surface is marked, and then the planks are cut. After this, their corner sections are glued. The angle must be even. Lastly, the vertical and horizontal strips are secured.
How to protect the base material on the wall
You can place a picture and save the basic wallpaper if you first frame it or make a stretcher out of foam plastic. After this, the product is hung on a nail or hook. On the back side of the frame, two loops are created through which a strong rope is threaded to hang the picture on the wall surface.
The option of fixing it to a wine cork will also help to preserve the wallpaper. It is cut into small circles, which are then attached to the wall, and self-tapping screws are installed in them. The latter will become a kind of hooks in the future.
Please note that this method can only be used for light, small-sized parts. It is not suitable for products with glass and powerful baguettes.
Light wallpaper paintings weighing up to 1 kg, which contain several small parts, can be attached to double-sided tape or special Velcro. The product will be held quite securely using such a system.
Tips for choosing material
For a harmonious and original interior, you need to pay great attention to the choice of wallpaper for a panel or painting. Simple recommendations will help facilitate the selection of materials:
Wallpaper should be combined with the overall design, but at the same time stand out clearly against the background of the surface in order to emphasize the designer’s idea; The type of detail should not be sharply opposed to the main style of the room; The size of the panel must correspond to the size of the pattern applied to it. Small designs look good on small canvases, while large patterns will suit large images in a spacious room.
When choosing a picture, do not forget about the general stylistic design of the room, its predominant shades and geometric shapes. A well-chosen frame of the canvas creates a unique style, originality and beautifully completes the main idea of the finishing element. The frame is made using different variations of moldings. The latter is a volumetric overlay for decorating walls, ceilings, window and door openings, arches and other interior elements.
Design secrets
Decorative frames help visually differentiate between different finishing materials. For example, you can successfully separate the painted area from the wallpapered area. Combining materials can become an additional element of interior design.
Wallpaper in a frame will fit perfectly into any room design and can easily replace ordinary paintings on the walls. At the same time, it is important to correctly combine the design of the frame and the internal content of the picture. For example, embossed silk wallpaper will look great in a wooden frame, which can be complemented with exquisite inlays. If the monochromatic color of the wallpaper in a minimalist interior seems too boring, try complementing it with neat floral canvases to match.
When implementing one of the fashionable design ideas in your home using photo wallpaper frames, use recommendations from designers for the perfect result:
To create an intricate pattern, you will need to first mark the surface using a construction pencil; Moldings are painted immediately before pasting; White panels will help visually expand the space; It is necessary to organize support for frames and skirting boards in several places in the room; In large rooms you can safely use wide and massive options, but for small spaces it is better to choose narrow and straight solutions.
Frame making
In order for the size of the future frame to exactly match the photo wallpaper to be pasted, it is necessary to determine in advance the dimensions of the picture and saw off all blanks in exact accordance with the measurements. At the same time, it is important to take into account that the canvas is glued inside the frame and it is necessary to measure the inside of the part. To ensure that the corners of the frame fit together exactly, they are sawed off using a miter box at an angle of 45 degrees. How to do this is shown in the illustration below.
After all the blanks have been sawed off, all that remains is to check the coincidence of the corners and you can proceed to gluing or attaching all the components directly to the wall. At the same time, you can first stick the decorative material itself tightly, and then attach the frame parts, or you can do it in the reverse order - attach the frame components first. The choice of the appropriate method is up to you - do whatever is more convenient for you. There is no fundamental difference here.
← Previous post
Next post →
How to make a frame from ceiling plinth
To complete this work you will need:
ceiling plinth made of polystyrene foam; universal adhesive base; acrylic wood putty; well sharpened knife; protractor; acrylic based paints; corrugated cardboard or packaging from household appliances.
The required picture is cut out of paper and glued to the ceiling slab. The latter should exceed the size of the picture by about 1 cm on each side.
Next, work is carried out on the production of frames from corrugated cardboard or ceiling plinth. First, a template for the future product is cut out. A rectangular shape is made from corrugated cardboard, and a hole is made in the center for a photograph or picture. The size of the frame depends on the size of the desired image that will subsequently be contained in it. Then an identical rectangle with a slightly larger window is cut out from the workpiece. Then the elements are glued to each other. The result is a ready-made place for inserting a picture. If you plan to use glass or a stretcher, you will need to make a couple more of the same rectangles with a wider window to glue them to the other side of the frame. The number of products depends on the thickness of the embedded image.
When the base is ready, they begin to decorate the frame with ceiling plinth. Each edge of the baguette is cut at an angle of 45 degrees. Mark the corners and cutting lines on the paper using a protractor, then lay down the strip and make marks on it. Then the 4 elements are cut off using a sharp knife. Next, the baguette is glued to the cardboard blank from the outside. The cracks in the corners are sealed with putty and paint. The work done must be left for some time until the glue completely dries.
Then you need to putty the areas where the baguette meets the cardboard, as well as the joints at the corners and the back side of the frame. This solution will help strengthen the product and hide all uneven finishes. The ends of the frame are puttied several times, dried, and then each layer is sanded one by one using sandpaper.
The dried putty begins to be painted. It is best to use acrylic compounds or water-based emulsion. To get a milky tone, you can add a small amount of ocher to white paint. For a dark shade, black paint is mixed with red and dark brown. Then the finished product should be treated with water-based varnish.
Lastly, fasten the product. For this purpose, you can use thick twine, from which you cut from 10 to 14 cm. Then take a dense but thin piece of cardboard and cut out a rectangle with sides 5 by 7 cm. The rope is applied to the back side of the frame. After this, glue is applied and the cardboard is glued, which is pressed with a weight until it dries completely. Now the frame for photo wallpaper on the wall is ready, all that remains is to fix it on the mount and enjoy the result of the work done.