Stretch ceilings » Ceiling painting
Painting the ceiling
Despite the abundance of options for finishing ceilings, good old painting is still in demand. Ease of application and cost-effectiveness of use play a paramount role for many compatriots. Moreover, nowadays ceiling paint has acquired new qualities and differs not only in shades. Many compositions include various decorative components that allow you to create a unique and unusually beautiful surface.
Colors and textures
Emulsion paints not only have undeniable advantages in use, but are also distinguished by bright, saturated colors and a large palette of colors. In addition, they all have different visual effects. There are matte, glossy, semi-gloss and textured mixtures. Let's look at their properties in more detail.
When painted with matte paints, a non-shiny, uniform coating is obtained that can hide any defects in the ceiling surface. This type of coloring has long become traditional due to its versatility and elegance. Matte paints have a porous structure that quickly becomes dirty and is difficult to clean. Any, even the smallest stains will be visible on it, so you should carefully choose the type of paint and its color.
When painted with glossy paints and varnishes, the ceiling turns out shiny, which looks especially impressive on large areas. This type of painting is only suitable for perfectly smooth ceilings, since all the imperfections and defects of the original ceiling covering will be clearly visible on the glossy surface. Thanks to the mirror effect of the paint, you can visually enlarge the room, so it is an excellent option for use in small apartments.
This ceiling is easy to clean - the glossy paint is resistant to moisture, and dirt and dust do not settle on it so much. Even if heavily soiled, the glossy coating can be easily cleaned; just wipe with a damp cloth and the ceiling will sparkle again.
Many consumers opt for semi-gloss compounds. This is a kind of compromise between matte and glossy painting - the coating will shine, but not as much as with the previous option. The advantage of using such paints is the ability to select the optimal composition based on the degree of gloss.
Textured mixtures have remained the most popular paints for many years. Their range is represented by many varieties of products, which include a special component that gives the surface a unique structure. The most commonly used are mineral fibers and polymer chips. By adding sawdust, sand or water, you can achieve a certain effect, for example, roughness or blurriness.
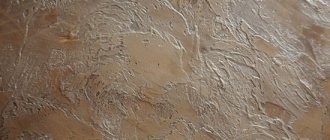
Using textured paint, you can get the effect of “velvet”, “flock”, “moire coating”. Skilled craftsmen use it to create a coating that imitates natural stone and various mineral materials.
It is worth noting that this paint is not so easy to use and additional equipment will be required to achieve a high-quality result.
The most common mistakes when finishing ceilings
There is hardly a person who does not want to decorate the ceilings in their apartment in an original way. But not everyone has the opportunity to resort to the services of a professional decorator, so they prefer to carry out the work themselves. Due to ignorance and lack of proper experience in this area, people can make mistakes. To ensure that your efforts are crowned with success and bring positive results, use the following recommendations:
- do not use massive cornices in the decorative decoration of rooms of standard height or small rooms;
- harmoniously combine different lighting sources on one ceiling surface;
- do not try to use the maximum number of decorative techniques on one ceiling. Otherwise, your interior will turn out tasteless;
- don't be afraid to experiment with colors. You can combine shades that match each other. However, do not forget about the main rule - the maximum number of tones is no more than three.
Modern materials provide ample opportunities for decorating the ceiling in a variety of ways. Choose the appropriate option and get down to business. Unusually designed ceilings will definitely decorate your room.
The best ceiling paint - a review of manufacturers
Let us repeat in the statement that choosing the best paint based on all indicators is difficult, almost impossible. Each of them has its own pros and cons; the best one can be determined only by one or two indicators. For example, a paint that is excellent in coverage and water resistance will turn out to be too “fragrant,” while an environmentally friendly and vapor-permeable paint will not be tinted well. Therefore, we will limit ourselves to only a brief overview of the best manufacturers, indicating the advantages of their paints.
Snowball
Polish paints are distinguished by their practicality, low price, and ease of use. They are available in a wide variety of types and you can find compositions for concrete, drywall, wood, and plaster. This allows you to cover a ceiling made of dissimilar adjacent materials with one paint.
“Snezhka” paint was appreciated by both professionals and people who use it in household repairs. For a family budget, there is practically no better choice than to paint the ceiling like Snezhka. The best paints for the ceiling are the “Disney”, “Ultra Belle”, “ECO” series.
Dulux
Professional paints with increased environmental safety. For ceilings, special compositions are very convenient, which have a pink color when applied, and after drying they become perfectly white. This allows you to avoid unpainted areas against the background of a white primer or the first, already dried layer of paint. Some compositions contain silver ions, which prevent the appearance of mold and mildew on the ceiling.
For paints, Dulux offers a wide selection of dyes collected in the Dulux Color Palette catalog. You can see how the ceiling will look under different lighting using special computer programs developed by the company.
Tikkurila
One of the most famous companies in the world of paints. The products of the Finnish concern belong to the elite of paint and varnish materials. You can choose paints for any materials that are tinted in Tikkurila Symphony colors (20,000 colors), OPUS 1 (2436), Monicolor (2024) and several dozen other options. All paints are of the highest quality and, naturally, quite high in price. As a rule, paints from the Finnish brand are used in designer renovations when decorating exclusive interiors.
Tex
Budget paint from the Finnish concern Tikkurila. It is produced both in Finland and in Russia for wide use, most often for household repairs. They do not require highly qualified builders, but the results from using TEX are not too impressive. But given the affordable price of paint, updating the ceiling every 2 to 4 years is quite acceptable for any budget. Good paints in white form and for tinting in rooms with a normal and dry microclimate. For kitchens, bathrooms, and offices, it is better to choose more expensive paint.
Caparol
Given the current market situation, the Caparol brand is holding very confidently, not inferior in popularity to Snezka and even surpassing it. But the price of this paint is significantly higher. The German brand Caparol produces environmentally friendly interior paints for various purposes. Latex and silicone compounds of the CAPASILAN, Indeko-Plus, Samtex and others series are intended for ceilings. They are perfectly tinted using the ColorExspress system and are distinguished by the durability of the coating and exceptional color fastness.
The advantages of this finish
The most important advantage of this design method is the ability to hide quite significant defects and flaws. This is true not only for ceiling planes, but also for walls. However, for ceilings this point is most important.
To perform such finishing, there is no need to carefully level the surface - the texture obtained after using such materials will reliably hide all imperfections. Of course, there are certain limits to their capabilities, but most minor defects can be hidden quite successfully.
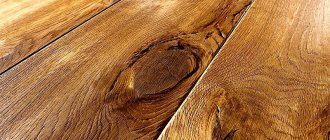
To work and finish with such materials, you do not need complex tools or any special skills - just basic knowledge and a minimum of skills and you can achieve excellent results. The textured paint chosen for finishing the ceiling will allow you to get the same texture as in the next photo.
Types of rollers for working with decorative plaster
Initially, all rollers were intended only for working with paint, so the main material for their manufacture was fur or foam rubber. With the development of technology, instruments made of foam, rubber and other artificial materials appeared. The basis of the first textured rollers was coarse foam rubber.
Today, foam, foam, leather or rubber rollers are used to treat surfaces covered with decorative plaster. If the instrument is made by hand, it can also be made of wood. Craftsmen are able to carve not only imitation mats or brickwork on wood, but also complex patterns.
In order to make a structural tool, you need to decide what pattern will decorate the walls of the house. To obtain the desired prints, the rollers must have indentations or projections that match the selected pattern. If you want to apply protruding patterns, there should be depressions in the roller, and if depressed, there should be protrusions.
What tools can you use to work?
What the finished surface will ultimately look like depends not only on the type of paint and varnish material, but also on how it is applied. Many formulations come with instructions for use. But for most textured paintwork materials, you can use a variety of tools. Thanks to this, you can obtain types of textures that differ from each other:
roller (standard). By evenly moving it over a fresh layer of paint, you can get an attractive-looking rough texture;
The type will depend on the material of the roller (foam rubber or fur).
- roller (curly). This is a special roller with a convex pattern. Often used for two-tone painting. The first layer of paint becomes the background, and the roller pattern is applied with paint of a different color. If treated from floor to ceiling, the result may be decorative painting of walls instead of wallpaper;
- crest. With its help, you can get a clear pattern if you simply move it over the newly applied paint. But this method is chosen quite rarely;
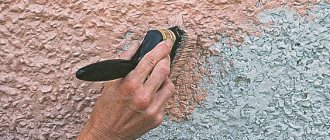
- brush/brush. After applying the composition to an area of one and a half to two “squares”, you need to take a brush or a wide brush with stiff bristles and move it over the paint, creating patterned lines. You can choose any direction;
- crumpled paper, crumpled fabric. With their help, you can apply a chaotic pattern with short, stamping movements;
- latex gloves. A non-standard tool, but also used quite often. Mainly by artists who prefer to paint with their fingers on walls;
- putty knife. The first step is to apply a thin layer of paint to the wall. Then, using a spatula, make sparse and rather rough strokes. The last application method is used quite rarely by beginners due to its complexity.
When working with textured compositions, you can not be afraid of experiments. For example, apply strokes of different colors or shades to the surface, and then shade them with a sponge. This way you can get a completely new pattern. However, it is worth considering that you should spend no more than a quarter of an hour on any decor. Then the paint and varnish material begins to dry out and it becomes more difficult to work with.
Therefore, professionals advise treating surfaces in parts or working in pairs - one applies the background, the other decorates.
Textured rollers - understanding the variety of species
How to use this tool, and where is it used? The surface of the structural (relief) rollers is made in the form of various patterns. Their very name suggests that they are intended for creating decorative coatings. To create the most uniform pattern on the surface, the structural roller must be rolled in different directions, while trying to maintain uniform pressure.
Working with a structural roller involves forming a three-dimensional pattern on decorative plaster. There are two types of tools: soft - made of foam rubber or fabric, and hard - made of rubber. A texture roller is used if it is necessary to level a surface covered with liquid wallpaper.
Most often, rollers with a textured surface are used to create a uniform relief pattern on wet plaster; its depth does not exceed 5 mm. They are made from wood, linoleum or rubber. To achieve a textured effect, use a figured roller. You can even do it yourself. To do this, the surface of the sleeve should be tied in several places with thread.
If you have a foam roller, use a knife to cut out the simplest pattern on its surface. A structural rubber roller is usually used indoors for applying dispersion paints. With their help, a coating with a pronounced relief structure is formed.
Preparing textured paint
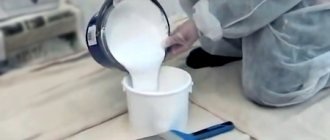
Before using textured paint, you should carefully study its instructions, which indicate the drying time, preparation procedure and application tips. Mostly such mixtures are sold in plastic buckets.
Its consistency is impressively dense, which is why a small amount of water is added to it before application, after which mixing is carried out using a drill with a mixing attachment installed. In this case, the main thing is not to pour more liquid than necessary, since as a result the product may no longer fully adhere to the base due to its excessive rarity, for example, on the ceiling. When diluting, experts do not recommend adding more than 1/10 of water relative to the total volume of the mixture. In practice, on average, 4% is enough for optimal stirring.
If, according to the plan, the surface should be painted in a color other than white, then a suitable pigment is added to the mixture.
After each portion, you need to pause, stirring and checking the resulting shade for consistency. If the color is still too light, you can continue adding pigment. To check the degree of color intensity, a stroke of paint is applied to an unnecessary piece of wallpaper or other material, which can be dried with a hairdryer to dry quickly. The best quality of pigmentation is achieved by adding a color from the same manufacturer that produces the paint used.
Decorative plasterboard ceilings design rules
Plaster cannot always be used to finish the ceiling space. For example, in relatively new buildings that have not yet acquired proper shrinkage. Cracks can quickly appear on the ceilings in such apartments or houses. Therefore, in this case, the most preferable option is to decorate the ceiling with plasterboard, which will hide all construction defects, allow you to disguise wiring and communications, and also install original spot lighting.
With the help of gypsum plasterboard you can not only decorate the ceiling, but also divide the room into zones by creating multi-level original structures.
Another advantage of plasterboard sheets is that they can be painted in any shade. If you want to visually expand the space, the paint on the ceiling should be light pastel colors. For larger rooms, you can choose darker shades. Bright colors will enliven the interior and lift your spirits.
Coloring
General remarks
It is recommended to apply the paint at a temperature not lower than +7 C. At lower temperatures it becomes too viscous and does not adhere well to the surface.
Before application, the ceiling paint is mixed. If you plan to apply it using a roller, it is diluted with water to the consistency of liquid sour cream.
Until complete drying (usually a period of approximately one day from the moment of application), textured paint should not be exposed to direct water. Simply put, if you want to clean up any splashes that accidentally hit the ceiling while cooking, wait until tomorrow.
The volume of paint is tinted with some reserve. Don’t forget: when tinting again, it is impossible to achieve exactly the same shade.
A surface with a knurled texture can be painted in any color with ordinary water-based emulsion. The most daring decisions are possible.
The paint is applied in one step to the entire ceiling. Key point: the area where you apply the paint coat should not border on dry areas.
Work order
- Clean the ceiling from dust and dirt.
- Prime its surface with primer. It should be slightly rough to the touch.
- The paint is applied with a wide soft brush, foam roller or spatula, depending on the desired layer thickness and consistency. IMMEDIATELY the surface of the paint that has just been applied will have a texture: it is rolled with a hard roller with a relief surface.
An alternative method is to texture the surface with a sponge, stiff brush or notched trowel.
Basic methods of adding texture to a painted surface.
What it is
The main recommendation when painting walls and ceilings with any paint is to apply it in as thin a layer as possible. Two or three thin layers provide more uniform coverage and much faster drying compared to one thick one, not to mention saving paint.
When you are dealing with textured paints, it is better to completely forget about this recommendation. It is applied in a thick, dense layer. Often - not with a roller or brush, but just like plaster - with a spatula.
Attention: this is not the only way to apply textured paint. We will return to this issue in the appropriate section of the article.
What is the difference between this paint and conventional paint coatings in terms of composition?
A large amount of filler is added to textured paint. Thanks to it, the composition turns out to be quite thick and can be applied in a thick layer without running down or collecting drops. Why is this necessary? To create a relief surface using a roller, brush or other tool.
The binder base is most often acrylic resin, the thinner is water. Most often, textured paint is produced white, but if necessary, it can be tinted to any desired color.
The walls and ceiling are decorated with a textured helmet, tinted in different colors.
Textured paint for walls and ceilings
We think we should figure out what it consists of.
In appearance, it is a thick, homogeneous mass with a thick structuring filler. If you put this name in a nutshell, it will sound like paint with sand.
Thanks to this filler, textured paint for walls and ceilings has the opportunity to create a relief pattern on the surface being treated.
Classification
The presence of a large amount of material on the country’s construction market and a large number of manufacturers imply classification of the material.
And it’s easy to divide or break it down into classes
It is important to consider the type of filler, the substance that performs the functions of the base and the area of application
The role of filler in textured paint is performed by natural or man-made minerals, calibrated to one size:
- marble chips;
- granite chips;
- quartz sand;
- crushed gas silicate;
- fibers of various polymers.
The binder of the building material can also be different. Film-forming substances can be used as a base:
- acrylic;
- silicone;
- silicate.
But the most important factor that determines the class is the grain size of the filler. It is divided into three categories:
- small – with a size of up to 0.5 mm;
- medium – from 0.5 to 1 mm;
- large – from 1 to 2 mm.
I think the area of application is also an important factor. There is paint for textured walls of the building's base and facade. Also in the arsenals of hardware stores you can find textured paints for interior work in your home.
Useful qualities
Textured wall paints are produced on the basis of aqueous acrylic, silicone and silicate dispersions, without the use of solvents. This circumstance minimizes the risk of harm to the human body.
The finishing material has many advantages inherent in decorative plaster:
- hides minor surface defects;
- does not require special preparation of the processed surface;
- has high atmospheric and water resistance;
- the completely dried layer has a high level of hardness and is used as an anti-vandal coating;
- surprisingly, having high hardness, it forms a vapor-permeable coating;
- can be painted as a finished coating or tinted during preparation for application.
All these qualities make textured paints an indispensable finishing element for renovating your apartment. Moreover, the application can be done with your own hands and in the shortest possible time.
In the near future, I hope to please you with a story about how to apply finishes to walls, ceilings and other surfaces.
Decorating the ceiling with fabric
Finishing the ceiling with textiles is a fashionable novelty that has gained wide popularity. The material you can use is:
- linen;
- velvet;
- cotton;
- silk.
Decoration methods and the strength of the material determine the reliability of the coating. On sale you can find specially treated canvases. It's much easier to work with these. Velor, velvet or suede are usually glued on, cotton and viscose are stretched and fixed with a construction stapler, and the surfaces are draped with thinner and lighter materials.
Subtleties of applying acrylic paint
Application defects are corrected immediately, as the compositions dry quickly
- The paint for applying the second layer is made more liquid than for the first in order to slightly blur the previous coating and eliminate defects.
- You should not apply a second layer of composition if the first has not had time to dry, otherwise the coating will wash out.
- Before you start painting the ceiling, it is recommended to practice applying the mixture using a roller.
- It is recommended to apply foreign-made compositions in two layers, Russian ones - in three.
- If, after the painted surface has completely dried, serious defects are discovered, you should not try to paint over them separately. In this case, it is better to take sandpaper and sand the entire ceiling, but this technique is considered effective only when no more than 2 layers of paint are applied to the ceiling.
- There is no need to rush when applying the composition - a complete redo of the work will require a lot of time and money.
Acrylic compositions are a convenient and inexpensive option for painting ceilings in rooms for any purpose. If the composition is applied correctly, an even, smooth, beautiful coating will please the eye for a long time and protect the surface from damage.
Technology and basic techniques
It should be noted that the basic techniques when working with different types of decorative plasters are general and, first of all, this applies to applying the material to the surface. Also, in general, the number of stages is the same, but the technique of working with different materials, of course, has its differences.
Different techniques for applying decorative plasterDecorative plaster for interior wall decoration is applied to the surface using a trowel and spatulas, and using the latter it is leveled.
Most often, craftsmen use the “bottom-up” technique. But there are exceptions: you can also use “radial”, “runaway” or “horizontal” leveling.
For work, you can use either a spatula with a smooth edge or a serrated one. It should be noted that decorative plaster for interior wall decoration can be applied in several layers, but it is necessary: each subsequent one is carried out only after the previous one has completely dried.
Applying decorative plaster with a trowel
The timing depends on several parameters:
- layer thickness;
- type of plaster;
- air temperature;
- humidity.
In addition, it is necessary to ensure the ventilation of the room and limit the access of sunlight, even to the extent of installing protective screens on the windows.
Variety of textures of decorative plaster
You should not try to shorten the drying time, for example, by using heating devices, as this will lead to cracking of the plaster.
On average, the drying time of one layer ranges from 2-3 hours to one day. But if the technique of applying plaster involves the “wet on wet” principle, then the maximum period is no more than 10-15 hours.
Watch in this video the technique of applying decorative plaster under a stone.
To achieve the required artistic effect, the following techniques are widely used:
- tinting or tinting, the essence of which is to apply a thin layer of plaster to the surface with a roller, which differs in color or tone from the main layer;
- modeling, for which stamps, rollers or even the fingers of one’s own hands are used, serves to create the necessary relief or pattern on the surface;
- rubbing is necessary in several cases: to prepare the surface for applying the next layer, for finishing, or on the finished surface to obtain the required pattern. Most often, this method is used when working with structural and textured types of materials.
The final stage of working with decorative plasters is glazing, with the help of which the surface receives a completed look and the necessary protection.
Glazing of decorative plaster
To perform it, wax is used if mineral or silicate types of plasters or varnish are processed, which is most often used on acrylic or silicone surfaces.
Decorative plaster with wax
Review of manufacturers
The manufacturer Amourcolor produces high quality textured paints that are resistant to wear. Buyers are provided with 3 product options: Tactite with a suede surface or mosaic, Perlata with a pearl sheen and Escenta with a variety of undertones. All paints are water-based and environmentally friendly.
Domestic offers paints with various textures: embossed, “Mizuri”, “wet silk” and others. All products of high quality can be purchased at a competitive price.
The Russian company VGT has been producing paint and varnish products since 1992. It is possible to purchase various types of textured paints: facade and interior, water-based, crack-resistant.
The product is ideal for our climate. There are a lot of positive reviews about it. In the video below you can watch a master class on applying textured paint with the “Travertine” effect.
Manufacturer from France Blancolor supplies many types of durable materials for decorative wall decoration. Among them are translucent paint Essuyables, silk based on cellulose fibers Tradimurs, waxed plaster effect Effets Platre Cires and many other types.
Textured paints from the manufacturer Clavel have a variety of colors and perfectly imitate silk, brocade, and velvet on walls. There are different types of designs ranging from antique to modern. The composition uses environmentally friendly components.
Features of the solution
How does texture paint compare favorably with other ceiling coverings? Does she have any disadvantages?
Advantages
- Paint, like any water-based paint, is vapor permeable. The ceiling will not provide an impenetrable barrier to water vapor.
- Unlike hanging structures of various types, paint will not reduce the height of the room.
- The textured surface perfectly hides minor surface defects. The ceiling does not need to be leveled as carefully as in the case of conventional painting and, in particular, the application of any glossy coating.
- Textured paint coating is one of the cheapest ceiling coverings. The cost of repairing the ceiling with its help (of course, if you do it yourself) does not exceed 50-70 rubles per square meter, taking into account the cost of the primer.
Flaws
- Paint consumption is relatively high: up to a kilogram per square meter of surface. Which, in general, is quite natural: the paint is applied in a thick layer.
- To give the ceiling an attractive appearance using textured paint, certain skills are required. They are produced very quickly; but it is better, if you are painting the ceiling for the first time, to experiment first in the least noticeable place.
- Of course, it will not hide height differences and large irregularities. If the ceiling has serious defects, suspended and suspended ceilings are unrivaled in terms of time and effort.
- For private houses with wooden floors, textured paint is clearly not the best solution. Cracks at the seams are inevitable, even despite some elasticity of the acrylic resin paint layer.
Textured paints and putties work best on a primed concrete base.
General principles of use
Coloring is carried out according to all the basic rules provided for conventional coloring solutions. It is necessary to carefully prepare the surface for painting. Here, the same methods and techniques are used as for conventional paints.
Next, priming is necessary. Without using a primer, the applied decorative layer may peel off and will “stick” less well to the floor plane. In addition, priming reduces material consumption.
When painting, you should achieve the thinnest possible layer of composition. This will reduce material consumption and, most importantly, achieve exactly the texture that should be obtained as intended by the manufacturer. By neglecting this rule, many people themselves spoil the decorative layer - the result is an ugly and lumpy texture.
Otherwise, there are no particular difficulties when using this material. To better understand all the intricacies of its use, below is a video that shows how textured ceiling paint is applied and what the texture is after it dries.
Application methods
Walls can be finished with any convenient tools. You can take a spatula or something else suitable, but painting the ceiling with textured paint is done mainly with rollers. First of all, this is due to the fact that applying thick and heavy solutions to the surface of the ceiling is not very convenient - they constantly tend to fall off or delaminate.
Some varieties can be applied with a spatula, but this requires some skill and experience. Therefore, if you are planning to finish your ceiling in this way, you need to choose those solutions that can be applied with a roller.
If necessary, you can thin the paint a little if it is initially too thick. Then it will be much easier to apply it with a roller. It is necessary to control the dilution process so that the consistency does not become too liquid - it loses its coloring properties and may become unsuitable for use.
Working tools and necessary materials
To perform decorative painting of the ceiling with your own hands, the master will need the following kit:
- spatula for putty;
- brush for processing corners and joints;
- roller for applying decor;
- containers for paint;
- primer with antiseptic;
- putty;
- decorative paint.
Don’t forget about personal protective equipment: gloves and a mask are a must. Covering material for flooring and furniture is also useful. Stock up on rags; you will need them for grouting.
Ceiling preparation and painting with water-based paint
Why you should choose water-based paints for ceilings
Water-based paints and varnishes are most suitable for interior decoration. I'll explain why.
The advantages of such compositions
- Water-based paints can be used to coat substrates made of all types of materials. It is undesirable to do this only with metal, since water can cause corrosion of the base.
Water-based paints contain no harmful substances.
- Such compositions are the most environmentally friendly and do not contain harmful substances. When painting the ceiling, there are no persistent sharp and unpleasant odors that cannot be removed for several days.
- To remove old water-based coating from ceilings, there is no need to use solvents or cleaners. You just need to wet the surface and after 7-10 minutes the paint can be removed with a spatula.
Using tint, white paint can be given any color.
- In most cases, waterborne types of coatings are produced in white, the so-called “base” color.
If necessary, you can purchase a variety of colors and tones for them:
- thanks to this, you can recreate any of the shades of the coating. This circumstance makes it very convenient to design the ceiling.
- white ceilings are the most common and are considered classic. However, now their colored finishes are becoming increasingly popular. It increases the aesthetics of the interior, naturally, if the color of the coating is chosen correctly and accents are made.
In terms of aesthetics, painting is at least not inferior to other ceiling design options. This type of cladding has a very low price. Thanks to this, painting is almost always cheaper than other finishes.
Artistic painting
Allows you to recreate an amazing indoor interior. And, if earlier, for this original design of ceilings it was necessary to use the services of professional artists, modern markets offer a large number of materials, using which you can paint the ceilings in the apartment yourself. These include stencils. With the help of such elements, applying a pattern to the ceiling will be a feasible task even for a beginner. It is enough to fix the stencil to the ceiling with tape, and paint the cut holes with the chosen paint.
If you don’t have time, you can decorate the ceilings with vinyl stickers, or use other techniques that will help you fully paint the ceiling space.
Distinctive finishing features
As a building material, decorative textured wall paint is a thick mass (white or colored with pigments) with various fillers that create a relief texture when applied. The paint has the ability to hold the applied pattern until it hardens completely.
The thickness of the permissible layer of paint makes it possible to fill in minor surface defects, and the texture itself visually hides unresolved irregularities in the plane treated with this composition.
Combination of decorative items and decoration
Preparatory leveling of plastered walls for upcoming painting is a rather labor-intensive process. Often, plasterboard sheathing is used to speed up the deadlines. This solution leads to the loss of a certain part of the usable area.
The problem is solved by applying a decorative layer of paint, which only acquires an even more unusual and spectacular appearance from the play of the light flux on the relief pattern.
An example of a stylish interior design that is not demanding on the ideal base plane is shown in the photo:
Mastering the technology and methods of working with any textured paint is not very difficult, so if you have a complete lack of experience in construction and finishing work, you should decide to do this type of finishing yourself. First you need to practice on a sheet of plywood, a small and non-critical section of the prepared wall. The mixture has such a hardening period that it leaves enough time for the gradual application of the pattern and its correction if the master considers that something did not work out.
Characteristic advantages
In relation to other finishing finishing coatings, the advantages of painting walls with textured paint relate to both the decorative properties and the operational characteristics of the resulting front surface of the walls.
Among the main advantages are the following:
- the plasticity of the formed layer, which does not crack under deforming forces from the natural shrinkage of the house;
- dust-repellent qualities that facilitate cleaning during cleaning;
- moisture-resistant film that prevents the absorption of odors, the formation and proliferation of mold and fungi;
- frost resistance;
- resistance to ultraviolet radiation;
- high environmental friendliness, allowing use in bedrooms and children's rooms;
- application on all types of substrates (brickwork, cement and complex mortars, wooden materials, glass, metal);
- ease of changing the appearance to a different color during routine repairs.
Pattern obtained with polyethylene or wet cloth
The photo shows an example of a simple and undefined texture that will make minor defects in the base invisible or give a natural look:
Water-dispersion-based materials are universal, suitable for use in decorating a kitchen work area, a respectable living room interior, and a bright and colorful atmosphere in children's rooms.
Effect paint
Textured paints for walls with effects that enliven the atmosphere and look different when the lighting in the room changes have become very popular.
Compositions with the following capabilities are sold in ready-to-use form:
- Nacre. This paint can make a room brighter by softly reflecting the incident light. In cloudy weather in the autumn-winter period, the walls, reminiscent of silk, seem to radiate warmth. With a change in viewing angle or type of lighting, mother-of-pearl coatings change shades of color. For this reason the material is called chameleon paint.
- Velvet (velor). The paint's fleecy appearance is given by the inclusion of solid grains of various colors.
- Granite. The role of granite chips is played by acrylic granules of paints of different shades, which break against the wall when the material is sequentially applied when sprayed through a spray gun.
- Textured decorative mixtures. They contain mineral particles, shell fragments, fine sand and other characteristic additives. The label indicates what effect is intended by the manufacturer: coral reef, seabed, spectacular shiny relief.
Sand filler with mother of pearl
Types of finishes with photos in the interior of the kitchen and other rooms
The variety of textures of decorative plaster is one of its main advantages.
But when choosing a material, it is worth considering that the main stages of finishing work will directly depend on the texture of the putty. For example, finely textured plaster will not hide all the flaws and irregularities on the ceiling, but coarsely textured putty is quite difficult to work with without some experience. As for the type of finishing of the ceiling surface, it all depends on the chosen composition. By type of filling it is divided into:
Invoice. It is classified as embossed, as it forms a rough surface. Wood, mica, flax fibers, marble or granite chips are used as fillers. It is used for finishing brick, concrete, wood, and plastered surfaces. The mixture hides minor defects on the ceiling well, so before working with it, the surfaces do not need to be prepared too carefully. It goes on sale in finished or dry form. When purchasing textured plaster, it is worth considering that the larger the filler, the greater its consumption. According to subtypes, textured plaster is divided into: lamb; fur coat; bark beetle Their features include the fact that the relief on the ceiling appears immediately after applying the material.
Structural. It is made on an acrylic or silicate base. It uses marble chips and quartz elements as filler. The material is a granular heterogeneous mass. When choosing a fine fraction, the ceiling surface looks almost flat and smooth. And the medium-textured material forms a small relief after drying. This material goes on sale ready-made, and there is no need to add color to it. To get the effect of waves on the surface, a large textured mixture is selected, which is applied to the ceiling with large movements using a spatula
Important When finishing residential premises, preference is given to water-based materials. Because it dries quickly and does not emit an unpleasant odor.
Venetian
It is a multi-layer decorative coating. It contains marble chips and slaked lime. When applied to the surface it resembles natural marble or onyx. This material requires certain skills and experience for application. To do this, use a flexible rubber spatula and apply the plaster with thin strokes in several layers (from 5 to 6). Moreover, before applying the next layer, the previous one must dry well. Despite the fact that this type of decorative finishing is quite expensive, it is fully justified by its impeccable appearance, practicality and durability. Depending on the application method, both matte and glossy surfaces are formed. This type of plaster imitates stone surfaces and precious metals (if it is painted with special pigments).
Textured:
Structural:
Venetian:
If you follow certain rules when choosing a finishing material, you can quickly and originally transform the ceiling surface in any interior.
Attention Each individual type of decorative plaster involves the use of different application methods and techniques to give the ceiling surface expressiveness.
How to choose paint
When choosing paint, you must pay attention to the parameters specified by the manufacturer.
To choose the right paint, it is recommended to take into account the conditions in which the coating will be used - permissible temperature, humidity, etc. indicated on the label.
- Covering power. The recommended figure (the number of grams of mixture required to densely cover 1 square meter of surface) is 20-60 g. A mixture with these characteristics will make the previous shade invisible.
- Drying time. Acrylic paint usually takes 1-4 hours to dry.
- Consumption. The lower the composition consumption per square meter of ceiling, the cheaper the work will cost. The figure varies among different manufacturers - a liter per 9-13 square meters.
- Terms of Use. For unheated rooms it is recommended to use frost-resistant mixtures, for bathrooms - moisture-resistant, for kitchens - biostatic (protect against mold, fungi or other biological formations).
- Permissible degree of exposure. The parameter indicates the degree of impact the finished coating can withstand, and is designated by numbers from 1 to 5. Mixtures marked as “class 1” can withstand frequent washing with abrasive agents, and class 5 paints only require gentle dry cleaning.
The color and other aesthetic characteristics of acrylic paint are chosen depending on the characteristics of the interior. Typically, white compositions are used to paint ceilings, but do not forget that the definition of “white” may differ among different manufacturers. The package may contain a mixture of milky, grayish, pearl or other shades
When choosing a paint shade, it is important to remember that acrylic will darken slightly after drying.
Video - Acrylic paints
If you have no experience in repair work, it is better to choose paints that form a matte film - unevenness and defects are less noticeable on it. Glossy compositions require a perfectly smooth surface, and the higher the degree of gloss, the more errors will appear on the ceiling. In addition, there are textured and pearlescent compositions that look very original.
Read with this
- Painting drywall: 4 finishing features
- Technology of painting wallpaper with water-based paint
- How to paint wooden furniture yourself
- Which roller to choose for painting the ceiling: types and features of products
- How to glue fiberglass correctly?
- Is it worth replacing wallpaper with paint in an apartment: what to paint with, is it possible to do the work yourself, and what paint to choose for the wall
- Cost of painting walls and ceilings
- Materials for painting wooden products
- Caring for matte and glossy stretch ceilings
- How to prepare silver paint from powder and drying oil
Which roller to paint the ceiling with
The roller for ceilings must be selected according to the same criteria as for walls. Typically, a ceiling roller, unlike a wall paint tool, has a relatively short or medium-sized handle. The quality requirements for ceiling painting are usually higher, so the roller needs to be chosen more carefully. Most often, rollers with slightly elongated soft pile are used for painting ceilings. It is very good if such pile is made from natural materials, for example, wool. Pile that is too short does not pick up enough paint. You can use a foam roller for the ceiling, but it is not the best choice: it creates “bubbles”.
If you have children, this is also an option in areas that see a lot of hand-to-wall contact, like the hallway or playroom. Once you know what paint you want and you have the brand applied, you can go and choose a color. Some people may say that you should choose your color before the brand, but in my experience and with color choices for even the least expensive paints, you're better off not considering your budget and then working within what you can afford.
Buy a small test jar and paint it onto something quite large. Make sure you really like it before you continue. This step isn't absolutely critical, but it's certainly something to consider before you start painting. Also keep in mind that the actual colors and how light or dark they are can greatly affect your mood. Do some research on how colors affect mood and think about how you and your other family members would feel about the colors you're considering.
If you need to paint a large area, it is better to use a roller. This article will discuss how to paint with a roller correctly. Working with this tool is both easier and faster than with a regular brush. In addition, the quality of the painted surface is much higher. The range of rollers is very large; they are available in different widths (from 10 to 30 cm) and with different handle lengths. If you need to paint the walls, it is better to choose a roller with a long handle. The same tool can be used to paint the floor in hard-to-reach places. The size of the roller directly depends on the type of surface to be painted.
The last thing you want is to make the space feel bad by choosing a color that doesn't contribute to the activity of the room. If you have enough space around the perimeter, putting everything in the middle of the room and covering it with a tarp is great, but for smaller rooms or those with a lot of stuff, clearing them out works best.
You really don't want us tripping over things when you're painting. The paint isn't particularly difficult to work with, but you'd be amazed at how easily you can get it in places you didn't intend to. Keeping this in mind, you should try to make plans so that the mourners and small members of your family are not going to get into mischief while working.