Should I buy a unit or assemble it myself?
Therefore, it makes sense to make a compressor for painting a car yourself. To do this, it is worth studying in detail the structure and operating principle of a real, factory compressor. And it is the same for all samples. High pressure is created in the cylinder. The method of air injection is not important - it can be mechanical or by hand. In the case of manual supply, we save a lot of money, but where can we find a slave capable of pumping air continuously? The automatic process will eliminate many disadvantages and problems. An exception is changing the oil in the compressor. Only the mechanism is capable of continuously supplying a stream of air into the cylinder! The theory is simple; making a personal compressor station with your own hands is quick and easy.
Compressor from a car chamber
How to make a paint application installation from a simple car camera? List of required materials:
- pump with pressure gauge for blower function,
- car camera for receiver function,
- awl,
- repair tool kit,
- nipple from a car camera.
The difficult stage is the creation of a compressor station. The camera should be checked for leaks. She's being pumped up. If there is an air leak, the problem is solved by gluing or vulcanizing the raw rubber. Then a hole is pierced with an awl. We place the nipple in it for uniform air flow. The auxiliary fitting is secured by gluing. A repair kit will help you cope with this work. Then the fitting is attached to the spray gun. To control the release of the air stream, unscrew the nipple.
But it is noteworthy that the old nipple is not removed. It will act as a valve and hold excess pressure. A control check of the pressure value is carried out by spraying a dye onto the metal surface. If the paint lays down in an even layer, then the installation is functioning perfectly! Additional control of the pressure value can be checked with a pressure gauge. The air flow, even after turning on the aerator key, must be intermittent!
Designing a home compressor is easy. And after using it, car painting will be of better quality than using a spray can. When working at home, you should avoid the penetration of dust, foreign bodies, and water into the car chamber. These things can get into the spray gun and the painting will have to be done again. With proper operation, our unit will work for a long time, and it is advisable to automate air injection.
Craftsmen often noticed that a homemade compressor can last much longer than a factory one. And regardless - domestic or imported. An item assembled with your own hands has positive energy. It is easier to repair and maintain - after all, you are well aware of its weaknesses and design.
Compressor types
To begin with, we should highlight car compressors for inflating tires, which are considered mobile and operate from a cigarette lighter. There is no way this equipment can be used for anything other than inflating tires. But even here you should understand a little so as not to make a mistake when choosing.
This type of compressor is produced by two types of manufacturers:
- membrane;
- piston.
What is the difference? Diaphragm compressors produce less pressure, are not as stable as piston compressors, and cannot be used in extreme cold. However, their big advantage is their low price.
A piston compressor is usually more expensive, but its cost is justified by higher performance, stable operation and the ability to use at any temperature.
As for universal compressors, they can also be divided into membrane and piston ones. Just as in the case of the equipment described above, membrane compressors have lower productivity, are unstable in operation and are less expensive. Such compressors can hardly be used for airbrushing. They are suitable for inflating tires of small cars.
Piston compressors are considered more professional equipment. They are capable of delivering the high pressure necessary for stable operation of spray guns and other equipment. Additionally equipped with a receiver, such devices have high stability and durability.
Compressor from an old refrigerator
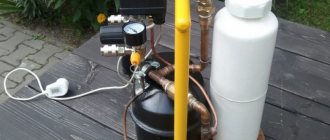
The unit, made from components of an ancient refrigerator, will not be inferior in performance to compressors from elite manufacturers. To construct it you will need:
- pressure gauge,
- rust converter,
- compressor receiver,
- threaded adapters,
- relay for high-quality control of the flow pressure force in our compressor,
- fuel filter element for gasoline,
- oil moisture separating filter and its gearbox,
- the engine driving the installation,
- cross with 3/4 inch thread for water pipes,
- switch for 220 V voltage,
- sealant,
- motor oil grade 10W40,
- brass tubes,
- oil hose,
- simple syringe,
- thicker board
- metal paint,
- filter element of the power supply system for a diesel engine,
- furniture wheels,
- needle file,
- studs, nuts, washers,
- fum tape,
- car clamps.
A compressor unit from a rare Soviet refrigerator can be useful as a motor.
In our example, a compressor from a refrigerator is the most optimal solution. It has one great benefit - a compressor start relay! Very old Soviet models have an advantage over foreign competitors. They are capable of pumping up very high pressures. During assembly, it is necessary to carefully remove rust from the actuator unit. The rust converter will be able to perform high-quality treatment of the compressor and prevent further oxidation. This will simultaneously prepare the working engine housing for painting. Then they move on to changing the oil. It is clear that if the old refrigerator was subject to maintenance, it was a very long time ago. This also applies to changing the oil in it. But this situation also has a justification - the system is absolutely completely isolated from the environment. Semi-synthetic oil is suitable. This modern lubricant has properties no worse than compressor oil. It will cope with the task remarkably well - it contains many high-quality and effective additives. On the compressor body we find 3 tubes: two of them are open, the remaining one is hermetically sealed. We supply power to the compressor unit and determine the nature and direction of the air flow. It is better to immediately write down or mark the intake and exhaust ducts.
Equipment selection
Let's start with what is best to paint.
Spray gun
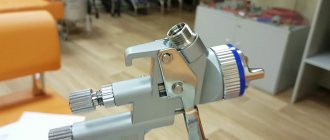
There are three types of sprayers on sale:
- HP (with white or silver markings).
- LPHV (with green marks on screws).
- LPLV (marked in blue).
Their price varies from a minimum of 300 rubles for the first category of devices to an impressive 8-10 thousand for LPLV spray guns.
Let us clarify: there are also compact electric sprayers on the market, the compressor of which is combined with a spray gun. To operate such a device, only power is required. For household painting of relatively small surfaces, electric sprayers are the ideal choice.
Electric spray gun.
What is the difference between different types of spray guns? Why do they differ so much in cost?
HP (sometimes labeled as CONV) are High Pressure devices used in their current form for almost a century. The operating pressure reaches 5-6 atmospheres with a relatively large air flow. The downside of cheapness is a huge waste of dye: its transfer is only 30-50 percent; most of the aerosol ends up uselessly on the floor.
LPHV – low pressure sprayers that use a large volume of air (Low Pressure, High Volume). For their operation, an excess pressure of about one atmosphere is required; paint transfer reaches 70%. An additional bonus is much less air pollution from aerosols of organic solvents, most of which are very toxic.
LPLV (Low Pressure, Low Volume) operate at low pressure with minimal air flow. As you might guess, they are very unpretentious when choosing a compressor for painting; More importantly, the paint transfer of these devices is close to 90 percent of the volume used.
Three generations of sprayers in one photo.
Compressor
What kind of compressor can be used for painting? What criteria should you use to choose these devices? First, let's delve into their classification.
Screw and piston
A piston compressor is a relatively simple device consisting of a motor, a crank mechanism, a cylinder with a piston and a pair of check valves. During the working stroke of the piston, compressed air is pushed into the discharge pipe; when idle, it is taken from outside.
The screw design is much more interesting. Two tightly fitting rotors, rotating, continuously displace air from the groove between them into the discharge pipe.
This scheme of work provides quite a few advantages:
- The service life between overhauls is much longer than that of any piston design.
- The outlet pressure is very stable even without the use of a receiver (air storage tank).
- The noise level is noticeably lower.
The only reason why screw compressors have very limited popularity is their high cost. If a high-quality piston device with a power of about two kilowatts can be bought for 6-8 thousand rubles, then the cheapest screw compressors made in Belarus are offered on the Russian market for 110-120 thousand.
Working chamber of a screw compressor.
Oil and oil-free
Piston compressors are divided into oil and oil-free. It’s not hard to guess what the difference is.
What does filling the crankcase with oil affect?
- For compressor life.
- On the noise level during operation.
Obviously, oil-based devices are preferable, despite the need for periodic maintenance.
Belt and direct drive
Rotation can be transmitted from an electric motor either directly, through a common axis, or through two pulleys of different diameters and a belt. The first scheme is simpler and more compact; however, the second is somewhat more preferable: it allows you to achieve greater compression in the cylinder at lower speeds and less power of the electric motor.
However: the belt will need periodic replacement. During operation, it continuously experiences deforming loads.
Belt driven compressor.
What else should you pay attention to when buying an air compressor?
- On electrical power, which determines the performance of the device. It is better to take a closer look at compressors that consume at least 2 kilowatts. Do not be afraid of excessive consumption of electricity: when the set pressure in the receiver is reached, the power will turn off.
- On the volume of the receiver. It is better that it is not less than 50 liters. The large volume of the air tank often compensates for the lack of performance, allowing the spray gun to consume more air than is pumped into the receiver.
Receiver
How to make a receiver?
It is good to use a cylinder from a simple fire extinguisher. It can withstand high pressure perfectly and has a good margin of safety. The cylinder is an excellent solution for attached technological equipment. As a basis, you can take a fire extinguisher of the OU-10 brand with a volume of 9.99 liters. It is able to withstand pressure up to 16 MPa. We unscrew the locking and trigger mechanism from our workpiece and screw in the adapter. If we find corrosion, we will mercilessly remove it. It is difficult to remove internal rust; to do this, pour the rust converter into the container of the cylinder and shake out the contents. After cleaning is completed, screw in the crosspiece for the water supply. A wooden board will be a good base for mounting the motor and fire extinguisher body. It is advisable to place all working parts and assemblies on one line. Threaded rods will serve as fasteners; they must be threaded into the holes obtained by drilling. You will need nuts and washers. Then take the receiver and place it vertically. You will need 3 sheets of plywood. One sheet is for a through hole for the cylinder. The remaining 2 sheets are fastened with self-tapping screws to the main board and glued to the sheet that holds the receiver. At the base, a recess is made from wood for the bottom of the receiver. To move the unit, we attach furniture wheels.
The system should be protected from dust using a gasoline filter for rough cleaning of the fuel. It will act as an air intake. A rubber hose and an inlet tube from the supercharger will come in handy. The air pressure at the inlet is very low, clamps are not useful. An oil dehumidifier is installed at the outlet to block liquid droplets. A filter element for the power supply system (in simple terms, a filter) is suitable. You will need clamps for the car. The oil moisture separator is connected to the input of the gearbox, and the output is screwed into the crosspiece we have already prepared on the left side. A pressure gauge is screwed into the right side to monitor the pressure value. And on top of the crosspiece we screw in a relay for adjustment.
Airbrush compressor
To apply airbrushing at an amateur level, a compressor that produces a maximum pressure of up to 2 atmospheres will be sufficient. However, here too you should pay attention to other factors. For example, only a piston apparatus can ensure an uninterrupted supply of compressed air. And this, in turn, has a positive effect on the quality of airbrushing.
In addition, sometimes not one, but two airbrushes are used simultaneously with a compressor. In this case, you should pay attention not only to the maximum pressure, but also to the performance of the device. It should be noted that you should not expect high performance from the membrane type. Only a piston compressor can provide sufficient pressure and performance to two airbrushes.
An important factor when choosing equipment for airbrushing is the availability and volume of the receiver. Thus, a large receiver will not only make the operation more stable and of higher quality, but will also significantly extend the life of the compressor with frequent use.
Adjusting the pressure force in the system
The adjustment relay allows you to set the desired range or limit of the receiver pressure.
And at the required moment, interrupt the power supply circuit of the system supercharger. It is recommended to use RDM-5 as a performing unit. With its help, the compressor will start when the air pressure in the tank drops below the required value and will turn off if the parameters are higher than permissible. The required amount of air flow is adjusted to the relay using a pair of springs. The purpose of a large spring is to apply light pressure. A small spring allows you to adjust the upper limit and set the final limit for turning off the entire compressor installation. RDM-5 was designed for water supply lines. In reality, this is a simple two-pin switch. In this example, one contact is needed for switching with the network zero, the other is needed for switching with the supercharger. The mains phase is carried out through a toggle switch for connection to the second input of the compressor installation. The toggle switch will help you quickly disconnect the system from the power supply. All electrical contacts are well soldered. Then the compressor unit is painted and tested. During a test run, the operation of the relay and the tightness of the system are checked. A test run will allow you to determine the optimal pressure for painting with a uniform layer. To ensure high-quality and long-term operation of the compressor, maintenance is required. An important step in this case is changing the oil.
If you decide to buy a factory-made air compressor, study its parameters and capabilities. Give preference to well-known companies.
