Window sill repair: restoration of wooden products
Wood is a very soft and pliable material that can be restored in almost 100% of cases. The only exceptions are those wooden window sills that have rotted and turned into dust. In all other cases, there is only one obstacle in the process of window sill restoration - a large number of layers of paint that will definitely have to be removed. This is the first stage of work related to solving the question of how to repair a wooden window sill with your own hands? There are several ways to remove old paint from a wooden surface.
- Chemically - here you will need a remover for old paint. It is applied to the surface of the window sill and after a few minutes the paint bubbles, after which it can be removed with a spatula. This option has a lot of disadvantages. Firstly, the remover is very toxic. Secondly, each layer of paint will have to be processed separately.
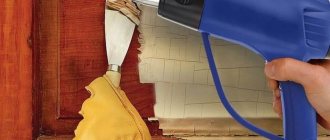
- Temperature. The paint is heated to a high temperature using a hair dryer, after which it becomes soft and pliable for removal with a spatula. This option has only one drawback - the length of the process.
- Mechanical method, which involves the use of a grinding machine. Just like the previous option, it has several disadvantages. Firstly, the machine is not able to remove the paint in the corners and along the window - here you will have to peel it off with your hands. Secondly, you can go broke on abrasive material. Thirdly, this is a very dirty process.
Wooden window sill repair photo
Alternatively, if the wooden window sill can be carefully dismantled, the old paint can be burned using a blowtorch or autogen - naturally, this should not be done in an apartment, since the volatile remains of burnt paint are very toxic.
You don’t have to worry about completely removing paint from a wooden window sill - this option is acceptable when the product will be painted again. In this case, the surface of the window sill will only need to be sanded to remove sagging old paint.
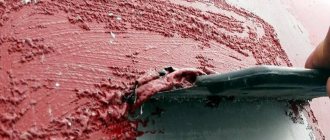
After such preliminary preparation, the old wooden window sill will need to be puttied to remove various kinds of cavities, potholes and large scratches, then remove dust from it and treat the surface with a degreasing compound (solvent) and only then apply a new coat of paint. It should be noted right away that this is best done with a roller and not in one layer - at a minimum, painting should be done in two layers, each of which should dry thoroughly within several days.
Inspection and surface treatment
After removing the paint, you will find uneven spots and imperfections. It is quite possible that the tree is infected with a fungus and the surface is susceptible to rotting. The affected areas must be removed and the layers of healthy wood must be reached. If necessary, treat the wooden canvas with an impregnation that prevents the development of fungus and mold. Dry.
Leveling the surface
After thermal or chemical removal of paint, the working surface has a lot of defects and irregularities. You need to get rid of them using a sanding machine. In those places where the machine does not reach, the surface is processed manually with sandpaper. After sanding is completed, all dust must be removed, the easiest way to do this is with a vacuum cleaner.
putty
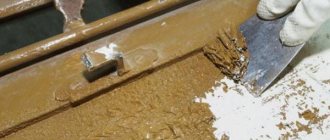
If there are few defects and unevenness, they are each separately sealed with putty, then sanded. If there are many defects, it is easier to cover the entire surface with wood putty. Using a rubber spatula, rub the solution into the wood. To level large areas, you will need a large metal spatula. It is necessary to dry the window sill if the cracks were deep, this will take approximately two days. After drying, the window sill is sanded again.
“Chemical” options for removing protective film:
Option 5 Denatured alcohol + COSMOFEN
The method described below has been tested by the author several times.
Pour denatured alcohol (technical alcohol) into a water sprayer. It is advisable to take a small sprayer, for example, like for spraying indoor plants. Spray denatured alcohol evenly onto the protective film. Let it stand for a couple of minutes, after which we pry up the edge of the film with a sharp knife and gently pull it out. We methodically repeat the procedure until we remove the remaining protective film. We remove traces of glue with COSMOFEN or acrylic solvent.
Option 6 Schumanit
According to reviews on the Internet, primarily on the window forum forum.OKNA.ua, the Shumanit detergent from the Israeli company Buggy has proven itself well. But you have to be extremely careful, because this is a very strong remedy.
And the most reliable and easiest way to get rid of protective film is to remove the film before or immediately after installing the windows . In such cases, it can be removed easily and without any complications.
Thermal method
This method is usually used if:
- The stains are quite old.
- Window stains have become very dry or difficult to remove.
- The surface to be cleaned is large.
- The paint layer is quite thick.
The tool used for this method is a regular hair dryer. But if you don’t have such a device, you can use an iron.
Naturally, before using high temperatures, the glass must be cleaned and degreased.
A heat gun is brought at a slight angle to the surface of the stain and waited until bubbles form. After this, the paint that has peeled off the windows is carefully removed with a spatula.
If you use a regular iron, then place a piece of foil on the stain and only then begin to heat the stain with an electric device.
The procedure for performing work to restore the window sill.
After replacing the old window unit with a new one, do the following:
► Remove the old paint.
Please note that there are three ways to remove old paint.
- Using heating with an electric hair dryer or gas burner.
- Chemically, using special acids.
- Mechanical method, using a hatchet or pickaxe (construction hammer).
Advice.
- If the paint layer is not large (up to 3 mm), then it is better to use the first or second method to remove such a layer.
- If the paint layer is thicker than 3 mm, then it is better to tap with a hatchet or pick.
In my case, the paint layer was 5 mm.
► We use a hatchet to break the old paint down to the concrete base.
► Sweep away dust and remaining paint. ► Prime with any primer for concrete.
► Let the soil dry for up to 24 hours. (Drying time should be written in the instructions). ► Attach the protective perforated corner to the end using putty.
The corner will hide all the irregularities and defects of the window sill.
Advice. If you want the end of the window sill to be straight on both sides. To do this, the protective corner must be placed not only from below, but also from above.
► We putty with any starting putty for concrete.
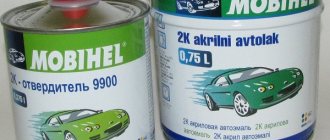
Advice. It is advisable that all materials be from the same manufacturer.
► We putty with finishing putty after the first starting layer has completely dried. ► Clean with fine sandpaper. ► Sweep with a clean brush. ► We paint with white enamel (semi-matte or glossy) three times, no less!
Advice. It is better to paint with a roller, then there will be no streaks. And further. Don't skimp on paint.
The window sill is ready.
This article could end here. But I think that this would not be complete information on this topic, because... There are also wooden window sills. Of course, hardly anyone leaves them. Still, I’ll tell you briefly.
Choosing paint for window sills
Successful painting of plastic windows will directly depend on the choice of paint. On the modern construction market there is a huge number of paints for plastic, so it will not be difficult to choose the most optimal option.
To paint plastic windows, you can choose aerosol paint, which is used for painting plastic parts in cars. Such a coating will not only be strong and durable, but will also be very easy and evenly applied.
In this case, paint can be applied in several layers. The color range of such aerosols is quite wide, which will allow the user to choose the most optimal option.
In order to provide a durable and reliable coating, you can use polyurethane or alkyd-urethane paint.
This coating can withstand heavy loads, which makes it possible to place flowers on painted window sills. This coating has a wide range of colors, which allows you to decorate any interior.
Homemade solutions
There is not always available cash to purchase special chemicals for cleaning paint. Ingenuity and skillful hands will come to the rescue. Homemade solution consists of:
- caustic soda;
- slaked lime;
- crushed chalk
First, mix lime and chalk until smooth, and then add soda. The ideal consistency should look like thick sour cream.
Apply the prepared paste to the stains and leave the mixture for several hours. After the specified time has passed, you can easily remove the dirt with a spatula. The method is considered inexpensive compared to thermal and chemical ones.
Cleaning with chemicals
The chemical method of cleaning plastic windows has a number of advantages:
- ease of use;
- achieving high results;
- Possibility of removing stubborn or stubborn stains.
The main means of this method is the so-called wash. It can be purchased at any hardware store. You can familiarize yourself with the use of such a chemical on the label, but the principle of use is almost the same:
- Before removing the old paint from the window, it is worth carrying out preparatory work: clean the glass surfaces from visible dirt and dust.
- A remover is applied to the paint stains. The solution must remain on the dirt for some time so that the coating can swell.
- After curing, remove the peeling paint from the glass with a construction spatula or scraper and wipe the surface with a solvent.
- Finally, the plastic windows are washed with a solution prepared using water and vinegar.
The most convenient form of removing old paint is a paste - it does not run off the glass.
Working with plastic surfaces
Over time, even the highest quality window sill can lose its perfect white color. Under the influence of unfavorable factors, the base begins to turn yellow, spots and scratches of varying depths appear on it. During the restoration the following actions are performed:
- Cleaning the window sill from accumulated dirt and dust using a regular cleaning product and a sponge.
- Treat the surface with fine sandpaper, but do not press too hard, otherwise the plastic may be damaged.
- Application of primer for polyvinyl chloride. Deep scratches and chips can be filled with putty. The treated surface is sanded again and cleaned of dust.
- Protect the heating radiator using newspaper and masking tape.
Attention! The window sill can be coated with spray paint designed for automotive PVC parts or enamel combined with a primer.
How to clean the sill of a plastic window
Plastic windows are quite easy to use, they do not need constant maintenance, they do not require constant maintenance, unlike wooden ones. But minimal care is still required, sometimes wiping the glass and brushing off the dust. The window sill is more susceptible to contamination, dust settles on it, and paint may accidentally get in during repairs. How to give it its original appearance and clean the windowsill at home from various types of pollution?
What are the types of window sill stains?
Plastic window sills do not require constant maintenance; once a week you can wipe off the dust with a dry cloth, and that will be enough. Of course, if the house is not located in an industrial area where there will be increased pollution.
But if the window sill needs to be washed, it will not take much time and effort; it is enough to use a regular dishwashing detergent in the form of gel and powder and warm water. In rooms where there is a higher probability of contamination (for example, in the kitchen), or during renovations, a more serious approach to cleaning is needed.
The main pollutants can be identified as follows:
- dirt and dust;
- yellow and other spots;
- paints and primers;
- polyurethane foam;
- glue, tar and others.
Also, if there are children, then traces of plasticine, felt-tip pens, and markers can also be included here. How to clean the window sill of a plastic window? To do this, you can apply your own approach to each type of pollution.
What products to use to clean window sills
In the fight for cleanliness, you can use any means designed to clean surfaces from contamination. The whole variety of cleaning substances can be divided into three main groups:
- detergents;
- cleaning;
- spraying.
There are a lot of names of cleaning products in each of the groups; in addition, there are special types of cleaners intended for window sills and frames. Their special feature is their composition without substances harmful to plastic: acids, acetone, solvents. So what is the best way to wash window sills?
In principle, you don’t have to buy special cleaning products; ordinary household products are enough. Cleaning and detergents are suitable in the form of gel, powder or liquid. Powder cleaners should be diluted in warm water. The sprayers are ready for use, and any well-known brands are suitable; they usually do not contain substances harmful to plastic. The main thing when choosing a cleaning product is the absence of aggressive components.
Removal of construction contaminants
Windows are installed in a house or apartment at the construction stage, and are far from finishing the interior. Of course, when making repairs, it is advisable to cover the surfaces with film, but such protection will not always be effective. In fact, after finishing is completed, stains and traces of a construction nature remain on the surface of windows and window sills: paint stains, polyurethane foam, traces of putty and others.
You can remove old paint from a window sill using various types of solvents. A fresh paint stain can be removed using sunflower oil and washing powder. Apply the oil first, then the powder and brush well.
Toilet bowl cleaners in the form of a gel are great for getting rid of polyurethane foam, but you shouldn’t overuse them; after frequent use, the plastic may begin to turn yellow.
You can clean tar from the windowsill using special removal products; you can also apply gasoline or WD-40. After this, you need to thoroughly wash away traces of the use of such cleaners.
So, after repair, the steps for cleaning the window sills are as follows:
- Cleaning from dirt
To begin with, you need to remove the caps from the ends of the window sill, if any. Then remove the layer of dirt and dust from the surface, you can also vacuum it. Cleaning should be done using a cleaning product, water and a cloth. For cleaning it is better to use a microfiber cloth.
- Removing Construction Stains
Plaster or putty stains should be soaked in cleaning gel or paste and wait a couple of minutes. After this, such a stain can be easily removed. Polyurethane foam is disposed of as follows. You need to cut off as much of the top part as possible (a stationery knife is perfect for this), soak the rest with gel and solvent and let it stand for ten minutes. The solvent must be applied to the stain itself. After this treatment, the remaining foam can be easily removed using a rubber spatula or a brush with stiff bristles.
- Cleaning
How to remove old paint from metal
Before painting a metal structure, rust and old paint should be removed, otherwise the new coating will look unsightly and may quickly peel off. There are three main ways:
- Mechanical — the surface is treated with sandpaper or a wire brush.
- Pros: economical, tools available.
- Cons: long, possible damage to the product.
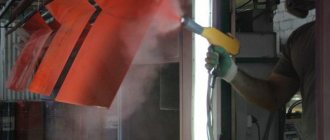
- Thermal - the surface is heated with a blowtorch until the paint begins to peel off.
- Pros: prompt, efficient.
- Disadvantages: increased fire hazard, unsafe for health.
- Chemical - removing paint using removers and solvents.
- Pros: quick and simple.
- Cons: increased toxicity, environmental unsafety.
The last method is the most appropriate, since there is no risk of damage to the surface, and the work is completed quickly, without unnecessary effort.
What can be processed
List of products that can be subjected to the procedure for removing paint from wood:
- parquet;
- wooden floor boards;
- baseboards;
- doors and door frames;
- windows, window sills;
- external, internal fittings;
- stair railings, etc.
If the old layer is of small thickness and there are no visible defects, then it is enough to work with sandpaper. Then a new coating can be applied. But if the base is covered in several layers, they are thick, then the coating must be removed.
Home First Aid Kit: Baking Soda
If you have baking soda on hand, you can dissolve it in warm water and use this solution as a cleaning agent for a white plastic window. Baking soda is not only used in the kitchen for baking cakes, but is also a well-known cleaning agent. Baking soda (chemical name sodium bicarbonate) primarily softens water and is a very important reagent for cleaning anything with water. In addition, using baking soda can remove or neutralize any odors.
Baking soda is safe for human health and the environment (completely biodegradable), and it also has bleaching properties, which is important in the case of a white plastic window. Alternatively, you can use it as a powder. Just do not overdo it when rubbing the surface of the PVC profile with this cleaning agent.
Window sill in the nursery: how to use the usable area
Today there is a tendency not to hide the window sill behind curtains, but to use the usable area to the maximum. Designers and furniture makers strongly suggest using it under a tabletop, using it as a shelf, sofa, chest of drawers, etc. Is this real? Certainly! We offer several ideas on how to use a window sill in a children's room.
designremont.com
Let's start with, perhaps, the most trivial solution. A wide window sill is the dream of any housewife and flower girl. Naturally, there is nothing more important than her violets, ficus, cacti and other green friends, which a priori will lay claim to a new living space. And let the whole world wait! There will be flowers on the windowsill. From now on and forever!
img0.liveinternet.ru
If the flowers have won and taken their place in the sun on the windowsill in the nursery, it is worth considering the fact that part of that same sun will be “eaten up” by the flowers, so it is better not to place bulky pots with tall plants on the windowsill. Let the sun smile on the owner of the nursery, and not just on mother’s flowers.
sovgavan.ru
The second solution, which suggests itself, is to turn the window sill in the nursery into a work desk. It's easy to extend a window sill and turn it into a tabletop. Only heating radiators can cause minor troubles, but they can be replaced with more compact ones or even moved aside. As an option, make holes (decorative grille) in the countertop to allow warm air to escape.
lamcdn.net
poryadokvdome.com
mtdata.ru
inohouse.com
If it is not possible to move the battery, it is worth using it to its advantage. For example, provide special fastenings for buckets with office supplies.
lamcdn.net
If the level of the window sill differs significantly from the height of the table, you can arrange additional storage space under the window sill. The battery in this case is also a significant hindrance; you should think about how to get rid of it correctly.
design-homes.ru
cdn14.mdomukr.smcloud.net
Many modern apartments have bay windows. The space under them can and should be used wisely. Additional storage containers will not be superfluous. If we are talking about a children's room, then in such “sofas” it is convenient to store toys, books, bedding, etc.
www.onekindesign.com
If there are people in your house who like to sit with a book in their hands, a wide window sill is THE place where you can get a true thrill from the process. It wouldn’t hurt to show children by your own example that reading is interesting, especially in such an unusual place. A cozy sofa with pillows surrounded by bookshelves - why not a secluded corner? And there is a lot of light, and no one bothers you to watch the landscape outside the window.
www.onekindesign.com
www.onekindesign.com
www.tvoydesigner.ru
www.onekindesign.com
www.onekindesign.com
interiorizm.com
Without a cat, life, as you know, is not the same. If you are lucky enough to have a wide window sill, forget it. Forget that you have it (the windowsill, not the cat), it no longer belongs to you. Whatever you decide to place there, the cat will silently do it in his own way. And period! Who is the head in this house?
design-homes.ru
remoskop.ru
Dear readers! Tell us how you solved the problem of window sills in your apartment. Perhaps your interior solutions will be useful to someone else. We are waiting for your comments.
We bring to your attention programs of developmental classes with therapy dogs, depending on the age of the child and your wishes:
- Training to free dogs from fear. 3+
- “Read to the Dog” therapy dog sessions. 5+
- Lesson for kids “Hugging Dogs”. 0+ (up to 3 years)
- Educational lesson “For children about human and canine professions.” 4+
- Training sessions with therapy dogs as part of a creative camp. 8+
- Classes with therapy dogs and children with developmental disabilities. 5+
- Developmental course “A dog is a man’s friend.” (4 lessons). 4+
How to paint a wooden window sill with your own hands - step-by-step diagram
Step 1: Remove the old coating
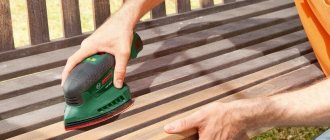
There are several methods for removing old paint. The first method is to peel off the old paint using a hair dryer. Be sure to ventilate the room, as the paint, when exposed to high temperatures, will begin to emit a very unpleasant odor. The second method takes longer, but is also the cheapest. To do this, we will need sandpaper, with which we need to clean the window sill from the coating. Sandpaper will help not only remove old paint, but also level the surface of the window sill.
Step 2: Apply Primer
If there are any unevenness on the surface of the window sill, they must be covered with putty, which was prepared not with water, but with soil. However, before this, you should definitely degrease the window sill, remove small debris and thoroughly wipe off dust. The next step is to level the surface with a spatula. A day later, when the composition is completely dry, go over it again with sandpaper.
Step 3: Protect surfaces from paint
If you don’t want to spend a few more days scrubbing the paint off the floor and furniture, be sure to cover all objects and furniture close to the windows with regular film, and the area in front of the window sill is usually covered with masking tape. Plain newspapers are great for protecting the floor.
How to get rid of paint and solvent smells
- After chemical and thermal removal, an unpleasant odor remains in the room. There is only one method to get rid of it - ventilation. So, if you leave the windows open for a day, then the next day there will be practically no smell left.
- There are also several methods for removing paint smell from a room without windows (toilet, bathroom). Special charcoal will help with this. There are also modern carbon filters that are connected to the ventilation system.
- Our parents, when it was necessary to eliminate an unpleasant odor, left a lit candle in the room, which caused the acetone and solvents in the air to burn.
- Vinegar and baking soda, which are found in every home, can absorb odors. Vinegar must be poured into a wide container to increase the area of contact with air. You can simply sprinkle baking soda on the floor.
You shouldn't expect a magical effect from these methods, but they are more useful than masking the smell with mint, vanilla or other flavorings.
you should use a respirator directly during the work process . This is extremely important for maintaining health.
As you know, the best treatment is prevention. To prevent the smell from remaining in the house for a long time after removing paint, be sure to work with the windows open. Also, do not leave garbage in the room - remove it immediately upon completion of work. The same goes for cans and bottles of paints and solvents. They need to be tightly closed and removed from the living area.
A few simple techniques will help you maintain cleanliness during renovations:
- cover the floor with film or newspapers;
- curtain the door to prevent dust from entering neighboring rooms;
- place a damp cloth for your feet at the entrance;
- take out all the furniture; if this is not possible, cover it.
And finally: don’t delay the renovation, and order will quickly reign in the house. And you can do everything in a short time only if you choose the right tools.
How to paint without having to repaint?
There is a huge difference between painting a fence and a wooden frame. There are a lot of subtleties in painting a frame that many people forget about. You need to start painting, as strange as it may sound, with wet cleaning of the room. Dust, if not removed, will settle on fresh paint and “steal” the shine and brightness of the surface.
All fittings must be removed from the frame before starting work. Firstly, latches and hinges with stains of paint do not look very aesthetically pleasing, secondly, they perform their functions much worse, and thirdly, the fittings interfere with covering the surface effectively enough.
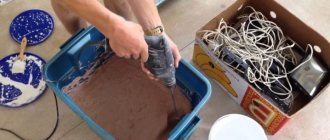
Then you need to remove the old paint. With a spatula, a sander or a drill attachment - the choice is yours. The main thing is to do this carefully, without leaving mechanical damage on the frame itself. The paint can be softened with special means beforehand.
Traditional methods
If the above methods do not suit you, use traditional methods. They are more effective than mechanical methods and cheaper than chemicals. Among the folk recipes are:
- solution based on ammonia;
- soda-based solution;
- a mixture of chalk, lime and caustic soda.
Ammonia
We wet a piece of cloth with a solution of ammonia, and then wipe off the dirt. As soon as the marks completely disappear, dry the area with a regular napkin. After ammonia, the glass will shine like new.
Mix baking soda with water until you get a paste. Apply it to the damaged area and leave for a few minutes. We wash off the excess paste and wipe off the stain with a knife blade or scraper.
Lime, chalk and caustic soda
To prepare the solution we take:
- 30 grams of lime;
- 10 grams of chalk;
- 10 grams of caustic soda.
Mix lime and chalk. We dilute them with water until the consistency resembles liquid sour cream. Mix the soda.
We treat the required area with the resulting substance and give it several hours to dissolve the paint. We wipe off the excess with a damp cloth, and remove the remaining paint using a stationery knife.
To avoid having to wash off the paint after painting, it is worth taking some measures to prevent it from getting on the window. The glass, frames and window sill must be covered with polyethylene or sealed with tape.
Sometimes it is impossible to avoid accidental hits. Therefore, before painting, it is recommended to rub the glass and frame with laundry soap. After finishing the work, stains of fresh paint will be easily washed off from the soaped surface.