Advantages of non-woven wallpaper
Non-woven wallpaper is based on a special two-layer material , one part of which consists of cellulose and the other of textile fibers. They are bonded together with a very thin layer of a polymer substance resembling glass wool. This composition has high performance characteristics that distinguish this type of coating from others. On sale you can find both plain embossed wallpaper, intended for subsequent painting, and colored wallpaper with all kinds of designs.
Wallpaper made from this material is deservedly popular, which is due to the numerous advantages of non-woven products . These include:
- High strength , especially when compared with paper wallpaper. When working with non-woven fabric, you don’t have to worry about the fabric tearing at the most inopportune moment.
- Stability. After drying, the material does not shrink, so the joints of the coatings will not separate under any conditions.
- Convenience at work. You only need to apply glue to the ceiling, leaving the canvas itself dry. This is very practical and allows you to cover a room alone.
- Great looks. Everyone can find a product with a suitable pattern that will transform any room.
- Practicality. Wallpaper for painting can be renewed several times, and when replacing non-woven coverings, it is enough to remove only the top layer, while the bottom will make the surface stronger and smoother and will facilitate the next pasting.
- Possibility of gluing on different types of ceilings - both wooden or concrete, and plasterboard.
- Durability. This product will easily last about 10 years.
- Easy to care for. A non-woven ceiling can only be vacuumed or wiped with a damp cloth from time to time.
Types of wallpaper
There are two main types of non-woven wallpaper.
Non-woven base
Wallpaper based on it consists of a backing and an outer decorative covering.
Distinctive properties
- This non-woven ceiling wallpaper is double-layered.
- The backing is a canvas made of compressed textile fibers (non-woven fabric).
- The outer decorative layer is usually made of finely porous vinyl, which is given a certain texture and color.
- Non-woven wallpaper has an absolutely smooth back side.
Full non-woven wallpaper
Structured non-woven wallpaper wins the competition with conventional materials.
Distinctive properties
- This is a structured wallpaper for the ceiling.
- The relief is rolled - the wallpaper is rolled through special rollers.
- On the reverse side of the canvas, the reverse side of the relief is visible.
- They are very strong and durable.
Manufacturers also produce two types of non-woven wallpaper specifically for painting : painted and unpainted. Wallpaper is usually painted in light colors - green, yellow, blue, pink.
Note! After applying paint to painted wallpaper, its shade will change slightly. However, the newest non-woven wallpaper for ceilings has a winning advantage: they are able to withstand repeated repainting without losing strength and texture properties.
Non-woven wallpaper can be smooth, embossed or corrugated by surface type.
Such wallpapers can be:
- plain;
- with a very small, almost monochromatic pattern;
- with an embossed small pattern;
- with a large geometric or floral pattern;
- multicolor.
Ceiling wallpaper with a pattern is usually used in living rooms, children's rooms, and bedrooms.
Preparatory activities
Before gluing non-woven wallpaper to the ceiling, you must first prepare it properly. High-quality preparation will guarantee that the pasting process will go faster and the wallpaper will last longer. Here are the features of work on different types of ceilings:
- If whitewash with lime or chalk has been applied to the surface , it must be thoroughly washed off with warm soapy water using a rag or brush. If the whitewash layer is thick, you should use a spatula to remove it, and then remove the remaining chalk with water.
- There is no need to wash off oil-based or dispersion paint from the ceiling before pasting. The main thing is that it does not crumble, because this will prevent the wallpaper from holding firmly in the future. To check how well the paint is set, just attach a strip of tape to the ceiling and then quickly tear it off. If the tape is clean, you can start gluing, having first cleaned the surface of dust. Otherwise, you will have to get rid of the paint.
- Concrete or plastered ceiling surfaces must be leveled. All deep cracks should be filled with putty, dried, sanded and primed. Small irregularities can be left, because non-woven fabric is a fairly dense material that can smooth out minor imperfections on the surface to be pasted.
- The plasterboard ceiling requires the most work. It is necessary to smooth out all the joints between the plates and the places where the screws are attached. This is done using putty and reinforcing tape. After drying, the areas are leveled with sandpaper and primed. Next comes the stage of finishing putty over the entire coating area, which can be skipped if the plasterboard boards are of a light shade. As for priming work before gluing, it must be carried out very carefully, since if it gets too wet, the drywall may delaminate.
- In wooden houses there are ceilings made of OSB and plywood. You can also stick non-woven wallpaper on them. The main thing is to remove any existing irregularities, and cover the OSB surface with starting and finishing putty and prime it. On plywood, you can simply smooth out the joints and apply a primer after drying.
How to properly glue non-woven wallpaper
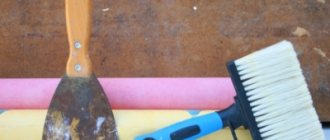
In order for the material to last a long time and please the eye, you need to know how to hang non-woven wallpaper. To begin, prepare materials and tools for work:
- glue;
- water;
- container and tool for mixing glue;
- stationery knife or scissors;
- brush or roller for glue;
- foam sponge or silicone spatula.
The wallpaper must first be carefully measured and cut taking into account the length of the ceiling. It is best to leave allowances of about 3-6 cm on each side, this will help to fit the pattern faster and easier. In order not to get lost when gluing the strips, you need to make markings on the ceiling. When the non-woven wallpaper is cut, you can start preparing the glue. The packaging always gives detailed instructions on how to dilute the powder. It is best to follow it to the end, then the glue will be the correct consistency and suitable for work. You should not save money, but choose glue with an indicator. After all, when covering the ceiling with glue, a pink surface is formed. This allows you to distinguish places where glue has not yet been applied. After drying, the indicator loses its color and no traces remain.
Pasting the ceiling with non-woven wallpaper is not very labor-intensive; even one person can do it.
First, the ceiling should be treated with adhesive using a wide roller or brush, then wallpaper can be applied. During work, you must carefully ensure that the panel lies parallel to the previously outlined line. You need to make a small gap on the wall, and after drying, remove the excess. To remove air bubbles, you need to smooth the canvas with a special spatula or a simple sponge. Movements should not be chaotic; it is better to work from the center to the edges. This must be done before the glue is completely dry. The second canvas must be glued overlapping to the first, and then the excess must be carefully removed. Some craftsmen place two pieces of wallpaper end-to-end, because the non-woven material does not shrink when it dries. Both gluing methods are allowed. Excess glue must be removed before it dries, and you should not forget about air bubbles throughout the entire work. In order for the glue to dry well, it is necessary to close all the windows in the room and prevent drafts.
Calculation of material quantity
Before pasting, you should calculate the required number of rolls to purchase. It depends on the area of the room where the repair will be carried out, and also on the width of the product. The length of one roll of wallpaper is 10.5 m, and the width can be either 53 or 106 cm. It is faster and more practical to glue meter-long non-woven wallpaper to the ceiling.
First you need to determine the required strip length. To do this, you need to decide how to hang the wallpaper - lengthwise or crosswise. It is more convenient to place stripes along the short side of the room. It is very good if they are located perpendicular to the wall in which the window opening is located. Depending on the decision made, the length of one strip should be a distance equal to the length or width of the room, to which 10-15 cm is added for possible trimming.
Next, the number of stripes is calculated. To find out, you should divide the distance of the side along which the pasting will be made by the width of the wallpaper and round up. After such calculations, it will not be difficult to understand how many strips will come out of one roll and determine the required number.
Using non-woven wallpaper for repairs
The process is standard, as for all other types of wallpaper (for details, see How to glue non-woven wallpaper on the ceiling: useful tips for home craftsmen)
- Surface preparation.
- Cutting panels.
- And only the sticker itself is unique: we apply the glue only to the ceiling.
Note! The color of the ceiling on which we will glue the wallpaper must be uniform, because the non-woven base is slightly transparent.
We glue the wallpaper so that the edges of the panels only neatly join and do not run into each other.
Non-woven wallpaper painting technology
We will paint the interlining glued to the ceiling only after the glue has completely dried - in a day.
With high humidity or temperatures below 15 degrees, this time increases slightly. Painting this wallpaper can be done up to 7 times (see Painting wallpaper on the ceiling: the eyes are afraid - the hands do it)
For this purpose paints are used:
- water-based;
- latex;
- acrylic.
Dyeing process
- Cover the floor with plastic wrap or newspapers.
- We will cover the boundaries of the area for applying paint with masking tape.
- Pour the paint into a paint tray and carefully roll the roller in the paint so that it is absorbed more evenly, but does not drip from the tool raised to the ceiling.
- Paint hard-to-reach corners with a brush.
- We will paint the reverse side of the ceiling wallpaper with latex water-dispersion paint. Then, after drying, stick it to the ceiling. Only the interlining for the ceiling will be painted, and the structure will still be white.
- We will paint the ceiling itself with bright paint, intended for subsequent wallpapering. After drying, we will glue the wallpaper for the ceiling: now the color is slightly visible through the translucent non-woven wallpaper.
- Lightly treat the embossed part of the already pasted wallpaper with a hard (lint-free) rubber roller without pressing, so that the paint does not get into the recesses.
- By combining wallpaper of different colors we can achieve an imitation of fashionable multi-level ceilings.
Unusual ways to paint non-woven wallpaper
Stages of work
After completing all the preparatory work and purchasing the material, you can begin gluing the ceiling. First you need to remove all the lamps from it and close the windows to prevent the formation of drafts. Since wallpaper is measured and cut on the floor, it must be clean and dry.
Preparing the adhesive solution
Non-woven wallpaper requires special glue . Therefore, when choosing it, you should pay attention to what products this or that type of glue is intended for. The types with coloring pigments are very convenient to use. This way you won’t be afraid to miss any area when applying glue to the surface.
The adhesive solution must be prepared in strict accordance with the attached instructions. Some experts even recommend taking a little less water than the manufacturer advises. This will make the solution thicker and enhance its adhesive properties.
Pasting process
Many people who are planning to do ceiling papering for the first time consider the work ahead to be very difficult. This is not at all true, because the ceiling surface is usually much smoother than the walls, and besides, there are no extra openings, corners and a large number of sockets that interfere with the process. But in this case you will still need an assistant.
The gluing process itself consists of the following steps:
- Markings are applied to the ceiling. To do this, the width of the wallpaper is marked at both ends, and then they are connected with a cord along which a line is drawn with a pencil or chalk;
- The roll is rolled out face down on the floor. The distance corresponding to the required length of the strip is marked on it. If you choose wallpaper with a large pattern, it must be lined and each stripe must be numbered. It is better to cut a piece using a sharp stationery knife;
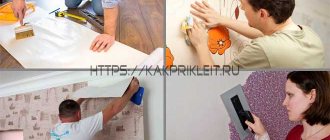
- Glue is spread evenly onto the ceiling. This can be done using a paint brush or a roller with a long handle;
- the cut strip is aligned with the markings and pressed tightly against the surface. If 2 people are working, one holds the end of the strip, and the second does the gluing. When the worker is alone, the strip should be rolled up, one end glued, and then, gradually unrolling the roll, move to the opposite side;
- the panel is carefully smoothed with a spatula or rubber roller to remove air bubbles and get rid of wrinkles. Movements are made from the center to the edges;
- the wallpaper is wiped with a soft cloth to eliminate traces of glue;
- the strips are glued end to end;
- At the point where the lamp is located, a cross-shaped cut is made through which the wires are brought out. After they are removed, the panel is pressed firmly along the edges of the incision. The decorative box of the chandelier will make it invisible;
- Excess wallpaper is cut off with a sharp knife, running it along a ruler or spatula tightly pressed to the surface. Trimming can be done both after gluing each strip, and at the end of the work.
After completing the work, you should wait until the wallpaper is completely dry, without opening windows or connecting lamps. In winter, it is recommended to cover the batteries with a slightly damp cloth, otherwise the glued panels may fall off.
Ceiling finishing
Before gluing non-woven wallpaper to the ceiling, turn off the power and remove all lamps. Ensure the room is at normal temperature and free of drafts.
Preparation of glue
For non-woven fabrics it is necessary to use special glue. Usually it is purchased together with wallpaper - the seller will advise you which glue will not turn yellow over time and will be easy to use.
Don't be afraid to buy pigmented glue: after drying, it becomes discolored and leaves no residue. But it is much easier to work with.
Methylane glue with color indicator
Be sure to follow the proportions of dry glue and water specified by the manufacturer and the technology for preparing the composition. This information is contained in the instructions for the drug.
Advice. To paste the ceiling, the glue can be diluted even a little thicker than required.
Wallpapering
For those who are going to wallpaper the ceiling for the first time, this work may seem more complicated than pasting the walls. In fact, the absence of openings, corners and many sockets will make your task easier. But having an assistant is still very desirable.
Wallpaper sticking process:
- Apply markings for the first piece of wallpaper. To do this, set aside at the joints of opposite walls and ceiling a distance equal to the width of your wallpaper, subtracting a couple of centimeters from it. Connect the resulting marks using a cord stretched between them.
Marking the ceiling for wallpaper
Attention! The marking should be done parallel to the light flux, i.e. perpendicular to the window. In this case, the joints will be less noticeable.
- Cut out the rolls of canvas along the length, taking into account small overlaps on the walls on both sides. Cut the roll along the line drawn with a square.
Cutting cloths
- If wallpaper with a pattern requires adjustment, then number the canvases so as not to get confused.
Adjusting the pattern
- Cover the floors with film or paper and, using a brush or roller with a long handle, apply glue to a strip on the ceiling, slightly wider than the width of the roll. As already mentioned, the non-woven wallpaper itself does not need to be lubricated with glue.
- The most difficult part begins: how to stick non-woven wallpaper on the ceiling. To do this, one person stands on the sawhorse, and the second one gives him the canvas and holds its free end while the first one glues the wallpaper, pressing it tightly to the surface and aligning the edge with the markings. In this case, the opposite edge should be slightly on the wall.
Gluing the first sheet
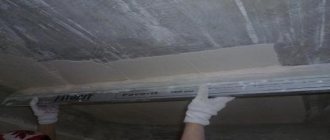
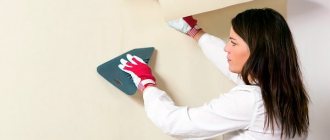
- After gluing, the wallpaper panel must be leveled from the center to the edges using a plastic spatula or rubber roller, getting rid of air bubbles and folds. The edge extending onto the wall must be pressed firmly against the corner with a spatula or metal ruler and the excess must be cut off with a utility knife.
- The excess along their short side is also cut off.
Trimming excess
- Do not forget to immediately wipe off any traces of glue that get on the wallpaper with a soft cloth.
Traces of glue are removed before it dries
- The second panel is glued butt to the first. Do not be afraid that the joints will separate after drying - this will not happen with non-woven wallpaper.
You can’t do this without an assistant
- To paste the ceiling in the area of the lamps, a cross-shaped cut is made in the wallpaper, through which the wires are released. And the products themselves are pressed tightly against the edges of the hole for the chandelier or lamp. After installing the decorative box, the cutout will not be visible.
Important! Install lamps and connect them only after the wallpaper has completely dried!
That's all - your ceiling is covered. To prevent the canvas from falling off, try not to open windows and doors in the room so as not to create drafts. And do not proceed with subsequent finishing until the wallpaper is dry.
To determine if the ceiling is dry, stick a small strip of tape to it. If droplets of moisture do not appear on it after a few hours, it means everything is dry.
Coloring
Very often, ceilings covered with non-woven wallpaper are painted with acrylic or water-based paint (see How to paint a ceiling with water-based paint). The paint is selected depending on the color of the walls and the entire interior.
Before applying paint to the top of the walls, if they are already finished, apply masking tape to avoid staining them.
The paint is applied with a soft roller in the same direction in which the canvases were glued - perpendicular to the window. After the first coat of paint has dried, it is advisable to apply another one so that there are no unpainted areas left.
If there is stucco on the ceiling, it is painted with a brush.
Repainting
Ceiling painting
If you purchased wallpaper that requires subsequent painting, you should start it only after the ceiling is completely dry. As for paint, dispersion, latex and water-based types are suitable. The shade depends on the preference of the owner of the room, but it is better to choose more delicate pastel colors. This is especially true for rooms with low ceilings.
It is recommended to apply the paint with a short-nap roller. You need to do this 2 times. The first layer is applied perpendicular to the wall with the window, and the next layer is applied parallel to it. This method of painting ensures that there are no noticeable stripes on the ceiling. If there are decorative elements on the ceiling surface, they should first be attached to a permanent place and painted with a brush. Painting wallpaper and elements must be done at the same time.
A ceiling covered with non-woven wallpaper will not require large expenditures and will please its owner for a long time.
Ceiling design
Non-woven wallpaper for ceilings
The appearance of the ceiling covered with wallpaper and the room as a whole depends on the correctly selected pattern, color and placement on the ceiling surface.
In this regard, experts recommend the following:
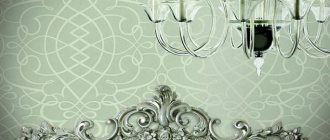
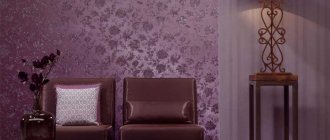
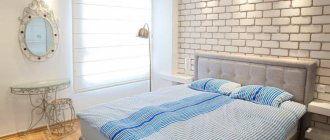
- When choosing a shade of material, take into account the purpose of the room and the overall color scheme of the interior. Thus, it is customary to choose rolled products in beige and pastel colors for the bedroom. You can choose bolder colors for the living room - blue or purple. When choosing a black color, take into account the area of the room and good lighting;
An expressive pattern against the background of other neutral finishes will become the main accent spot in the interior
- An unusual effect can be obtained by combining several shades. This technique looks especially good on a multi-level plasterboard ceiling. By combining plain and colored fragments, you can visually divide the room into several functional zones;
- If you see that there is a lack of natural light in the room, then the canvas can be varnished, giving the surface a glossy shine;
The color scheme of the material must match the overall tone of the interior
- Colorful rolled products on the ceiling can be used in those rooms where the rest of the decoration is made in no more than two soothing colors. In this case, it will be possible to create a bright accent spot in the interior;
- In the bedroom, photo wallpaper depicting a forest or seascape will look organic;
Decorating your office with photo wallpapers
- For the nursery, roll products of the appropriate theme are chosen - fairy-tale characters, animals, princesses and cars will appeal to all children without exception;
- For the bathroom, you can choose images of the underwater world with exotic algae and fish or sunken ships with treasures. The marine theme can be supported with striped white and blue canvases. Stripes will help visually adjust the size of a small room;
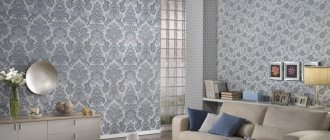
- For the living room, a floral or geometric print, or an image of the sky is often chosen;
The direction of the ornament allows you to make adjustments to the geometry of space
- When choosing embossed roll products with a pattern or ornament that have a clear top and bottom, you need to know that it is not recommended to paste both the ceiling and walls with this material at the same time, since the pattern will be perceived upside down. It is enough to paste over the ceiling and one wall to avoid this;
- More often, the paintings on the ceiling and on the walls differ in pattern;
- It is advisable that the wallpaper pattern does not need adjustment - this way the work will be completed faster;
Decorating ceilings in the bedroom
- With the help of voluminous and embossed wallpaper, you can disguise the imperfections of the base. This material is good for painting.
Important! To make the ceiling look complete, you need to use a ceiling plinth of small width, up to 5 cm.