Do you doubt whether you can glue wallpaper to plywood? You're doing the right thing, because there are many pitfalls waiting for you. But you can bypass them, and we will tell you how to do it.
Pitfalls and ways to eliminate them:
- Plywood absorbs moisture from the air. Over time, a height difference appears at the joints, or the base moves in a wave. But this will not happen if a gap of 5 mm is left between the sheets. Then the material will have room to expand. In damp rooms, the problem is solved by covering the walls with FSF plywood of increased moisture resistance.
- Metal screws and nails disrupt the evenness of the surface and rust over time, leaving rusty spots on the wallpaper. To prevent the fasteners from protruding outward, their caps must be recessed by approximately 1 mm. And if you treat them with varnish or drying oil, they will not rust.
- Old plywood sheathing already has height differences. In such cases, putty and adhesive mesh tape – serpyanka – help hide the unevenness. First, a mesh is glued to the joints - it will firmly hold the putty mass. Then they are puttied, making a smooth transition between heights. Plywood should be puttied with a compound intended for wooden surfaces.
Not all wallpapers can be glued to plywood. Simple paper ones will quickly tear and become covered with rusty spots. Plain ones are also not suitable - they will show the slightest differences in height. Best of all, the shortcomings of a plywood base are hidden by bamboo, reed or liquid wallpaper. From budget materials, vinyl and non-woven wallpapers cope well with this.
Types of wallpaper glue
The entire product line can be divided into three groups. Each has its own technological composition. In order to answer the question of how to choose an adhesive for gluing wallpaper on wood, it is important to understand the features of the process itself.
Types of glue for different types of coating:
- For light wallpaper. The composition includes a base (97%), fungicide, bactericide (3%).
- For heavy wallpaper. Suitable for vinyl and thick paper materials. PVC (25%), bactericide and fungicide are added to the base.
- Universal. It is characterized by the fact that it contains components in small proportions and can be used with different wallpapers. But experts still recommend choosing the right type.
- For non-woven wallpaper.
- For glass wallpaper. This is a dispersion adhesive with a high concentration of PVC. It can also be suitable for fabric, metallized and laminated wallpaper.
Wallpapering
The technology itself is no different from conventional technology. The difference is the preparatory process.
- The surface is cleaned of dust and dirt. The seams should be cleaned especially carefully. If the material was coated with varnish or wax, the top layer will have to be removed. To do this, the lamellas are cleaned with sandpaper.
- Plastic slats are simply wiped with a damp sponge.
- It is recommended to putty the seams between the slats. This ensures at least relative durability of the finish.
- Both wooden and plastic surfaces are primed in several layers. Typically an acrylic latex primer is used.
- Then they begin gluing in the usual manner: apply a layer of glue, start working from the corner from the window, and so on. The photo shows a working moment.
Application of liquid wallpaper
This material is a cross between plaster and wallpaper. The similarity with the first is ensured by the method of application, with the second - a higher decorative effect due to the addition of various components: silk fibers, metal threads, mica and others.
The idea of covering the paneling with liquid wallpaper turns out to be even worse. The material really resembles plaster and fills small gaps, cracks and chips, as it is quite voluminous. It can fill the seams between the lamellas, but the material consumption will increase sharply, and this kind of finishing will cost more than dismantling the lining and preparing the base surface.
The seams between the lamellas can be filled with regular plaster. Then the total cost will not be so high.
The surface of the lamellas must be sanded and treated with a primer that increases adhesion. How to hang wallpaper on lining is covered in detail in the video.
Wallpaper in a wooden house: types of products and installation features
Wallpaper in a wooden house is selected based on the personal preferences of the owners of buildings and the creation of protective properties for vertical and ceiling coverings. Different types of products are characterized by their inherent advantages and disadvantages. They differ in application and operation technology.
Wallpaper for decorating a wooden surface
Selection of materials
- Wallpapering in a wooden house is done with paper and more expensive products, but paper has breathable properties. Performance characteristics are characterized by rapid wear of low-quality natural material.
- Vinyl wallpaper for a wooden home desktop comes in the form of synthetic materials that are easy to clean, do not fade or deteriorate. When applied, the rolls are not stretched in width, which threatens to create a crumpled surface.
- Liquid wallpaper in a wooden house is used to decorate surfaces with the ability to fill small cracks and seams.
- The cellulose version is used to eliminate wrinkles and bubbles on the walls. They are reusable and practical.
Wallpaper for finishing wooden floors
Preparing the walls
So, we glue wallpaper in a wooden house. At the first stage, plastering of the surface is carried out. This is facilitated by the creation of wooden shingles from thin slats placed at an angle in opposite directions. When finishing a plank surface, it is enough to rinse and clean the products. If the precoat is oil paint, it is sanded and primed.
When understanding the issue of how to hang wallpaper in a wooden house, it is important to remember that when drying walls, natural technologies are used without heat guns and heaters. Preparing the walls involves temporarily removing the baseboard. It will need to be mounted in place after gluing the products.
It is important to exclude sockets and ventilation grilles. Putty is used to smooth panel seams. At the end of the work, the structures are treated with a primer.
Wallpaper for covering wooden walls
The process of wallpapering wooden walls
The process of applying panels begins with gluing decorative sheets from the outer corner. It should form an angle of 90 degrees. To take measurements you will need a level.
The first canvas will have longer parameters. This facilitates the fit of products. If you need to create a vinyl covering, it is recommended to lubricate it with glue and leave time to saturate the surface.
Applying wallpaper to wooden walls
You can avoid excess glue consumption by preparing a special bath. There are wallpapers that can be applied with a damp sponge or spray gun. The sheets are placed from ceiling to floor. The decoration begins from the window. Use a rag or soft spatula to smooth out bubbles.
The application of the following canvases is carried out by alignment along the first strip. At corners and joints, laying is done with an overlap. Strips from rolls are pre-cut. Paper wallpaper is equipped with an edge located on the right side. The edge should be cut carefully.
Wallpaper for solid wood walls
Wallpaper with a pattern should match at the joints. The rolls are cut into pieces with preliminary laying out on the floor to take measurements.
The panels are prepared by laying them in a stack on a clean floor. In this case, each underlying product should protrude by 1-2 cm. This facilitates their convenient separation before gluing on the wall.
While the wallpaper is still wet, you can create gaps for sockets and ventilation. Within 2 days the strips should not come off at the joints.
Wallpaper for walls made of wooden beams
Liquid wallpaper
Processing of wooden coverings, plywood, fiberboard, MDF and other coverings is not carried out everywhere. Before application, you should ensure that it is securely attached and that there is no deformation due to moisture. The thickness of the sheet is also taken into account; the thinner it is, the greater the likelihood of deformation. The surface is decorated after placing 2-3 layers of primer with water- or oil-based paint.
Preparing the mixture
The contents of the box are poured into a container with 30-40 g of water. The ratio of proportions is indicated on the packaging.
Primer for wallpaper
The powder is poured out gradually with thorough mixing and swelling for 30-40 minutes.
Various pigments, glitter, etc. can also be added there. This process is ensured at the stage of preparing the mixture. Its volume must be consumed at one time. Creating different batches creates a difference in color. Mixing the mixture is done manually.
Application of liquid wallpaper
Placement is made with neat strokes in a layer of 1-2 mm. The tool used is a spatula or a special plastic trowel. Curly spatulas give a textured look.
Wallpaper for wall coverings
After a few you need to check how smooth the coating is. If there are small defects, they are removed with a spatula soaked in water. To create a better quality coating, bright lighting is used.
Drying of the surface is carried out using a technology similar to conventional paper products. It will take 1-3 days to dry.
Attention!
Liquid wallpaper is not recommended for use in rooms with high humidity, for example in the kitchen or bathroom.
Wall covering with liquid wallpaper
Important Tips
- If there are deep recesses (2-3mm), you can finish it with liquid wallpaper, which allows you to hide these defects. There is no need to spend extra money on repairs.
- The tinting of the substrate is carried out using a decorative surface made in a bright design. The backing is made from a material that forms the same shade as the decorative coating.
- The use of 3 layers of paint is due to the fact that the first and second layers are absorbed into the surface, so their protective characteristics tend to zero. By using a primer, you can reduce paint consumption.
Wallpaper for finishing work in a timber building
Attention!
Decorating a wooden house with wallpaper increases its fire hazard properties. In addition, the walls do not allow air to pass through well and form fungus.
However, we cannot exclude from attention the opportunity to hide minor defects and efficiently insulate the room. The top coating of modern products is easy to clean and replace.
Which wallpaper is better to choose
It is not advisable to glue paper sheets onto plywood. They will make visible the joints and defects of the slabs. Paper has low elasticity - with changes in humidity, the canvas will shrink and tear. When, contrary to the advice of the masters, the choice is made on the paper version, it is worth gluing the joints with sickle tape, preventing the canvas from tearing.
Vinyl and non-woven wallpaper are good finishing options. Such a coating will reliably protect wood building material from moisture. Textured volumetric canvases will successfully hide surface unevenness and sheet joints.
Expensive textile and velor, environmentally friendly bamboo and jute, fiberglass and even liquid wallpaper are suitable for finishing plywood. The materials will create a beautiful relief, making the imperfections of the walls invisible.
Try decorating the interior with duplex wallpaper, which can be:
- smooth;
- embossed;
- for painting;
- corrugated.
What will you need for work?
After completing the preparatory work and completely drying the primer and putty, you can glue the wallpaper onto the plywood. To do this, you need to stock up on the following tools and materials:
- wallpaper glue and a container for diluting it;
- conical roller for joints;
- a knife with a retractable blade;
- level for vertical marking of the first strip;
- a lint roller for applying glue and a cuvette;
- foam roller for pressing wallpaper;
- rags to remove excess glue.
A glue roller with a telescopic handle will be a good helper both when gluing walls and when decorating the ceiling. It will help save both energy and time.
Basic Steps
Before you hang wallpaper on the lining, you need to select and buy it. Let's start with this:
Step #1: selection
The selected canvases should be:
- Dense . Preference should be given to products with a non-woven base. Although their price is higher, they will last longer and be of better quality;
Non-woven fabrics, due to their high density, can easily withstand the mobility of wooden sections
- Textured . These will better mask the gaps between the panels.
Dense textured samples do not fall through at the joints, but stretch over them and hide any unevenness underneath
I recommend buying canvases that are impregnated with special glue. They adhere much better to wooden surfaces.
You can also put photo wallpaper on the lining. They are distinguished by a fairly high density, have a wear-resistant coating and are able to give a wooden wall not just a new, but simply a fantastic look.
Thanks to photo wallpaper, a simple lining can even acquire a landscape of another planet
Another interesting trick is to use wallpaper under the lining. It is convenient to use in cases where the warm soft wood-colored finish suits you quite well in terms of its visual qualities, but is already quite worn out, and there is not enough money to fully replace it.
The canvases can externally repeat the lining pattern
Step #2: Cleaning the Panels
Is it possible to glue wallpaper onto wooden sections right away without any preparation? Of course not, first the foundation must be properly prepared. And you should start by cleaning it, since over the years of operation a lot of garbage has probably accumulated on it:
| Photo | Description |
| We remove all dust and cobwebs from the surface of the wooden panels with our own hands. To do this, use a slightly damp but very wet rag or sponge. | |
| We sand damaged areas, chips, and rough spots so that the surface of the lining becomes as smooth as possible. |
I do not recommend using cleaning products that contain wax, polish or oil. They will create a layer that interferes with the quality fixation of the adhesive sheets.
Step #3: preparing the site
Further instructions for preparatory work look like this:
- Carefully remove the floor and ceiling fillets so that after all work is completed they can be installed back. Why spend money on new ones if you can successfully use the old ones?
- We dismantle sockets and ventilation grilles , if any. It is much easier to then cut out the corresponding hole in the canvas and install the object back than to engage in appliqué to get around problem areas.
Step #4: Primer
Despite the fact that wallpaper sticks to wood quite well, it doesn’t hurt to prime it first. This way you will reduce the absorbent properties of the wooden panels, so you will need much less expensive glue.
| Photo | Description |
| We dilute a primer, which can be bought at any specialized store. | |
| Apply primer evenly to the lining using a wide brush or roller. |
Step #5: gluing
- We close all doors and windows . Drafts during the described process are unacceptable; they will lead to peeling of the finishing material even before the glue that is supposed to hold it dries;
- We measure the height of the wall in the corner where wallpapering will begin. It is also advisable to measure the angle itself using a spirit level;
- We measure and cut the first piece . It is better to cut off the strip with a margin, since it is much easier to trim it later than to sharpen it using small inserts;
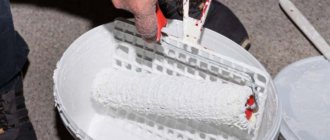
- We spread the glue. It’s even better to do this much earlier so that the solution has time to infuse;
It is convenient to stir the glue using a drill set at a low number of revolutions per minute.
- We wet a wide brush or roller in the adhesive mixture, squeeze out excess glue on the edge of the container;
I recommend using special containers with a ribbed wing for glue. It is very convenient to remove excess solution.
A couple of movements on the embossed surface will rid the roller of excess adhesive mixture
- Apply glue to the wall. If you purchased non-woven wallpaper, as advised in the first point, then you will not need to treat the canvases themselves with an adhesive;
How to choose wallpaper in a wooden house
It is advisable to choose wallpaper in a log house with a pronounced pattern: floral designs, plant patterns, birds. Wallpaper made of bamboo will look no less interesting. Embossed options imitating stone or wood have proven themselves well. These are horizontal stripes, circles or rectangles, depending on whether the log is round or imitation timber. In the photographs presented, the wallpaper pattern is consistent in scale with these dimensions. If the pattern is too small or too large, there will be an imbalance. In this case, you need to pay attention to the scale of the drawing, taking into account a certain pitch and the height of the log: usually it is 20–30 cm.
Flowers and smooth lines look great in houses made of round logs, and cages look great in houses made of laminated veneer lumber. It is difficult to match the shade of wallpaper to the natural yellowish color of the logs; together they look alien. To combine materials, choose a tone from the palette that is present in the wallpaper and paint the wood with it. This color will connect both materials into a harmonious composition. For example, in the photo, delicate colors and classic patterns on the wallpaper go well with slightly bleached logs.
To make neat transitions at the joints of textures, use wooden elements: moldings, cornices, baseboards. It is important to attach them correctly to the stationary part of the wall, given that wooden walls “shrink.” There are many more possibilities for decoration in a wooden house than it seems at first glance. The main thing is to approach this issue creatively or seek advice from professionals - designers, decorators. But it is important to take into account the professional experience of a specialist working with wooden houses.
Advice from professionals
● Finishing of log houses is carried out only after the house has settled, that is, at least 1.5–2 years after construction.
● When installing drywall, leave a space at the top for shrinkage. It is calculated depending on the material: laminated veneer lumber shrinks less than logs. the resulting gap is closed with a platband.
● Wallpaper is not glued directly to drywall, since when removed it is torn off along with the cardboard base. Before work, the walls are additionally plastered. The seams are filled with putty, and sickle tape is glued over it. The heads of the screws are well recessed and the resulting recesses are also puttied.
● Clean the board walls from dust, apply a primer intended for wood, and seal the joints with sickle tape.
● To ensure that there are as few joints between the canvases as possible, choose wallpaper that is one meter wide.
● Wallpaper can be glued to wall panels without special surface preparation. Embossed thick wallpaper can hide flaws in wooden panels. A wood primer is also applied to the panels before wallpapering.
Preparing the base
The “stumbling block” is the different thickness of the plywood sheets. When purchasing plywood for wall decoration, it is advisable to purchase sheets from the same batch, produced from the same press. Otherwise, after installation, you risk getting differences on the plane of 1-2 mm - wallpaper (especially thin paper) does not level the surface, but only emphasizes the imperfections.
It is possible to purchase plywood boards that have been stored in conditions of high humidity. Such plywood swells, quite a bit, but enough to increase in thickness by 1-1.5 mm. As a result, there is a difference at the joints, which is “conspicuous” under window lighting.
Types of wooden wallpaper
Due to the particular popularity of this material, many manufacturers have taken a new path in the production of finishing materials in the form of wooden wallpaper. It is worth saying that in a short time this idea has exceeded all expectations, and today wooden wallpaper for walls is attracting more and more attention in the consumer market.
Apartments and houses, offices and attics, any room decorated with wooden wallpaper, veneer and cork will always have an original design, elegance and solidity.
In total, this category of materials contains several versions:
- Products made from natural wood.
- Veneer wallpaper.
- Cork.
- An assortment of photo wallpapers on the wall imitating natural wood.
Very often, a wooden house is decorated with wallpaper in the same, appropriate style.
Such finishing material is made in the form of miniature plates, the width of which is from 5 to 20 cm. Manufacturers often make them with both a smooth surface and printed patterns.
This type of product is attached using a special glue, and the joining occurs using a standard groove-to-tenon mechanism. A wide variety of wood is used to make wooden wallpaper, but pine and spruce are usually classified as economy class. As for the premium class, it includes larch; accordingly, the quality and durability will fully correspond to the cost.
On the other hand, using larch finishing, you can carry out work in a wide variety of rooms, and even in those where the humidity level does not allow the use of spruce or pine.
Choosing wallpaper for work
It is equally important to choose the right canvas. Moreover, the construction market offers a lot of options to consumers. Products can be divided according to the following classification:
- Simple - paper options. They can only be cleaned with a dry cloth. Dampness and moisture are your worst enemy. The cheapest option.
- Waterproof wallpaper. They can be washed with a sponge and gentle detergents. The best option for gluing to OSB.
- Fading under the influence of UV rays. The label indicates whether the fabrics fade or not. This will affect further operation, especially if the room is on the sunny side.
- With customization of the pattern. The image on the wallpaper can be selected or not. The second option is simpler, since there will be less waste and gluing will take less time.
Each roll contains instructions with basic characteristics: is the wallpaper washable, what material is it made of, is it UV resistant, how many layers, is joining required, what glue should be used, etc. Having chosen the wallpaper, you can start gluing it on OSB.
How to prepare for gluing?
The result of the repair depends on the quality and volume of preparatory work done.
If you skip at least one stage of preparation, uneven walls will not look aesthetically pleasing, so it is better to hire a professional to process plywood sheets before gluing.
Stages of preparation for pasting:
- Sand the surface using a sander, a flat wooden block or a plastic sandpaper holder.
- Protection from moisture: impregnation of the ends with natural drying oil, the surface with a special composition based on PVA (water, PVA glue, copper sulfate).
- Puttying uneven areas with acrylic putty, filling the seams between sheets with putty.
- Re-grinding the surface.
- Treat the wall with a primer based on wallpaper glue (wallpaper glue and white paint in a ratio of 1:2).
- Cleaning the walls with sandpaper (if necessary).
You can start gluing only after the ground layer has completely dried.
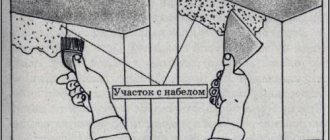
How to putty correctly?
Puttying is necessary to hide rough unevenness of the material, cracks, achieve equal thickness of the sheets and avoid the appearance of stains that may appear in the places where the plywood is attached to the wall.
The puttying stage cannot be skipped.
Gypsum and acrylic putties are suitable for treating plywood walls. Both types have pros and cons, but it is better to choose acrylic:
- Firstly, the putty is sold ready-made and does not need to be diluted with water.
- Secondly, they have good moisture-proof properties, which cannot be said about gypsum.
The disadvantage of acrylic is its high price, but since putty extends the life of the plywood, it is completely worth it.
- The putty is applied with a spatula to the entire surface of the plywood sheet, but you need to start from the joints, recesses from self-tapping screws, and large defects in the sheet.
- First, the most problematic areas are treated with the mixture, allowed to dry completely, then the entire surface is puttied.
- The final stage is the removal of traces from the spatula, random drops, and irregularities.
What types of materials are used for wall decoration?
The material is not suitable for interior decoration of rooms with high levels of humidity.
To finish the walls, you need moisture-resistant sheets with a thickness of at least 16 mm. The length of one sheet should be slightly greater than the height of the ceiling. Despite the variety of types and varieties of this wooden material, when finishing walls they are most often used:
- FSF is plywood based on resin formaldehyde glue, which consists of birch, pine or beech veneer. It has increased moisture resistance, strength, and is easy to install and process.
- Construction on a glued base. It is made from wood of almost any species, which determines its performance properties.
- Laminated - a material coated with a phenol film that provides moisture resistance to the finished sheets.
- FC is a material made from veneer of coniferous or deciduous trees, bonded with carbide-formaldehyde glue.
When choosing, take into account the purpose and area of the room, brand, type of material, sheet sizes, type of wood used for it.
How to properly hang wallpaper on plywood
Since its inception, plywood has been used in construction to line walls.
New materials and technologies have undeservedly pushed plywood out of this niche - it is cheaper and faster to level the walls with plasterboard boards or inexpensive gypsum putty. In the decorative decoration of the premises, mainly sheets of elite and first grade plywood were used. With the development of wooden frame construction and people’s desire for environmentally friendly housing, plywood has received the opportunity to be rehabilitated as a material for interior decoration - high-quality grades of plywood sheets (E and 1st) are used for decoration, secondary grades (2nd, 3rd, 4 th) - brought to the required condition by painting or wallpapering.
Tips for buying wallpaper glue
All construction and repair work directly depends on the quality of the glue:
- When purchasing glue, you need to pay attention to the type of wallpaper. If it is a paper version, then feel free to buy any glue. For example, for fabric wallpaper it is better to use a vinyl mixture. It is very comfortable, as defects and shortcomings may occur in the work. With this type of glue, fixing them will be very easy: the wallpaper is simply carefully removed from the wall surface, and then, after making adjustments, it is placed back. In such cases, we do not apply glue several times.
- In order for heavy wallpaper to be glued well, you need to purchase a special glue of the required composition in the store, where its structure includes antifungal substances. However, it has one drawback - the price for such a high-value product. However, its advantages outweigh its disadvantages: it has a high level of moisture resistance and is very durable.
We glue wallpaper onto fiberboard ourselves
The process of wallpapering on fiberboard in no way differs from the same types of work on other surfaces made of a wide variety of materials.
- We do not put the glue on the wallpaper itself, but on the base of the fiberboard surface. Since moisture will be absorbed very strongly, we apply a large amount of the mixture to the sheet. The best option for repairs would be a universal glue, which protects the surface from the appearance of fungus in the future, since it contains special fillers.
- We purchase glue from a building materials store with a large supply (as well as the wallpaper itself. So when working, it is simply impossible to accurately calculate the amount of its use. After gluing the wallpaper, we must wait two days for it to dry. Therefore, we must not open all windows and shutters this entire period of time.Otherwise, we may see swelling of the working surface and even peeling of the wallpaper itself from the wall.
- Once they are completely dry, they are varnished.
Types of wallpaper for hanging in the house
The most popular types of wallpaper, in fact there are a great many of them, and all of them
presented on the market:
- paper;
- textile;
- washable;
- non-woven;
- made of fiberglass;
- natural;
- liquid and many others.
What wallpaper to buy for your home? When choosing wallpaper, you should rely on your taste, as well as the functional characteristics of the coating.
If you like an item with a clear pattern, keep in mind that due to the need for alignment, more material may be needed. And the process itself will be more complicated and take more time.
Simple paper wallpapers seem attractive to many because of the ease of working with them. A misleading impression. In fact, they are often soaked through with glue, stick together, tear and deteriorate. It is much easier to work with thicker interlining or vinyl. You need to take into account all the nuances when deciding what wallpaper to put in your house.
How to calculate the required amount of wallpaper?
Before you go to the store, let's calculate the required amount of material without a calculator. How many rolls of wallpaper are needed to decorate a house depends on the area of the surfaces to be pasted, as well as the length and width of the rolls. Using simple arithmetic calculations we get the required number. If you plan to cover different types (and this usually happens), then we calculate it separately for each room.
Preparation stages
Room
It is more convenient to work in a room free from all unnecessary things. It is better to completely empty the room where the gluing is to be done. It is advisable to remove furniture and appliances, remove curtains and curtains, and remove everything unnecessary.
If there is no opportunity to free up the work front, it’s okay. You can move the furniture one at a time, each time leaving the working wall free. If the dimensions allow, then everything is put together in the center and covered with large pieces of film, fabric or paper.